Quote:
Originally posted by kcress
MeuserReef; That looks great! You could service your main battle tank on top of that.
If it would be easier a single diagonal on the back from one bottom corner to the opposite top works two. It would be six less welds actually 18 less weld lines and three less pieces. What you have is fine! Just an option to consider.
You don't need the cross piece at the middle bottom. There is almost no force in play there and that cross piece will raise havoc with a sump.
I'd put two more cross pieces at the top. Divide the two sides in half with them. This will support the plywood I expect you'll use much better than just the edges and one in the middle.
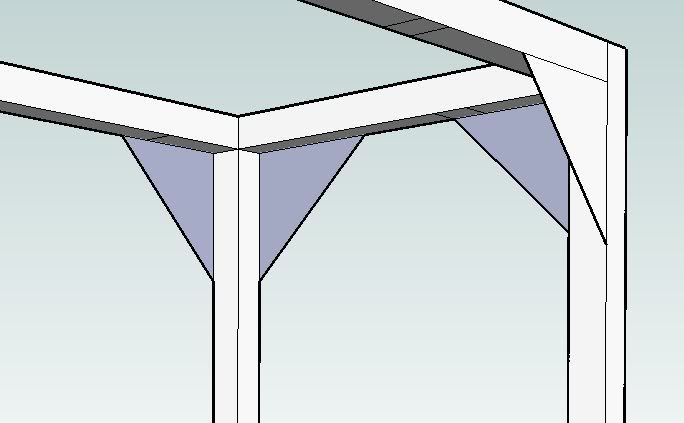
If desired you can pitch the diagonals and use gussets instead. They're just a triangle of metal. You'd make them the same 0.125 thick steel and they'd go in all the vertical corners. They should be about five or six inches. Again just an option. If you put them out on the outer edge they can be used as easy wood mounting points, if that's a future desire.
Hmmm. WHOA!! Just noticed you have no center braces. 1,200lbs would be a problem. If I got the math right you would be looking at about a 1/4" of deflection in the center. More than enough for most tanks to go south.. Or at least one side to go south while the other goes north. Picture your tank sitting on two 1/4" dowels at the ends on an otherwise flat surface. Not a pretty picture.
You need center braces. If you can't get a sump in then you can make the front one removable. Just make sure you use two snug bolts in it. And don't consider pulling the brace with a full tank riding on the stand unless you do some serious, calculated, temporary auxiliary bracing.
|
kcress, I appreciate your valuable assistance in this thread.
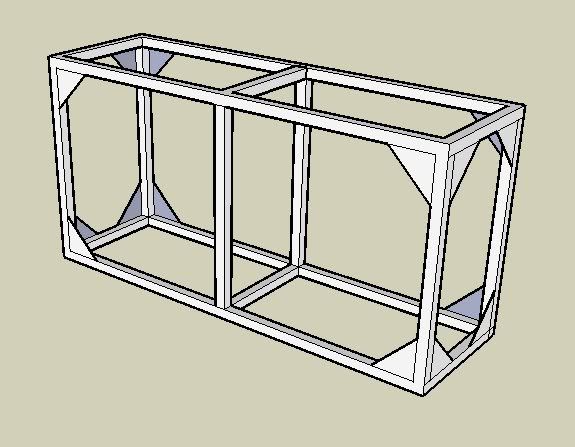
I like the changes that you suggested and have changed the design a bit. The corner braces are 6"x6"x8.5" triangles.
FRONT VIEW (version 2)
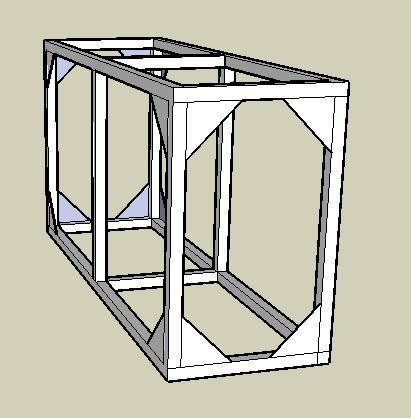
 END VIEW (version 2)
 CORNER BRACE DETAIL
I liked the idea of using the flat angle pieces in the corners for mounting surfaces for my exterior cabinet that I will have covering this. Im planning on making the wooden exterior "skin" removable so I can maintenance the sump/components as well as clean any spills that will most definetly happen along the way. This tank will be in my living room that will have brand new hardwood flooring so I want to make sure that any spils wont hurt the floor (long term).
As far as sump access, Im using a 20L for a sump so Im sure it will fit without having to remove the center brace. One challenge that I have is that ALL equipment (except DIY Chiller) will have to live in the stand under the tank. If this means that I have to have a smaller sump... so be it. I actually cant go too big with the sump as it will take up too much valuable space that could be used to house other equipment.
With regards to your suggestion that I split the top section to provide additional support for potential plywood; Do I really need these supports if I dont plan on using plywood? My tank is made of glass and has the plastic trim that supports the weight of the tank along the perimeter. I have always made my stands for these types of tanks open so that they only support the tank under/along the trim. Suggestions/concerns with this? (The largest tank that I have built a stand for using this method is a 55 gallon, about 1/4 of the weight of my new tank

)
-Are these supports critical if Im not planning to use any sort of material between the tank and the stand?
-
Should I use plywood between the stand and tank?
mx36... How easily does the liner scratch off if bumped/scraped? How much did the DIY liner cost you vs. the powdercoating?