
|
|
|
|||||||
 |
| Thread Tools |
 01/13/2018, 10:43 AM
|
#126 |
|
Registered Member
Join Date: Apr 2003
Location: Mtl. Canada
Posts: 7,824
|
Holy smokes... I can’t keep up with this thread!!!
Your tank is looking great, Wally! Shiny and new. I believe the reason why my Miracles tank leaked a year and a half after I got it was because they did not add bottom eurobracing. When they repaired it for free, I asked them to add it and they do at no extra charge. Too bad you couldn’t do the orphek review. Very interesting light! One question- you touched on it briefly but wasn’t sure.. did you say that each light emitting area, under each lens is actually made up of different led chips like the Kessil design? This is very interesting. I always liked this concept for a well mixed light source. We are totally snowed in here as well.. was +10 degrees and raining 24 hours ago and now it is 25 degrees colder and we have about a foot of snow on the ground. I’ll be spending the day shoveling! Good luck Wally- this thread continues be entertaining AND enlightening! Ps.. I’m on the side of just letting the rocks cook in a low light/nutrient environment. No crazy dosing..
__________________
Matt. Current Tank Info: 53x32.5x26 190g dt 60g of sumps 3 tank-100 gal frag system 6xAI prime 8xt5. 4x maxspect gyre. Skimz Dual internal sicce pump skimmer Deltec PF601s ca rx+Kalk stirrer |

|

|
|
01/13/2018, 11:09 AM
|
#127 | |
|
Registered Member
Join Date: Oct 2014
Location: Toronto GTA,Canada
Posts: 1,763
|
Quote:
Anyway, I will do the Orphek Trial again when the New Tank has Water and Rocks. I stumbled on the trial because the gateway that controls the fixture was reset (config) by previous person who borrowed it. I drove back to ReefShop and another one worked 100%. But without that Gataway the light wouldn't turn on. (It would Breathe Pulse from Low to High), which did give me an idea on it's Intensity (A Powerhouse for sure). I must try it. As far as dosing old Tank. NOTHING AT ALL except.. Just the minimal amount of Vinegar (5ml daily) for a bit of bacteria Boost and I am not increasing this so I have to wean the tank off. With the Vinegar, Snails, Hermits, and Emerald Crabs (Plus Low Light) the OLD tank is looking amazing (no corals). Rock will be in great condition a for when NEW tank arrives. |
|
|
|
|
|
01/13/2018, 02:26 PM
|
#128 |
|
Registered Member
Join Date: Oct 2014
Location: Toronto GTA,Canada
Posts: 1,763
|
TONS OF (Bristle Star Worms)
There is one thing with the OLD Tank (now Empty with only Fish and Rocks). It's loaded with BRISTLE STAR WORMs. I know they are good for your tank, and SHOULD BE HARMLESS. But having all those tentacles waving out of every nook and cranny gives me the CREEPS. THEY ARE EVERYWHERE. All sizes. Largest would be 50cent piece, or a TWOONIE. Maybe if tank was encrusted with SPS base, and other corals.... the Bristle Stars tentacles wouldn't be so noticeable. Maybe I should eventually get a fish that would keep them under control. |
|
|
|
|
01/13/2018, 02:54 PM
|
#129 |
|
Registered Member
Join Date: Oct 2014
Location: Toronto GTA,Canada
Posts: 1,763
|
PHOTO BREAK (Office and Sump Room Being Torn Apart)
Busy, busy, but while passing by Kitchen Tank I noticed the New Kitchen Tank Starfish is on the move. Whew!! Was worried I killed him. I actually was worried I didn't acclimatize it long enough (2 hours), since for 2 days he never moved from the spot I dropped him on. Got this photo near some Mushrooms 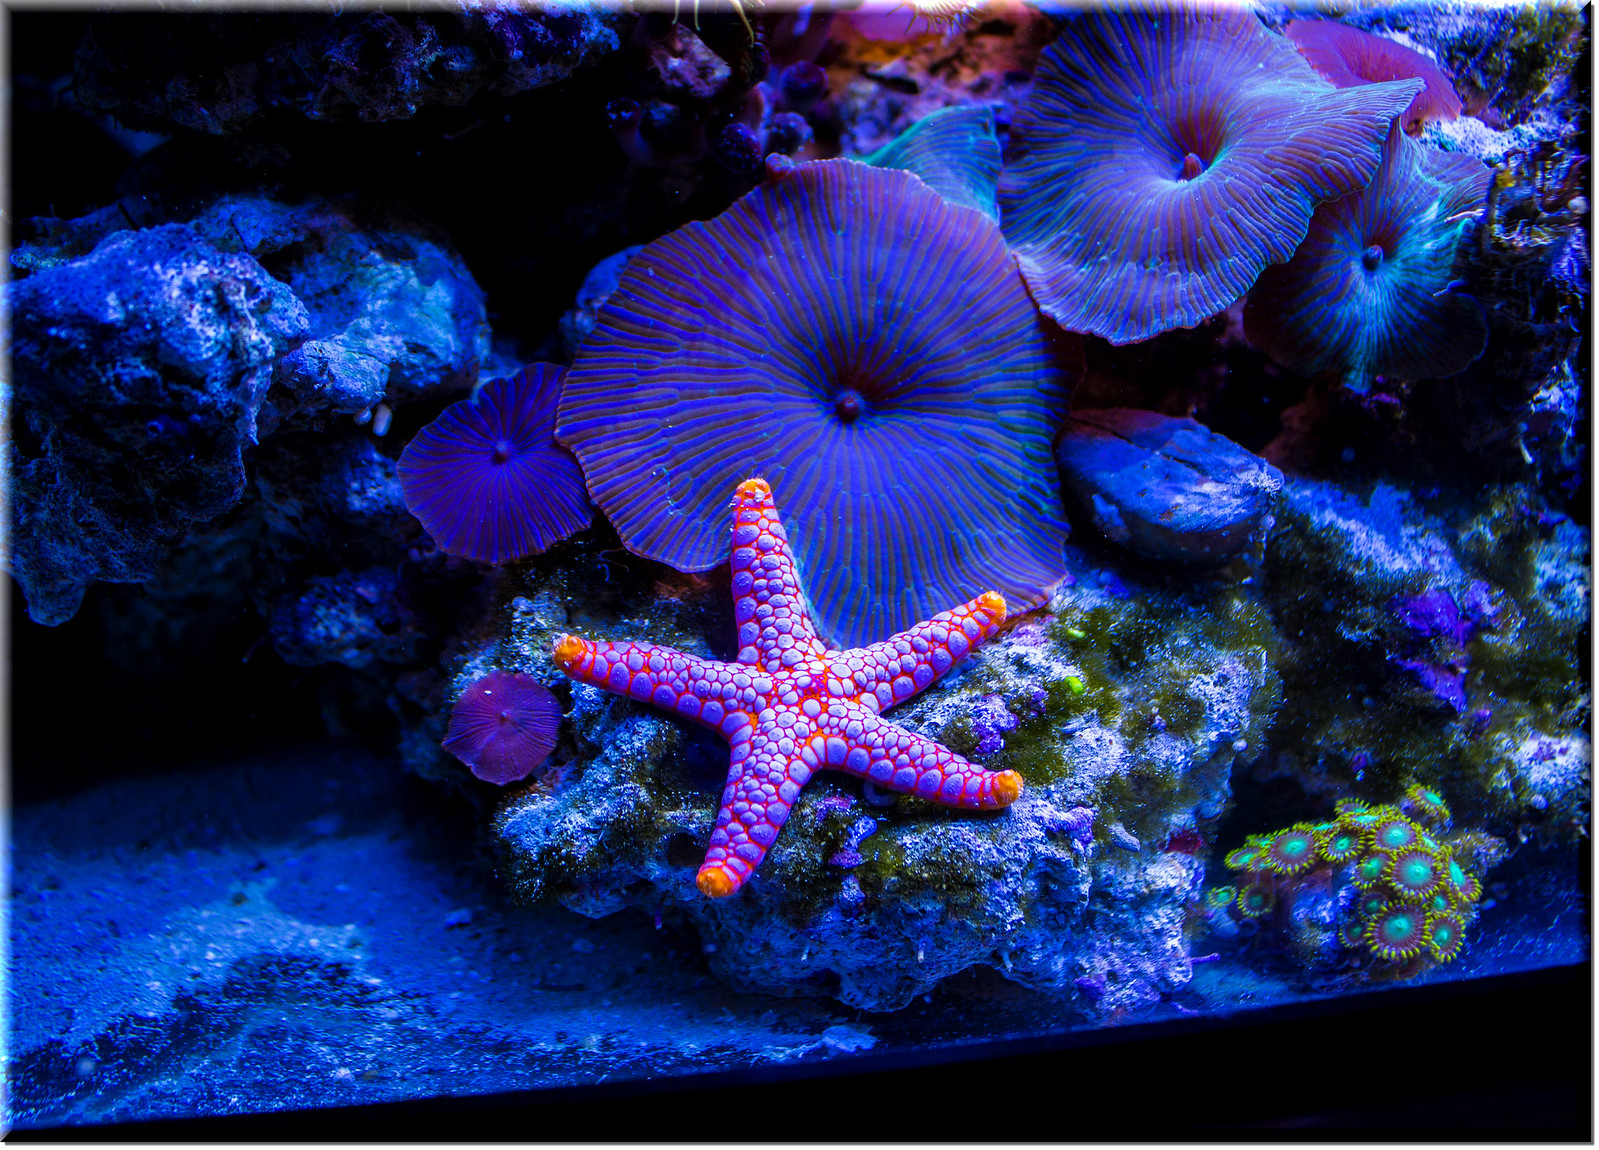 They are nice. Never had a starfish before (except a sand shifter). The Store has other colors so maybe will get some later. Last edited by Wally.B; 01/13/2018 at 03:53 PM. |
|
|
|
|
01/13/2018, 11:27 PM
|
#130 |
|
Registered Member
Join Date: Oct 2014
Location: Toronto GTA,Canada
Posts: 1,763
|
The Impossible Desk Move (DONE)
After I cleared out and prepare the desk for moving out, I learned the Top part Can't be removed without TOTAL TAKE APART. It's a ALL ONE PIECE (HEAVY with TOP ON) unit that I built in place 12 years ago. No reverse Instruction anymore  Lifting without back corner access was impossible. (Even with 2-3 people) My son and I almost gave up, then we got an idea. (And it worked)  Putting a CAR Jack with a board to lift back corner, and slowly roll (Pivot) the desk out of way. Not perfect, but at least I have access to the Exterior Sump Wall. Will have to figure out a Complete move out later to do Flooring. But that's later. |
|
|
|
|
01/14/2018, 06:50 PM
|
#131 |
|
In Memoriam
Join Date: Jan 2004
Location: Huntington Beach, CA
Posts: 3,059
|
Haha, definitely moving along at a brisk pace. Fish will be in there any minute I swear
|
|
|
|
|
01/14/2018, 07:03 PM
|
#132 |
|
Registered Member
Join Date: Oct 2014
Location: Toronto GTA,Canada
Posts: 1,763
|
Progress Update (1 SUMP Moved Out - TOUGH WORK)
Quick 3 Photos, since I got 1 more SUMP to do (hoping tonight) SETUP A Temporarily OFFICE (Short Term Hack) 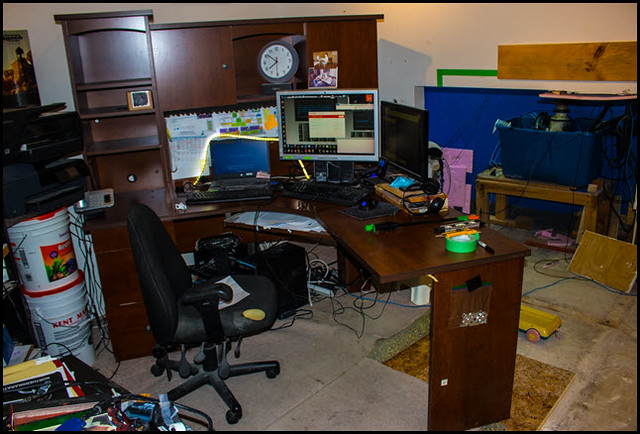 Moved out Basement TANK SUMP (Hey FOUND the Skimmer tube I lost 4 years ago [Under SUMP] ) 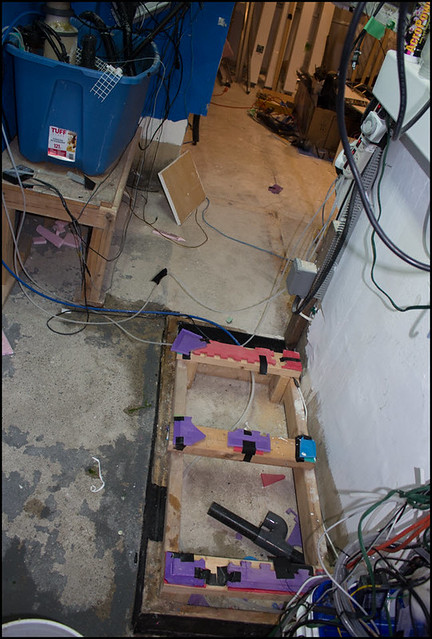 New Sump LOCATION [Sump Room now has one Wall Fully Accessible] ) 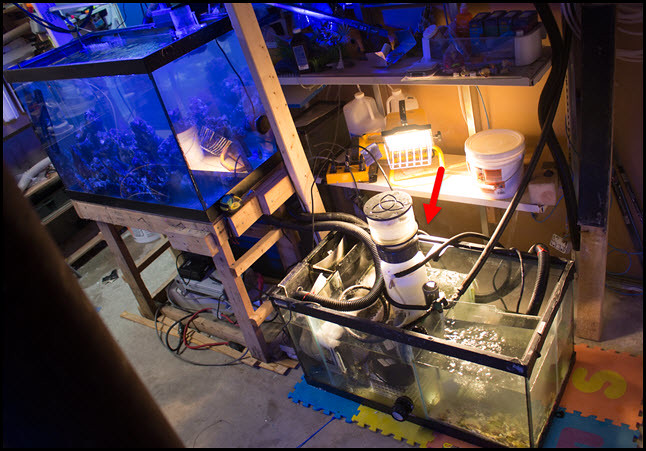 I cleaned the sump since I had to Drain it for the move. (No time to tell the story, but move wasn't easy. Glad I opened up wall since it didn't fit the other way) Not quite done, since I have to move the Apex Over (WIRES don't reach for Auto-Heaters, PH Probe, and Doser for Kitchen Sump) BUT THIS BASEMENT SUMP is a Great Move (Since basically I am preparing everything to be ready for NEW TANK, and SUMP ROOM will be Totally OPEN for Build work). |
|
|
|
|
01/14/2018, 08:20 PM
|
#133 |
|
Registered Member
Join Date: Oct 2014
Location: Toronto GTA,Canada
Posts: 1,763
|
BASEMENT SUMP (MOVE OUT - COMPLETE) Apex and All
It ain't pretty.........But it works.  Top Priority is SAFETY. (All wires secured and inspected TWICE) I haven't had an accident so far....Till just now. Nothing to do with (the direct move parts) Electrical, Tank System, Leak, etc But my Mechanical Fresh Water Top-Up Valve got jammed (OPEN) when I swung over SUMP to new location. SO BUCKET FILLEd UP and Kept filling till it leaked over top. I SAW WATER ON FLOOR spreading.....I thought it was Sump, or hoses leaking, but ALL OK NOW |
|
|
|
|
01/14/2018, 10:27 PM
|
#134 |
|
Registered Member
Join Date: Oct 2014
Location: Toronto GTA,Canada
Posts: 1,763
|
2nd SUMP Moved out (SUMP ROOM EMPTY) Pre-Build almost Completed
2nd Sump move wasn't too bad. (Only thing left is DOSING Lines and ATO Line). 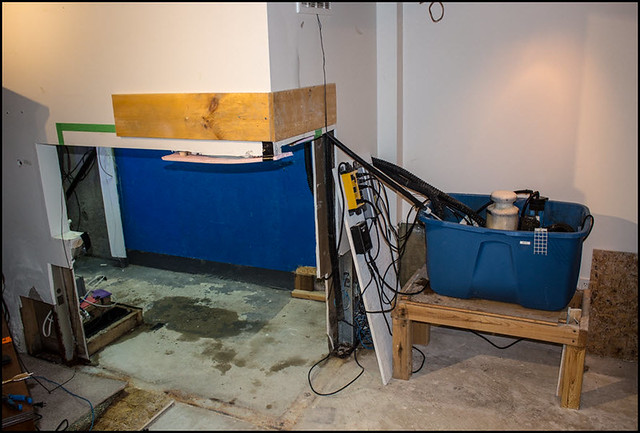 Quick Review of Progress So Far.  NOW THINGS are going to MOVE FAST. (I hope  ) )
|
|
|
|
|
01/14/2018, 10:47 PM
|
#135 |
|
Registered Member
Join Date: Oct 2014
Location: Toronto GTA,Canada
Posts: 1,763
|
Surprising DISCOVERY (My DIY SUMP)
This shocked me when I noticed this TODAY during the Clean and Moved. I bought my sump Aquarum over a decade ago. Just the Aquarium from a Reef Store. Had it drill for my first Sump. 3 Years ago re-built the sump with the Baffles, Refuge, and Algae Scrubber. I never noticed this ever before (TILL TODAY). 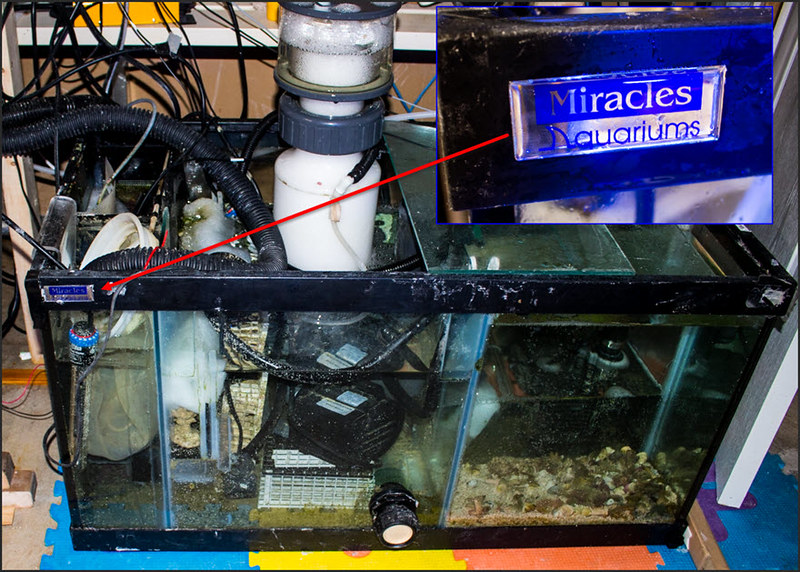 My NEW 110G Custom Built Aquarium is a Miracle Aquariums, and is the 55G DIY SUMP. (A 2:1 Volume Ratio) Cool. A true Miracle indeed. More to come. |
|
|
|
|
01/15/2018, 02:27 PM
|
#136 |
|
Registered Member
Join Date: Oct 2014
Location: Toronto GTA,Canada
Posts: 1,763
|
Interesting Possibility (SUMP ROOM Expansion) *LAST CHANCE before walls go up*
After moving everything out to SUMP room (I started to appreciate the SPACE) or (Realized how tight thing were, and how much worse thing will get with Bigger Tank). Then Looking at the SUMP outside, it hit me looking at the walls/ceiling. 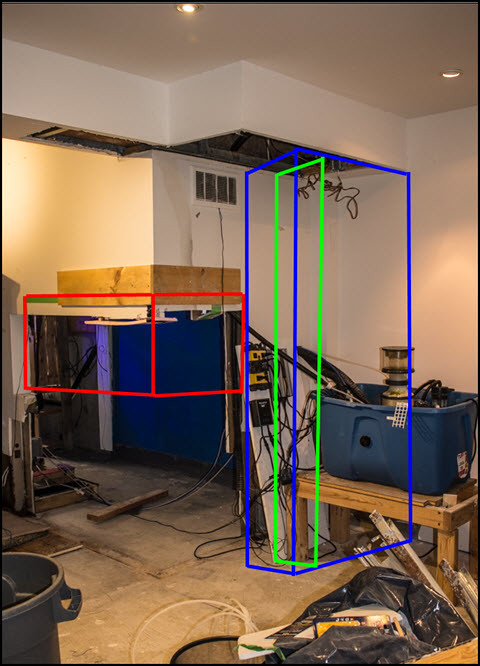 That Ceiling box above is there due to BEAM and DUCT Work. I choose the Sump room Wall (Years ago) due to that boundary. Also to keep the Rec Room Rectangular. But if I do what I show above (smaller vs large box) BLUE VS GREEN. I could possibly make a closet into sump room, or better yet squeeze in my Kitchen sump SOMEHOW. It would make the Back Wall of Rec-Room awkward looking but the Tank might fill things in to mitigate the Offset. SO I TESTED THE IDEA with a MOCK UP (using some wood) 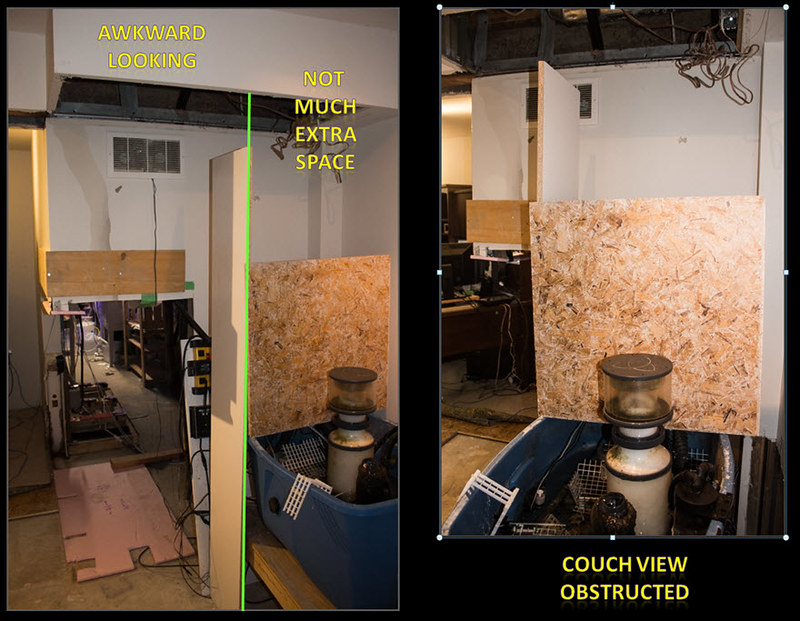 -> Bad Idea. ----> Not much space in SUmp Room expansion. ----> Looks weird to break up a smooth wall. ----> View of Tank from Couch in Rec Room Obstructed. I need to build a STAND to hide that 2nd SUMP, or smaller Rubbermaid Bin. Last edited by Wally.B; 01/15/2018 at 02:48 PM. |
|
|
|
|
01/15/2018, 02:38 PM
|
#137 |
|
Registered Member
Join Date: Apr 2003
Location: Mtl. Canada
Posts: 7,824
|
It is looking like the Wild West in there!
Coming along though.. Wally- just one small comment.. having been married for over 20 years and in the hobby longer than that... (as is the case with you I think).. Careful how much you creep into your wife’s life space....
__________________
Matt. Current Tank Info: 53x32.5x26 190g dt 60g of sumps 3 tank-100 gal frag system 6xAI prime 8xt5. 4x maxspect gyre. Skimz Dual internal sicce pump skimmer Deltec PF601s ca rx+Kalk stirrer |
|
|
|
|
01/15/2018, 03:04 PM
|
#138 | |
|
Registered Member
Join Date: Oct 2014
Location: Toronto GTA,Canada
Posts: 1,763
|
Quote:
Yes married the same period of time. To wife and hobby. Have no worries. She never comes down to basement at all. 1st floor rec-room with TV is hers, and kids. They like the fish tank there (Since they see from both Kithchen and Family Room). Hoping this tank improves the Rec Room nobody uses other than me (even I don't use it except for odd movie) Maybe that will be my biggest regret (they will like it...they will start using the room next to my office/MAN-CAVE). This is mostly for my office, the other room is just there (but 3 kids entering teen years, so it might become handy) And on that thought. I was always hoping I cut ISOLATE my office from the other room (Both privacy) But with Corner tank, that possibility is out the window. Last edited by Wally.B; 01/15/2018 at 03:10 PM. |
|
|
|
|
|
01/15/2018, 03:51 PM
|
#139 |
|
Registered Member
Join Date: Apr 2003
Location: Mtl. Canada
Posts: 7,824
|
Good to know she’s got her space upstairs!
My ‘man cave’ is also next to the room with the tank - in basement I’ve grown to like it like that.. but I also have two kids heading into teenage years.. may not be my man cave forever..
__________________
Matt. Current Tank Info: 53x32.5x26 190g dt 60g of sumps 3 tank-100 gal frag system 6xAI prime 8xt5. 4x maxspect gyre. Skimz Dual internal sicce pump skimmer Deltec PF601s ca rx+Kalk stirrer |
|
|
|
|
01/15/2018, 06:40 PM
|
#140 |
|
Registered Member
Join Date: Jul 2015
Posts: 227
|
... I am dreaming of a man cave, where I have to snorkel to take pictures of sps
looking good Wally!Sent from my iPhone using Tapatalk |
|
|
|
|
01/16/2018, 01:17 PM
|
#141 | |
|
Registered Member
Join Date: Oct 2014
Location: Toronto GTA,Canada
Posts: 1,763
|
Quote:
But it does sound like a nice man cave idea if you keep your tank on the warmer side. |
|
|
|
|
|
01/16/2018, 01:25 PM
|
#142 |
|
Registered Member
Join Date: Oct 2014
Location: Toronto GTA,Canada
Posts: 1,763
|
The STAND and In-Wall Trimming (Tough DESIGN/choices) But learning by playing
I visualize and In-Wall Setup where Wall would be perfectly flush with tank glass. I even asked Miracle to remove FRONT PLASTIC Trim of the two Wall Facing Sizes. (So tank glass is exposed at bottom, and Bottom matches top) Kind of a RIMLESS TANK TOP AND BOTTOM BUT THERE ARE CHALLENGES. (STAND IS ONE) But another is covering up the TANK BOTTOM 1" GLASS PLATE (IT cannot be exposed) So I played with some WOOD and Learned something INTERESTING 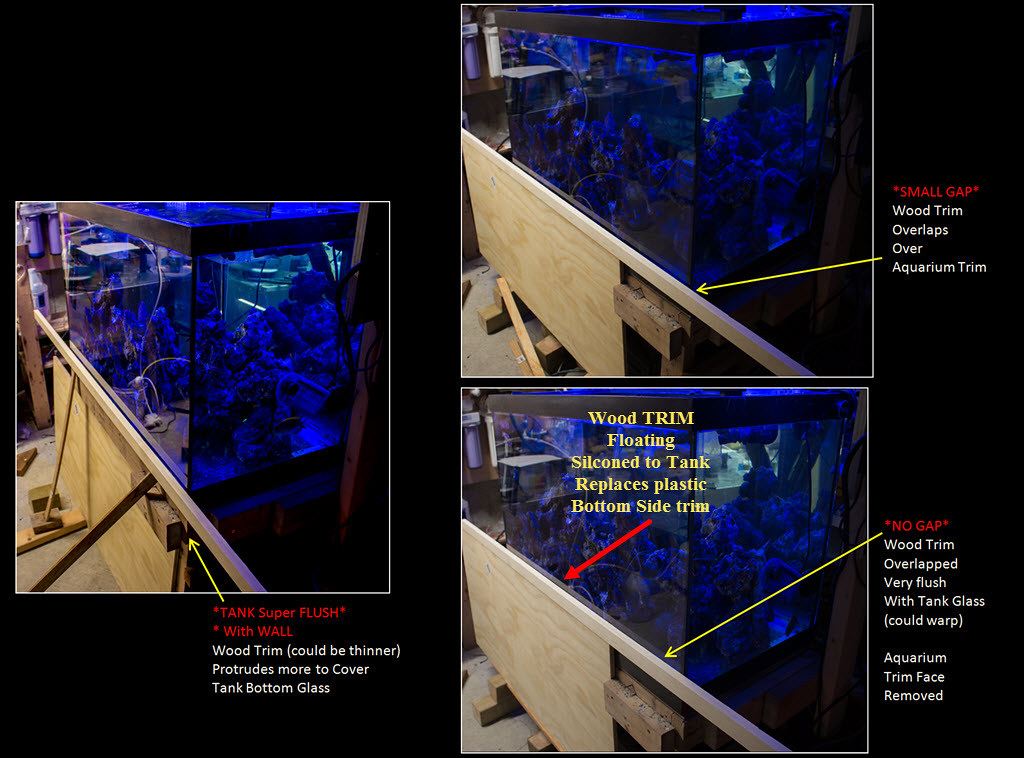 What I learned (I need some kind of trim regardless) ** Since Plywood edge is layers. Solid wood option is too expensive for the large panel ** But the TRIM has to be a bit thick to not WARP over time (Sealer will help with warping). And I LEARNED I can make the THICKER TRIM look Thinner (via an ILLUSION) if you set it over the plywood Bottom [Hope I explained that right].....But it is visible in the TWO RIGHT PHOTO's. (That illusion will even become better once all the wood is painted/stained same color) THE OTHER CHALLEGE is the Tiny GAP between TANK GLASS AND TRIM. If the gap is too small you will see imperfections. If too much (then GRAND CANYON "gap" look). Still ok (since gap will be very narrow in general) But if just right (then it looks pretty good, and allow some tank cleaning drips to not affect trim) ** A Idea I just came up with is the WOOD TRIM is SILCONED, onto TANK GLASS ** Floating and Separate from plywood base ** ** PLUS ANOTHER "BIG FACTOR" is how level is my WALL (since tank/stand will be fairly level/SQUARE) . (I need a few milimeters of wiggle space to line things up flush ) *** **** THE FLOATING TRIM SOLVED THAT *** I haven't even begun thinking how I will deal with CORNER TRIM (Edging cover up), but a Thought I have is a similar Trim piece just like the Tank Edge trim (Tricky cut to do that) HOWEVER "the only conclusion" I have kind of come to (is STAND will be separate and independent, and then I'll cover it up with panelling). THAT MAKES NEXT STEP EASY (BUILD a "floating" STAND) Last edited by Wally.B; 01/16/2018 at 02:12 PM. |
|
|
|
|
01/16/2018, 02:45 PM
|
#143 |
|
In Memoriam
Join Date: Jan 2004
Location: Huntington Beach, CA
Posts: 3,059
|
Your build is coming together at break-neck speed. If I attempted anything this quickly my tank would have been a mess. i took a week to paint inside the stand and the back/bottom of the tank black.
|
|
|
|
|
01/16/2018, 02:46 PM
|
#144 |
|
In Memoriam
Join Date: Jan 2004
Location: Huntington Beach, CA
Posts: 3,059
|
At the very least, I insist this thread be mentioned in your first post of the new build as the pre-build stages. LOTS of good information and ideas here, trust me, this will be very useful to someone out there!
|
|
|
|
|
01/16/2018, 03:01 PM
|
#145 | |
|
Registered Member
Join Date: Oct 2014
Location: Toronto GTA,Canada
Posts: 1,763
|
Quote:
I will post in my build thread this history. Appears i scrapped the paper design idea. Well it did help early on. I am a touch, feel, see, adjust kind of guy. New ideas come at each step. My whole original plan is quite different but i think things are coming out better than i expected. One thing about painting tank black. I learned when i visited tank that Maracles uses a film, not paint to make glass black. They spray on a adhesive and then the film. it won't flake and it is removable. Cool thing they do. In the photo of my tank you see the black left side (i wanted clear) but since removeable I said leave it on and i can remove later if I don't like it |
|
|
|
|
|
01/16/2018, 03:46 PM
|
#146 |
|
Registered Member
Join Date: Oct 2014
Location: Toronto GTA,Canada
Posts: 1,763
|
OLD TANK (ROCK UPDATE) Started some NORI (All Algae Polished off [Snails, Hermits, and Emerald Crab)
So the OLD ROCKS are doing extremely well. Coraline Coverage spreading and all picked clean of any nuisance Algae. I even cleaned out my ATS since it has gone a bit idle. So with the Clean Up crew starving I added my INNOVATIE MARINE (Gourment Grazer) and some Nori (daily). 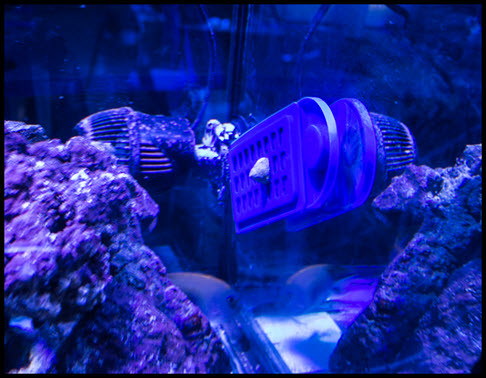 I love this product and have 3, since it doesn't waste nori, and Uneatten/Loose Nori doesn't polute tank. (Fish and CUC find it quickly since they smell the food). It's been visited by all. Cool to see Emerald Crab on there. |
|
|
|
|
01/16/2018, 10:55 PM
|
#147 |
|
Registered Member
Join Date: Oct 2014
Location: Toronto GTA,Canada
Posts: 1,763
|
One Regret that keeps bothering me.
It may not matter with the Trim I am planning. But I chose one corner of tank (the Exposed Right corner) to have CLEAR SILICONE. Kind of a rimless look. The rest of the tank is Black Silicone. I somehow got the impression that using the Starphire Glass on those two panes would look better with Clear Silicone. But when I visited tank I was a bit taken back at the cloudy color. It may be still curing and may clear up. It looks ok (not sure when fully lit up), but my plan is to cover up the corner anyway with Trim since I don't really like black either (like my kitchen tank). Still it bugs me that I didn't go black all around. Since I am reading that clear can get algae build up and go green. TOO LATE now. Too late long ago. Oh well. Maybe I will like it. |
|
|
|
|
01/17/2018, 12:23 AM
|
#148 |
|
In Memoriam
Join Date: Jan 2004
Location: Huntington Beach, CA
Posts: 3,059
|
Perfect opportunity to get a bigger tank in my opinion

|
|
|
|
|
01/17/2018, 08:48 AM
|
#149 | |
|
Registered Member
Join Date: Oct 2014
Location: Toronto GTA,Canada
Posts: 1,763
|
Quote:
But I do appreciate the humour and you NOT SAYING Something like "What a terrible decision choosing Clear Silicone for one Edge". But I did google some tanks and clear Silicone does look nice (With Starphire Glass). I think I arrived for the Tank visit a bit too soon, and the Silicone wasn't cured (Thus still cloudy and not clear yet)...Plus they didn't yet do the Silicone Trimming work. But I already have a solution to make the edge Black (if necessary). I can rotate the tank for the install. (Small problem is the tank glass has black film, and the Overflow would be on the viewing side )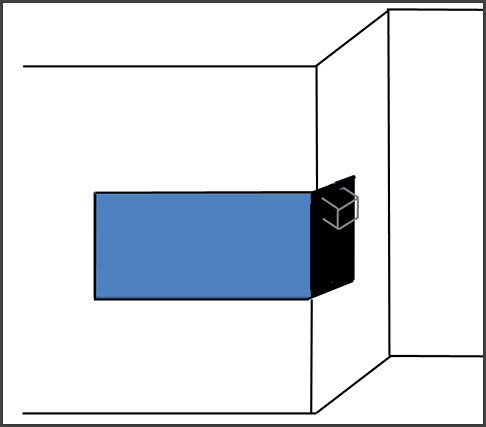 Funny eh?
|
|
|
|
|
|
01/17/2018, 08:48 AM
|
#150 |
|
Registered Member
Join Date: Apr 2003
Location: Mtl. Canada
Posts: 7,824
|
Clear silicone always looks a bit cloudy but it’s better than a solid black line, no?
I guess this a personal preference thing..
__________________
Matt. Current Tank Info: 53x32.5x26 190g dt 60g of sumps 3 tank-100 gal frag system 6xAI prime 8xt5. 4x maxspect gyre. Skimz Dual internal sicce pump skimmer Deltec PF601s ca rx+Kalk stirrer |
|
|
|
|
|
|


