
|
|
 04/15/2007, 11:37 PM
|
#1 |
|
Registered Member
Join Date: Sep 2005
Location: Nashville, TN
Posts: 2,086
|
DIY 92 Corner Bow Hood/Canopy (pic intense)
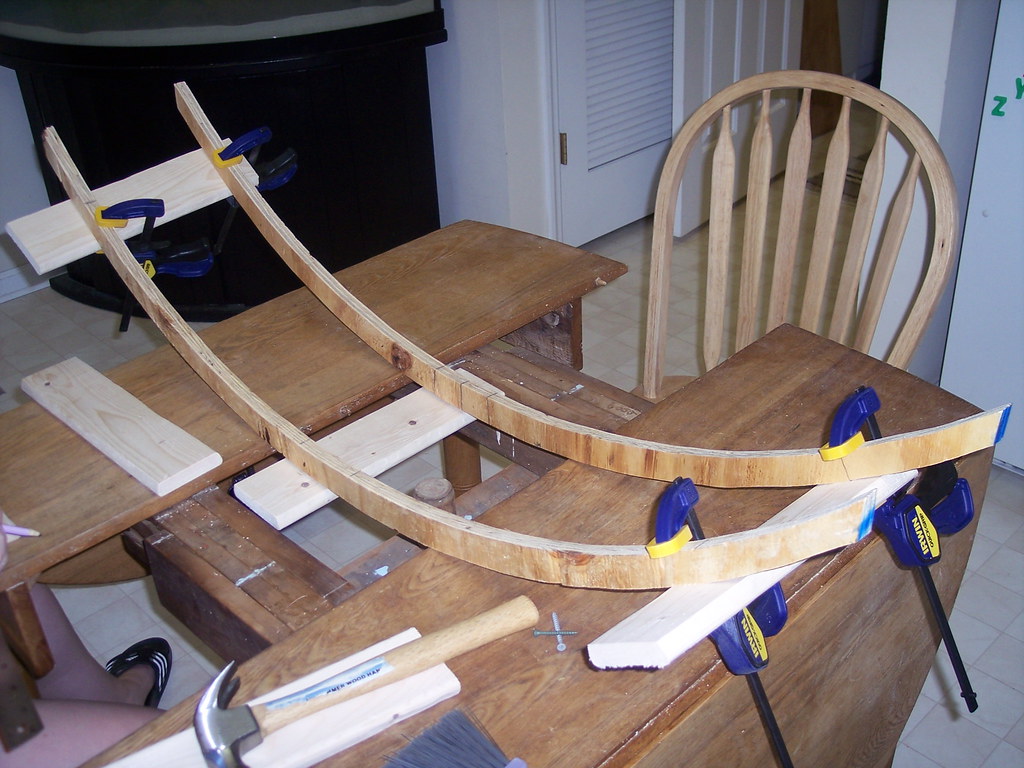
I got an All-Glass 92 corner bow without a hood thinking I was up to the task of building one. Upon looking around for a decent set of plans, I came up pretty empty. I wanted something that would open in the front without having to hinge the top open (you'll see my lighting solution, which was the main reason) or without having to remove the hood whenever I needed to get in the tank. I also wanted it to jive with the All-Glass stand I already had. So, I set about making my own plans.
For lighting, I knew it was going to be a softie/LPS tank. I have another set-up that I was converting to all SPS. I had heard that lighting these tanks is a bit of a pain because of the corner shape and that lighting the front of the bow could be challenging. So, I focused the design around my lighting needs. I decided on 3x24" T5 retro fits arrayed in a fan shape. The tank has been running for a few months now and everything seems to be pretty happy. Disclaimer: I am not a carpenter and there were probably some fancier/easier ways of building this thing. That said, I built it in my kitchen with a jigsaw, a mitre box, a sander, some clamps, a drill, a square, and screws (which is all I really had at my disposal). I'm open to hear about anything that might have made this much easier to build. Here goes... First, I traced the bow of the tank onto a sheet of 3/4" plywood and cut 4 bow shaped pieces approximately 1.5" wide (2 for the hood and 2 for the doors). Then I made a frame of 1x3" pieces and arranged them as seen in the pics. I used a 2x4 on the front of the bow to help stabilize the design, since without a nice strong piece in the front, not much stopped it from flexing side to side. This also served as a stop for the doors. 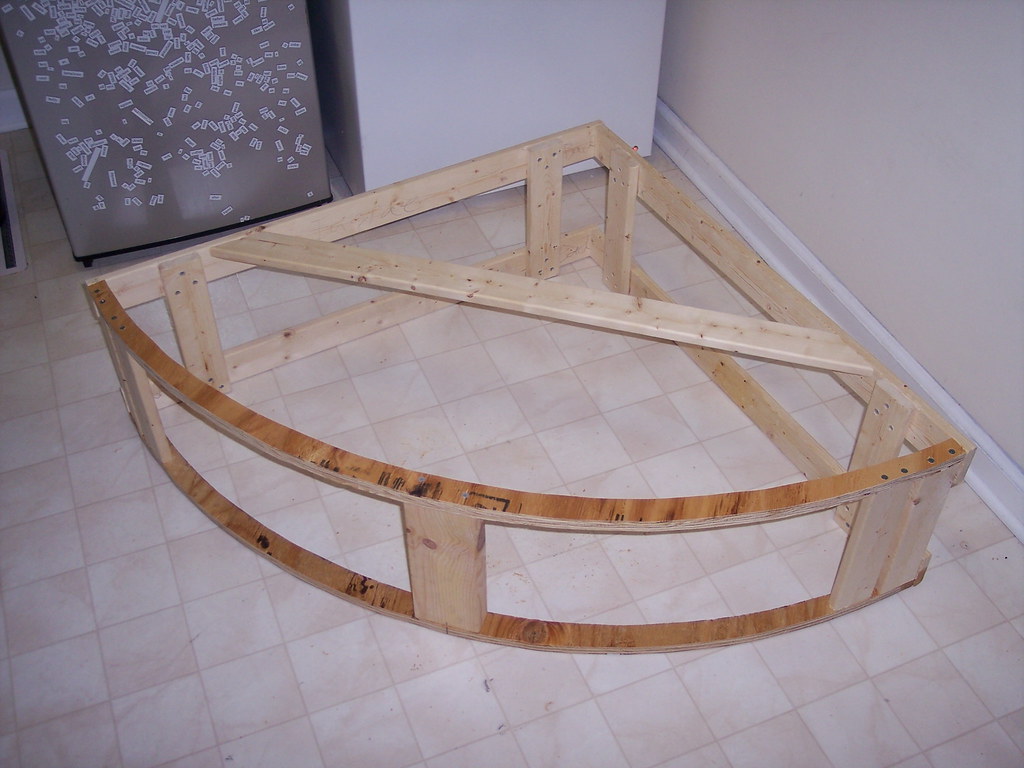 I then lined the sides with 1/4" plywood, leaving an opening in the back for cords to go through. These sides were also cut to hang down past the top of the tank to hold the hood from sliding forward. These should be cut to go as far down past the top of the tank as you want the front to go (I went about 1.5"). The top is lined with 2 x 1/4" pieces. The hole in the top is offset so that I could set a piece of egg crate right into the hole. This way, the egg crate sits flush inside. I hoped it would help keep the lights pretty cool by having the top open (avoiding big loud fans). I may eventually add some smaller fans since keeping the bulbs cool is supposed to extend their life, but it seems to stay pretty cool as is. 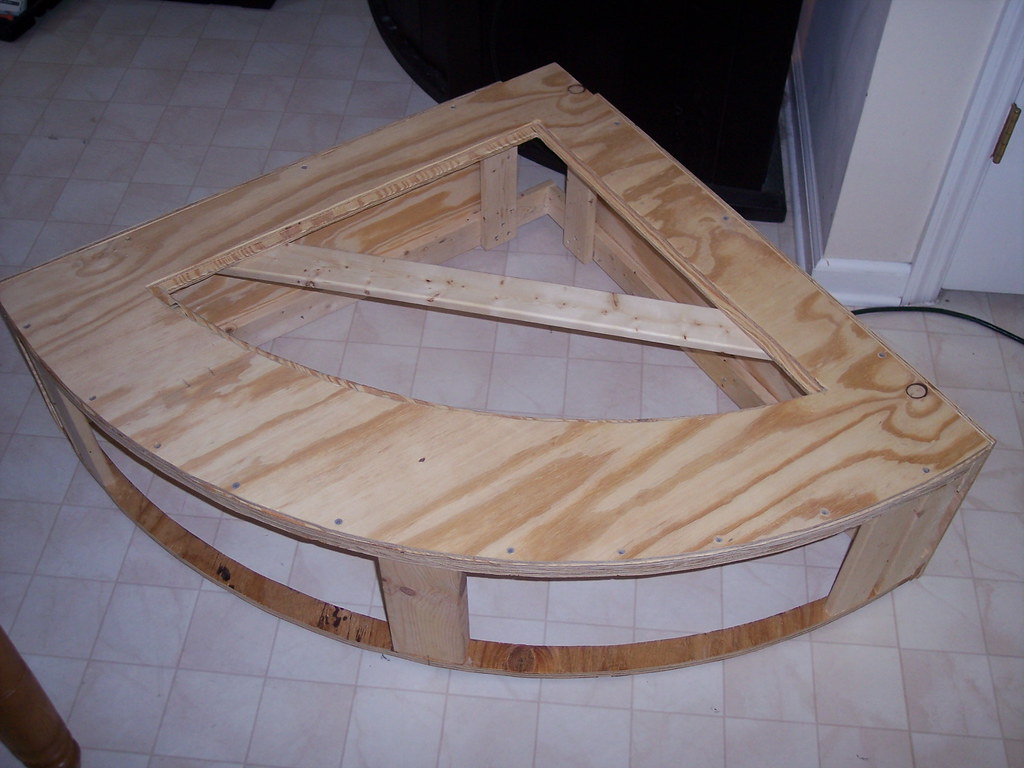 Another view... 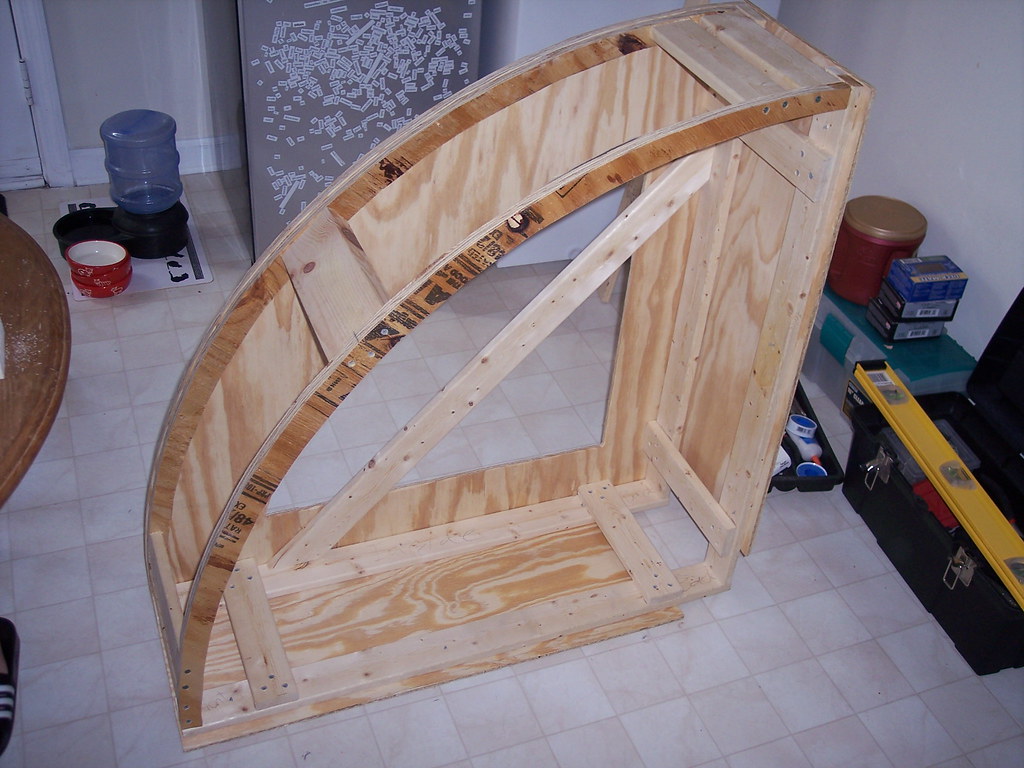 Egg crate in... 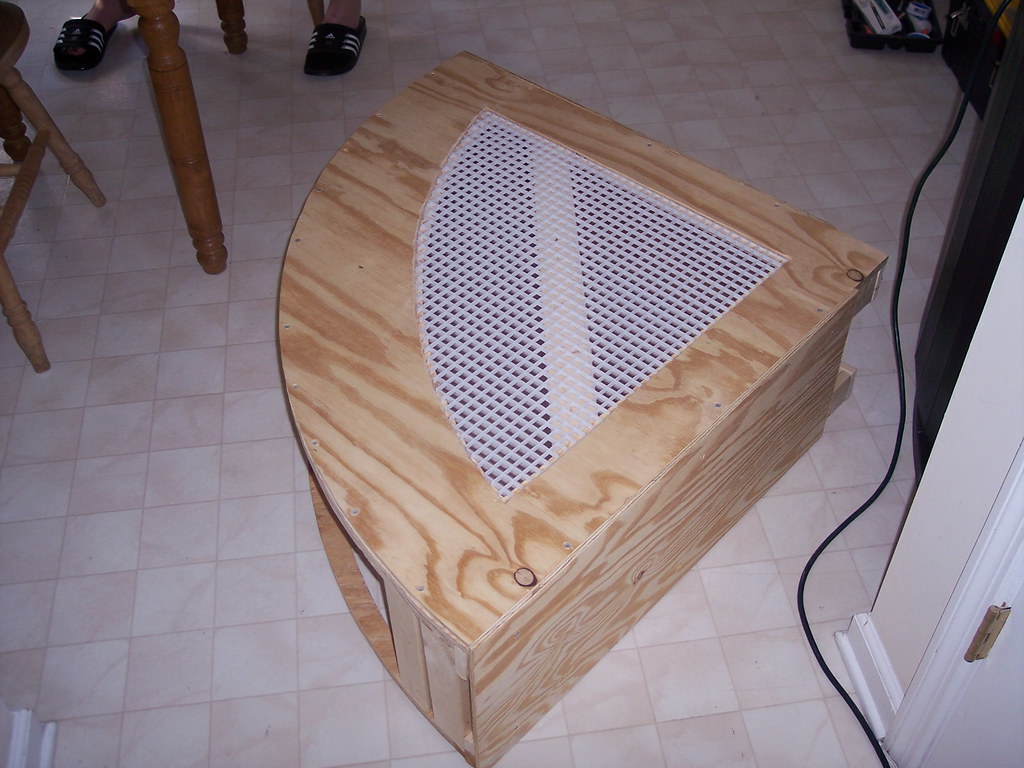
__________________
Brian |

|

|
|
04/15/2007, 11:38 PM
|
#2 |
|
Registered Member
Join Date: Sep 2005
Location: Nashville, TN
Posts: 2,086
|
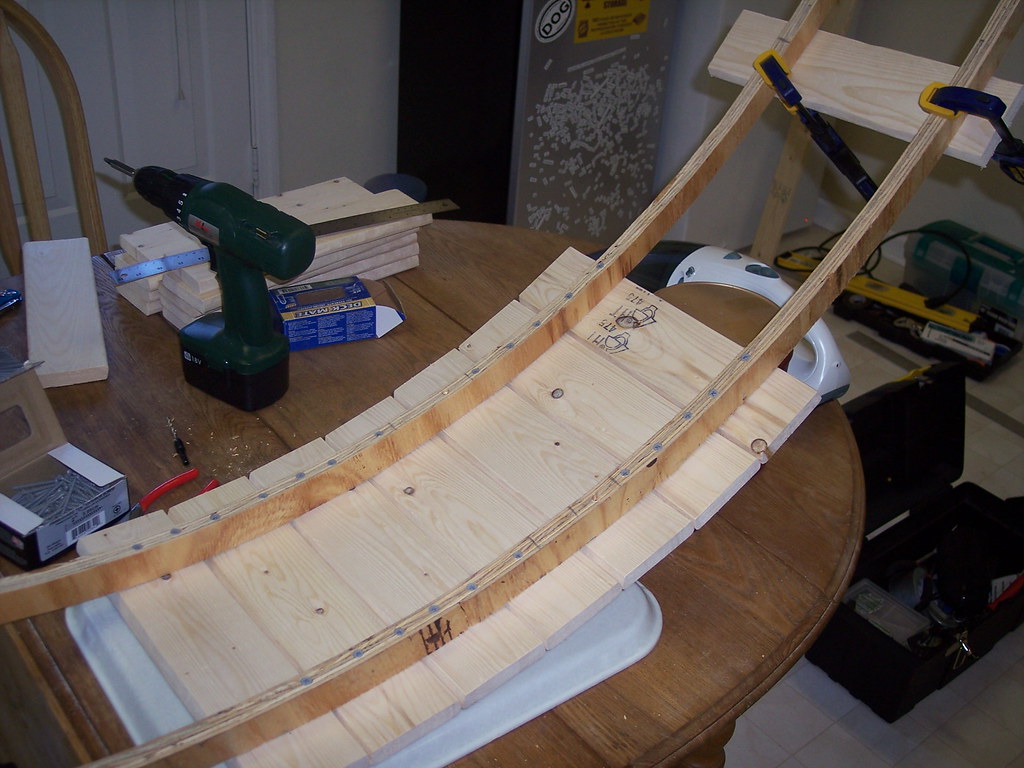
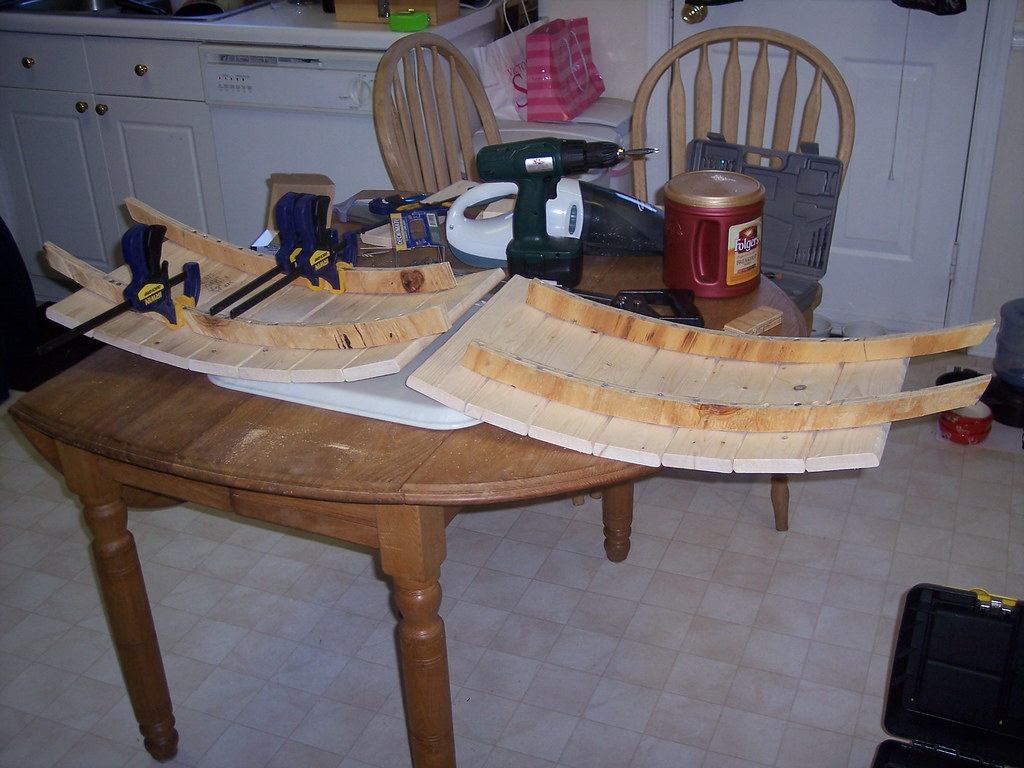
After getting it all skinned out, I was ready to make some doors. I used clamps to space the two extra bows the correct amount apart and started adding appropriately lengthed 1x4's (which match the slat size for the stand). The slats were made to hang down about 1.5" past the top edge of the tank and go up past the top of the hood top. I used the extra hanging over the top to put my latches and so that I could easily grab and open the doors. I simply drilled the bows and put screws through them into the backs of the slats. This way, you won't see any screws at all until you open the doors. Remember as you do this to start with the slat in the middle where you'll cut the bow in half to get two doors. From there, you just jam the boards tight together and make sure you keep everything square. A note on the slats, I sanded the edges down on each of the sides so that if you look down from the top it looks more like a trapezoid than a square (take a gander at the doors on an All-Glass stand and you'll see that they are "wedged" like that). This lets you get the fronts of the slats flush with each other so that there are no gaps, otherwise, the backs of the sides would hit and you'd have larger gaps between the slats in the front. Another note...you might have to cut a slat or two in half on the edges to make the slats go flush to the sides of the hood when you get to the edges of the bow.
   I then attached the doors with regular old butt hinges. These are the only pieces of hardware that show from the front, and it's only the rounded part where the two pieces are joined together. Unfortunately, I don't have a good pic of this, but I could get one if you can't tell what I did from one of the later pictures. 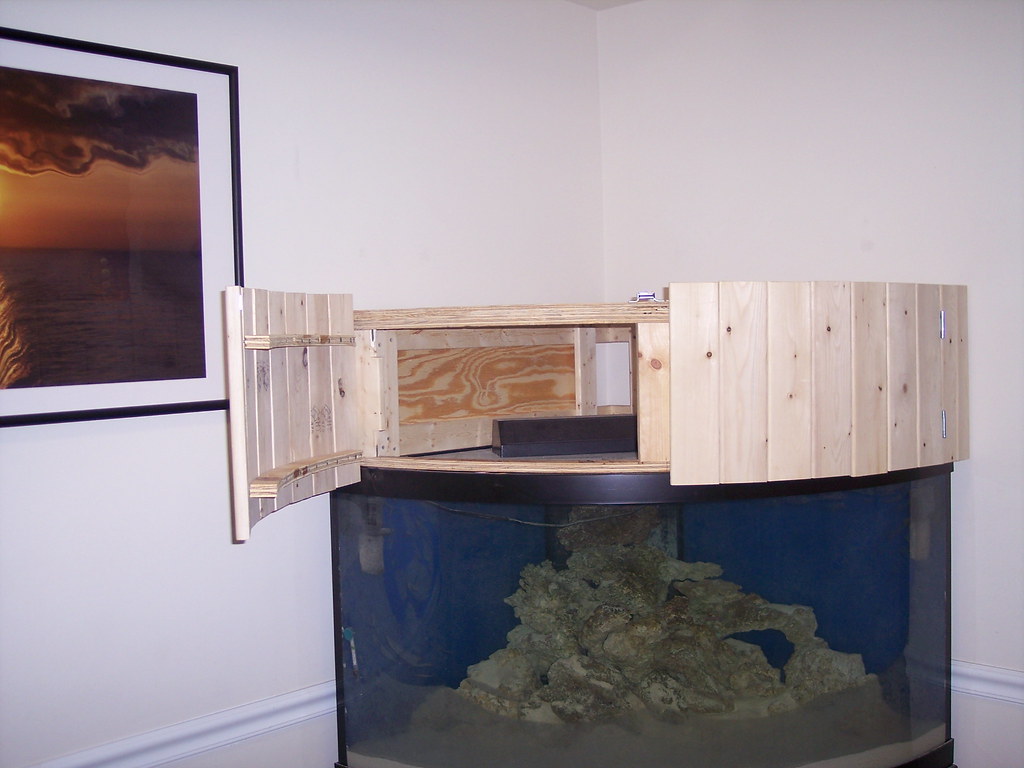 For lighting, as described above, I used 3 x 24" T5's arrayed in a fan (see pic). I put two sets of moonlights in between the reflectors on the cross brace. I arranged them so that I have two actinics on the outside, a 10,000K and actinic in the middle two, and two 10,000Ks on the two in between (just a note, it might take some extra messing about, but I think you could get at least another set of T5's in without overlapping reflectors...I just didn't need that much light or the added expense). Lights off... 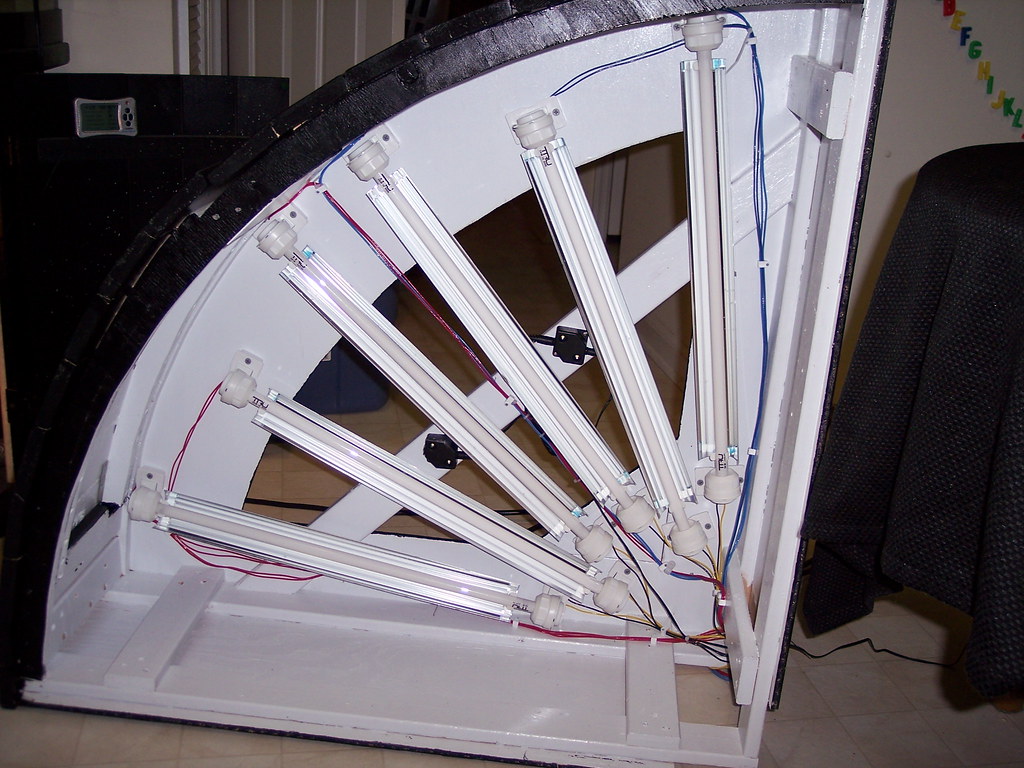 All on... the array of bulbs is a little off center, but you can fix any inconsistencies you might notice (I never have) by just tilting the reflectors some. Since they are attached to the bulbs, they easily move. I have the two outside actinics tilted in quite a bit to reach the middle of the tank without a noticeable dark spot. 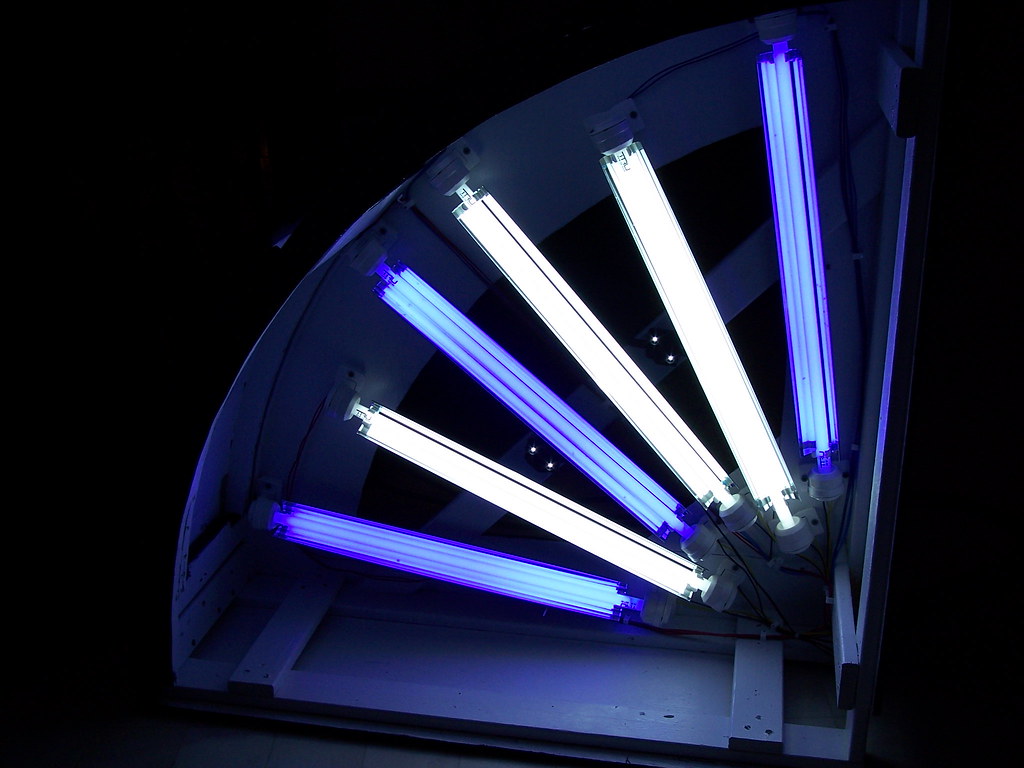 Here's the hood on and painted. I made the inside white to reflect any stray light...hopefully back into the tank. 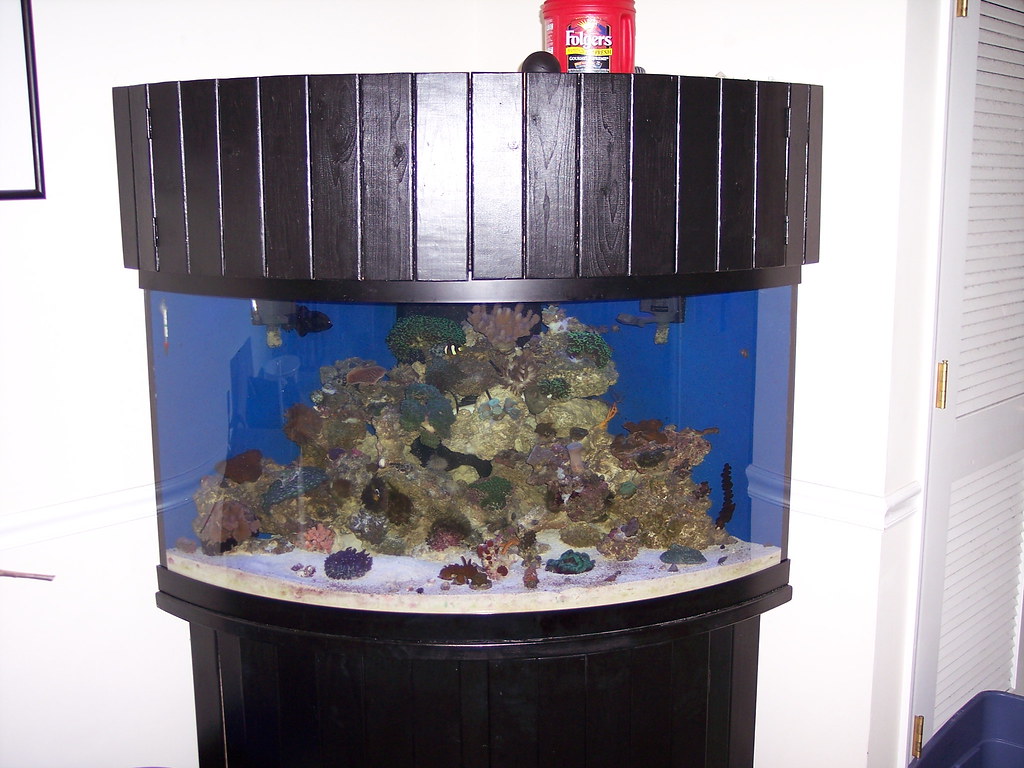 Now some full tank shots to give an idea of how the lighting looks. I have a crappy camera, so these aren't great, but you'll get the general idea. I have a pistol shrimp that's been plowing a lot, so there's some fog in the water. I also turned on the lights after they cycled off, so some stuff is a wee bit angry looking. The bulbs in these pics are TRU T5's that came, for free, with the retros. I will definitely be swapping out the actinics with superactinics once I wear these ones out a little bit. That might make it blue enough that I have to mess around with my lighting combo. However, right now, I just can't make myself mess with a free light combo when everything seems to be doing fine. Phase 1 - 2 Actinics  Phase 2 - 3 Actinics/1 10,000K 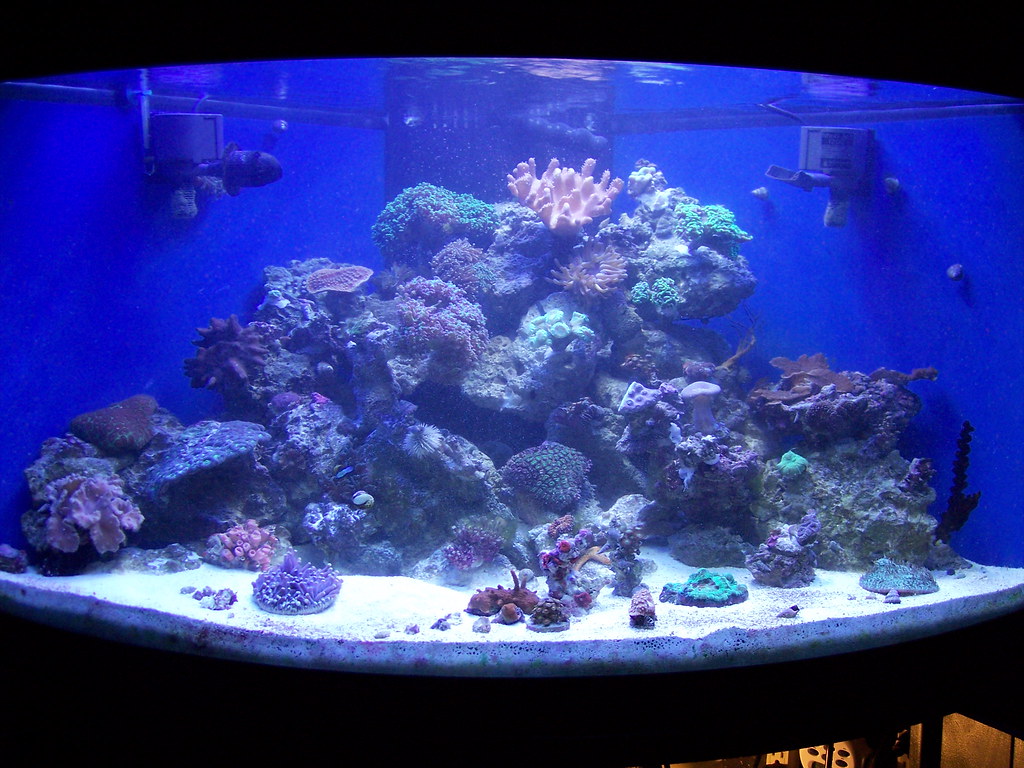 Phase 3 - 3 Actinics/3 10,000K 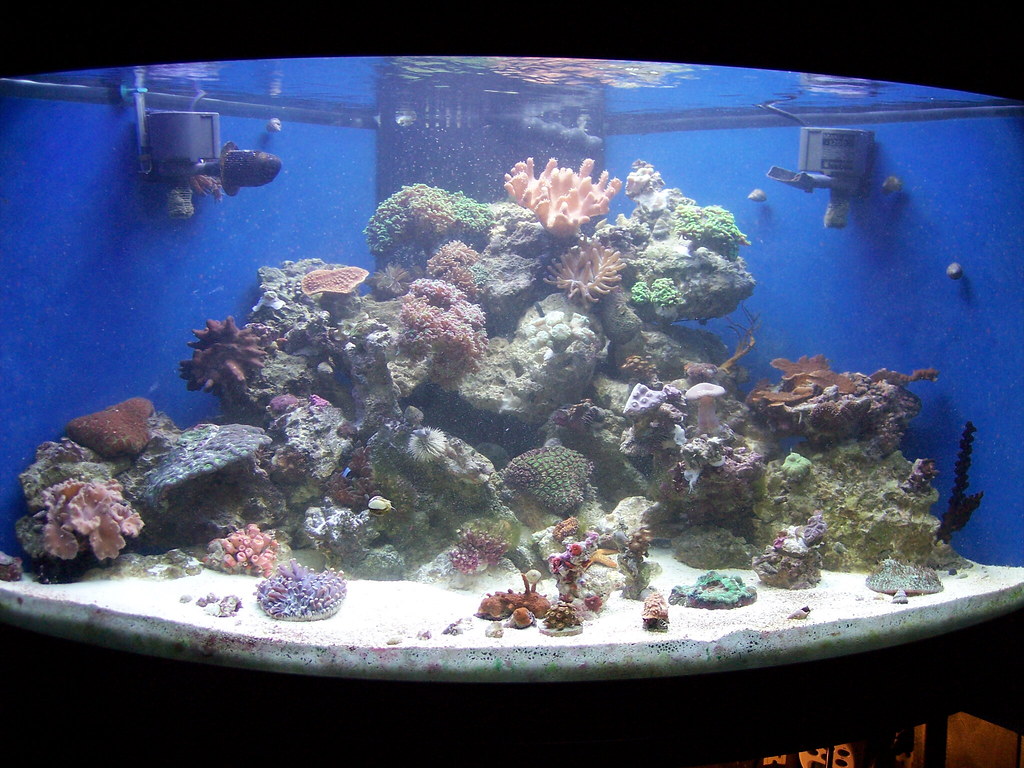 Thanks for looking. Hopefully this helps someone put together ideas to build something for their own. If there's anything I can answer about the set-up, or other pics to clarify how I did it, feel free to post or PM me.
__________________
Brian |
|
|
|
|
04/15/2007, 11:43 PM
|
#3 |
|
Premium Member
 Join Date: Feb 2007
Location: Land of Lincoln
Posts: 943
|
Brian, my hat's off to ya!
That's a darned decent job you did, considering your work bench was the kitchen table  Kudos amigo! Guy
__________________
Guy Smilie |
|
|
|
|
04/16/2007, 12:09 AM
|
#4 |
|
Craft Beer Geek
Join Date: Aug 2003
Location: CT/NYC
Posts: 1,469
|
I agree...that's something to be proud of..nice job!
|
|
|
|
|
04/16/2007, 04:10 AM
|
#5 |
|
catch and release
Join Date: Dec 2003
Location: Old Hickory,TN
Posts: 13,237
|
Looks great Brian
__________________
"Try to learn something about everything and everything about something" -- Thomas H. Huxley Current Tank Info: 70 gallon mixed reef |
|
|
|
|
04/16/2007, 05:53 AM
|
#6 |
|
They call me EC
Join Date: Apr 2007
Location: central Florida
Posts: 6,208
|
I always wondered what a reef would look like in one of those tanks. Now I know, AWESUME! GREAT JOB!
__________________
"Most of the failures with marine aquaria are due to lack of knowledge of the biological processes that occur in the aquarium." Martin A. Moe, Jr. "A scientist seeks the truth, wherever that may lead. A believer already knows the truth, and cannot be swayed no matter how compelling the evidence." Current Tank Info: I'm trying to see how many tanks will fit in my house before the wife loses it. |
|
|
|
|
04/16/2007, 07:11 AM
|
#7 |
|
Registered Member
Join Date: Sep 2005
Location: Nashville, TN
Posts: 2,086
|
Thanks for the kind words guys. Elegance, I love the look of these tanks, which is the main reason I just had to have one... that, and if I was going to convince my girlfriend that we needed a tank in the kitchen, it was going to have to fit neatly in a corner. They create a few interesting challenges, but also have some upsides. I think with the distance front-to-back in the tank I could have done some more interesting things with the rock work, but my planning of this tank was with prior knowledge of rectangular footprint tanks, in which your choices for stacking are more limited.
__________________
Brian |
|
|
|
|
04/16/2007, 07:31 AM
|
#8 |
|
Registered Member
Join Date: Sep 2002
Location: Centerville ohio
Posts: 7,606
|
following!
__________________
Gas....Coral......Gas....Coral...ahhh who needs to go anywhere...CORAL!!! Current Tank Info: JBJ rl nano 20, aq ax360z. Still building..... |
|
|
|
|
04/16/2007, 07:37 AM
|
#9 |
|
Registered Member
Join Date: Aug 2005
Location: South Florida
Posts: 1,127
|
Very nice job. Where are the ballasts? Any pics would be great I am planning on a diy.
Thanks,
__________________
FMAS - Florida Marine Aquarium Society Member . Current Tank Info: AGA 75g RR 6 x 54w T5 overdriven (510w) with 2 x Icecap 660, DAS EX-1 Skimmer, OR 2500, Reefkeeper II |
|
|
|
|
04/16/2007, 07:41 AM
|
#10 |
|
Registered Member
Join Date: Sep 2002
Location: Centerville ohio
Posts: 7,606
|
I am also looking to do a hood, since they are rare to find....
__________________
Gas....Coral......Gas....Coral...ahhh who needs to go anywhere...CORAL!!! Current Tank Info: JBJ rl nano 20, aq ax360z. Still building..... |
|
|
|
|
04/16/2007, 09:52 AM
|
#11 |
|
Registered Member
Join Date: Sep 2005
Location: Nashville, TN
Posts: 2,086
|
I put the ballasts on the top of the hood in the back. I am only 5'8", so I can't easily see on top of the tank and with the doors being cut a little bit taller than the hood, they kind of just hide back there. I thought about putting them on the sides, but I thought they might be easier to see. Also, I have the tank pretty close to the wall because I have cats and don't want them to go for a swim in the sump.
__________________
Brian |
|
|
|
|
04/16/2007, 11:03 AM
|
#12 |
|
Registered Member

Join Date: Oct 2004
Location: Franklin TN
Posts: 4,010
|
Very nice job!! Tank looks great also!
__________________
I wish krogers sold corals so I could hide my habit in the grocery bill Don't judge me because I can't spell. I use my brain space for more important things, like thinking of a fancy user name Current Tank Info: Small FW tank :) |
|
|
|
|
04/16/2007, 11:33 AM
|
#13 |
|
Registered Member
Join Date: Aug 2001
Location: Northern Cali. Bay Area
Posts: 1,669
|
What kind of paint did you use? Looks great BTW
|
|
|
|
|
04/16/2007, 11:51 AM
|
#14 |
|
Registered Member
Join Date: Sep 2005
Location: Nashville, TN
Posts: 2,086
|
I used Rustoleum Painters Touch, semi-gloss black and gloss white.
__________________
Brian |
|
|
|
 |
|
|


