
|
|
 07/25/2007, 07:55 PM
|
#1 |
|
Premium Member
 Join Date: Jul 2001
Location: Astoria, NYC
Posts: 564
|
meschaefer's 225g inwall
Thanks to Cali-Reef and Wombat, as well as my friends Mike, Andres and Maurice who helped me pick up my new tank on Sunday.
I purchased it from Jaybird, who is moving, and moving onto bigger and better. It was made by Miracles and is 72 long x 30 wide x 24 tall, with another 6 inches on the width for external overflows. Starphire on 3 sides. Sorry about the pics, I only had my phone with me and we where to busy to take to many pics anyway. 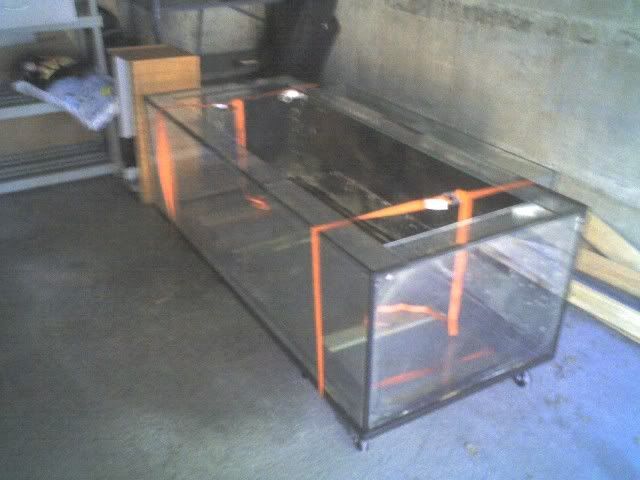 Cali-Reef was a great help, letting me bounce ideas off of him for the last week, then basicly telling me how we were going to move it. Jaybird was nice enough to send me pics of the route the tank needed to come out of the house by, and we where able to come prepared. Cali-reef put together this ramp, so we where able to slide it down the previous owners stoop. 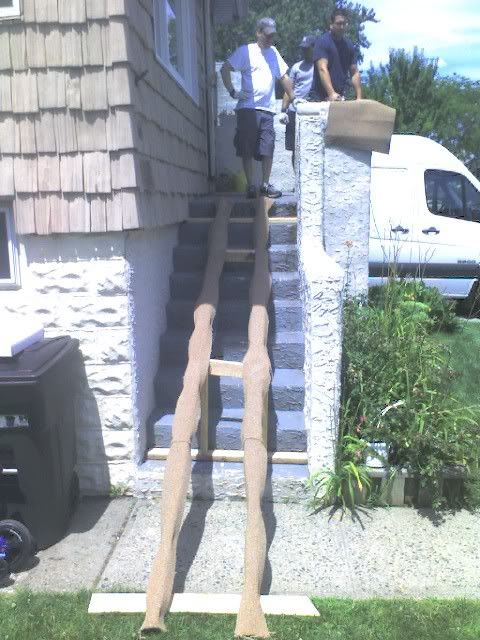 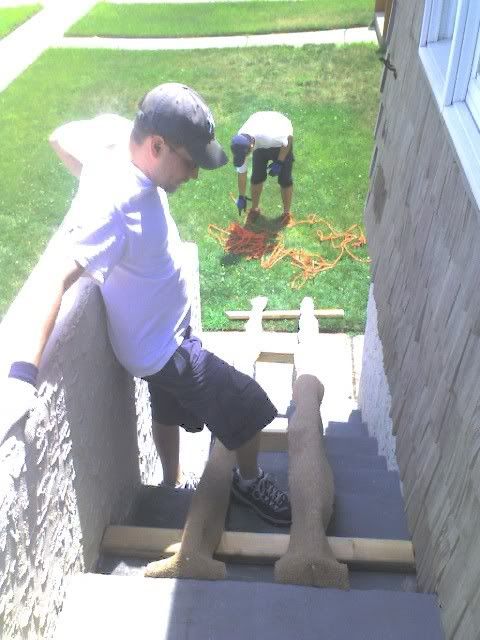 After that it was placed into a u-haul van and moved to a secret location  , to be held by a friend until I am done with the renovations on my basement. , to be held by a friend until I am done with the renovations on my basement.
__________________
Matt Current Tank Info: 220 gallon w/ starphire, 120 gallon starphire sump, Skimmer DAS Ex-2, Calcium Reactor Geo 618, Trade Wind 1/2 hp compact Chiller, 2x 250 HQI Lumenarc Reflectors, Vortech mp40w, AC Jr., |

|

|
|
07/25/2007, 08:03 PM
|
#2 |
|
Premium Member
Join Date: Jul 2001
Location: Astoria, NYC
Posts: 564
|
Speaking of construction, the impetus behind this tank is the finishing of my basement. My wife wanted it done, I wanted to wait as one part of the house or another has been under construction for the last three years. Then she said i could put a new tank down there, and bingo.. I had a contractor ready to go three weeks later.
The tank is going inwall, with a "fish room behind it. This is a picture of the wall where the tank is going to go before construction, and after. 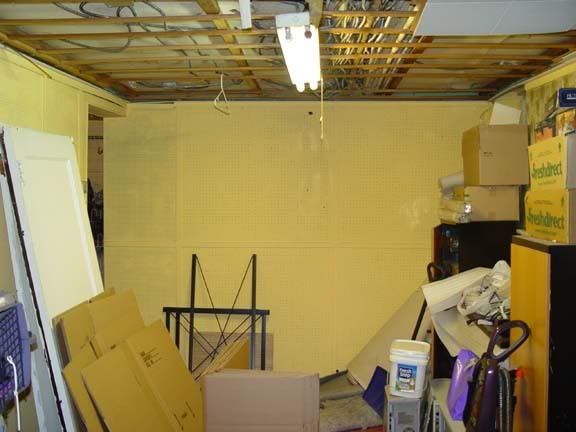 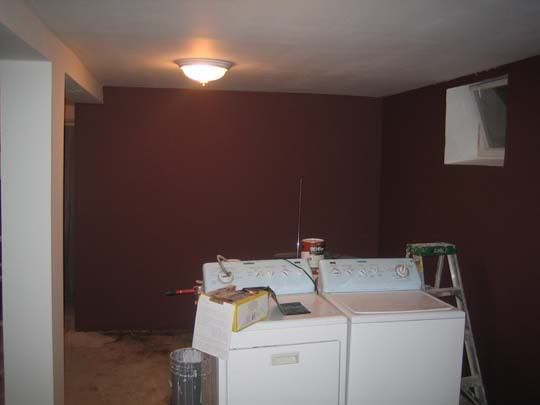 The wall is 10 foot long, and the tank is 6 foot long and will be centered left to right, and about 36 inches off of the ground. behind that wall is a room that measures roughly 8 foot by 10 foot. The first picture is before construction, then during and an inside shot of how it looks now. The room was only 5 foot wide before renovations. 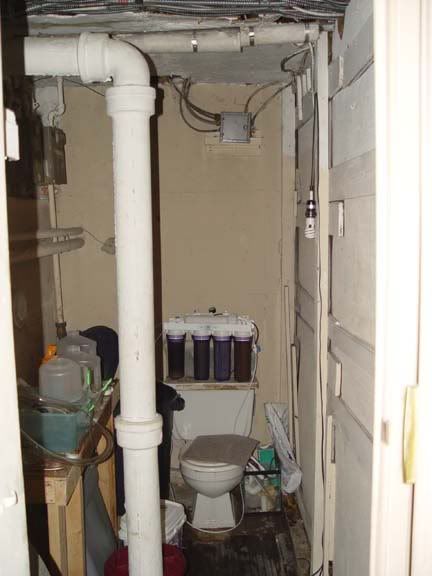  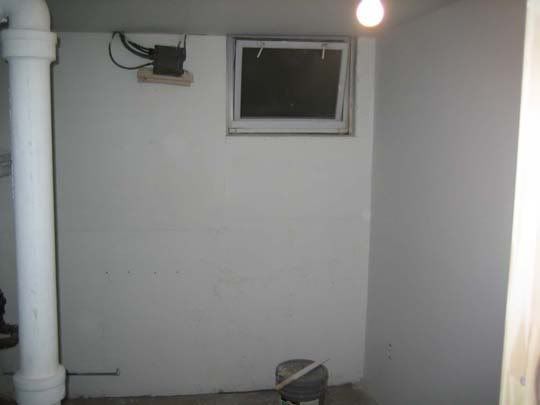 You can see from the second picture, how much the room was widened. The room was orginally to narrow, now it might be wider than I need, but I had to get past that window. The window will also allow me to vent the room. There was also a toilet in thst room, which now becomes a floor drain. The cold water hook up will be used for the RO/DI and a slop sink.
__________________
Matt Current Tank Info: 220 gallon w/ starphire, 120 gallon starphire sump, Skimmer DAS Ex-2, Calcium Reactor Geo 618, Trade Wind 1/2 hp compact Chiller, 2x 250 HQI Lumenarc Reflectors, Vortech mp40w, AC Jr., Last edited by meschaefer; 07/25/2007 at 08:12 PM. |
|
|
|
|
07/25/2007, 08:31 PM
|
#3 |
|
Premium Member
Join Date: Jul 2001
Location: Astoria, NYC
Posts: 564
|
As part of the construction I had them add 2 x 20 amp dedicated circuits for the tank.
I was originally going to have the contractor due the cut out for the tank and build the stand for it, but I wanted to have the tank in my posession before I went that far. Furthermore, I am fairly particulars and wanted it done my way, so that often means doing it yourself. I am glad I waited, as the orignial plans called for a standard AGA 180 gallon tank. That was until I found what is now the pride and joy of my life, the 225g starphire with eurobracing and external overflows. Since this tank, is 30 inches wide and the 180 is only 24 inches wide I would have had problems if I had them build the stand when building the wall. It is more of a pain, but I think I will be happy when I am done...or so I hope. I am going to hopefully start the cut out for the wall, and perhaps the stand this weekend if I can find time. I am modeling the stand off of Weatherson's(pic here) .
__________________
Matt Current Tank Info: 220 gallon w/ starphire, 120 gallon starphire sump, Skimmer DAS Ex-2, Calcium Reactor Geo 618, Trade Wind 1/2 hp compact Chiller, 2x 250 HQI Lumenarc Reflectors, Vortech mp40w, AC Jr., |
|
|
|
|
07/27/2007, 12:52 PM
|
#4 |
|
Premium Member
Join Date: Jul 2001
Location: Astoria, NYC
Posts: 564
|
The original plan was to slowly pick up the peices I needed for the new tank, and then set the whole thing up at once. After a disaster in my old tank, I deceided to put the whole project on the front burner as I hate not having a tank.
A little over a month ago, I had gone to look at a friend's 150g inwall to get some ideas as I planned things out. The contractor had just started work and if I wanted him to do anything special I needed to let him know now. At about 10pm, I get a call from my wife and all she can say to me is that she's "sorry" and she sounds frantic. Apparantly what had happened was that the cord to a Maxijet, that was being used for ATO somehow caught fire. She was home alone, and needed to do something quick, so she grabbed the fire extinguisher. As the cord, was behind the tank, and acessible through the sump she sprayed the extinguisher into the sump. Here is a picture of what the sump looked like when I got home.  This was the most recent picture I had of the display tank (65g). Followed by what the display looked like shortly after the fire.   Luckily everybody was safe, and my wife acted quickly or it could have been alot worse. Unforutnatly, it wiped out my tank. All I have left are three montipora's and a single perc clown. I hate not having a tank set up, so I am pushing ahead with this one faster than I was going to.
__________________
Matt Current Tank Info: 220 gallon w/ starphire, 120 gallon starphire sump, Skimmer DAS Ex-2, Calcium Reactor Geo 618, Trade Wind 1/2 hp compact Chiller, 2x 250 HQI Lumenarc Reflectors, Vortech mp40w, AC Jr., |
|
|
|
|
07/27/2007, 05:27 PM
|
#5 |
|
Registered Member
Join Date: Apr 2006
Location: new york
Posts: 339
|
OMG !!
my condolences..and may the new tank arise like the phoenix and be even better than before.
__________________
WWBD ? |
|
|
|
|
07/28/2007, 08:09 AM
|
#6 |
|
Premium Member
Join Date: Jul 2001
Location: Astoria, NYC
Posts: 564
|
Thanks Boozeman.
It hurt, and my wife was more upset than I was as she felt personally responsible for their demise. But I told her that if she was ever faced with the same event, that she should take the same action. Fire spreads quickly and should be taken seriously. That being said. I am off to Home Depot this morning to pick up supplies to build the stand. I am also going to stop at a local reefer's to pick up a lightly used Sequence Dart. Hopefully this single pump, will take care of all my pumping needs.
__________________
Matt Current Tank Info: 220 gallon w/ starphire, 120 gallon starphire sump, Skimmer DAS Ex-2, Calcium Reactor Geo 618, Trade Wind 1/2 hp compact Chiller, 2x 250 HQI Lumenarc Reflectors, Vortech mp40w, AC Jr., |
|
|
|
|
07/30/2007, 10:09 AM
|
#7 |
|
Premium Member
Join Date: Jul 2001
Location: Astoria, NYC
Posts: 564
|
Although Ididn't get started on building my stand this weekend, I did manage to pick up some equipment from a guy getting out of the hobby.
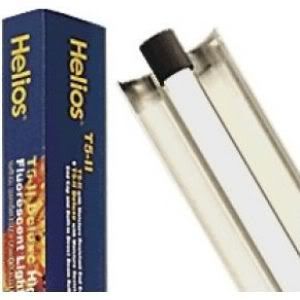
I picked up a 3 month old Sequence Reeflo Dart for $175. When I was there he made me a deal on his hood, wich he gave to me for $100. Although the hood was only 4 foot long, I will canabalize it for parts. Inside the hood where two full size lumenarcs and two Helios (II ?) T5 fixtures. The lumearcs where a little beat up, but not to bad. I figured for the price I couldn't pass them up. The T5 fixtures where thrown in as an added bonous. I do not know to much about these fixtures and could find very little about them online. I did read that at least one version of the Helios fixtures are "disposable" in that the bulbs are not replaceable. I don't know if this is the case, but any information would be appreciated. I also picked up from him 2 x DJ power strips for $5 each. Also a good deal.
__________________
Matt Current Tank Info: 220 gallon w/ starphire, 120 gallon starphire sump, Skimmer DAS Ex-2, Calcium Reactor Geo 618, Trade Wind 1/2 hp compact Chiller, 2x 250 HQI Lumenarc Reflectors, Vortech mp40w, AC Jr., |
|
|
|
|
07/30/2007, 10:18 AM
|
#8 |
|
Premium Member
Join Date: Jul 2001
Location: Astoria, NYC
Posts: 564
|
here is a stock picture of what my fixtures look like.
__________________
Matt Current Tank Info: 220 gallon w/ starphire, 120 gallon starphire sump, Skimmer DAS Ex-2, Calcium Reactor Geo 618, Trade Wind 1/2 hp compact Chiller, 2x 250 HQI Lumenarc Reflectors, Vortech mp40w, AC Jr., |
|
|
|
|
08/05/2007, 06:27 PM
|
#9 |
|
Premium Member
Join Date: Jul 2001
Location: Astoria, NYC
Posts: 564
|
OK it's been about a week since my last update, but that is only because I hadn't gotten anything done. I found some time today, and I started the cut out in the wall for the tank. After alot of thought and looking at alot of pictures of inwall tanks I decided against front access. I must have looked at 30 or so pictures of different inwall set ups and didn't see a single one with front access that I liked and that would be acceptable to my wife.
Using a 4 foot level as a straight edge, I drew out the rough dimensions of the opening for the tank.  Next I took a 7 inch circular saw and cut freehand along the lines. I had to stop after making each cut as the amount of dust was amazing. Even with a window open, a fan blowing out of the room and a dust mask, I had to wait about 10 to 15 minutes between cuts. I am glad I did this before the basment is finished. 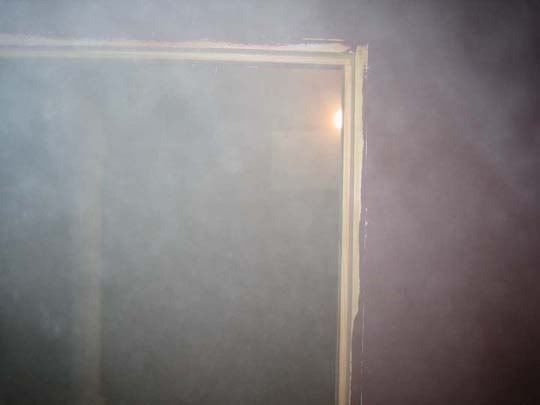 When I had made the four cuts I pulled the sheetrock from the studs. It should be noted that I new exactly where the power lines ran to the outlets. When they where installed, I had the guy redo them as they where originally in the way. I would not have used a powersaw like this if I didn't already know where the power lines where.  Because the saw could not cut all the way through the wall, I performed the same procedure on the other side of the wall. 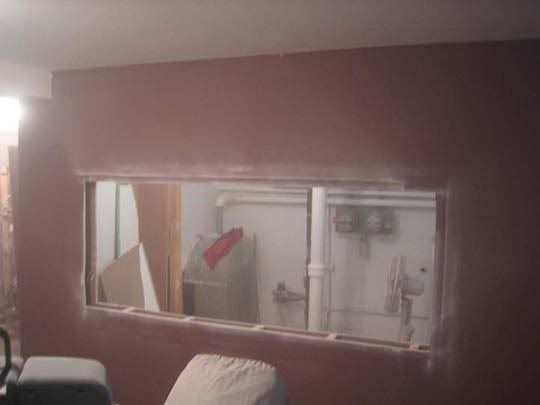 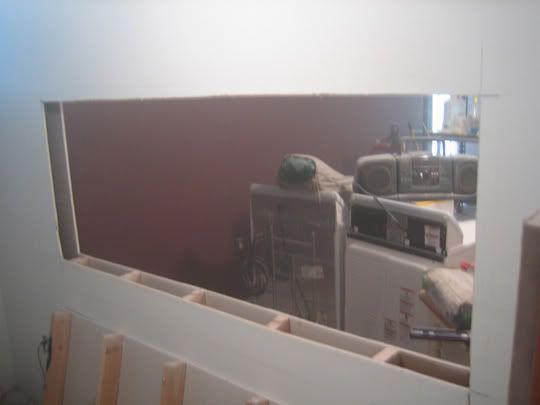 Next I removed the lower piece of sheetrock, so that I had access to the studs. I framed out the window, making sure everything was nice and level, which is not as easy as it sounds because my floor is anything but even. 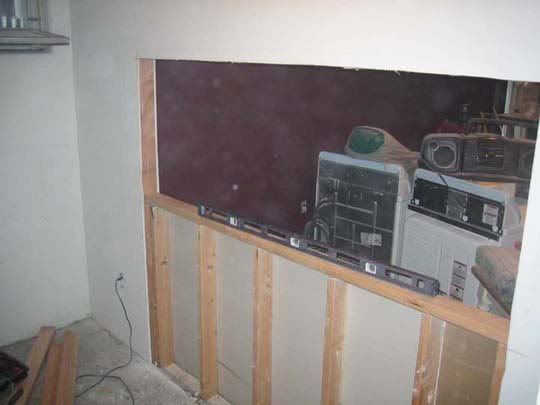 That took me about three hours to do. I had to stop there as I need to pick up some brackets so I can build the rest of the stand.
__________________
Matt Current Tank Info: 220 gallon w/ starphire, 120 gallon starphire sump, Skimmer DAS Ex-2, Calcium Reactor Geo 618, Trade Wind 1/2 hp compact Chiller, 2x 250 HQI Lumenarc Reflectors, Vortech mp40w, AC Jr., |
|
|
|
|
08/05/2007, 08:39 PM
|
#10 |
|
Registered Member
Join Date: Apr 2004
Location: Dallas-Fort Worth
Posts: 286
|
These are pics of Ryan Reeves'(Servo) tank. I am going to do my front wall like this and it gives front access. I am going to try and make the front access a little taller.
  
__________________
90 gallon bowfront for a year then upgraded to a 140 gallon in April 2005. Then in October 2007 started a 295 gallon in-wall build. |
|
|
|
|
08/05/2007, 11:04 PM
|
#11 |
|
♥Acropora Aficionado♥
Join Date: Jul 2004
Location: Hollister,Ca.
Posts: 5,163
|
very nice so far, keep us posted with lotsa piks!
__________________
Live everyday as if it was your last, take time to smell the flowers, enjoy all things living, never take anything for granted, you just never know when your number might be up... Current Tank Info: * 90g. Reef Ready TruVu tank with 30g. Platinum Filtration Series Sump SpS Acro enthusiast * |
|
|
|
|
08/06/2007, 08:55 AM
|
#12 | |
|
Premium Member
Join Date: Jul 2001
Location: Astoria, NYC
Posts: 564
|
Quote:
__________________
Matt Current Tank Info: 220 gallon w/ starphire, 120 gallon starphire sump, Skimmer DAS Ex-2, Calcium Reactor Geo 618, Trade Wind 1/2 hp compact Chiller, 2x 250 HQI Lumenarc Reflectors, Vortech mp40w, AC Jr., |
|
|
|
|
|
08/06/2007, 09:00 AM
|
#13 |
|
Premium Member
Join Date: Jul 2001
Location: Astoria, NYC
Posts: 564
|
My plan going forward is to frame the stand by connecting cross bracing to each of the studs with a "U" bracket. Each of the corners will have doubled up 2x4 running to the floor as a leg, that is connected to the framing with a makeshift lap joint. The lap joint will be made by cutting one of the 2x4s , 3 1/2 inches shorter than the other. There will be two other legs across the back of the stand wich will also be doubled up and lap jointed 2x4.
The stand design is based upon the one made by Weatherson, (link a few posts back) he used "T" brackets on the middle back legs so that he could remove them for access under the tank. (I.e. to switch out the sump if needed). Are "T" brackets necessary, could I use two bolts instead? When the framing is done, I am going to use 3/4 inch ply on top, and will use the scraps to make some corner bracing. All of the framing that you see in the picture above, is "dry fitted", i.e. nothing has been fastned togther. I thought I had some decking screws in my tool box, but they where not there. I have either used them all, or they are in storage (Almost all my tools are, while construction is ongoing). Are decking screws the best thing to use, or should I look for something else? I am going to paint the whole thing in order to give it some protection from salt water. Since all of the other stands I have made where meant to be seen, they where stained with many coats of polyurethane on them (Helmsman from Minwax) Since I want to paint this as opposed to staining it I am not sure what type of paint to use. Suggestions? A peice of "styrofoam type pink insulation", will go over the 3/4 ply, and under the tank. COMMENTS PLEASE....I want both the "You have no idea what your doing and the whole thing will collapse", the occasional "Your doing a great job" would be nice too
__________________
Matt Current Tank Info: 220 gallon w/ starphire, 120 gallon starphire sump, Skimmer DAS Ex-2, Calcium Reactor Geo 618, Trade Wind 1/2 hp compact Chiller, 2x 250 HQI Lumenarc Reflectors, Vortech mp40w, AC Jr., |
|
|
|
|
08/08/2007, 11:43 AM
|
#14 |
|
Premium Member
Join Date: Jul 2001
Location: Astoria, NYC
Posts: 564
|
With my busy schedule building the stand is going to take awhile, and i probably wont be ready until the end of next week, maybe sooner if I can find the time. With that I thought I would share some of the planning that has been going into the tank generally.
The tank is 72" long x 24" tall x 30" wide, with external overflows. Eurobracing and starphire on 3 sides. Due to the disaster with my former tank my goal is to get this tank up and running as fast as possible. That means, that I will not have all the equipment I would like when I start. Since I lost almost all of my SPS, I am going to focus on they fish first, letting the tank mature as I upgrade the system for SPS. Lighting About a month or so I got a really good deal on three Blue Wave III HQI ballasts from Sunlight Supply. I had been debating whether to use HQI or a standard ballast, but then I found these for a price that could not be beat. I know a few people who run these ballasts and they swear by them. 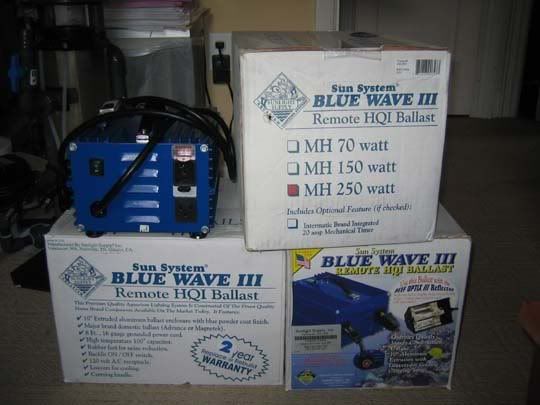 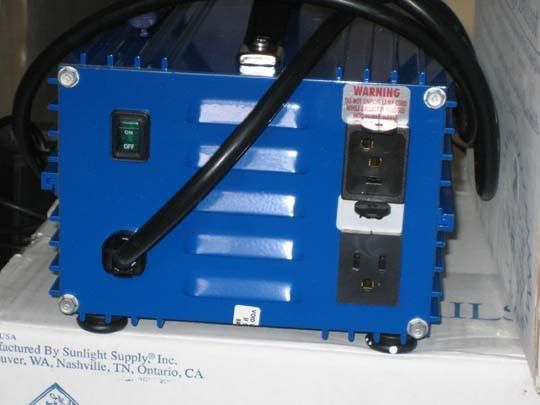 As you can see from the close up, each ballast has a utility outlet on it. In theory this would allow you to have a fan turn on with the ballast, I don't think you could daisy chain the ballasts. The Three ballasts are going to power single ended bulbs in lumenarc III reflectors. I picked up two lumenarcs used, and need to pick up a third. I havn't decided on which lamps I am going to use, but am leaning towards 10K ushios, but I am open to pretty much anything. These will be supplemented with T5, I have been looking at a 4 x39w Tek2 fixture from ReefGeek, but I am undecided yet. I am unsure about how many T5 I want, as I would like to eventually run the MH for only few hours a day, a miday burn. The t5 would then be my primary lighting. I am also considering picking up the Tek retrofit earlier, and putting off the third lumenarc and the bulbs, as it seems a waste to have to run the MH for the primarily fish only system my tank will be during it first few months. Supplementation I will be using a Aquamedic Reefdoser twin, which I had on my last system to dose Randy's Two Part. Since my tank disaster, a buddy of mine has been using my doser so the only picture I could take was off the box. 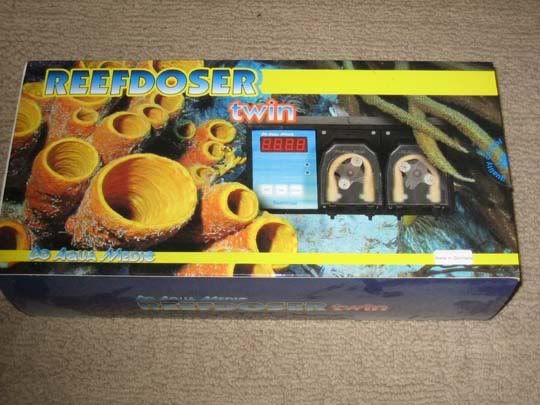 Filtration On my old system, I was using a DAS Ex-2 wich was extremely oversized for my 65 gallon tank. For those not familiar witht he skimmer, it is recirculating type needle wheel skimmer, powered by two relabled Aquabee 2001s. Skimmer dimensions: 16.1"x11"x27.5" Mixing tube diameter: 6" Collection neck diameter: 3.5" Here is a pic next to a five gallon bucket for reference. 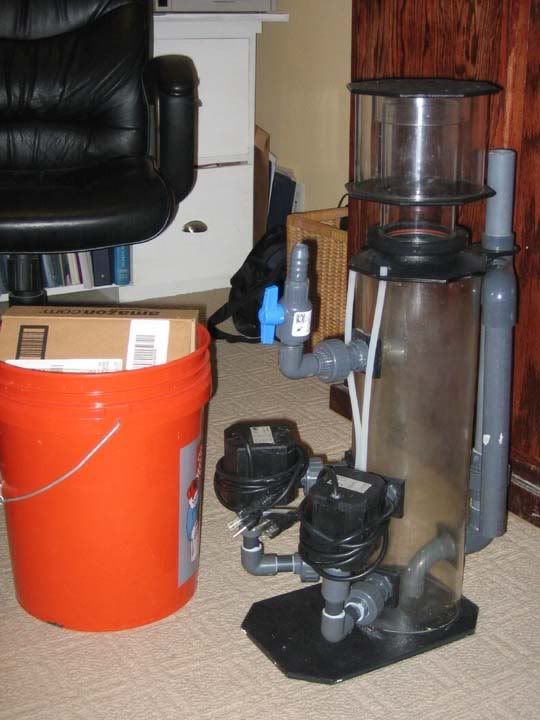 This skimmer may not be adequate for my system once it is fully stocked, but it should do the job until I have made some of the other upgrades I want to do. Flow I have yet to purchase any powerheads etc. for the tank. I briefly considered a closed loop system, but nixed that idea as it is extremely inefficient. My plan now is to start with one Vortech, and add another once I have things up and running. I feel that ultimately I will need three of them, to really get things moving. I hear rumor that they have a wireless controller coming out that will handle up to ten of them, so it seems that this type of system will be expandable as needed. In the short term, I have a couple of nanostreams laying around which will help get rid of dead spots. Although my ultimate goal is to keep all cords out of the tank. Live Rock & Sand. It is hard to say how much live rock I have, But it has to be close to 150lbs. I currently have some of it "cooking" in a brute trash can. I have to admit that I havn't done as many water changes as they say you are supposed to. Also the temp in the garbage can really spiked a couple of time, with a lot of die off, when the outside temp surpassed 90 degrees. I had some trouble with hydroids, and I dried out any rock with them on it. Perhaps the increased temp in the garbage can, killed off any that I missed. 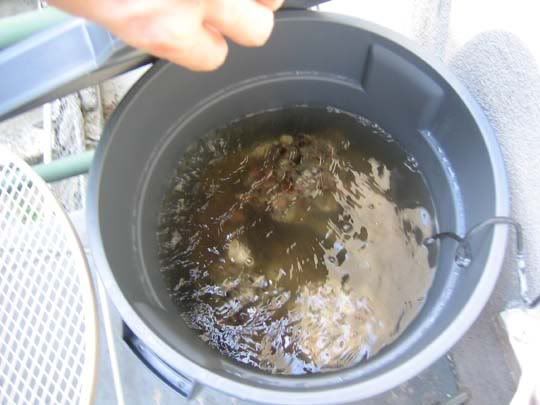 In terms of sand, my old system was a DSB. My plan in this tank, is to use a shallow sandbed only for asthetics. About 200lbs of ESV, or something similar. I want something with slightly larger particle size so it doesn''t get blown around when I get all the Vortechs running. A multitude of stand stirrirs should keep it clean, and keep it from becoming detrius trap. More to come....
__________________
Matt Current Tank Info: 220 gallon w/ starphire, 120 gallon starphire sump, Skimmer DAS Ex-2, Calcium Reactor Geo 618, Trade Wind 1/2 hp compact Chiller, 2x 250 HQI Lumenarc Reflectors, Vortech mp40w, AC Jr., |
|
|
|
|
08/10/2007, 11:40 PM
|
#15 |
|
Registered Member
Join Date: Mar 2007
Location: Palm Bay FL
Posts: 2,957
|
I love Ryan's molding shelf and want to do the same thing on my build. Sweet..
__________________
Eric (Red House for my 300 display 600 system) Current Tank Info: 600 gallon system with 300 display |
|
|
|
|
09/17/2007, 10:19 PM
|
#16 |
|
Premium Member
Join Date: Jul 2001
Location: Astoria, NYC
Posts: 564
|
It been awhile, but....
It has been awhile since I had an update. Not much has happened, as my summers are to busy to get anything done fast. Well summer's over, and it is time to get busy again.
I did make some progress . Marco Rocks was having a sale, with $5 shipping per box so I picked up a 50lb box of Fiji and a 25lb box of Tonga Shelf. The Fiji rock is really nice. I got 3-4 really nice size pieces, another 10 or so decent size pieces and a whole lot of smaller pieces. It was shipped via UPS and the rock came loosely wrapped in bubble wrap. Since the rock is weighed dry, you get more of it than if it had been weighed wet. This is an over view of all the non-rubble size pieces, and then a close up of two of the larger pieces with a beer bottle thrown in for size reference. 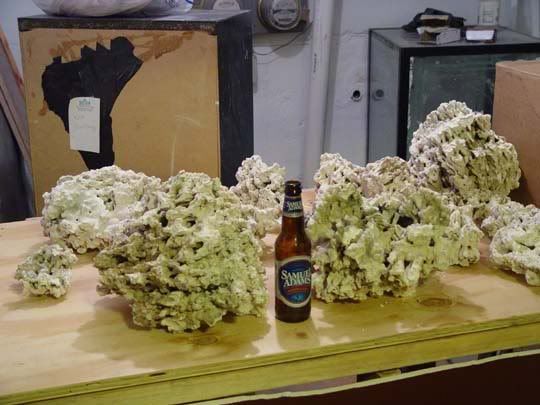 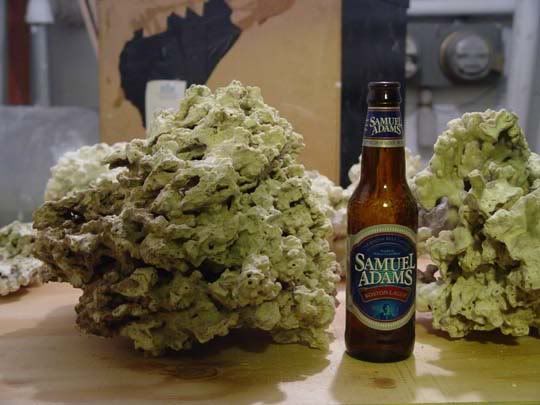 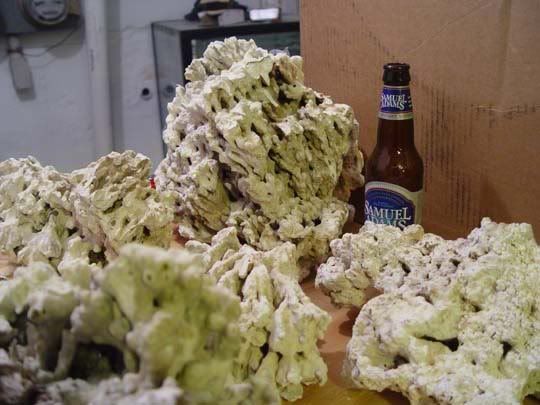 This is a pic of the "rubble", which I guess is from shipping "damage", 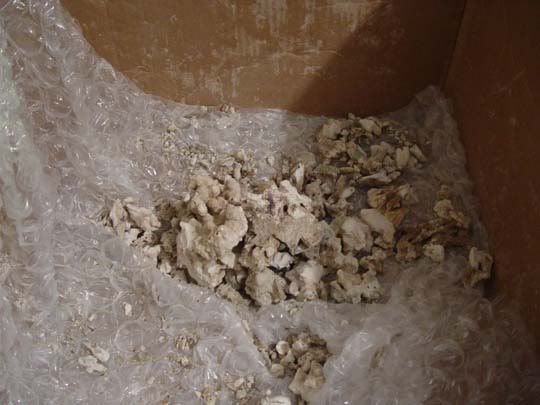 The Tonga Shelf rock was slightly more meticulously wrapped, but it does seem to be more fragile. A couple of pieces broke, leaving me with a smaller piece than I had started with. Also the Tonga is much more dense than the Fiji, so you get allot less "volume". 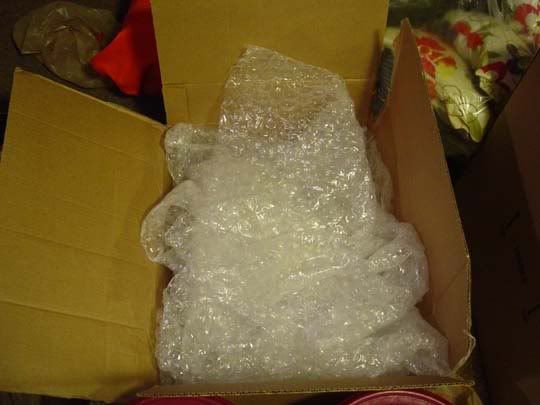 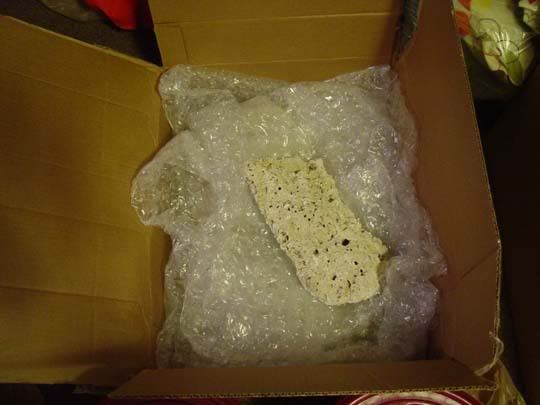 To get an idea of the size of the rock, the following pic is of the piece in the pic above on top of a five gallon bucket and a pic of some of the other rock with my trusty beer bottle.  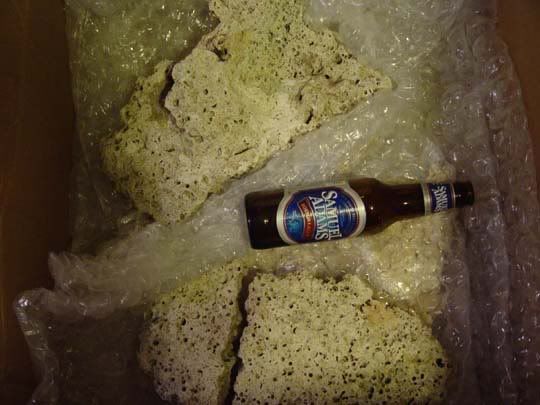 As I said, I really like the Fiji rock that I got. If I had to do it over, I would think twice about the Tonga. Because of the shipping damage, the pieces where smaller than I was hoping for and it costs significantly more than the Fiji. I guess I will really have to wait until I can start aquascaping before I can pass judgment.
__________________
Matt Current Tank Info: 220 gallon w/ starphire, 120 gallon starphire sump, Skimmer DAS Ex-2, Calcium Reactor Geo 618, Trade Wind 1/2 hp compact Chiller, 2x 250 HQI Lumenarc Reflectors, Vortech mp40w, AC Jr., |
|
|
|
|
09/18/2007, 12:14 AM
|
#17 |
|
Registered Member
Join Date: Mar 2007
Location: Palm Bay FL
Posts: 2,957
|
Cool Rocks... I started my build finally and think I am going to do the shelf like servo's.
I used some primer for my stand then went with a bunch of coats with semi gloss. It will hold up a littler better against water compared to flat. I tripled up each leg for my stand with screws only. I was also thinking about doing some reinforcments on the side like weathersons.
__________________
Eric (Red House for my 300 display 600 system) Current Tank Info: 600 gallon system with 300 display |
|
|
|
|
09/18/2007, 06:30 AM
|
#18 |
|
Premium Member
Join Date: Jul 2001
Location: Astoria, NYC
Posts: 564
|
I have a few pics of the stand coming, I doubled up the legs along the back, and used the studs from the wall from the front. I figure at 16" apart, they should be fine by themselves. I do need to add some reinforcement to the sides like Weathrson's. I also have some pics of my "sump" coming as well (in quotes because it is not quite a sump yet).
__________________
Matt Current Tank Info: 220 gallon w/ starphire, 120 gallon starphire sump, Skimmer DAS Ex-2, Calcium Reactor Geo 618, Trade Wind 1/2 hp compact Chiller, 2x 250 HQI Lumenarc Reflectors, Vortech mp40w, AC Jr., |
|
|
|
|
09/18/2007, 07:55 AM
|
#19 |
|
Registered Member
Join Date: Jul 2005
Location: PA
Posts: 759
|
really love the dimensions of your tank, ill certainly be following along. Nice work thus far...good luck with everything.
__________________
Trust the Process Current Tank Info: 75 gallon RR Display, 30 gallon sump, SRO INT1000, Jebao CP9's, Marsaqua LEDS. |
|
|
|
|
09/18/2007, 11:15 AM
|
#20 |
|
Registered Member
Join Date: Mar 2007
Location: Palm Bay FL
Posts: 2,957
|
I tripled my legs by the wall. I started on the front side but decided to wait until I get my plumbing going and make sure the sump will fit? If you scroll down on my thread you can see the legs by the wall are tripled. A little extra support can go a long way. I had my 150 stand flex when I tried to drag it full of water.
http://reefcentral.com/forums/showth...5&pagenumber=5 How big of a sump are you using? I wish we had basements in Florida..You basement guys are lucky..
__________________
Eric (Red House for my 300 display 600 system) Current Tank Info: 600 gallon system with 300 display |
|
|
|
|
09/18/2007, 10:30 PM
|
#21 |
|
Premium Member
Join Date: Jul 2001
Location: Astoria, NYC
Posts: 564
|
I contacted Marc at Marco Rocks, regarding the tonga shelf that had been damaged in shipping. He got back to me within a few hours and is going to send me out some replacement pieces ASAP at no cost to me. That's what I call service.
He also told me that I can drill a hole on each side of the broken pieces and insert a piece of acrylic rod. A little bit of epoxy and some rubble over the crack, and it will look as good as new.
__________________
Matt Current Tank Info: 220 gallon w/ starphire, 120 gallon starphire sump, Skimmer DAS Ex-2, Calcium Reactor Geo 618, Trade Wind 1/2 hp compact Chiller, 2x 250 HQI Lumenarc Reflectors, Vortech mp40w, AC Jr., |
|
|
|
|
09/18/2007, 10:47 PM
|
#22 |
|
Registered Member
Join Date: Mar 2007
Location: Palm Bay FL
Posts: 2,957
|
Thats great service. The big cherry picked shelf pieces are not cheap.
__________________
Eric (Red House for my 300 display 600 system) Current Tank Info: 600 gallon system with 300 display |
|
|
|
|
09/19/2007, 11:37 AM
|
#23 |
|
Premium Member
Join Date: Jul 2001
Location: Astoria, NYC
Posts: 564
|
I just got a tracking number for the replacement Tonga shelf pieces. The package weighs 13lbs (the original 25lb box shipped to me weighed 27 lbs.)
Very exciting, and I am going to try and "repair" the rock that broke during shipping. Once it is delivered I will post some pics of the replacement pieces.
__________________
Matt Current Tank Info: 220 gallon w/ starphire, 120 gallon starphire sump, Skimmer DAS Ex-2, Calcium Reactor Geo 618, Trade Wind 1/2 hp compact Chiller, 2x 250 HQI Lumenarc Reflectors, Vortech mp40w, AC Jr., |
|
|
|
|
09/19/2007, 09:59 PM
|
#24 |
|
Premium Member
Join Date: Jul 2001
Location: Astoria, NYC
Posts: 564
|
A couple of weeks back, I picked up a 120 gallon tank from on of they guys on Manhattan Reefsfor a really good price. (FREE - Thanks Rich!!) It is a standard size 120 gallon made by Glass Cages with Starphire on the front. I am going to use it as a sump.
He was going to throw it out, as it has a small crack in the lower right front corner (you can see it to the right of the beer bottle). It was there for 6 months before he took the tank down, before I saw it I was gong to patch it, but after looking at I am going to leave it alone. The eurobracing is also cracked on one side as well, witch I will patch up (I did this when moving the tank, I had an incident with a deflated tire on the dolly I moved it with). 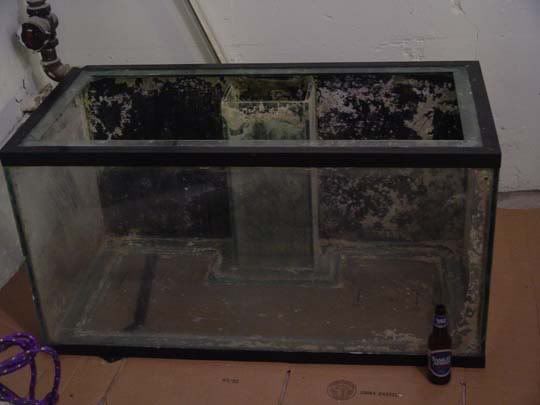 The tank was reef ready, so I had to remove the center overflow. It took me over an hour to get the overflow out. There was a learning curve involved and think I could get it out allot faster if I had to do it again. This leaves me with two holes in the bottom of the tank, witch will get a patch over it as well. 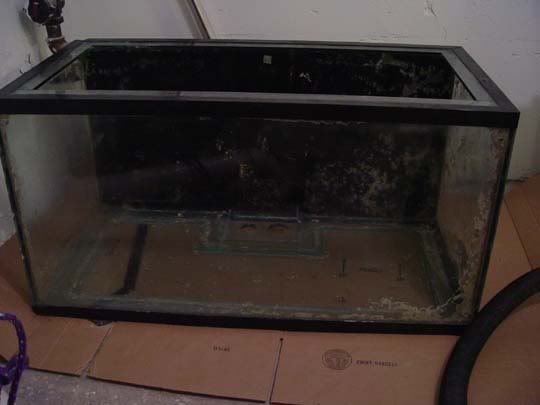 The big question is... how do I want to partition it up? I will be running an external skimmer, and need to drill one side to go to my return pump (reeflo dart). I will have two overflow coming into the sump and I need space for my heaters, probes, phosban reactor. etc etc/. I also want to have enough space in the area just before the return pump that I can easily drain out 50 gallons for a water change without having to turn off the return pump. Any ideas?
__________________
Matt Current Tank Info: 220 gallon w/ starphire, 120 gallon starphire sump, Skimmer DAS Ex-2, Calcium Reactor Geo 618, Trade Wind 1/2 hp compact Chiller, 2x 250 HQI Lumenarc Reflectors, Vortech mp40w, AC Jr., |
|
|
|
|
09/19/2007, 10:38 PM
|
#25 |
|
Registered Member
Join Date: Mar 2007
Location: Palm Bay FL
Posts: 2,957
|
I have seen guys just get cut glass and silicone them in. I wanted to try and see if I can seal some acrylic on to glass. Glass cages sells cut glass to make sumps out of tanks.
__________________
Eric (Red House for my 300 display 600 system) Current Tank Info: 600 gallon system with 300 display |
|
|
|
 |
|
|


