
|
|
 02/22/2005, 08:03 PM
|
#251 |
|
Registered Member
Join Date: Mar 2003
Location: Winnipeg,Canada
Posts: 1,287
|
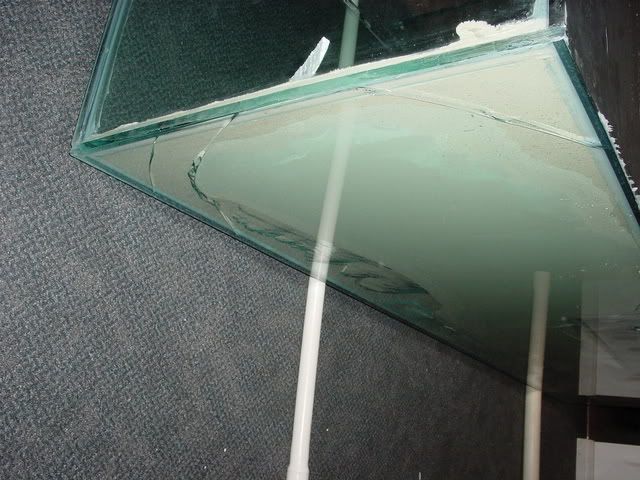
Well I moved the tank out of the house tonight got someone to haul it away
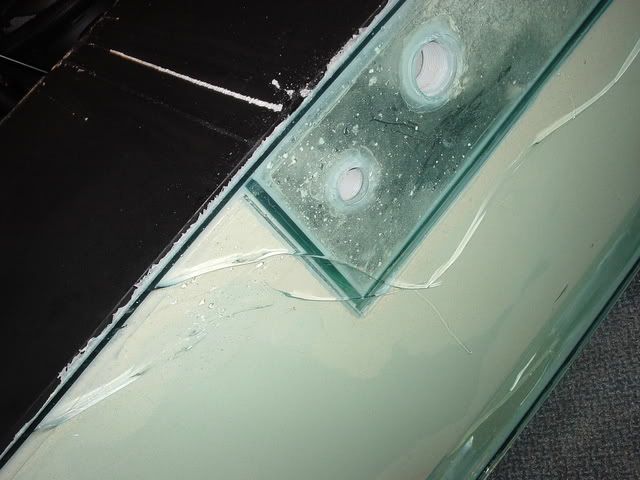
 I took some pictures of the bottom before we got it out of the house. 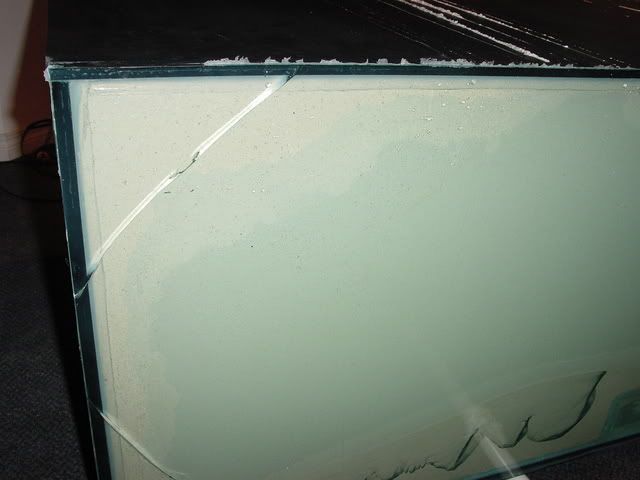 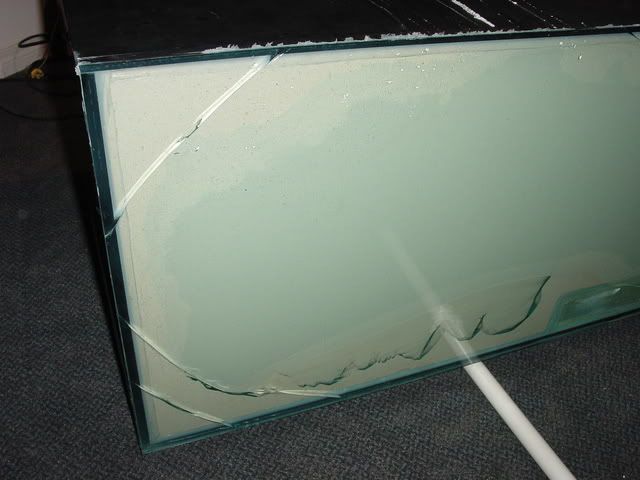 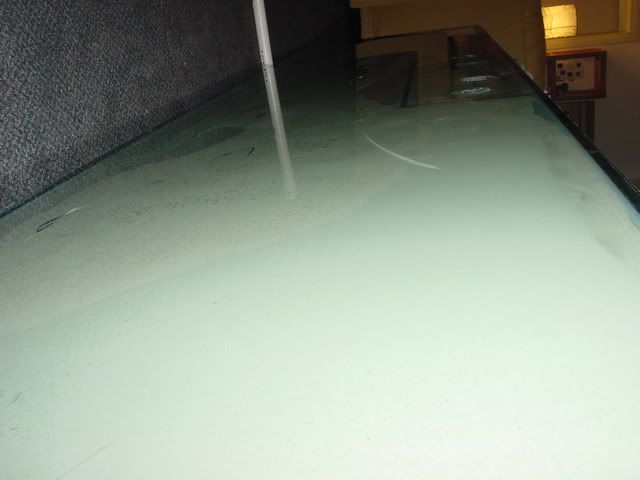
|

|

|
|
02/22/2005, 08:36 PM
|
#252 |
|
Registered Member

Join Date: Nov 2003
Location: Austin TX...Finally
Posts: 981
|
man, that really sucks. Are you going to try this again with your 300?
|
|
|
|
|
02/22/2005, 08:46 PM
|
#253 |
|
Registered Member
Join Date: Mar 2003
Location: Winnipeg,Canada
Posts: 1,287
|
|
|
|
|
|
02/22/2005, 08:47 PM
|
#254 | |
|
Registered Member
Join Date: Mar 2003
Location: Winnipeg,Canada
Posts: 1,287
|
Quote:
I may not sure yet? |
|
|
|
|
|
02/22/2005, 09:07 PM
|
#255 |
|
Registered Member
Join Date: May 2004
Location: NY
Posts: 1,726
|
Holy crackling fish tanks Batman!
Just finished mine & got everything in place this weekend & now you guys got me worried!!!! Method to my madness: Step1: Cut eggrate to size of fish tank bottom. Hopefully this will provide relief of pressure points & less chances of cracking. Used 2 pieces for this...that meet in the center. I had eggcrate around, what could be cheaper?  Step2: Fill in eggcrates with crushed coral. This allows for a lighter piece, not all of the spaces in there are filled, there is some room to breathe. Not every square mm of expoxy/crushed coral touches the glass (hopefully helps in the prevention of cracking.....heck I could be fooling myself). The partitions of plastic allow a little further resilience. Plus I had a ton of CC waiting to be used for something...finally!   Step 3 Let CC to slightly dry, enough not to disturb it & apply a coat of epoxy/fine sand. Apply sand sifting method at end. By this time too drunk to worry about pictures! Step4 -let cure for 4 days -pour in COLD water, yea I just realized this now. Didn't really think about the cold water, but actually was listening for cracking sounds. Remove cold water & pour in more & let sit over 2 days. I only filled the tank about 4" high, maybe this was the trick? Maybe it was the crate/cc? -fill up your tank & PRAY! 
__________________
75g AGA/RR/BB, 20g sump, Aquactinics 2x250 (Phoenix 14K)/2x54 T5 (AB & B+), Eheim 1262 Return, Deltec AP600, Tunze 6060 & Osmolator 3155, Homemade 2 part Current Tank Info: SW, Reef |
|
|
|
|
02/22/2005, 10:22 PM
|
#256 |
|
Registered Member
Join Date: Mar 2003
Location: Winnipeg,Canada
Posts: 1,287
|
Glad it worked out for you.
|
|
|
|
|
02/22/2005, 11:33 PM
|
#257 |
|
Registered Member
Join Date: Sep 2000
Location: Waukesha , WI
Posts: 4,998
|
Wow those cracks look bad...
Dave |
|
|
|
|
02/23/2005, 09:40 AM
|
#258 |
|
Registered Member
Join Date: May 2002
Location: San Rafael, CA
Posts: 746
|
Wow. Those are mind blowing cracks. I've never seen a crack in glass quite like the serpentine one in the bottom of your second photo.
It looks like the resin separated from the glass around the edges. Perhaps it was just the shock of the cold water causing the epoxy to contract that pulled on the glass and induced the stress? I think others may have speculated about that, but these pictures seem to show that something pulled the two apart. I can't imagine the density of the resin and sand would be light enough for it's own bouyancy to pull it upwards enough to lift from the glass, so something caused this. The fact that there are multiple unconnected cracks means that there was distrubuted stress, too, not just in an isolated area. hdtvguy: Thanks for posting the pictures. I know it must be pretty painful to dwell on. FastUno: Yours looks like it turned out well (knock on wood). How much depth do you think there is above the eggcrate?
__________________
-Ron |
|
|
|
|
02/23/2005, 10:09 AM
|
#259 |
|
Registered Member
Join Date: Jul 2001
Location: bay area
Posts: 3,808
|
Does the resin shrink as it cools?
__________________
The reefer formally known as Lefty Ink is the way; the way is ink. Current Tank Info: 150 mixed reef with a 180 remote sump 250 gallon fish breeding system 200 gallon cephalopod breeding system 212,000 gallon reef tank at work |
|
|
|
|
02/23/2005, 10:21 AM
|
#260 |
|
Premium Member
 Join Date: Apr 2004
Location: University of Cincinnati
Posts: 3,715
|
I am thinking about doing a drop in acrylic bottom - this makes me a tad nervous. I might make a mold of the tank. Not sure yet. This whole deal with HDTV guy makes me a bit nervous - I hope it's some consolation HD that you may have saved other peoples tanks from the same fate
Sorry you had to be the one to have it go bad.
__________________
Humuhumunukunukuapua'a! Current Tank Info: 24g nano reef |
|
|
|
|
02/23/2005, 10:24 AM
|
#261 |
|
Premium Member
Join Date: Apr 2004
Location: University of Cincinnati
Posts: 3,715
|
I think it probably would lefty - I think in this case since he added really cold water it might have contracted very rapidly - but still not sure entirely what happened.
__________________
Humuhumunukunukuapua'a! Current Tank Info: 24g nano reef |
|
|
|
|
02/23/2005, 11:36 AM
|
#262 | |
|
Registered Member
Join Date: May 2002
Location: San Rafael, CA
Posts: 746
|
Quote:
Here is something from a technical page on epoxy (I don't know which specific product hdtvguy used, and all epoxies have slightly different properties): "The reactivity of Epoxy and Polyurethane compounds will depend on the type of hardener employed and the chemistry involved. All reacting (curing) materials generate heat as a by-product of the reaction. The amount of heat generated will depend on the chemistry involved and can reach very high temperatures. for example; epoxy systems formulated for thin film bonding applications can generate enough energy to self-ignite in large mass castings. The un-dissipated heat generated as a by-product of the curing process will intern speed the reaction further until the material solidifies. Pot life is defined as the period of time, commencing from the time the resin and hardener are mixed together, the mixture remains pourable in its intended application. As a rule of thumb, the faster the reaction the higher the exotherm. The slower the reaction the better. Exotherm is defined as the increase in temperature above the cure temperature due to the energy released by the reaction. Excessive exotherm can damage components especially in encapsulating electronic circuits. If the resin and hardener are heated to lower the mixed viscosity, the resultant greater reactivity will cause the exotherm (heat) to be generated in a shorter period of time. The ultimate temperature will be much higher as there is less time for the mix to dissipate the internal heat being generated. High reactivity hardeners used in large mass casting can result in "runaway exotherm" because the heat being generated can not be dissipated at a sufficient rates from the center of the mass. In extreme cases, the temperature in the center of the mass can reach extremes to the point where it actually chars or even explodes. The lower the exotherm the better. Use low reactivity hardeners for large mass castings and faster reactivity hardeners for small mass casting or thin film applications. Shrinkage is the reduction in volume or linear dimensions as a result of cure. Excessive shrinkage will result in damage to embedded components and residual built in stresses in the casting. Built in stresses make the finished casting prone to cracking. As a rule, un-filled products shrink more than those containing fillers and slow reactivity materials will shrink less than high reactivity systems. In most cases, the higher the filler content the lower the shrinkage and the better the thermal conductivity of the casting. The lower the shrinkage the better. The ability to withstand thermal shock is generally a function of flexibility. The more flexible the cured system the better its ability to withstand thermal shock. This can be a problem if the potted component is required to operate at elevated temperatures because many flexibilized casting systems are not well suited to high temperature operation. The most suitable casting systems are those that possess a good combination of toughness and flexibility." It is important to note that commercial epoxy products come in many flavours for specific applications. Marine and industrial epoxies come in different speeds, viscosities and have different flexibility properties. There are also a multitude of fillers used that can change the final properties, like microballoons, fibers, etc. Sand is, unto itself, a filler in the epoxy mix. As long as the sand is dry, it should add to the desirable properties of the epoxy and should minimize shrinkage, but not to the degree of specialized additives. I still don't know that the epoxy mix was the smoking gun with hdtvguy's failure (how long did it take to kick?), but I think it would be safe to say that there may be less margin of error when dealing with large tanks and deeper FSBs. Until others step up and assume the risk in other larger tanks, I think the safest approach is to cast drop in parts or to cast in as shallow a layer as possible. My $0.02
__________________
-Ron |
|
|
|
|
|
02/23/2005, 12:58 PM
|
#263 |
|
Registered Member
Join Date: Mar 2003
Location: Winnipeg,Canada
Posts: 1,287
|
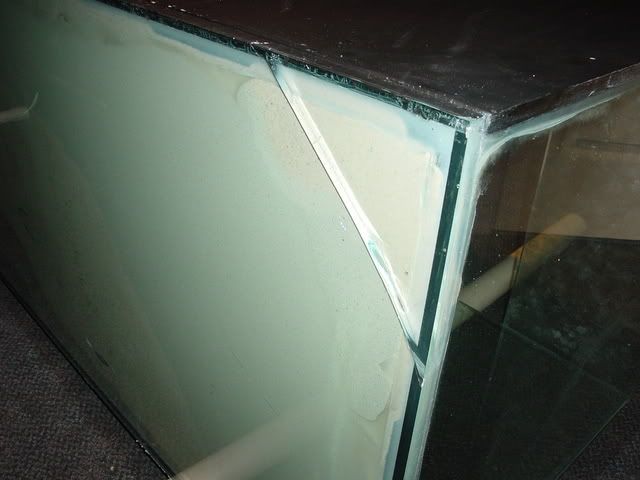
I used the same Epoxy as in this thread ( Envirotech Lite Epoxy) I still think it was caused by the extreme cold water from the tap that caused this. In the pictures posted you can tell by the cracks. That they are stress related from the hard cure epoxy sand mix and the glass just could not take the contraction.
I had to get the the tank out of the house it just made me sick looking at it! |
|
|
|
|
02/23/2005, 01:56 PM
|
#264 |
|
Registered Member
Join Date: Nov 2004
Location: Irvine, SOCAL
Posts: 2,365
|
fastuno when you placed the cc in whith the eggcreate epoxy was mixed into the cc correct?
cam
__________________
Cam Barr |
|
|
|
|
02/23/2005, 02:29 PM
|
#265 |
|
Premium Member
Join Date: Sep 2000
Location: Mpls, MN
Posts: 2,250
|
I figured epoxy would work well. I used PVC glue on mine...about the time this thread started. It's held up fairly well, but next time, I'll be trying a boatbuilders' epoxy or something similar. It should resist UV better (even though bulbs are shielded, there's still UV there). The bottom does get covered in coralline and other things and won't stay the pristine white it looks originally. I think it look more natural, though and actually takes on a resemblance to the live rock.
I personally wouldn't ever seal the bed right to the bottom (for reasons we've seen here). I fixed my current bed to HDPE and will do the same in the future. It's not worth the risk to me...
__________________
I'll shut up now... Current Tank Info: 120 reef, 75 plant |
|
|
|
|
02/23/2005, 08:18 PM
|
#266 |
|
Registered Member
Join Date: May 2004
Location: NY
Posts: 1,726
|
RonSF- I tried to make it as thin as possible, around 1/8-3/16"
CamBarr- yes, Famowood epoxy (got that at HD), was mixed in with cc, let it dry slightly (so that top layer does not mix or disturb with lower layer). Mix the next batch of fine sand/epoxy & spread. Then sprinkle a layer of fine sand on top of all that & let dry. Next day vacuum excess off. G-money- you said it, not worth the risk!!! You will sleep better if you add that bottom layer!
__________________
75g AGA/RR/BB, 20g sump, Aquactinics 2x250 (Phoenix 14K)/2x54 T5 (AB & B+), Eheim 1262 Return, Deltec AP600, Tunze 6060 & Osmolator 3155, Homemade 2 part Current Tank Info: SW, Reef |
|
|
|
|
02/26/2005, 08:51 AM
|
#267 |
|
Registered Member
Join Date: Apr 2002
Posts: 196
|
Did you guys who have done this find the epoxy still smells after the required cure time? I'm thinking maybe the sand in the mix and over top of the epoxy is slowing down the cure. I'm not sure I want to add water yet if it's still giving off fumes.
Jay |
|
|
|
|
02/26/2005, 10:57 PM
|
#268 |
|
Registered Member
Join Date: May 2004
Location: NY
Posts: 1,726
|
Mine smelled, well after a few days worth of curing. Some fresh water seems to take care of that, leave some FW in your tank for a while & remove. Repeat a few times.
__________________
75g AGA/RR/BB, 20g sump, Aquactinics 2x250 (Phoenix 14K)/2x54 T5 (AB & B+), Eheim 1262 Return, Deltec AP600, Tunze 6060 & Osmolator 3155, Homemade 2 part Current Tank Info: SW, Reef |
|
|
|
|
02/27/2005, 08:31 AM
|
#269 |
|
Registered Member
Join Date: Apr 2002
Posts: 196
|
Thanks,
I'm filling it today. Hope it doesn't crack. Jay |
|
|
|
|
02/27/2005, 12:09 PM
|
#270 |
|
Registered Member
Join Date: Apr 2002
Posts: 196
|
Well, I filled the 240 for the first time since doing the Faux bottom. I let the bottom cure for full week, but vacuumed out the excess sand after the recommended 72 hour cure time. While I was filling it I listened closely to see if I could hear the epoxy cracking. After hdtvguy's disaster I decided to use room temperature water. I heard no cracking and had no problems at all.
It looks great. Now I just have to wait 4 weeks or so for the aragacrete islands to cure. I'd like to thank hdtvguy for posting the problem he had. If he hadn't, i probably would have used cold water too and things might not have faired so well. Jay |
|
|
|
|
02/27/2005, 01:52 PM
|
#271 |
|
Registered Member
Join Date: Mar 2003
Location: Winnipeg,Canada
Posts: 1,287
|
Glad it worked out for you Jay! Lets see some pics.
|
|
|
|
|
02/27/2005, 09:40 PM
|
#272 |
|
Registered Member
Join Date: Apr 2002
Posts: 196
|
Here's my 240 with Envirotex Lite Faux sand bed, Great Stuff Foam backgrounds and Aragacrete islands with PVC built in to accept framework for aquascaping.
 Jay |
|
|
|
|
02/27/2005, 10:11 PM
|
#273 |
|
Moved On
Join Date: Apr 2004
Location: Staten Island, NY
Posts: 866
|
looks awesome are those 2 powerheads biult into the rock aka foam wall?
Nick |
|
|
|
|
02/28/2005, 12:27 AM
|
#274 |
|
Registered Member
Join Date: Apr 2002
Posts: 196
|
Those are the intakes for the closed loop. They have plugs in them for now while I'm curing the aragacrete.
Jay |
|
|
|
|
02/28/2005, 01:06 AM
|
#275 |
|
Registered Member
Join Date: Mar 2003
Location: Winnipeg,Canada
Posts: 1,287
|
Looks very good! Happy it is working for others

|
|
|
|
 |
|
|


