|
|
 04/29/2007, 12:32 AM
|
#476 |
|
Registered Member
Join Date: Apr 2007
Location: MD
Posts: 87
|
This thread rocks (it took me 3 days to read) thanx to melev for his website witch is a great help (I steal alot of his banwith
 ) and to all that have posted hear have answerd most of my questions. ) and to all that have posted hear have answerd most of my questions.I want to build a sump for my 220g fresh water tank (I know this forum is for marine/reef tanks but I need help and you all have exallent knowlage hear). I was actualy going to make two sumps for it sort of a redundant system in case one went down the other would suport my tank till I could fix it. the size I was going to make it is roughly 29"Lx23"Wx15"H Do I need baffles/bubble traps for fresh water? Also I was going to make an overflow/weir box for my 220g and I was wondering if it need to be a sertin size and how is the bulkhead attached to the overflow box? I think I saw it in hear but I cant find it again. I am useing AcryLite FF and have WO# 3,4, &16 And the sewing pins will work fine for the glueing of the acylic right? I am a little confused as every one is using differnt things for the pin method. Thanx, Allen
__________________
I know I can't spell thanx :) You will be sorry when I'm gone, dead, or armed Current Tank Info: 46g bow front & 220g under constuction Last edited by MightyWarMonger; 04/29/2007 at 01:28 AM. |

|

|
|
04/29/2007, 01:10 AM
|
#477 |
|
Moved On
Join Date: Sep 2002
Location: Ft Worth, Tx
Posts: 43,217
|
Mighty,
 To Reef Central I'm just glad I have enough bandwidth for everyone. Since I've never run a freshwater system, I can't give you any advice. For the overflow, it comes down to how much water you want to drain down from the tank. It can be 2 x 600gph (two 1" bulkheads), or more. |
|
|
|
|
04/29/2007, 01:21 AM
|
#478 |
|
Registered Member
Join Date: Apr 2007
Location: MD
Posts: 87
|
Well I have two mag drve 12 pumps that they say put out 1200 GPH per pump but I think with the height of my system it would be more like a total of 2000 gph I was thinking of useing a 2" drain pipe would the overflow/weir box on you're site http://www.melevsreef.com/acrylics/overflow.html handle that amount of GPH? and how is the bulkhead attached/method used?
Sorry of subject but when I'm done building my 220g tank I want to turn my 46g bowfront into a small reef tank any sugestions on good reading material to reserch on I have never done a marine tank and wish to educate myself a little first. Thanx, Allen
__________________
I know I can't spell thanx :) You will be sorry when I'm gone, dead, or armed Current Tank Info: 46g bow front & 220g under constuction Last edited by MightyWarMonger; 04/29/2007 at 01:28 AM. |
|
|
|
|
04/29/2007, 01:32 AM
|
#479 |
|
Moved On
Join Date: Sep 2002
Location: Ft Worth, Tx
Posts: 43,217
|
Allen,
I have a feeling that overflow box might have a hard time keeping up with a 2" drain. Maybe a bigger version would pull it off, or James might have a suggestion. Regarding what to read, check out this thread, and especially the book I linked: http://reefcentral.com/forums/showth...readid=1109284 |
|
|
|
|
04/29/2007, 02:14 AM
|
#480 |
|
Registered Member
Join Date: Apr 2007
Location: MD
Posts: 87
|
Well it doesnt have to be 2" I was just trying to make sure the overflow box could handle the GPH my pumps put out
I have no clue as to what size it realy needs to be.I also still need to know how to atach the bulkhead to the bottom of the overflow box. Thanx, Allen
__________________
I know I can't spell thanx :) You will be sorry when I'm gone, dead, or armed Current Tank Info: 46g bow front & 220g under constuction |
|
|
|
|
04/29/2007, 02:23 AM
|
#481 |
|
Moved On
Join Date: Sep 2002
Location: Ft Worth, Tx
Posts: 43,217
|
A Mag 12 pushing up 4' high using 1.5" plumbing will produce roughly 1000gph, I would expect.
The overflow box will have to be drilled to accommodate the bulkhead(s). Once the holes are drilled and the edges smoothed carefully, you screw the bulkhead (flange and O-ring inside, nut on the outside) hand tight. Then connect your plumbing to that, such as this way: 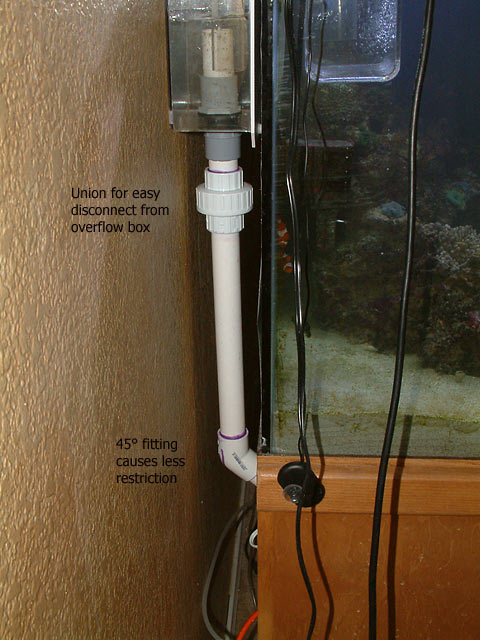
|
|
|
|
|
04/29/2007, 11:42 AM
|
#482 |
|
Registered Member
Join Date: Apr 2007
Location: MD
Posts: 87
|
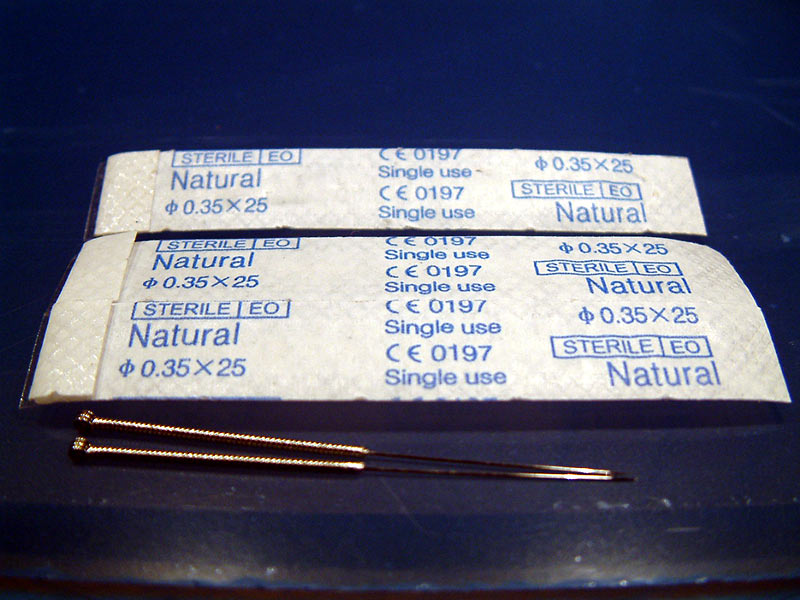
awsome..... melev are you still useing the acupuncture needls for the pin method? I was thinking of ordering some 38 gauge 15mm/0.5inch 18mm & 36 gauge 15mm/0.5inch 20mm will these work ok? Oh and I bout that book slow mail
 Thanx again Allen
__________________
I know I can't spell thanx :) You will be sorry when I'm gone, dead, or armed Current Tank Info: 46g bow front & 220g under constuction Last edited by MightyWarMonger; 04/29/2007 at 12:40 PM. |
|
|
|
|
04/29/2007, 01:25 PM
|
#483 |
|
Moved On
Join Date: Sep 2002
Location: Ft Worth, Tx
Posts: 43,217
|
Yes, I still use them. I think they are .35 and about 2" long, maybe slightly less.
Slow mail? You just ordered it yesterday, on a Saturday. By next Friday you'll be so busy reading you won't post. 
|
|
|
|
|
04/29/2007, 02:49 PM
|
#484 |
|
Registered Member
 Join Date: Sep 2005
Location: Jackson, MS
Posts: 1,029
|
Hey Marc,
Is that .35mm or 35 gauge or something else?
__________________
Michael Current Tank Info: 195G (125G Display, 70G Sump) |
|
|
|
|
04/29/2007, 03:15 PM
|
#485 |
|
Registered Member
Join Date: Sep 2006
Location: Ca
Posts: 1,310
|
Hi Zeph,
You have a very nice cut from the table saw. What kind of blade you use on the table saw? How fast you feed it thru the blade? Shin. |
|
|
|
|
04/29/2007, 03:30 PM
|
#486 |
|
Moved On
Join Date: Sep 2002
Location: Ft Worth, Tx
Posts: 43,217
|
|
|
|
|
|
04/30/2007, 08:42 AM
|
#487 |
|
Registered Member
Join Date: Sep 2005
Location: Jackson, MS
Posts: 1,029
|
Hmm, I see. Well maybe I should ask a more general question. I'm working with 1/2" cast material and getting joints that are completely clear about 80% of the way across the joint. For some reason though, at either edge the joints are developing a small line of bubbles as they cure for the first hour or so. And, I just can't figure out what the cause is. My pins are 0.011 inches (28 gauge steel wire), the joints are square (the line of bubbles occurs on both edges, not just one), I'm using Weld-On #4 and letting the joints soak for about 30-35 seconds. Also, the bubbles occur along the entire length of the joint, not in isolated areas, so it isn't a shimming issue either. Help from anyone would be much appreciated. I'd take a picture for you, but my fiance stole my camera.
__________________
Michael Current Tank Info: 195G (125G Display, 70G Sump) |
|
|
|
|
04/30/2007, 12:41 PM
|
#488 |
|
Moved On
Join Date: Sep 2002
Location: Ft Worth, Tx
Posts: 43,217
|
I think as it cures, it is drawing in air. Some have chosen after gluing to wait a short duration after the pins have been pulled to apply another run of Weld-On along the seam.
It happens to me as well when working with thicker material. One day I want to visit James and soak up everything I can to do better work. |
|
|
|
|
04/30/2007, 12:57 PM
|
#489 |
|
Registered Member
Join Date: Sep 2005
Location: Jackson, MS
Posts: 1,029
|
That's what I think it is too. I tried applying a second bead outside the joint, but it didn't really seem to help that much. I applied it right as I noticed most of the excess solvent evaporating away from the fillet on the outside of the joint. Does that sound like a good time to do it? Maybe my ambient conditions aren't right and the solvent's evaporating too quickly? Maybe James will have a suggestion. So far, I'm just gluing up the sump and some practice pieces, so not too worried about appearances, but I really would like the joints on the display to look better, and I'm going to start gluing it up very soon.
__________________
Michael Current Tank Info: 195G (125G Display, 70G Sump) |
|
|
|
|
04/30/2007, 01:07 PM
|
#490 |
|
Moved On
Join Date: Sep 2002
Location: Ft Worth, Tx
Posts: 43,217
|
He's the expert, that's for sure.
|
|
|
|
|
04/30/2007, 01:14 PM
|
#491 |
|
Registered Member
Join Date: Sep 2005
Location: Jackson, MS
Posts: 1,029
|
I appreciate your help too Marc. At least we're both thinking along the same lines.

__________________
Michael Current Tank Info: 195G (125G Display, 70G Sump) |
|
|
|
|
04/30/2007, 05:41 PM
|
#492 | |
|
Registered Member
Join Date: Jun 2003
Posts: 4,230
|
Quote:
What brand of acrylic is it? Also understand there can be variations from batch to batch from the same company. Is the router/jointer blade *absolutely* straight? Test the acrylic edge by placing a straightedge on it to see if it wobbles. Is the (horizontal) material warped? Same thing, put a straightedge on it to see if it wobbles. Sometimes the solvent is just evaporating too fast (this is why I like mixing my own) Even with all that, there are still mysteries for me too. I've never met anyone nor ever heard of anyone who can get perfect joints all the time with every material, just doesn't happen and I'm no exception by any means. Extruded acrylic is fairly simple since it muches out very easy, might get an ooze bubble but the joint will be clear. Cast can have fairly extreme variations in mole wt which helps determine the solvent used, or even if it will glue well at all. Some cell cast acrylics simply don't want to glue well. Pray to the plastic Gods, spend a little time alone with the material, drink a beer, toast the plastic, talk to the plastic, pet it a little, and explain the situation. Trust me on this, it's my routine everytime we do a $10k glue joint. If you think I'm a bit superstitious, you'd be right HTH, James |
|
|
|
|
|
04/30/2007, 06:15 PM
|
#493 |
|
Registered Member
Join Date: Sep 2005
Location: Jackson, MS
Posts: 1,029
|
Hey James,
Acrylite GP I'll check the bits (or their corresponding cuts), but brand new whiteside straight cutters and flush cutters. Materials good and flat. Using foam and shims where necessary, but I'm using my router table to glue on and it's dead level. I just checked it last night before I started gluing and shimmed it a touch to get it perfect (it was sagging about 0.02" across 4'). Any tips on slowing down the solvent's evaporation? It's Weld-On 4. Something as simple as raising or lowing the ambient temp maybe? Maybe lengthen the soak time a bit before "dropping" the top piece? Could get more dissolved acrylic mixed in with the solvent making it evaporate slower if I wait a little longer?
__________________
Michael Current Tank Info: 195G (125G Display, 70G Sump) |
|
|
|
|
04/30/2007, 07:11 PM
|
#494 |
|
Registered Member
Join Date: Jun 2003
Posts: 4,230
|
The best way I know of is to mix other solvents in with it, acetic acid, ethylene dichloride, trichloroethylene, etc. If you let it soak too long, the solvent starts to set prior to dropping it which doesn't wrok too well. If you let it soak too long and the solvent starts to set (with the acrylic still raised), the on.y way to get it to squeeze out is by used of clamps which runs the risk of squeezing out too much. There is also a debate as to whether there can be too much acrylic in solution for long term strength. Ie, if you let it soak too long, is this actually good or bad?
Raising and lowering ambient temp *can* work sometimes but not necessarily, cold acrylic does not glue well strengthwise as the joints end up kinda brittle. WO4 and all the IPS line has some pretty wide tolerances so knowing exactly what you have can be tough as the ratios can be all over the place and still be within tolerance. Wishing I had more answers, James |
|
|
|
|
05/01/2007, 03:11 PM
|
#495 |
|
Registered Member
Join Date: Jan 2007
Location: Mobile, Alabama
Posts: 250
|
When you are building a sump in what order do you glue the sides (Front , right side, ect.) I am trying to figure out in what order should I weld each side together.
Thanks in advance
__________________
GLORY! GLORY! Man United Click the Red House. Current Tank Info: 20T soon to be 150 |
|
|
|
|
05/01/2007, 03:15 PM
|
#496 |
|
Registered Member
Join Date: Jun 2003
Posts: 4,230
|
Generally, I do the front and ends first along with any baffles, flip it over and glue to the back, then glue this assembly to the top, then do the bottom.
James |
|
|
|
|
05/02/2007, 12:41 AM
|
#497 | |
|
Moved On
Join Date: Sep 2002
Location: Ft Worth, Tx
Posts: 43,217
|
Quote:
|
|
|
|
|
|
05/02/2007, 06:59 AM
|
#498 | |
|
Moved On
Join Date: Nov 2004
Location: Cape May County, NJ
Posts: 2,067
|
Quote:
|
|
|
|
|
|
05/02/2007, 01:05 PM
|
#499 |
|
Moved On
Join Date: Sep 2002
Location: Ft Worth, Tx
Posts: 43,217
|
Hey Rich! You thread stalker you.
|
|
|
|
|
05/02/2007, 03:56 PM
|
#500 |
|
Moved On
Join Date: Nov 2004
Location: Cape May County, NJ
Posts: 2,067
|
Hey Marc!
This is one of the only two active subscriptions I have going right now. The other if the Acrylic Fabrication Questions thread. You, James and the rest of the contributions are a real treasure of information. Last edited by Zephrant; 05/02/2007 at 11:43 PM. |
|
|
|
 |
|
|