
|
|
 09/19/2010, 07:36 AM
|
#326 |
|
SPS Slave
 Join Date: Aug 2003
Location: Richmond, VA
Posts: 3,388
|
We figured many of you might be interested in an update since our disaster.
The generosity and kindness of our local reef club is overwhelming... "adversity reveals character" they say, and we're certainly seeing that in spades with the way so many have reached out with moral support or physical support! Much has happened since the flood on Monday 9/13/10... We put everything into temporary holding vats, the 125g sump, and the 75g frag/refugium tank. We did a bunch of re-plumbing and temporary lighting to keep the livestock alive as best can. Then our friend Rick really saved the day by offering up his awesome 350g Oceanic tank for us to use. Rick - you and Randie are the BEST! Terry worked the phones and the WWW like nobody's business early in the week to pull together a team of folks to help us move Rick's behemoth tank over to our garage. The tank is 900 lbs if an ounce! For sure, we needed every bit of 8 strong men to move it. Our good friend LB brought the truck and trailer that allowed us to carry both the tank and stand. Thanks, LB! I'm sure I'll miss several if I attempt to list out everyone who has helped us over this very trying week, but thanks to Cody, Jon, Bobby, Rob, David, Matt, Chuck & Milissa, Tricia & George, Mark, Andy, Joe, my goodness the list goes on and on! Here's some pics from the move night: Getting the big ol' 350 leveled up! (We shimmed the stand with acrylic slices) - the guys gave me hell for my safety glasses LoL! 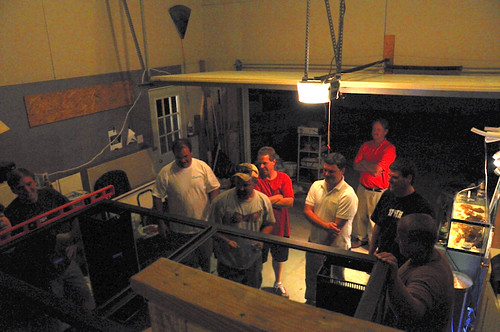 David explains some orientation theory: 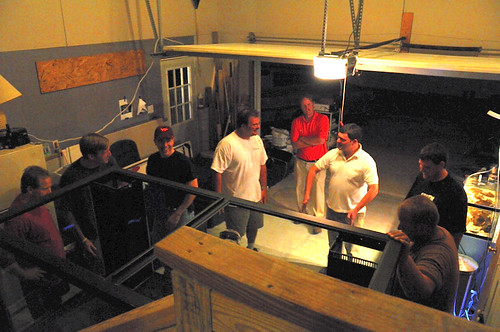 LB being a ham waving to the camera!  And the fruits of our labor today... got the 350 plumbed into the system, filled up, and much of the coral moved over. Joe helped with bringing over the 150g water vat, and getting the canopy from the display tank installed: 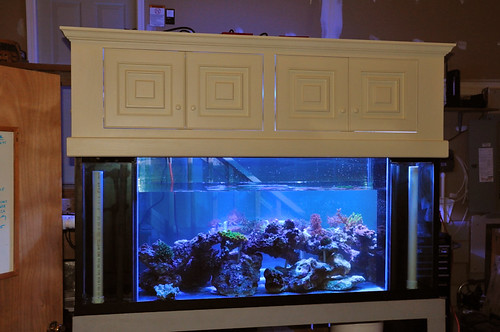 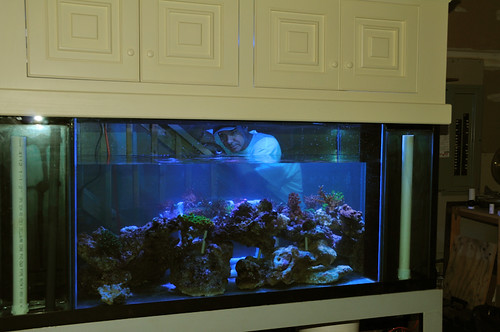 Thanks again for all the help everyone! Honestly, there have been some very dark moments this week, where the thoughts of giving up on this hobby have entered into our minds and our conversations, but it is the support of you all that gives us the lift we need to keep going... THANKS!
__________________
- Mike & Terry "Less technology, more biology ... indeed." - Gary White Current Tank Info: 200g temp garage tank |

|

|
|
09/19/2010, 04:02 PM
|
#327 |
|
Registered Member
Join Date: Jan 2006
Location: Toledo OH
Posts: 2,466
|
That is awesome the tragedy has thus far worked out fairly well

|
|
|
|
|
09/22/2010, 08:54 PM
|
#328 | |
|
SPS Slave
Join Date: Aug 2003
Location: Richmond, VA
Posts: 3,388
|
Quote:
Thankfully our insurance is going to cover replacement of our hardwood floors, electrical repairs, and insulation replacement under our house. Once we get repairs out of the way, things should start looking much better. 
__________________
- Mike & Terry "Less technology, more biology ... indeed." - Gary White Current Tank Info: 200g temp garage tank |
|
|
|
|
|
09/23/2010, 06:05 AM
|
#329 |
|
Team RC Member
Join Date: Jul 2005
Location: houstonia
Posts: 7,989
|
That's great news, Mike. Glad to hear that the insurance is stepping in... I made sure our policy was written to cover any damage from the tank just for that reason.
Do you have any more elaboration on why the tank seam let go?
__________________
-Chris- You don't win friends with salad. "Look! They're trying to learn for free!" ... "Use your phony guns as clubs!" Current Tank Info: rectangluar? wet? |
|
|
|
|
09/24/2010, 04:57 PM
|
#330 |
|
Registered Member
Join Date: Jul 2005
Location: Vancouver, WA.
Posts: 456
|
Glad to hear that a most of the livestock are in a safe home.
This reminds me of a simalar issue that happened to me with a 210 gallon (All glass/Aqueon) tank a few years ago. After the tank was running for a week or so, one of the bottom seems gave out and completely drained in about 10 mins. Luckily I was home and was able to save thousands in livestock by moving to an empty tank. The main culprit was most likely the stand not being 100% level. But mind you it was only off less then an 1/8 of an inch. Or it could have been too much LR on one area of the glass. After that disaster I decided to go acrylic on my last 2 tanks. I'd rather have scratches in my tanks then water on my floors.  My 2 cts is: when Marineland gives you a replacement tank. Double check the level all the way around on your stand. Good luck and glad you have not lost interest in this wonderful hobby! |
|
|
|
|
09/25/2010, 09:40 AM
|
#331 | ||
|
SPS Slave
Join Date: Aug 2003
Location: Richmond, VA
Posts: 3,388
|
Quote:
Quote:
In terms of what may have caused the failure, there's nothing definitive. The stand is level. The installer took great care to ensure that the stand and tank were spot-on...if it was off, it was imperceptible - certainly was less than 1/16", as we have had many large tank veterans take a look at it. In terms of stand structural integrity, we are going to up our game. Four months ago, an engineer Paul posted on our thread about some concerns he had. Once we showed better pictures, he agreed that the stand looked sufficient. This week, we had the quartz counters, display tank, stand, and cabinets removed. It's been hard watching all that work come un-done. However, since we now have the rare opportunity to revisit our design, We'd like to solicit more opinions from you guys. How can/should we improve upon the stand design? Plywood on the top? 2x6 for length-wise beams?
__________________
- Mike & Terry "Less technology, more biology ... indeed." - Gary White Current Tank Info: 200g temp garage tank |
||
|
|
|
|
09/25/2010, 11:04 AM
|
#332 |
|
Team RC Member
Join Date: Jul 2005
Location: houstonia
Posts: 7,989
|
I plan on 2x8s doubled up for my lengthwise beams (however after I jointed them, they are only about 6.75" tall, instead of 7.25"), though I won't have any middle support along the span. I also intend to stick plywood on top once it's built.
__________________
-Chris- You don't win friends with salad. "Look! They're trying to learn for free!" ... "Use your phony guns as clubs!" Current Tank Info: rectangluar? wet? |
|
|
|
|
09/26/2010, 10:04 PM
|
#333 |
|
Registered Member
Join Date: Sep 2009
Location: DeSoto, MO
Posts: 3,813
|
Holy frijoles, I just read this whole thread over the coarse of last night and today and didn't see this coming?! So sorry your tank sprung, glad to hear your local/out of town reefers were there to help. Glad to hear you're not getting out. I can't imagine how I'd feel if my tank popped on me. I wish you the best on your re-build and will be following along.
__________________
-Daniel- Love, grease and chicken peace! Chicken are people too. Current Tank Info: 29g since March 2012 |
|
|
|
|
09/26/2010, 10:58 PM
|
#334 |
|
Moved On
Join Date: Sep 2010
Posts: 138
|
Sorry to hear about your tank hope to see it back together soon.
|
|
|
|
|
09/29/2010, 07:04 PM
|
#335 | |||
|
SPS Slave
Join Date: Aug 2003
Location: Richmond, VA
Posts: 3,388
|
Quote:
Quote:
Quote:
 A little update. As we mentioned earlier, we've gotten the display all torn out. The last two weeks has been non-stop talking to adjusters & contractors, moving furniture, installing fans and de-humidifiers, taking care of the temporary tank/system, and wondering "why"??! Today, the flooring contractors came and ripped out the floors: 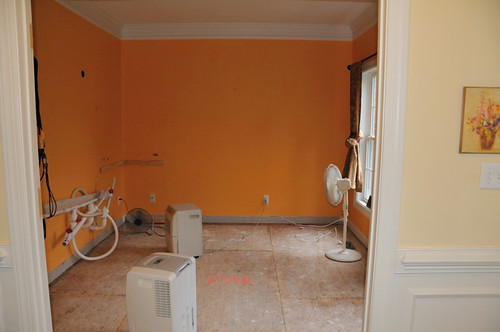 kinda sad, but kinda happy too.  On the one hand, it really sucks to see all that hard work undone, but this also kinda helps put some "turning the corner" into our days... On the one hand, it really sucks to see all that hard work undone, but this also kinda helps put some "turning the corner" into our days...We were thinking at one point that perhaps we could get away with just running the fans and letting the floors and crawlspace dry out. Not a chance. When the floor came up today, there were some very wet spots under there. The flooring contractors have a moisture meter they use to measure moisture on the subfloors. A measurement of 8 was "acceptable". In the fish room, we were measuring 16+, and 12+ in the adjoining hallway and bathroom (see post #15 for floorplan). The water had run quite a ways under the hardwood flooring in addition to pouring down to the crawlspace. Here's under the house - yep, fans and dehumidifiers under there too... Let us just say that large tanks are awesome, until they leak and then they are big trouble. We vacuumed many, many gallons of salt water up from under the house and pulled out about 300 sq ft of insulation - that's NO FUN.  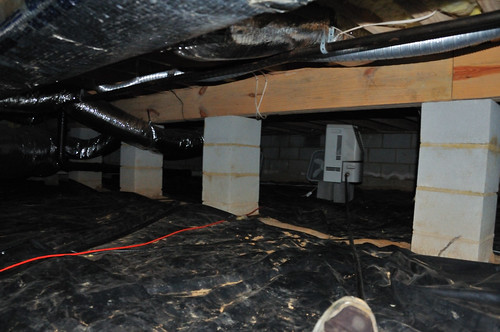 Now comes the waiting. It will probably be 7-10 days of running the fans, A/C, and dehumidifiers full-tilt before the new floors can be installed. In the meantime, we'll be focusing on strengthening the stand, ordering a newer better display tank, and reinforcing the floors and supports. Out in the garage, we've been working hard to keep the "loaner 350" (Thanks Rick!!) up and running, and getting it tuned in so we minimize our livestock losses. Lots of work there and Terry has been a real trooper to help with top-off, maintaining water chemistry, manually running lights, etc. You guys can just imagine having to essentially switch over to manual mode for a set up of this size and complexity! Anyway, here's a shot of the 350: 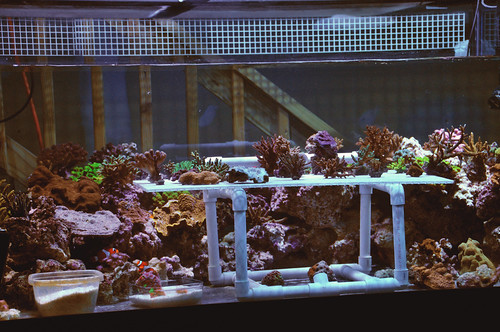 Thanks for watching!
__________________
- Mike & Terry "Less technology, more biology ... indeed." - Gary White Current Tank Info: 200g temp garage tank |
|||
|
|
|
|
09/29/2010, 07:17 PM
|
#336 |
|
Coral Curmudgeon
Join Date: Dec 2001
Location: western NC
Posts: 1,663
|
Just a thought.....
Mike -
If you are thinking of beefing up the structural rigidity for your tank, you might want to look at acquiring some "LVL" material from a lumber yard. They often have some which are left overs, or damaged on one end that you can buy cheap. LVL is "Linear Veneer Lumber. It is incredibly strong, and dense. Probably used for the main beam in you house or for some critiacla applications in your home. It is comprised of thin veneers of wood, heat and pressure glued with epoxy-phenolic adhesive for an engineered wood beam that is often used where steel used to be the choice. it will not rot ( In our lifetimes anyway...) and can be worked with conventional wood-working tools. I recommend pre-drilling tho. Just makes for neater install. MUCH stronger than any 2x lumber. Just for peace of mind....... T
__________________
No....really honey, it was a gift! Current Tank Info: 700 gallon combined reef/frag systems - 650gal Cichlid system |
|
|
|
|
09/29/2010, 08:36 PM
|
#337 |
|
Registered Member
Join Date: Jan 2010
Location: Canadia
Posts: 4,276
|
"Laminated" Veneer Lumber. Basically it is oriented wood strands in resins. Super strong.
Sorry to be anal. Dave.M
__________________
My Gawd! It's full of corals! Current Tank Info: None. Nil. Zip. Nada. |
|
|
|
|
09/29/2010, 08:48 PM
|
#338 |
|
Coral Curmudgeon
Join Date: Dec 2001
Location: western NC
Posts: 1,663
|
No problem Dave....but I think "Laminated" applies only in Canada - and is a direct reference to what happens when one drinks WAY to much beer
 . ."Linear veneer" is NOT "oriented strand board ( OSB for us in the south). But in either case - I think Mike gets the point! T
__________________
No....really honey, it was a gift! Current Tank Info: 700 gallon combined reef/frag systems - 650gal Cichlid system |
|
|
|
|
09/29/2010, 11:50 PM
|
#339 |
|
Registered Member
Join Date: Jan 2006
Location: Yukon, Oklahoma
Posts: 1,908
|
Hi Mike, Sorry to hear of the sad situation you have with the leaking tank. What a mess water can make in a house. But the good news is it looks like you will be back better than before. But again, I thought what you had was nice before. Glad you have so many locally that can help.
__________________
Doug G. "We can't help everyone, but everyone can help someone" Ronald Reagan (Eagles) LIFE'S BEEN GOOD Current Tank Info: 300 Gal starfire Reef Tank, SPS, LPS and zoas, 3-LumenMax MH fixtures driven by 250 watt icecap's and Radium bulbs, 2-Tunze 6105 controllable pumps with 7095 multi controller, 100 gal sump/refugium... 100 gal tank with T-5's |
|
|
|
|
09/30/2010, 07:08 AM
|
#340 |
|
Team RC Member
Join Date: Jul 2005
Location: houstonia
Posts: 7,989
|
corals are still looking good in the 350... hope they continue to thrive even through all the changes.
__________________
-Chris- You don't win friends with salad. "Look! They're trying to learn for free!" ... "Use your phony guns as clubs!" Current Tank Info: rectangluar? wet? |
|
|
|
|
10/03/2010, 02:47 PM
|
#341 | ||||
|
SPS Slave
Join Date: Aug 2003
Location: Richmond, VA
Posts: 3,388
|
Quote:
Quote:
Quote:
Quote:
___________________________ OK, here's an update on the renovations and rebuilding efforts. The work in the house continues. The sub flooring is drying out. We've got two dehumidifiers in the house with several fans targeting the areas that got the most water. There is also a dehumidifier and several fans underneath the house to pull out all the moisture from under there. We are going to remodel the laundry room to make room for the display tank electronics. The idea is to move all the electrical outlets, lighting ballasts, timers, Tunze controllers, etc., into the laundry room directly behind the tank, and well out of the way of any potential future splashes, leaks, or spills. More on that later as that work progresses. The other big project this weekend was doing the structural improvements under the house. We didn't have any real indications that the floor had deflected or contributed to the tank failure, but now we are paranoid and are going to take many more steps to increase safety. Thanks to Paul for these incredibly informative links (must read for anyone with large tanks in wood frame houses): Residential Wood Framed Floors and Aquarium Weights Raising A Slightly Sagging Floor The location of our tank and stand is optimal for using the existing structure of the house to support the load. The wall that the stand is up against is directly over a main support girder of the house, and the stand is perpendicular to the 2x10 floor joists, crossing at least 6 joists. Nevertheless, some engineering friends have chimed in and recommended that we add some additional structure anyway. So off to Lowe's and grab the materials - we're going to add a new 4x6 support beam, held up with two 36" screw jacks and concrete pilings. We will also add 2x8 pine blocks in-between the joists to minimize torsional buckling of the joists. Some steel anchor straps and some misc anodized lag screws round out the order: 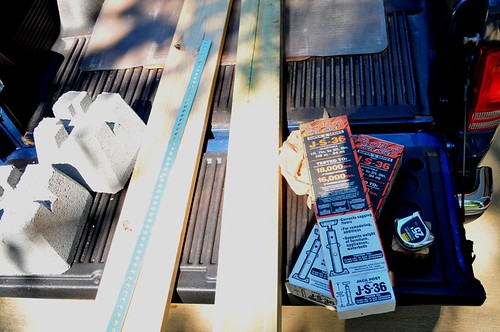 OK, carry all this heavy crap under the house (GRUNT) - that's more than a workout! The first thing to do is locate precisely where the stand and tank are going to sit over the floor joists. Measure it up, and mark it. The important thing for our application is to add additional support (beam) under the joists that are carrying the load of the tank and stand. We'll come out about 3 feet from the wall where that big girder is, and put our new beam there. Once we've marked where the beam will go, we fashioned some steel anchor straps and hang the beam up there in place: 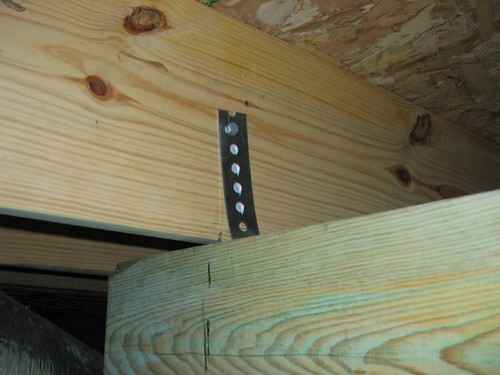 Next, we do a little test placement of the concrete pilings and screwjacks to find out where our holes for the pilings will be. Then we dig the holes (with a thimble, since we can't use a shovel under there): 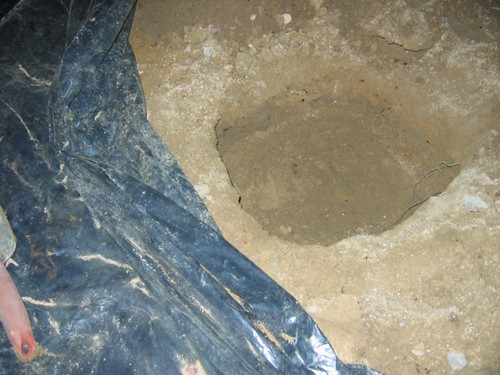 Place the concrete pilings and make sure they are level. 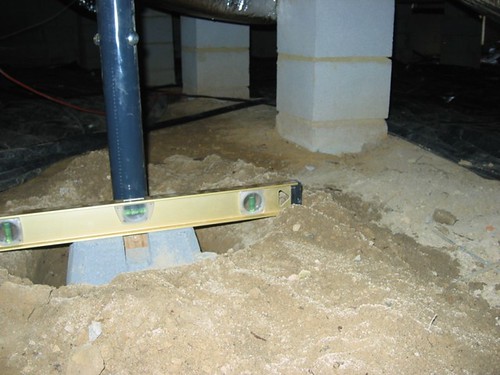 Next, we can put the screw jacks on the concrete pilings and line them up. It is absolutely critical that the jacks are plumb!! 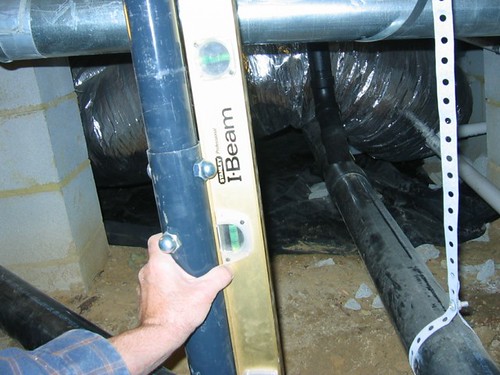 Now that the jacks are level and plumb, we can take loose our temporary anchor straps, and lift the beam up into position: 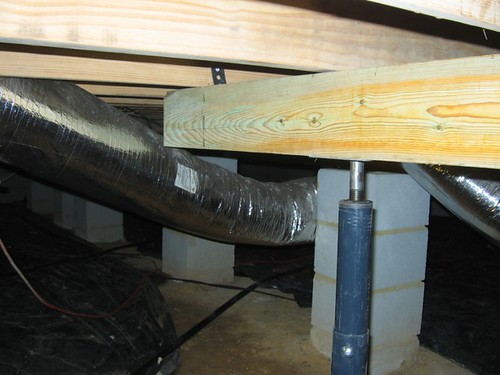 Now that some force has been applied to the jacks, we let that sit a while and go back to ensure everything is still level and plumb. Once we're happy with that, we fill the holes in around the pilings and compact the soil down nice and tight: 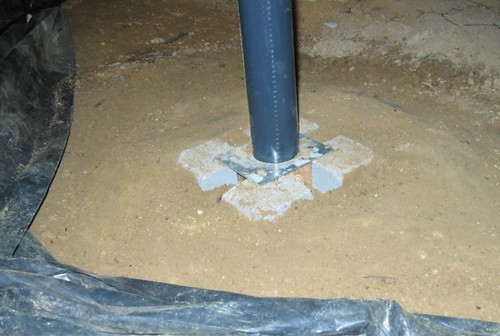 This is starting to look like we're getting close to being done! Next up is to use the lag screws and fasten the jack plates to the beam: 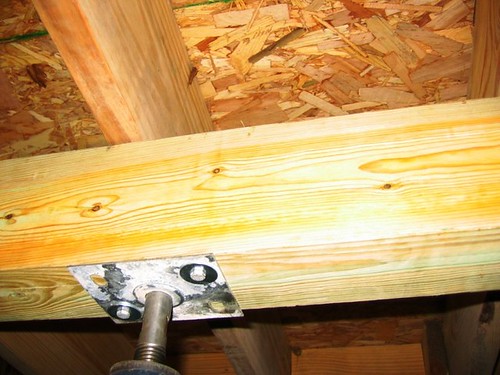 And here's a shot showing the beam elevated into position on both screw jacks: 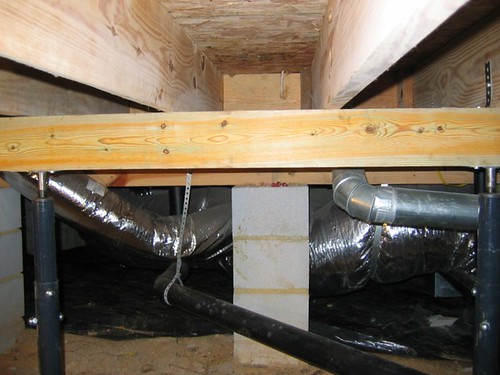 The final step was to install the 2x8 blocks between some of the joists. This helps with spreading load between the joints, and also reduces their ability to twist: 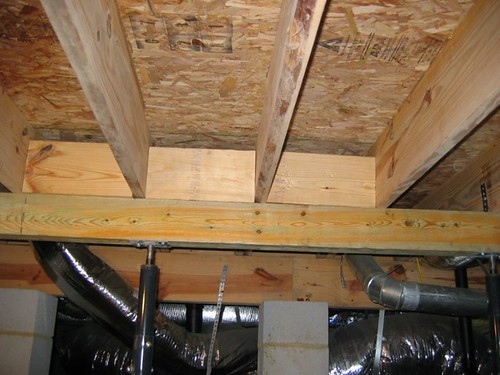 And there we have another gazillion pounds of load-bearing capacity or "safety factor" as the engineers like to say!!
__________________
- Mike & Terry "Less technology, more biology ... indeed." - Gary White Current Tank Info: 200g temp garage tank |
||||
|
|
|
|
10/03/2010, 02:58 PM
|
#342 |
|
Coral Curmudgeon
Join Date: Dec 2001
Location: western NC
Posts: 1,663
|
Sorry for my adding confusion of the vernacular mistake Dave and Mike - glad you looked up Glulam, I should have included that in my attempt to explain what I meant...Good job!
T
__________________
No....really honey, it was a gift! Current Tank Info: 700 gallon combined reef/frag systems - 650gal Cichlid system |
|
|
|
|
10/04/2010, 05:17 AM
|
#343 |
|
Registered Member
Join Date: Jan 2005
Location: Alpharetta Ga
Posts: 1,093
|
Lvl is strong until it gets wet, nothing rots faster! I would wrap it if you have any concerns of it getting wet!
|
|
|
|
|
10/04/2010, 06:23 AM
|
#344 |
|
Coral Curmudgeon
Join Date: Dec 2001
Location: western NC
Posts: 1,663
|
I don't believe you are thinking about the same beam material we are talking about. These are purpose built for structural support. Using waterproof glues. Design to hold roofs anf loor up for the life of the house.
They do not rot when they get wet any more than does pressure treated lumber. T
__________________
No....really honey, it was a gift! Current Tank Info: 700 gallon combined reef/frag systems - 650gal Cichlid system |
|
|
|
|
10/04/2010, 06:34 AM
|
#345 |
|
Registered Member
Join Date: Jan 2010
Location: Canadia
Posts: 4,276
|
teesquare is correct. Oriented strand board (OSB) will fall apart when it gets wet. Laminated veneer lumber (LVL) will not.
Dave.M
__________________
My Gawd! It's full of corals! Current Tank Info: None. Nil. Zip. Nada. |
|
|
|
|
10/04/2010, 06:42 AM
|
#346 |
|
Coral Curmudgeon
Join Date: Dec 2001
Location: western NC
Posts: 1,663
|
Thanks Dave - I had confused the issue before, and was hoping that this time I said it correctly
 T
__________________
No....really honey, it was a gift! Current Tank Info: 700 gallon combined reef/frag systems - 650gal Cichlid system |
|
|
|
|
10/04/2010, 07:34 AM
|
#347 |
|
Registered Member
Join Date: Jan 2010
Location: Canadia
Posts: 4,276
|
No worries. If I had a dollar for every time I got things wrong ...
Dave.M
__________________
My Gawd! It's full of corals! Current Tank Info: None. Nil. Zip. Nada. |
|
|
|
|
10/04/2010, 09:39 PM
|
#348 |
|
Registered Member
Join Date: Apr 2009
Location: Salisbury, NC
Posts: 192
|
I had been following your thread. I planned on getting a 300dd from marineland also..... Not so sure I want to now. Although yours is the first failure of them I have read about still not happy with how quickly you had a problem happen especially since the tank line has not been out that long....
When you get it all back togather will you be going with the sane tank? I planned on bracing my floor identically to yours how you have it now! Looking forward to the rebuild however a I'm sure it will be as great a before!
__________________
Click the little red house for my build thread. Current Tank Info: Building a 75 Gallon setup...... |
|
|
|
|
10/11/2010, 06:49 PM
|
#349 |
|
Registered Member
Join Date: Jan 2005
Location: Alpharetta Ga
Posts: 1,093
|
The second floor of my house was on no less than 10 jacks for months as they replaced all of my LVL beams. The rot was so bad I could put my hands through it.
If you are comparing them to OSB then sure, but let's face it particle board is exactly raising the bar... http://www.coastalcontractor.net/article/217.html The last paragraph speaks to the same experience I have had, mine however I'm sure was more costly... |
|
|
|
|
10/11/2010, 07:18 PM
|
#350 |
|
Coral Curmudgeon
Join Date: Dec 2001
Location: western NC
Posts: 1,663
|
reefkeeps-
Sorry to hear of your troubles. I think that, just like every other aspect of construction, there are materials which are suitable for a given use in one region of the country, but - not in another. Moisture, and moisture measured as relative humidity may be ( in this case) the key. Relative humidity is "relative" to temperature and this key in determining dewpoint. Additionally - from the pictures in the link, it apprears that the discussion is keying in on the use of a product that I have not ever ( nor would I reccomend) used. It does appear to be little more than particle board. The LVL beam that I am familiar with are not made this way, and are holding up houses in this area ( which has very similar weather to where Mike is) and have been doing so for several years. But - they are not eposed to the salt laden sea ir as in the article either...But it is a good article - and I think I will go make some "inspections for safety sake!  One thing I would be curious about your situation reefkeeps: Do you have a hygrometer in your house for tracking humidity? I am curious about whether the moisture/salt air may be the issue with the product you had problems with ? In any case - it does seem a plus to use pressure treated per the linked artcicle. Good input! T
__________________
No....really honey, it was a gift! Current Tank Info: 700 gallon combined reef/frag systems - 650gal Cichlid system |
|
|
|
 |
|
|


