
|
|
 01/14/2018, 08:25 PM
|
#26 | |
|
Registered Member
Join Date: Oct 2005
Location: Spokane, WA
Posts: 416
|
Quote:
|
|

|

|
|
01/15/2018, 08:49 PM
|
#27 |
|
Registered Member
Join Date: Oct 2005
Location: Spokane, WA
Posts: 416
|
Because I've had a few acrylic aquarium dosing containers start leaking at the bottom seam after just a year, I forced myself to grab some over built containers. I could've sourced some more reliable options that were much more cost conscious, but something tells me these won't cause any down road headaches. If I'm being honest, I also wanted a match for the rest of my setup.
Once past the price, it's easy to see that Royal Exclusiv builds some hefty stuff. The kind of equipment that lasts decades. The lids are beefy chunks of milled pvc and have a large straw that dips deep into the container. The thick clear cylinder is threaded to accept the cap and leads to another even bigger chunk of pvc at the bottom. The base has it's own well thought out recession carved to ensure all liquid is used for dosing. I imagine the CNC machine was busy for awhile crafting these and I keep telling myself that quality things payoff in the long run.  Did I mention it will match the rest of the filtration setup in the cabinet? I'm really excited to get the sump plumbed and running. 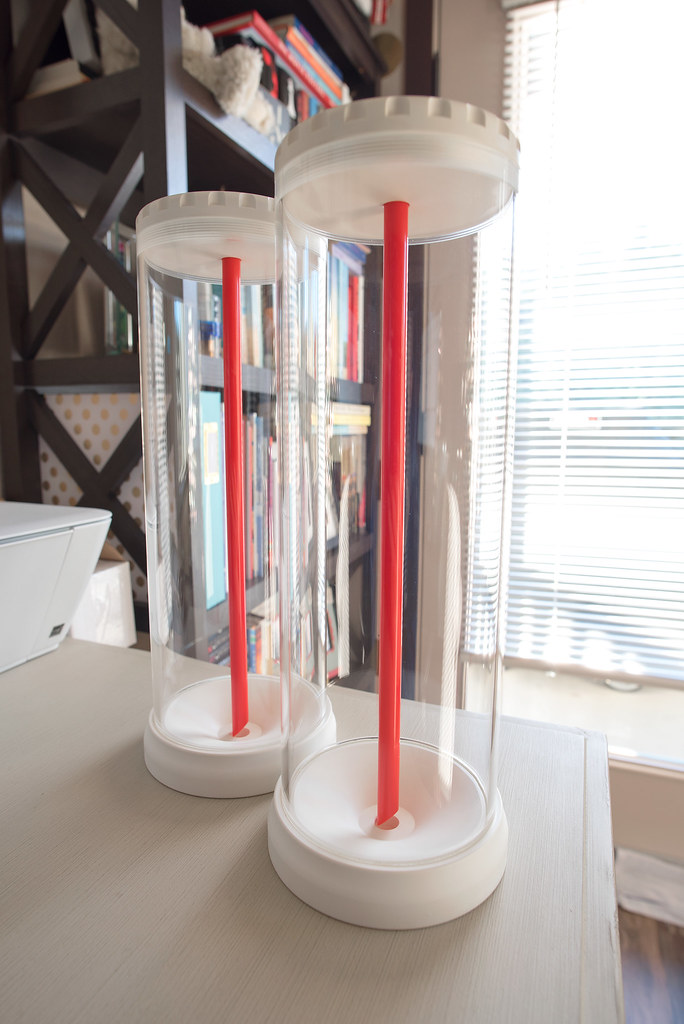 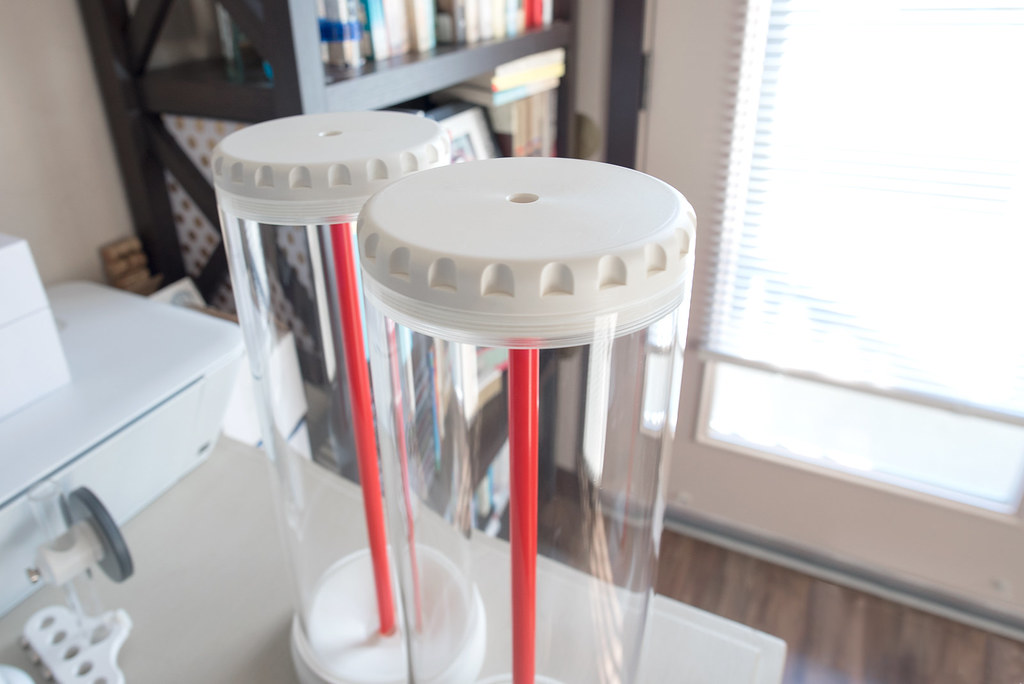 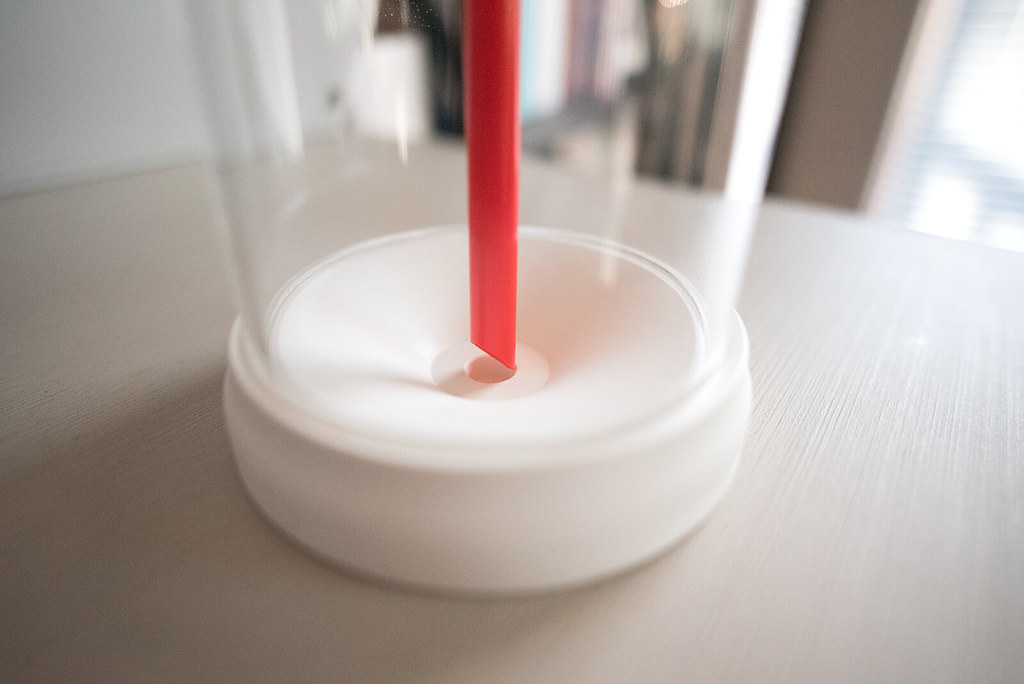 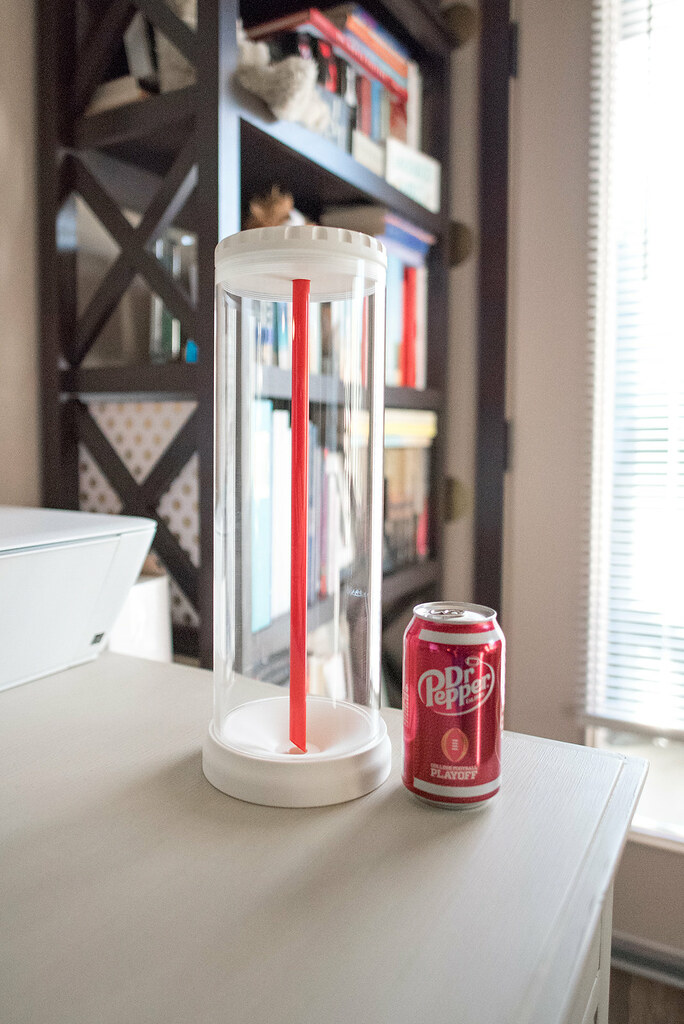
|
|
|
|
|
01/16/2018, 08:26 PM
|
#28 |
|
Registered Member
Join Date: Nov 2008
Location: Raleigh, NC
Posts: 601
|
Wow! I love your attention to detail. I plan on eventually keeping a peninsula style reef as a room decider. Good luck with your build, jumping on for the ride!
__________________
"Before you swim you've gotta be okay to sink..." Current Tank Info: Currently setting up a Red Sea 625 XXL |
|
|
|
|
01/16/2018, 10:26 PM
|
#29 |
|
Registered Member
Join Date: Sep 2015
Location: Mesa Az
Posts: 771
|
Making popcorn...this is going to be good.
__________________
Tank history 29g tropical ,55g cichlid tank, 20H softy reef, 29g mixed reef, 20H brackish goby & puffer tank, 55g mixed reef, 6g Nanocube softy lps reef, 40B sps reef, 75g sps reef, 75g sps reef in bu Current Tank Info: 75g sps reef build in the works. |
|
|
|
|
01/16/2018, 11:19 PM
|
#30 |
|
Registered Member

Join Date: Dec 2007
Location: Mississippi
Posts: 61
|
Beautiful set up. Following
|
|
|
|
|
01/16/2018, 11:43 PM
|
#31 | |||
|
Registered Member
Join Date: Oct 2005
Location: Spokane, WA
Posts: 416
|
Quote:
Quote:
Quote:
|
|||
|
|
|
|
01/30/2018, 08:49 PM
|
#32 |
|
Registered Member
Join Date: Oct 2005
Location: Spokane, WA
Posts: 416
|
After locating some furniture grade PVC online at Home Depot, I started assembling my drain and return lines. I have to admit that plumbing is one of my most hated chores. I always try to get everything exact and accurate, but I've always found it a challenge with PVC and it never looks clean enough in the end. There are just so many adjustments with rotation at the joints and pipe length tends to disappear once the cement is applied.
I tried a few new approaches this time around. I employed the use of a cheap miter saw instead of the previously poor results I was left with using a hacksaw. This really helped square up my cuts and gave me more precision with my measurements. The cuts made a bit of a mess, but the vacuum made quick work in comparison to similar run-ins when cutting wood as there is no dust. I wouldn’t recommend cutting wood inside. Another method I tried was to use tick marks on the dry-fitted pipe to give me an idea of how far to push the pipe in and how far to rotate different joints once the cement was applied. This ensured results very similar to my dry fitted pieces. 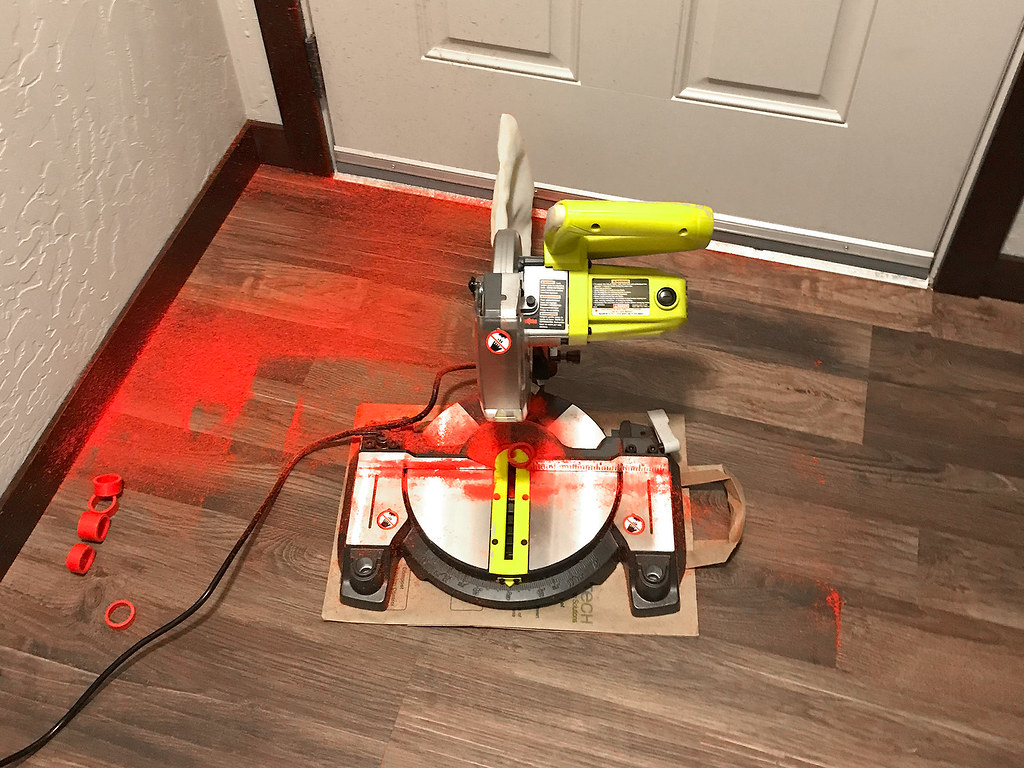 Due to the size of the drain section of the sump it took some effort to locate unions that would fit the metric pipe but also wouldn't impact the neighboring union. After sourcing a few parts and assembling different components, I ended up with a clean 32mm to 1” union that fits in a very tight space. 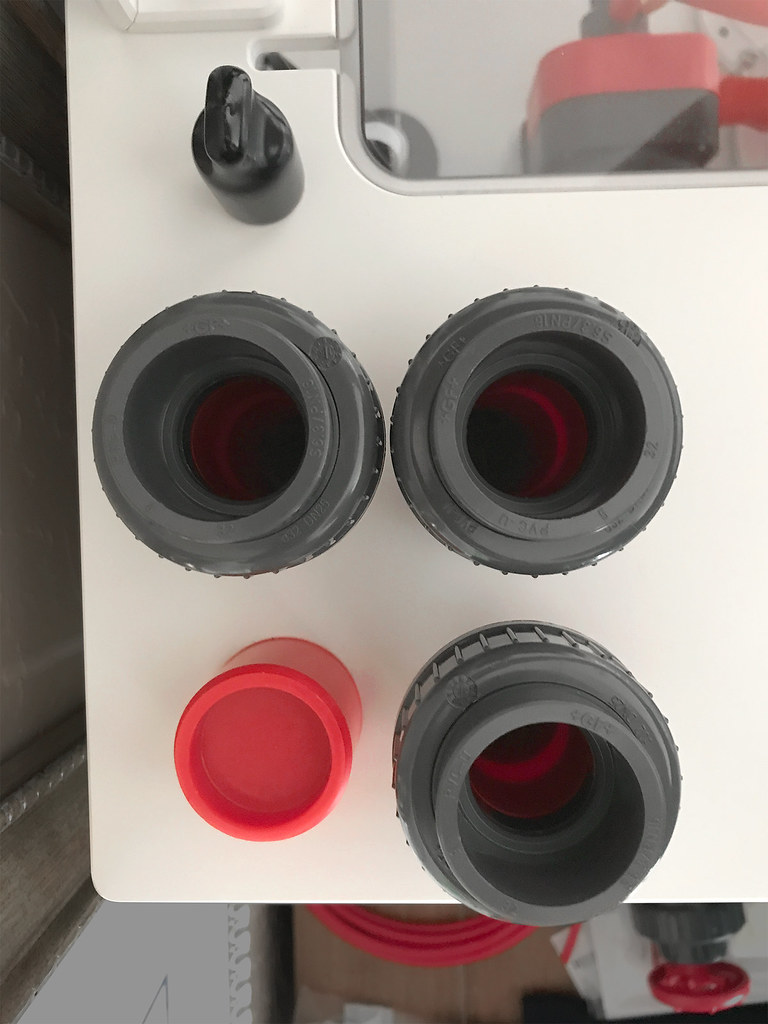 I plumbed three drain lines, but only one has a gate valve to dial in a beananimal style siphon. The fourth drain stub on the sump is 40mm and that allows a 1” pipe to slip in nicely with a coupling as a stopper. I ran this 1” pipe up above my ATO reservoir and capped it off with a drilled hole to accept the ATO tube. Having it at this height allows for a siphon break after the pump runs. This line should also ensure my limewater mixes thoroughly at the drain compartment before getting to the pumps. Here is the result. 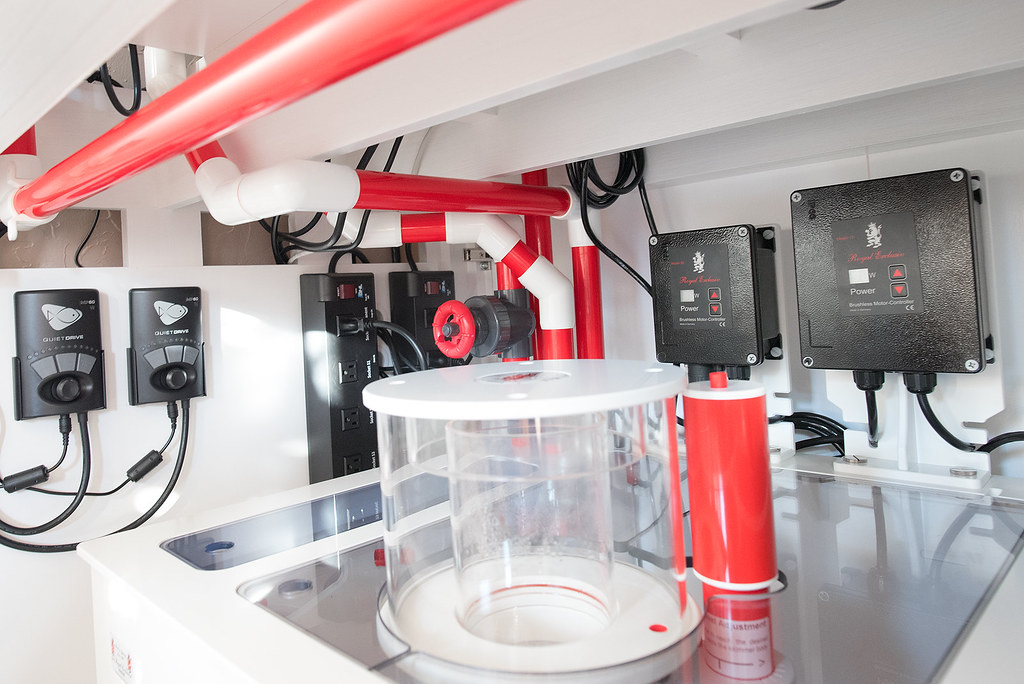
|
|
|
|
|
01/30/2018, 09:28 PM
|
#33 |
|
Registered Member
Join Date: Aug 2013
Location: holmdel, NJ
Posts: 555
|
This build Is truly a piece of art and it hasn't even seen a drop of water, puts me to shame! Following though, I'm super excited to see where this goes.
Sent from my SCH-I545 using Tapatalk
__________________
________________________ New Build in progress http://reefcentral.com/forums/showthread.php?t=2528685 90 gallon DT, 65 Gallon Fuge, Chinese LEDs, LPS and Soft coral reef |
|
|
|
|
01/30/2018, 11:59 PM
|
#34 |
|
Registered Member
Join Date: Mar 2005
Location: Kansas City, MO
Posts: 644
|
Beautiful! I’m hooked. How much more do you have before getting water and rock in it?
__________________
Andy 265g w/ 20" synergy overflow box Hamilton Cebu MH/T5 fixture w/ 250w Radium bulbs SPS/LPS mix | 30g (long) refugium with cheato | 40g sump |
|
|
|
|
01/31/2018, 06:14 AM
|
#35 |
|
Registered Member
Join Date: Sep 2016
Location: St. Augustine, FL
Posts: 1,857
|
Following
__________________
90g Mixed Reef |
|
|
|
|
01/31/2018, 06:30 AM
|
#36 | |
|
Saltwater Addict
Join Date: Jan 2012
Location: Vandalia OHIO
Posts: 11,624
|
Quote:
 The red plumbing looks really nice. The red plumbing looks really nice.
__________________
Fish are not disposable commodities, but a worthwhile investment that can be maintained and enjoyed for many years, providing one is willing to take the time to understand their requirements and needs Current Tank Info: 625g, 220g sump, RD3 230w, Vectra L1 on a closed loop, 3 MP60s, MP40. Several QTs |
|
|
|
|
|
01/31/2018, 02:09 PM
|
#37 | |
|
Registered Member
Join Date: Oct 2005
Location: Spokane, WA
Posts: 416
|
Quote:
|
|
|
|
|
|
01/31/2018, 02:11 PM
|
#38 | |
|
Registered Member
Join Date: Oct 2005
Location: Spokane, WA
Posts: 416
|
Quote:
|
|
|
|
|
|
01/31/2018, 02:12 PM
|
#39 | |
|
Registered Member
Join Date: Oct 2005
Location: Spokane, WA
Posts: 416
|
Quote:
|
|
|
|
|
|
01/31/2018, 02:26 PM
|
#40 |
|
Registered Member
Join Date: Aug 2012
Location: Ontario Canada
Posts: 304
|
Love it! The attention to detail is incredible. Reading through your experience with Miracles, I had the exact same thing. Inside was scratched, vinyl on the back was bubbling, silicone job was awful, and to top it all I found my tank on its side on the floor with nothing on it when I got to my LFS. Sent it back to them as I live 45 minutes from Miracles HQ in Orangeville, and I payed them a visit in person to figure out WTH happened. They of course resolved all issues and even gave me a free starphire side. I should ad be VERY gentle with the starphire glass. Their low lead glass scratches very very easily. Can't wait to see it full!
|
|
|
|
|
01/31/2018, 04:04 PM
|
#41 |
|
Registered Member
Join Date: Oct 2005
Location: Spokane, WA
Posts: 416
|
Here are a few pictures of the sump that Royal Exclusive built for me. The first chamber pushes water through 3 filter socks. I know a lot of people hate these, but I find them valuable if using lower micron mesh and rinsing them every 4-5 days. I elected to go with a Bubble King Double Cone 180 with a DC controller. This should help me dial in the skimmer, but I really was buying based on everything I read about its quiet operation. Similarly I chose the Red Dragon 80w DC return pump and I had RE build a simple manifold to feed a media reactor. I typically run GFO and this would be utilized for that down the road. There is a second output on the manifold if needed later on. Everything is topped off with lids to retain moisture and protect components in the stand from any micro salt spray. They're a bit cumbersome if I'm being picky, but definitely worth the effort considering the mess I usually run into with salt creep and the noise it eliminates.
Overall the whole box is really well built out of thick PVC. I can attest to it's bulk as it took some care to wrestle into the stand. Here are some more pictures. 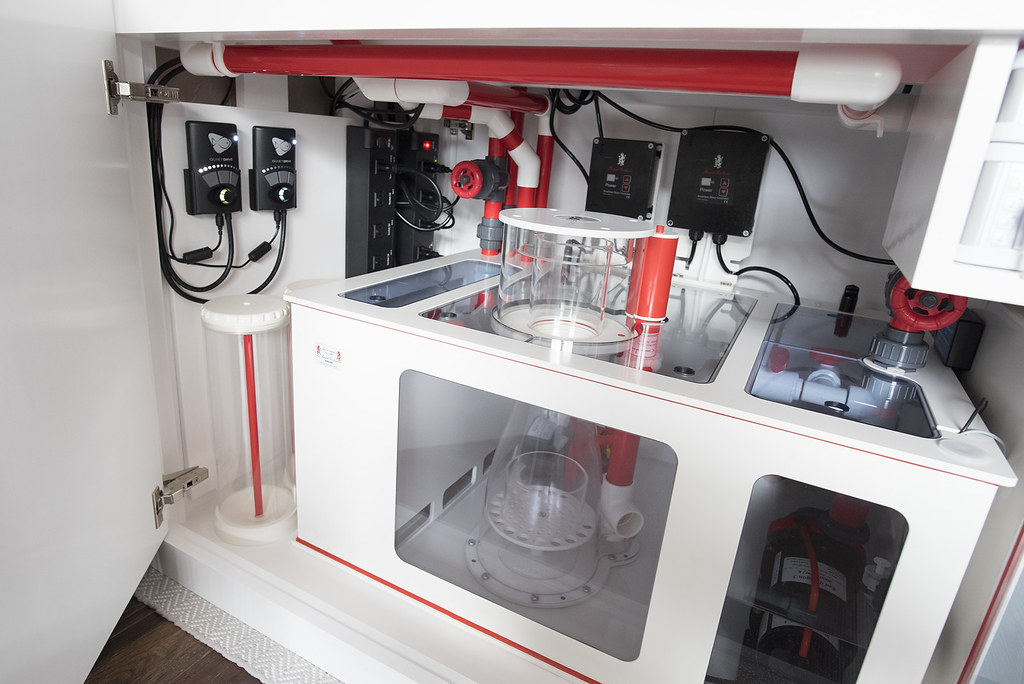 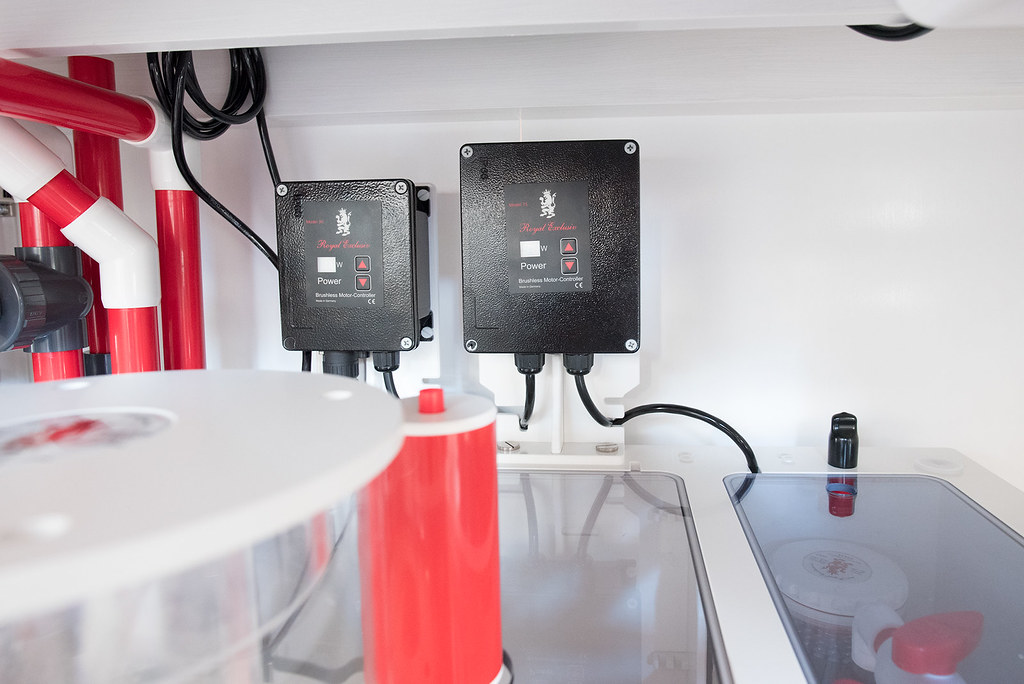 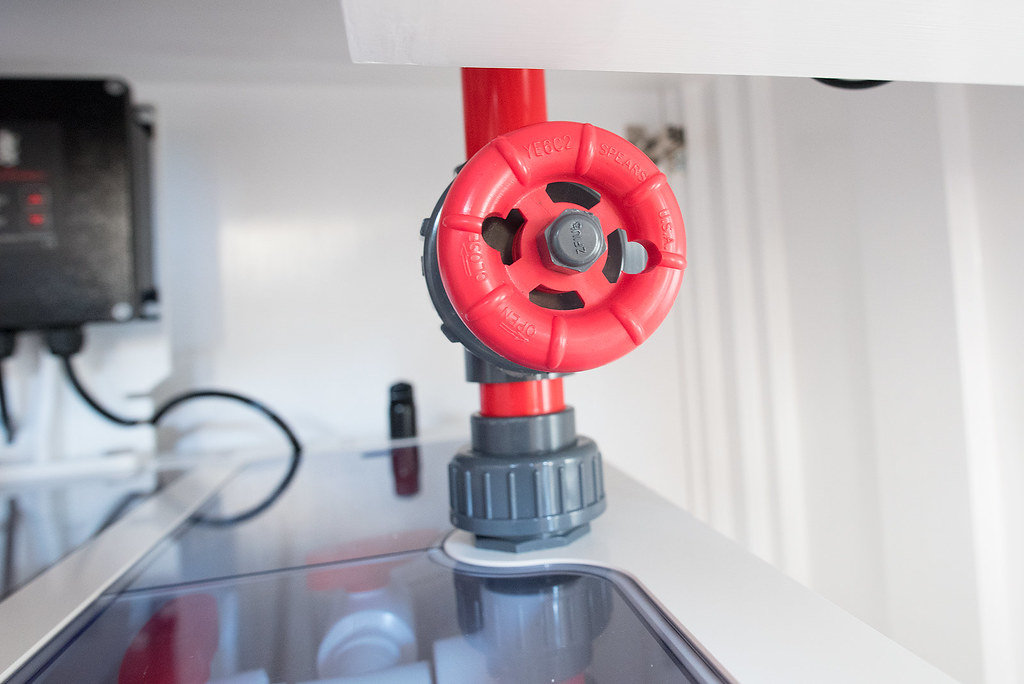 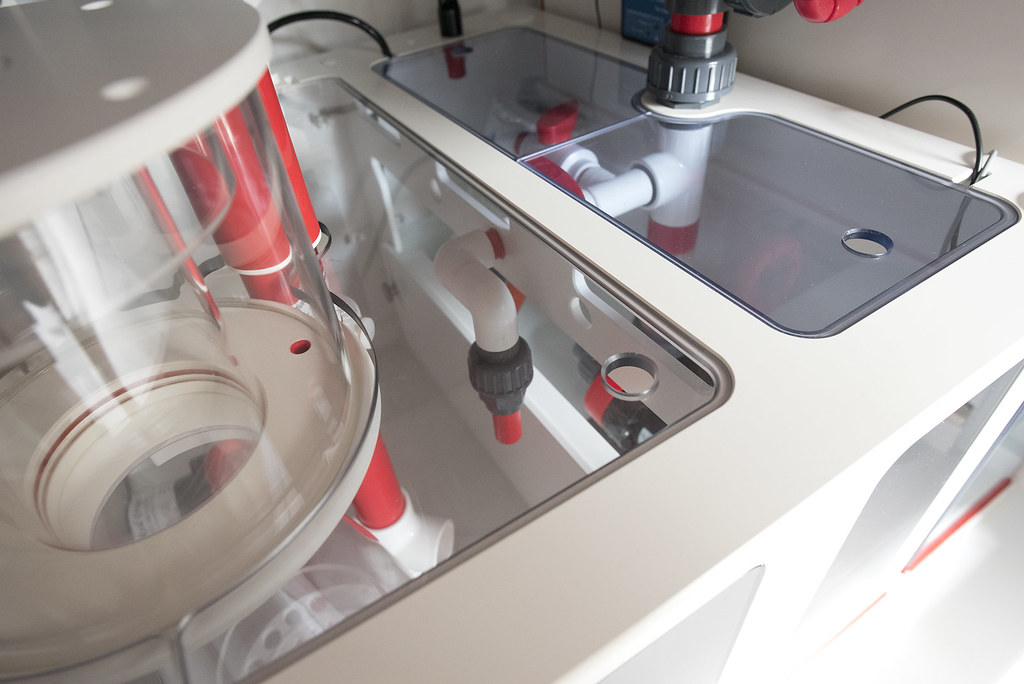 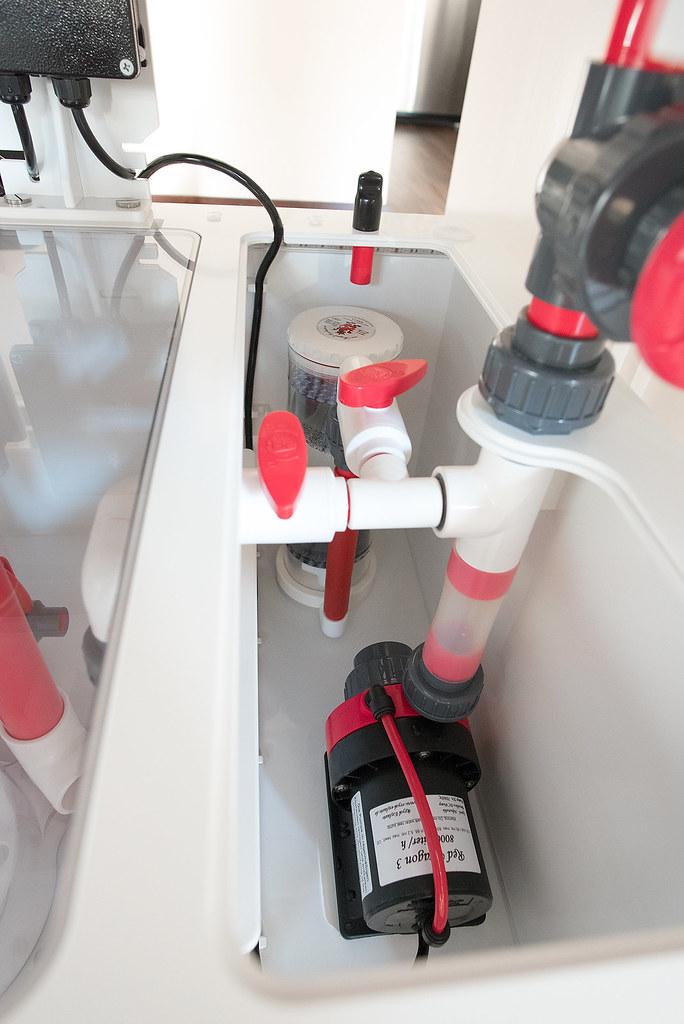
|
|
|
|
|
02/09/2018, 06:31 PM
|
#42 |
|
Registered Member
Join Date: Oct 2005
Location: Spokane, WA
Posts: 416
|
There is finally some water hitting the tank! Always scary and just a little bit exciting. No major leaks other than some necessary bulkhead and union tightening. The overflow is quiet, but not near as silent as I was hoping for. I blame the undertow of the water caused by the MP60s pulling water through the Synergy weir into the exterior box. I will continue to make adjustments to dial in the water level within the exterior overflow box as the noise seems to be from the waterfall here.
 The ATO container holds just under 12 gals and should give me about 10 days or so between fills depending on humidity. Not a large container, but it definitely fills as much of the space I had available. I enjoy the measurements on the front pane. 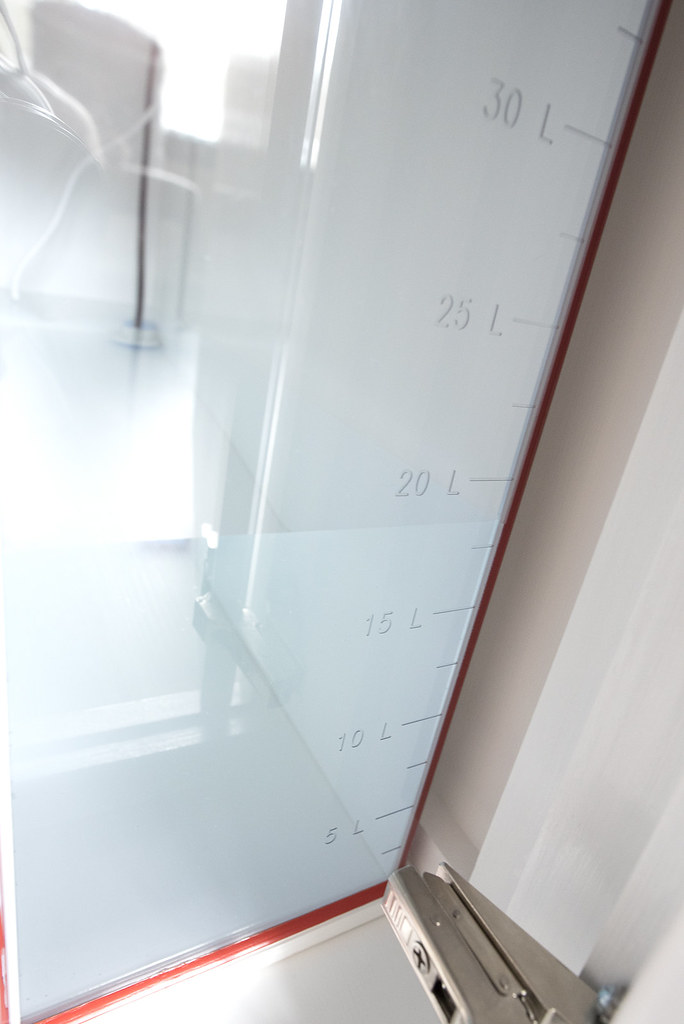
|
|
|
|
|
02/09/2018, 09:00 PM
|
#43 |
|
Registered Member
Join Date: Sep 2015
Location: Mesa Az
Posts: 771
|
 Its wet! Congrats on that mile stone. Personally I enjoy the design and build process as much as I enjoy growing corals. Your setup is so clean and well planned out. I love the organization in the stand. Some top quality equipment on this build and I will live vicariously through your thread. What rock are you planning on using for your reef? ....munching on that popcorn.
__________________
Tank history 29g tropical ,55g cichlid tank, 20H softy reef, 29g mixed reef, 20H brackish goby & puffer tank, 55g mixed reef, 6g Nanocube softy lps reef, 40B sps reef, 75g sps reef, 75g sps reef in bu Current Tank Info: 75g sps reef build in the works. |
|
|
|
|
02/10/2018, 01:00 PM
|
#44 | |
|
Registered Member
Join Date: Oct 2005
Location: Spokane, WA
Posts: 416
|
Quote:
|
|
|
|
|
|
02/10/2018, 01:39 PM
|
#45 |
|
Registered Member
Join Date: Dec 2009
Posts: 192
|
What paint did you use on your stand and what kind of wood did you use to skin it? It's exactly what I'm looking to do.
|
|
|
|
|
02/10/2018, 01:49 PM
|
#46 | |
|
Registered Member
Join Date: Oct 2005
Location: Spokane, WA
Posts: 416
|
Quote:
|
|
|
|
|
|
02/14/2018, 01:28 AM
|
#47 | |
|
Registered Member
Join Date: Sep 2015
Location: Mesa Az
Posts: 771
|
Quote:
__________________
Tank history 29g tropical ,55g cichlid tank, 20H softy reef, 29g mixed reef, 20H brackish goby & puffer tank, 55g mixed reef, 6g Nanocube softy lps reef, 40B sps reef, 75g sps reef, 75g sps reef in bu Current Tank Info: 75g sps reef build in the works. |
|
|
|
|
|
02/14/2018, 09:58 AM
|
#48 |
|
Proud user of IO Salt!
Join Date: Jun 2006
Location: Torrance, CA
Posts: 9,136
|
amazing looking build. I love the quality of the RE stuff.
__________________
Mike <*)))>{ <*)))>{ <*)))>{ <*)))>{ ReefKeeping.com TOTM Nov 2012 Socalireefs Featured Reef Oct 2011 Current Tank Info: 60*30*20, 8x54 ATI Powermodule, ReefBrite XHO, ATB Elegance 200, Aquamaxx CTech CaRx, Ecotech Vortechs, Apex Controls, WM Ecobak powered. RedSea Reefer 170, MP10, Apex Jr, Ecotech Radion XR15, Aquamaxx WS-1 |
|
|
|
|
02/14/2018, 02:13 PM
|
#49 |
|
Registered Member
Join Date: Jan 2014
Location: Louisville, KY
Posts: 600
|
Following! sharp build
|
|
|
|
|
02/14/2018, 02:44 PM
|
#50 |
|
Registered Member
Join Date: Feb 2018
Posts: 57
|
Looks awesome!
|
|
|
|
 |
|
|


