
|
|
 04/20/2010, 08:22 AM
|
#176 |
|
Registered Member
Join Date: Jan 2006
Location: Toledo OH
Posts: 2,466
|
Awesome build! Love the cabinet! Can't wait to see the growth of the tank!
|

|

|
|
05/03/2010, 08:56 PM
|
#177 | |
|
SPS Slave
 Join Date: Aug 2003
Location: Richmond, VA
Posts: 3,388
|
Quote:
__________________
- Mike & Terry "Less technology, more biology ... indeed." - Gary White Current Tank Info: 200g temp garage tank |
|
|
|
|
|
05/03/2010, 09:18 PM
|
#178 |
|
SPS Slave
Join Date: Aug 2003
Location: Richmond, VA
Posts: 3,388
|
OK, We've been just incredibly busy but thought we drop a few quick updates in so you guys can see how things are unfolding.
Once we started kicking back and watching the tank, we became increasingly dissatisfied with the aquascaping on the left side. The right side had turned out so well, that it "raised the bar". So we burned a couple of weekends between chores and errands just trying to improve it some. Finally, Terry said "you know that the whole thing has to come out." Groan. Yes, she was right. So, we pulled out the left side and went to work on rebuilding the left "tree". The design principles haven't changed - we still wanted interesting textures and the bonsai tree look with multiple levels. We ordered a couple more pieces of live rock, and shopped all the LFS's. Problem was, we just couldn't find the pieces that we needed. Thus came the research on what method to use to fabricate the branches that have that look we wanted. We landed on hydraulic cement. We ran several tests for construction techniques, for strength, and changes to the water (pH, etc.). This took an awfully long time. On top of that, I needed to go out of town on business. While I was away, Terry took all that we had learned through our experimentation and built this: 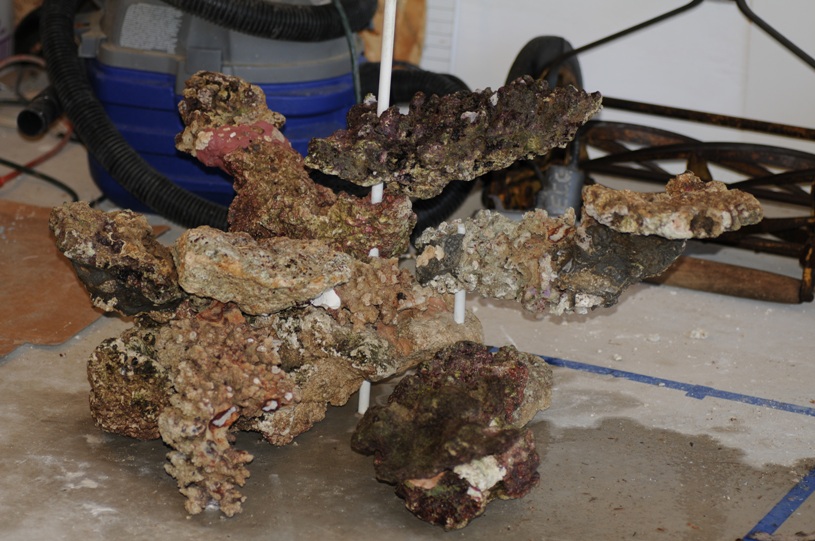 This pic doesn't do justice to all the work that went into this. Most of these pieces had to be fabricated using fiberglass rods, epoxy, hydraulic cement, etc. Needless to say, I was very happy to come home and have this ready to go. So we've been busy over the past two weekends getting the aquascaping finished and the corals placed. Here's a look at where we stand so far: Left side: 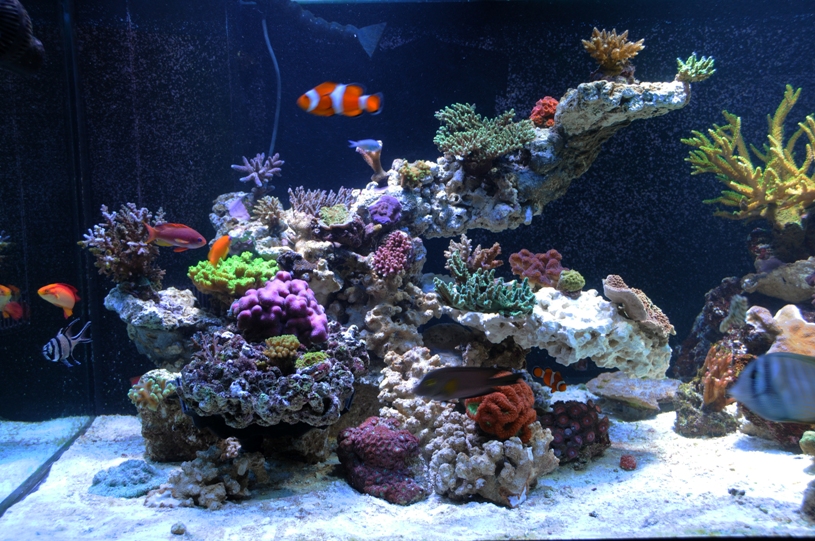 Right side: 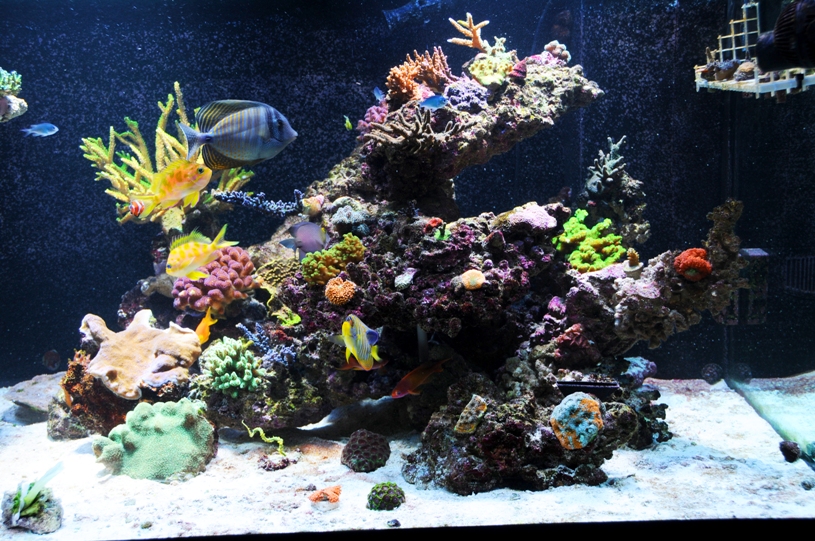 FTS: 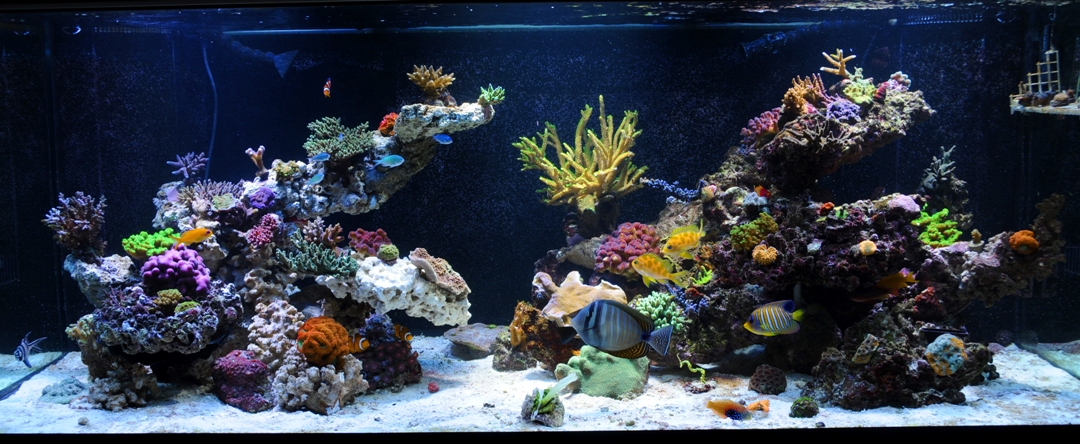 We have a lot more to post about in terms of other things we've done.... Just have to find the time to take pics and document our work.
__________________
- Mike & Terry "Less technology, more biology ... indeed." - Gary White Current Tank Info: 200g temp garage tank Last edited by Dino; 04/20/2013 at 05:04 AM. |
|
|
|
|
05/03/2010, 10:30 PM
|
#179 |
|
Registered Member
Join Date: Aug 2007
Location: El Paso, TX
Posts: 846
|
Amazing tank. Aquascape looks good. Real nice looking tank. Keep up the good work.
__________________
Robert Current Tank Info: 80g rimless. |
|
|
|
|
05/03/2010, 10:38 PM
|
#180 |
|
seeker of knowledge
Join Date: May 2007
Location: NW OKC
Posts: 3,276
|
very unique and great
corals, grown out, will make it outstanding
__________________
--Lynn The challenge is the fun. |
|
|
|
|
05/03/2010, 10:40 PM
|
#181 |
|
Registered Member
Join Date: Nov 2003
Location: South Harrison, NJ
Posts: 1,024
|
nice!
__________________
My addiction began as a kid visiting Martin's Aquarium!! Current Tank Info: 100 starphire rimless in planning since January 2012. 100 Gallon Rubbermaid Basement Sump and 65 gallon refugium. |
|
|
|
|
05/04/2010, 05:11 AM
|
#182 |
|
Team RC Member
Join Date: Jul 2005
Location: houstonia
Posts: 7,989
|
It looks great, Mike.
__________________
-Chris- You don't win friends with salad. "Look! They're trying to learn for free!" ... "Use your phony guns as clubs!" Current Tank Info: rectangluar? wet? |
|
|
|
|
05/04/2010, 05:32 AM
|
#183 |
|
Registered Member
Join Date: Jan 2010
Location: Canadia
Posts: 4,276
|
Um ... not to be negative or critical in any way, but those two structures look the same to me. Maybe it's just my misperception.
Dave.M |
|
|
|
|
05/04/2010, 07:36 AM
|
#184 |
|
TRC
Join Date: Apr 2005
Posts: 1,568
|
Very nice Mike, I know how much time it costs to create an attractive rockscape (that is stable
 ) )Leonardo
__________________
450G Office Reef |
|
|
|
|
05/04/2010, 08:06 AM
|
#185 |
|
Registered Member
Join Date: Jan 2006
Location: Yukon, Oklahoma
Posts: 1,908
|
Mike, I am lovin your tank. How much distance do you have between your back glass and rock work?
__________________
Doug G. "We can't help everyone, but everyone can help someone" Ronald Reagan (Eagles) LIFE'S BEEN GOOD Current Tank Info: 300 Gal starfire Reef Tank, SPS, LPS and zoas, 3-LumenMax MH fixtures driven by 250 watt icecap's and Radium bulbs, 2-Tunze 6105 controllable pumps with 7095 multi controller, 100 gal sump/refugium... 100 gal tank with T-5's |
|
|
|
|
05/04/2010, 11:18 AM
|
#186 |
|
Registered Member
Join Date: Jul 2009
Location: Richmond, Va.
Posts: 189
|
Hey Mike, the new tank is looking fantastic! I have been reading and re-reading your build thread lately trying to get some ideas for my DD project. I am only getting the 150 DD, so my build isn't on the same level as yours, but since all the DD tanks share the same overflows, 3' depth, and 27inch height, some aspects of the build are similar enough that I can get a pretty good idea of some of the obstacles I will face. So at some point, I would love to bring over some good beer/wine/single-malt, which ever you prefer, and lay eyes on your set-up and kick around some ideas! One question I have right off the bat is, I see that Joe drilled your tank so obviously the 300 is not tempered on the bottom, do you happen to know if all the DD tanks are the same in that regard?
__________________
Jon Current Tank Info: 150 Deep Dimension, OceansMotions 4-way w/ Reeflo Hammerhead, Deltec APF800, Velocity T-4 return pump w/ 1 inch Sea Swirl, 48 (soon to be 112) Cree 3 watt LED's controlled by Apex |
|
|
|
|
05/04/2010, 01:04 PM
|
#187 |
|
Moved On
Join Date: Feb 2006
Location: Durban, South Africa
Posts: 335
|
Mike, you've got a real quality build going there.
Really like you tank scaping and the cupboard design surrounding it. Have to say though, from your pics posted, your support stand worries me. There doesn't seem to be a lot of support for the tank base. No doubt the vertical legs can take the compressive load, but how much deflection are you getting on the horizontal wooden support beams? Any noticeable deflection accross the glass base? |
|
|
|
|
05/04/2010, 07:21 PM
|
#188 | |||||||||
|
SPS Slave
Join Date: Aug 2003
Location: Richmond, VA
Posts: 3,388
|
Quote:
Quote:
Quote:
Quote:
Quote:
Quote:
Quote:
Quote:
Quote:
  Here's a couple of new shots of the 'scaping with some better colors, contrast, etc. Left: 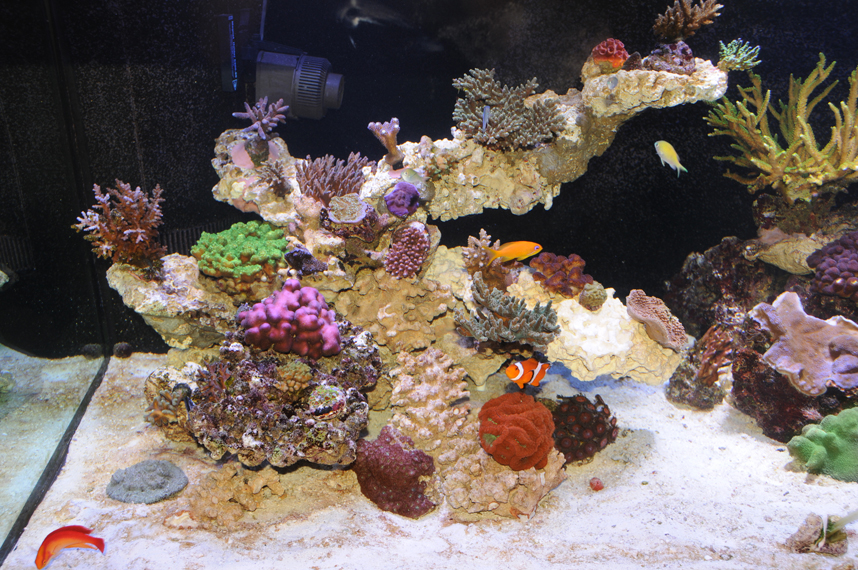 Right: 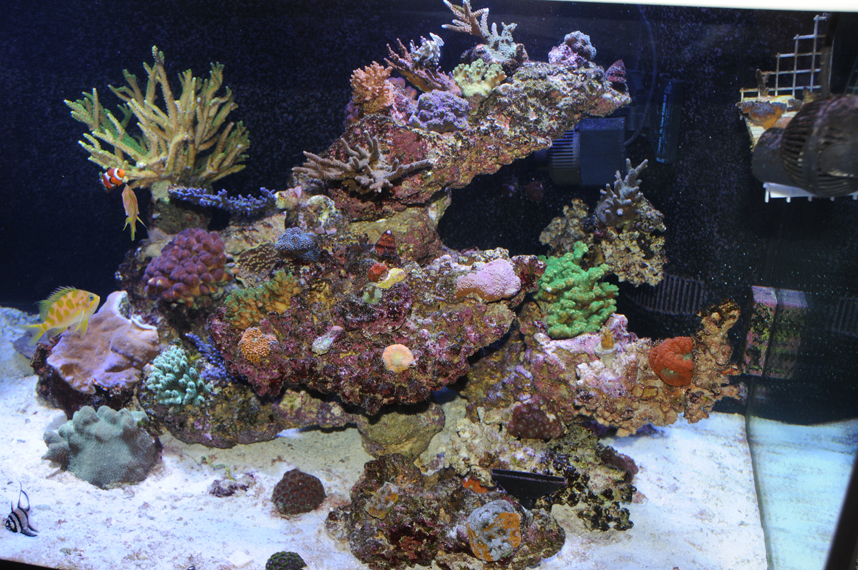
__________________
- Mike & Terry "Less technology, more biology ... indeed." - Gary White Current Tank Info: 200g temp garage tank Last edited by Dino; 04/20/2013 at 05:05 AM. |
|||||||||
|
|
|
|
05/05/2010, 07:05 PM
|
#189 |
|
Acropora Nut
Join Date: Jul 2006
Location: Newtown, PA
Posts: 2,453
|
Looks good
__________________
120 Gallon Acropora dominated tank, barebottom, APEX Controller, ATI Sunpower 8x54w, Skimz SM163, Jebao DCT 6000 return pump & two Jebao OW-40. Current Tank Info: SPS Dominated |
|
|
|
|
05/06/2010, 12:21 PM
|
#190 |
|
Registered Member
Join Date: Sep 2005
Location: First State
Posts: 98
|
Nice work. Love the aquascape!!!
__________________
Rhinecanthus aculeatus |
|
|
|
|
05/06/2010, 06:54 PM
|
#191 |
|
Registered Member
Join Date: Mar 2008
Location: Orange, Va.
Posts: 28
|
Hope you left some room for some of my corals
 . Tank looks great . Tank looks great  . .
|
|
|
|
|
05/06/2010, 09:51 PM
|
#192 | |||
|
SPS Slave
Join Date: Aug 2003
Location: Richmond, VA
Posts: 3,388
|
Quote:
Quote:
 Quote:
 As you guys may know, we are huge fans of the Panworld pumps. They are dependable as the sunrise, run like a top, and easy to maintain. Our current main return pump is the PW150PS. With the install of the new 300, we split the return into two lines and now there's not enough flow to suit us. Here's an old pic of the return line plumbing - you can see the spa flex line coming up from the remote sump, and tee'ing off to each of the overflows: 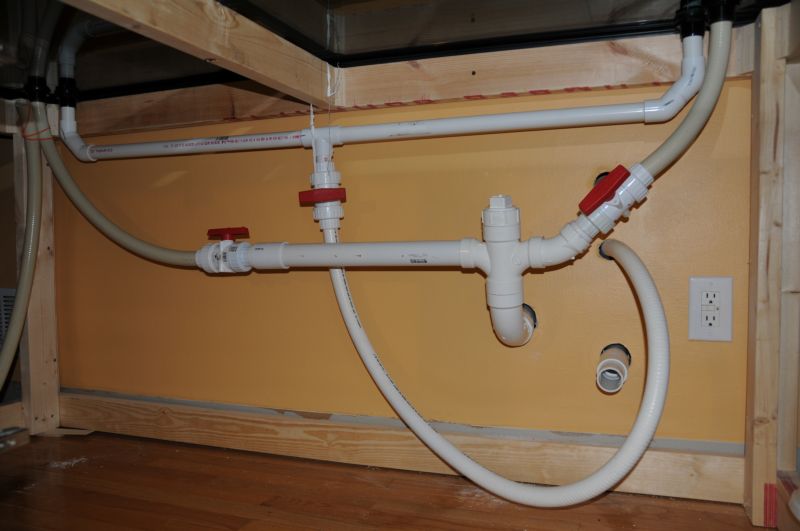 Well, for payday, we indulged in a new return pump: 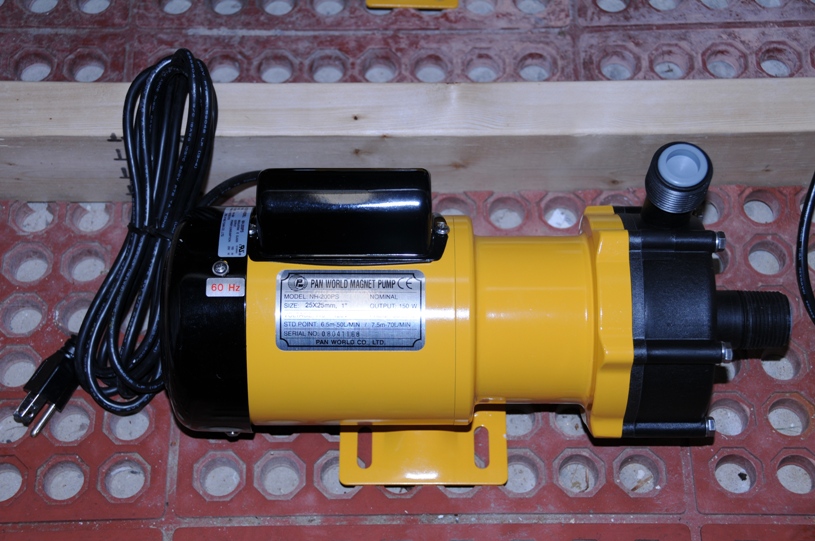 It's a PW200s, 1740 GPH. We installed it and put in a couple of penductors on the returns in the display...Here's a pic of the new pump installed under the sump:  You can see the main return is tee'd off to also feed the loop over to our 75g frag tank/refugium, and the little 1/4" quick connect fitting feeds the calcium reactor. Results of the new pump are very satisfactory. This thing is a BOSS. We have greatly improved flow into the display, and we now have the 150PS sitting as our hot-standby pump in case of failure.
__________________
- Mike & Terry "Less technology, more biology ... indeed." - Gary White Current Tank Info: 200g temp garage tank Last edited by Dino; 04/20/2013 at 05:06 AM. |
|||
|
|
|
|
05/08/2010, 03:00 PM
|
#193 |
|
SPS Slave
Join Date: Aug 2003
Location: Richmond, VA
Posts: 3,388
|
Today we tightened up the Tunze installation in the display.
The CL outlets are kickin' some terrific flow, but we still needed additional flow in a few spots: 1) across the back (there's a lot of space back there with the DD) 2) upper portions along the sides where the upper rock branches are Along the back, we were using the two old-style Tunze 6105's. We love the massive flow those things generate. Problem is, we had to use the magnetic mounts inside the overflows to point them across the back and the vibration noise was annoying. This is where the new return pump comes in. We added penductors to each of the return outlets, and with the flow that the PW200s is generating, we can retire the 6105s. Two less pumps to clean and the noise goes away entirely! SWEET. Here's a shot of the 3/4" penductors we picked up from premium aquatics: 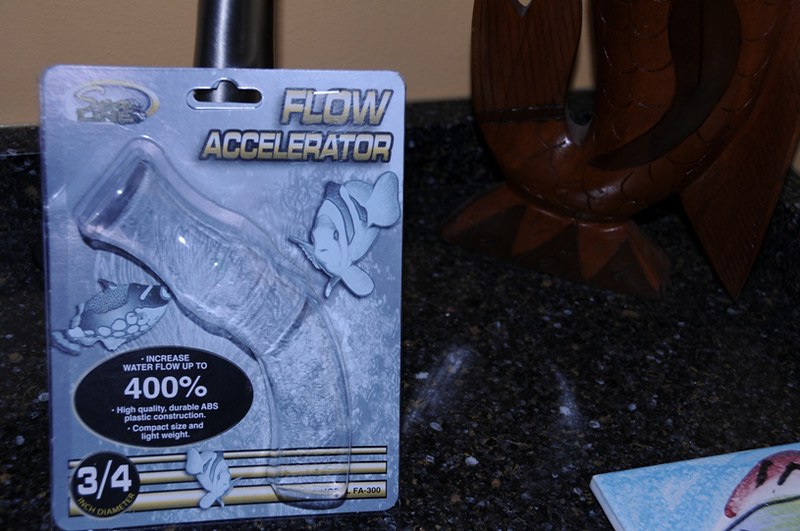 Yes, they are complete transparent! You cannot even see them. J/K, this is just the empty package. Anyhow, we've been thinking over how to install the Tunzes into the stand. Remember, that there's no way to get wires down from the tank to underneath the stand without going into the wall. So we needed to drill another set of holes. This time we used the 2.5" hole saw: 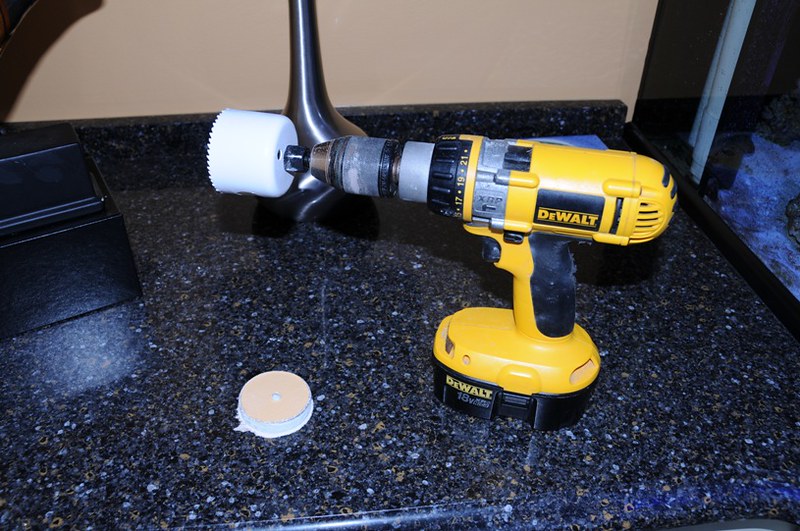 Why you may be asking would we need a monster 2.5" hole for a few wires? It's a design flaw with the Tunze stream pumps. The pumps are hard wired to these clunky connectors:  The hole saw makes very quick work of the drywall though:  Notice that we taped a large piece of cardboard over the tank to catch all the drywall crumbs. All this maintenance we've been doing over the past few weeks would have been a tremendous PITA if we didn't have the slide-out light rack. This is by far the most useful element we put into this build. I can't tell you how much we've used it and how well it has worked out. The thing just slides in / out so easily - it rocks! And you have got to be able to lean over the sides of the tank to reach much of it, just due to the dimensions of the big ol' double D.  OK with the holes drilled, to pretty everything up, we use another set of these nifty computer desk grommets: 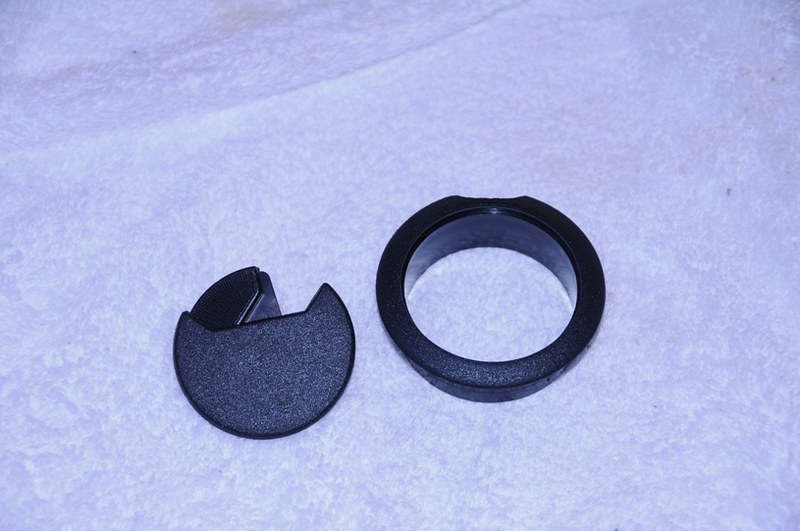 Next up, we run the 6055 connector wires from the canopy down to under the stand. Down below under the tank, we were able to reuse the the old hole in the wall that one of our old 1.5" drain lines was placed. Up above in the canopy, we simply drilled the upper hole on the same vertical line as the existing former drain line hole. The 7095 controller has another one of those silly Tunze design flaws. The moonlight/light sensor is hard wired to the controller. Why they chose to not use small connectors on all of this stuff is beyond me. Anyhow, since the 7095 is under the stand, we needed to feed the moonlight up through the wall to the canopy. We just dropped a nylon rope down the hole, taped the moonlight to it, and pulled it back up to do the job. Next, we put the nice grommet in place and voila: The last step was to use some little plastic wire clamps to secure all the wires up on the canopy so they don't flop around. It's a little hard to get a picture of this with the light rack in place, but you can get the idea: 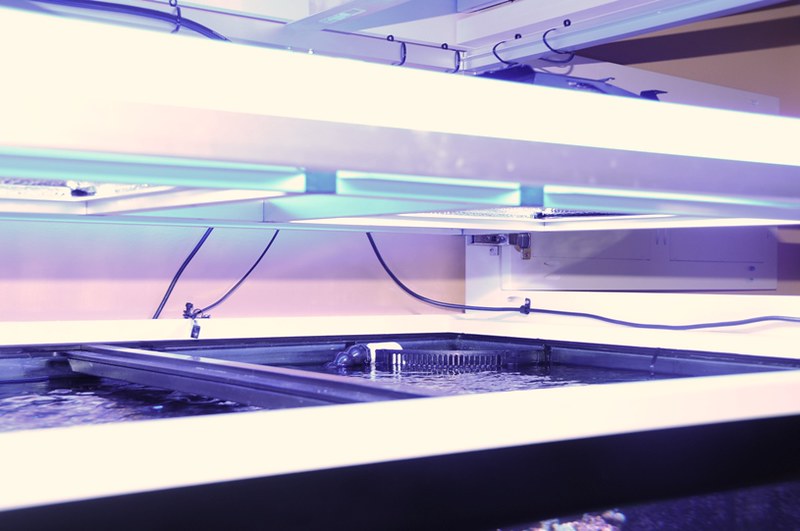 Another chore complete. Now its time to grill out and enjoy a few cold ones and some wonderful Virginia spring weather!!  Thanks for watching.
__________________
- Mike & Terry "Less technology, more biology ... indeed." - Gary White Current Tank Info: 200g temp garage tank Last edited by Dino; 04/22/2013 at 05:38 AM. |
|
|
|
|
05/10/2010, 12:02 PM
|
#194 |
|
Registered Member
Join Date: Jan 2005
Location: Zuehl, Texas
Posts: 4,460
|
Maybe I missed this if someone already asked but have you had any issues with your Regal Angel and any corals?
|
|
|
|
|
05/10/2010, 06:55 PM
|
#195 |
|
Registered Member
Join Date: Apr 2004
Location: Baton Rouge, LA
Posts: 1,398
|
Very impressive build and a great looking tank!
__________________
"I look for absolutes and there are absolutely none." 311 |
|
|
|
|
05/11/2010, 05:51 PM
|
#196 |
|
Registered Member
Join Date: Jul 2009
Location: Richmond, Va.
Posts: 189
|
Hey Mike, just a follow-up, I emailed Marineland to ask about whether the 150 DD can be drilled like the bigger DD tanks. They just emailed back, and they said that all the DD tanks are plate glass and can be drilled, however, if it is not drilled by them at the factory the warranty is void. This kind of stinks because I was considering moving the overflow and using the factory holes for part of a closed loop to better fit my install, but don't really want to void the warranty. On the flip side, I would custom order it from the factory,except the tanks are on sale right now and if I custom order, I lose the sale price!

__________________
Jon Current Tank Info: 150 Deep Dimension, OceansMotions 4-way w/ Reeflo Hammerhead, Deltec APF800, Velocity T-4 return pump w/ 1 inch Sea Swirl, 48 (soon to be 112) Cree 3 watt LED's controlled by Apex |
|
|
|
|
05/11/2010, 07:50 PM
|
#197 | |
|
SPS Slave
Join Date: Aug 2003
Location: Richmond, VA
Posts: 3,388
|
Quote:
__________________
- Mike & Terry "Less technology, more biology ... indeed." - Gary White Current Tank Info: 200g temp garage tank |
|
|
|
|
|
05/11/2010, 07:51 PM
|
#198 | |
|
SPS Slave
Join Date: Aug 2003
Location: Richmond, VA
Posts: 3,388
|
Quote:

__________________
- Mike & Terry "Less technology, more biology ... indeed." - Gary White Current Tank Info: 200g temp garage tank |
|
|
|
|
|
05/11/2010, 08:06 PM
|
#199 | |
|
SPS Slave
Join Date: Aug 2003
Location: Richmond, VA
Posts: 3,388
|
Quote:
 For the record, the warranty card that came with the 300DD says essentially that there is a "limited lifetime warranty" if you install the tank on their stand. And that there is a 1-year parts and workmanship warranty aside from that. Now there's a long list of stuff that voids the warranty of course... Here's how we rationalized/justified the modifications... both the LFS and we were very careful in our examination of the tank prior to taking delivery to ensure it was free of defects. We knew our stand was better than the factory stand. Drilling the tank was something we have done many times over and felt comfortable in our decision. Although there was still that lump in the throat when cutting that GI-NORMOUS hole for the CL intake 
__________________
- Mike & Terry "Less technology, more biology ... indeed." - Gary White Current Tank Info: 200g temp garage tank |
|
|
|
|
|
05/12/2010, 05:22 AM
|
#200 |
|
Registered Member
Join Date: Aug 2001
Location: Wayne PA
Posts: 692
|
Mike, the tank came together very nice! We move in a few weeks and then my planning begins. I'm gonna have to PM you about that light rack. It came out awesome.
|
|
|
|
 |
|
|


