
|
|
 11/04/2008, 08:36 AM
|
#76 |
|
Premium Member
 Join Date: Jun 2005
Location: Kansas
Posts: 851
|
I have a canopy that I will be attaching the Swirl Stein to. I will be cutting a piece of 1/4 acrylic that will attach to the side of the Swirl and will be a couple of inches longer. I then will attach the acrylic to the canopy. Nothing special, I will show pics tonight.
__________________
A real man builds it... Then his wife shows him what he did wrong. Current Tank Info: 210 RR, 75G sump, 350lbs DIY rock, DIY dual chamber calcium reactor, 7500 gph flow |

|

|
|
11/04/2008, 01:42 PM
|
#77 |
|
Registered Member
Join Date: Aug 2007
Location: Hanford,CA
Posts: 582
|
Could you measure the diameter of the outside of the box also please dngspot?
|
|
|
|
|
11/04/2008, 01:51 PM
|
#78 |
|
Premium Member
Join Date: Jun 2005
Location: Kansas
Posts: 851
|
4 inches square, 2 inches tall.
__________________
A real man builds it... Then his wife shows him what he did wrong. Current Tank Info: 210 RR, 75G sump, 350lbs DIY rock, DIY dual chamber calcium reactor, 7500 gph flow |
|
|
|
|
11/04/2008, 08:38 PM
|
#79 |
|
Premium Member
Join Date: Jun 2005
Location: Kansas
Posts: 851
|
I have them up and running. I had a little problem with one of the units. It was nothing that a little adjustment to the tie rod to fix it. The swivel was stalling at the end of the stroke. All is good now. I will leave them running over night and see how things are going.
To mount them I cut a piece of 1/4 acrylic. I also cut a piece of 3/4 plywood, it was used to space the pumps away from the glass for space for a mag cleaner. I drilled 2 holes in the side of the grey box and attached the acrylic with #8 machine screws. I then screwed the 3/4 plywood spacers into the canopy, it had to be counter sunk for the screws that went through the acrylic and box, the head of those screws needed a small pocket. I then screwed the acrylic and box to the spacer. Pretty darn simple. The random flow is awesome. 
__________________
A real man builds it... Then his wife shows him what he did wrong. Current Tank Info: 210 RR, 75G sump, 350lbs DIY rock, DIY dual chamber calcium reactor, 7500 gph flow |
|
|
|
|
11/04/2008, 08:43 PM
|
#80 |
|
Registered Member
Join Date: Aug 2008
Location: US ARMY - El Paso TX
Posts: 3,678
|
i got to thinking....how could one do this w/ a spraybar???? (or spraybars...one on each side of the tank)
hmmmmmm dngspot: your mission....should you choose to accept it.... **mission impossible theme starts***
__________________
Yes I hear voices in my head, but they speak spanish so I can't understand anything they say. there's no place like 127.0.0.1 It's a shame that stupidity isn't painful.... Current Tank Info: currently tankless....but planning an AIO |
|
|
|
|
11/04/2008, 09:00 PM
|
#81 |
|
Premium Member
Join Date: Jun 2005
Location: Kansas
Posts: 851
|
Thinking this out, I do not know of any hose that is flexible enough. The pumps may not have enough torque.
I have an idea with PVC couplers, used with o-rings, as a swivel.
__________________
A real man builds it... Then his wife shows him what he did wrong. Current Tank Info: 210 RR, 75G sump, 350lbs DIY rock, DIY dual chamber calcium reactor, 7500 gph flow |
|
|
|
|
11/04/2008, 09:19 PM
|
#82 |
|
Registered Member
Join Date: Aug 2008
Location: US ARMY - El Paso TX
Posts: 3,678
|
what i originally thought of wanting was a spraybar that went horizontial that would rotate up & down...but couldn't think of a way to make it rotate.
then i had a idea....gonna try & think of some way to attach the pvc spraybar to the guts of a hydor flow deflector. i think that might just work *thinking
__________________
Yes I hear voices in my head, but they speak spanish so I can't understand anything they say. there's no place like 127.0.0.1 It's a shame that stupidity isn't painful.... Current Tank Info: currently tankless....but planning an AIO |
|
|
|
|
11/04/2008, 09:25 PM
|
#83 |
|
Premium Member
Join Date: Jun 2005
Location: Kansas
Posts: 851
|
It just might.
I should have posted what they look like in the tank.  
__________________
A real man builds it... Then his wife shows him what he did wrong. Current Tank Info: 210 RR, 75G sump, 350lbs DIY rock, DIY dual chamber calcium reactor, 7500 gph flow |
|
|
|
|
11/05/2008, 12:22 AM
|
#84 |
|
Registered Member
Join Date: Aug 2007
Location: Hanford,CA
Posts: 582
|
Just put my current Ph setup forsale. I really want one of these. Does anyone have a link to the motor they used? I don't really want to deal with ebay so if someone has another source I would be greatful!

|
|
|
|
|
11/05/2008, 12:13 PM
|
#85 |
|
Likey the bikey
Join Date: Dec 2004
Location: Colorado
Posts: 3,371
|
E-bay really is the best option at the moment. Seller IDs and photos of motors are on page one.
__________________
Mike On hiatus. I'm either out riding my bicycle, playing with my family, or throwing ferts in my planted tank. Or working. I hope I'm not doing that though. Current Tank Info: 140 DIY Cube |
|
|
|
|
11/05/2008, 12:41 PM
|
#86 | |
|
Premium Member
Join Date: Jun 2005
Location: Boulder, CO
Posts: 4,112
|
Quote:
Thanks!
__________________
--Andy "And chase the frothy bubbles, / While the world is full of troubles. . . ." --W. B. Yeats Current Tank Info: ~480 gal. display, ~1,400 gal. system |
|
|
|
|
|
11/05/2008, 06:03 PM
|
#87 |
|
Premium Member
Join Date: Jun 2005
Location: Kansas
Posts: 851
|
One small problem raised its head. Well I thought it would. It was the noisy motor. It just kept binding. A week ago I contacted the vendor and told them one of the motors were noisy. I even told him that I glued a arm to the motor and was not using for what they are intended for. He said no problem and one was in my mail box with in the week. How is that for service? Not all eBay vendors are out to rip you off.
I installed the new motor and every thing seems smooth and silent. I will know if it is going to bind within the night. The motor on the left side has not missed a beat.
__________________
A real man builds it... Then his wife shows him what he did wrong. Current Tank Info: 210 RR, 75G sump, 350lbs DIY rock, DIY dual chamber calcium reactor, 7500 gph flow |
|
|
|
|
11/06/2008, 11:55 AM
|
#88 |
|
Likey the bikey
Join Date: Dec 2004
Location: Colorado
Posts: 3,371
|
Andy - I think they will burn up if you hook them to 110volts.
I rebuilt my second swirler stein last night using the sealed bearing approach. I was kind of in a rush and didn't give it the full spit and polish treatment (please excuse the fact that the box, motor, everything is dirty in the pics - if I had more time I would have cleaned everything up better). This motor is over two years old. It is the same one that went for a swim last year...hence the dirty appearance. Also, I cut about an inch off of the height of the project box so it would be low enough to squeeze into the spot without making contact with my hood. The lid still fit. You can see in the pics that I used my old arm as a reference to build the new one. For mounting, I put the down tube through one of the holes in my eurobrace and used velcro to hold the box in place. I then slipped the MJ mount that had been glued to the end of the downtube into the MJ slot. The dremeling on the downtube could have been a little cleaner. 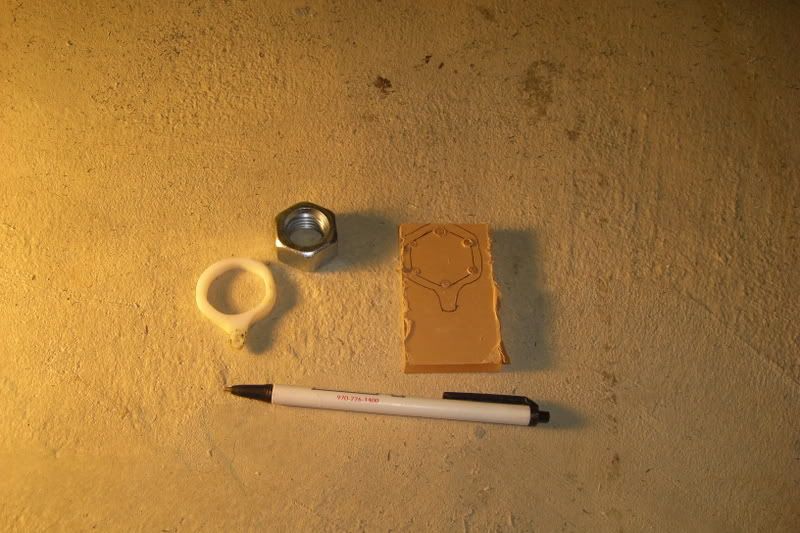 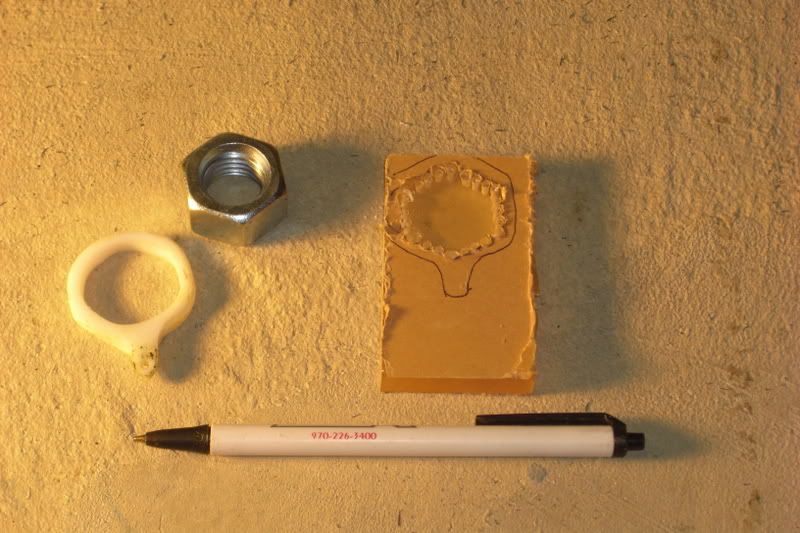  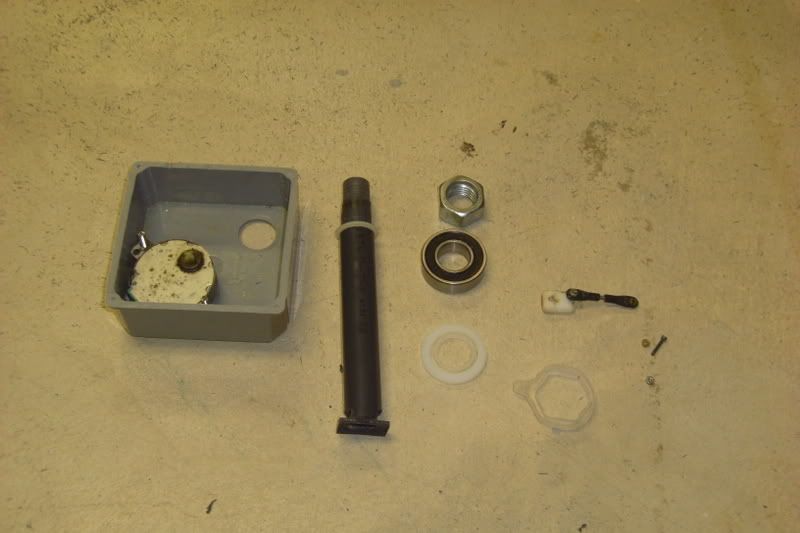 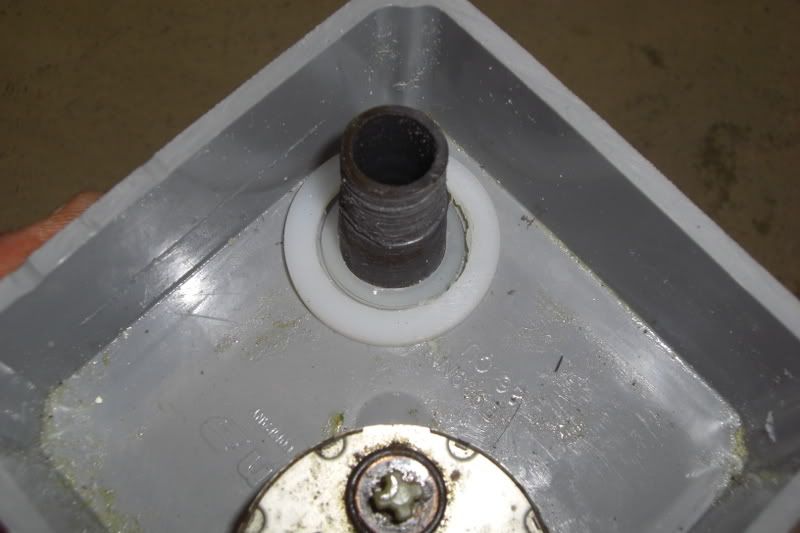 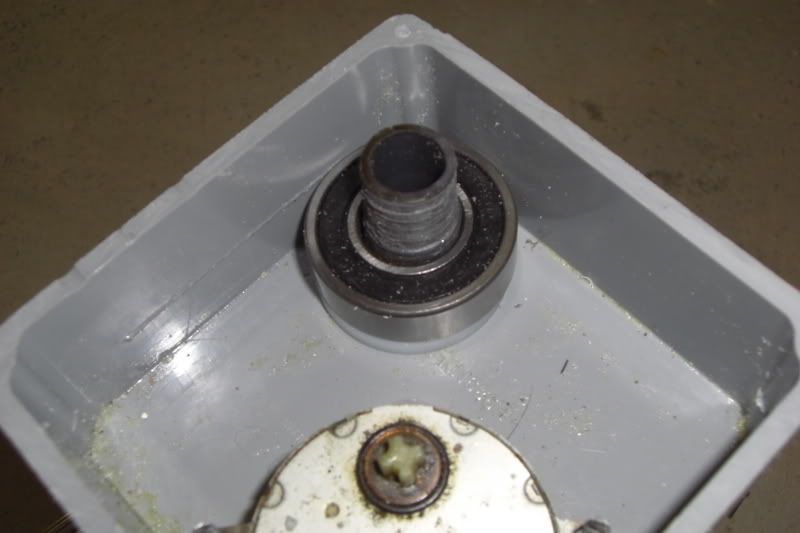 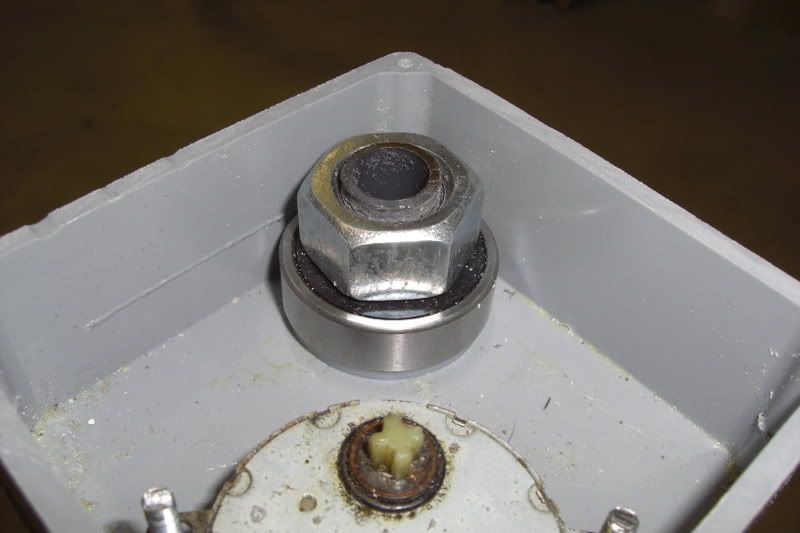 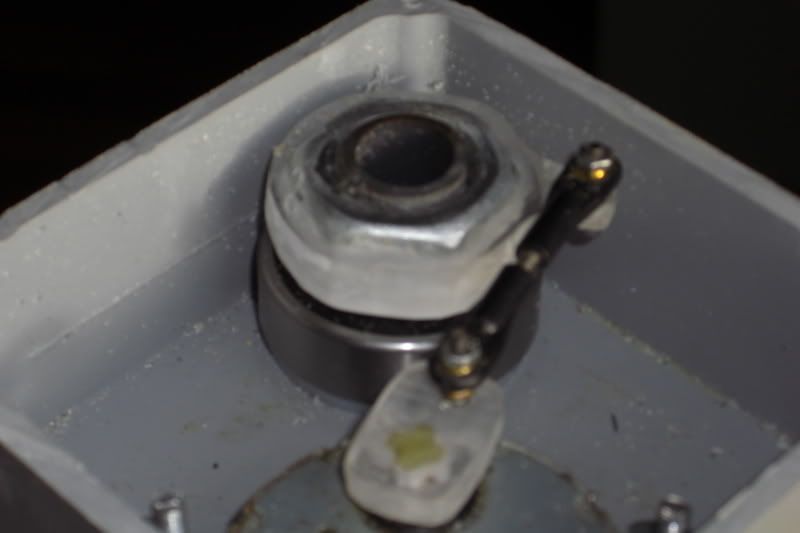 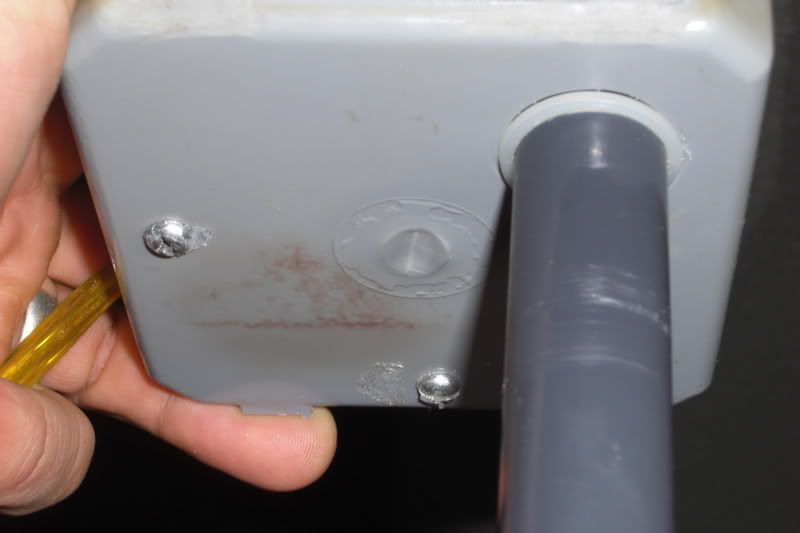 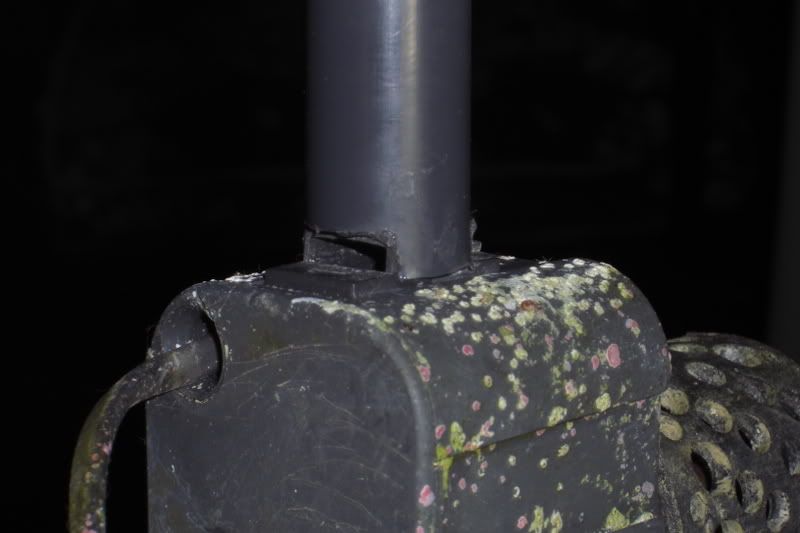
__________________
Mike On hiatus. I'm either out riding my bicycle, playing with my family, or throwing ferts in my planted tank. Or working. I hope I'm not doing that though. Current Tank Info: 140 DIY Cube Last edited by miwoodar; 11/06/2008 at 12:00 PM. |
|
|
|
|
11/06/2008, 12:29 PM
|
#89 |
|
Registered Member
Join Date: Apr 2002
Location: Western New York
Posts: 705
|
Dngspot and Miwoodar- great job and thx for all the pics. I ordered my motor - still waiting... I had an idea that might save time from fabricating the plastic ring - what about using a metal hose clamp and just tying on the arm firmly w/ wire?
__________________
Reef since 95'. 180g, 100g sump, 55 g refuge Current Tank Info: 180g, 100g sump, 55 g refuge |
|
|
|
|
11/06/2008, 12:33 PM
|
#90 |
|
Premium Member
Join Date: Jun 2005
Location: Kansas
Posts: 851
|
Could you mesure the ID and OD of that bearing?
__________________
A real man builds it... Then his wife shows him what he did wrong. Current Tank Info: 210 RR, 75G sump, 350lbs DIY rock, DIY dual chamber calcium reactor, 7500 gph flow |
|
|
|
|
11/06/2008, 12:43 PM
|
#91 |
|
Likey the bikey
Join Date: Dec 2004
Location: Colorado
Posts: 3,371
|
The ID is 3/4". OD is 1.575". I got them from Racergirlsrock on e-bay. They have some for sale right now via auction number 250305495785. Two for $10 shipped.
The nut is a 3/4" ID. I used a piece of 1/2" sprinkler pipe (the wall thickness seems a little thicker than regular PVC) for the downtube and shaved down the OD on the table saw so it would slip snugly into the bearing's ID. I then heated the nut slightly with a torch and screwed it onto the pipe to cut the threads. I didn't heat the nut on the last one I made - it's not necessary but makes cutting the threads go a little quicker.
__________________
Mike On hiatus. I'm either out riding my bicycle, playing with my family, or throwing ferts in my planted tank. Or working. I hope I'm not doing that though. Current Tank Info: 140 DIY Cube |
|
|
|
|
11/06/2008, 12:52 PM
|
#92 |
|
Likey the bikey
Join Date: Dec 2004
Location: Colorado
Posts: 3,371
|
BTW - these arms are giving me right around 90* rotation.
__________________
Mike On hiatus. I'm either out riding my bicycle, playing with my family, or throwing ferts in my planted tank. Or working. I hope I'm not doing that though. Current Tank Info: 140 DIY Cube |
|
|
|
|
11/06/2008, 03:09 PM
|
#93 |
|
Premium Member
Join Date: Jun 2005
Location: Kansas
Posts: 851
|
I may be missing something. I understand that the down tube is held in place by the ID of the bearing, what holds the OD of the bearing?
I have ordered the bearings. What I may do is find or make a tube and glue it to the box over the down tube hole. Then fit the bearing in that to keep it centered with the down tube hole. Then the bearing will do the whole support and not have drag from the bushing or the box. Does this make sence?
__________________
A real man builds it... Then his wife shows him what he did wrong. Current Tank Info: 210 RR, 75G sump, 350lbs DIY rock, DIY dual chamber calcium reactor, 7500 gph flow |
|
|
|
|
11/06/2008, 04:27 PM
|
#94 | |
|
Premium Member
Join Date: Jun 2005
Location: Boulder, CO
Posts: 4,112
|
Quote:
__________________
--Andy "And chase the frothy bubbles, / While the world is full of troubles. . . ." --W. B. Yeats Current Tank Info: ~480 gal. display, ~1,400 gal. system |
|
|
|
|
|
11/06/2008, 05:23 PM
|
#95 |
|
Likey the bikey
Join Date: Dec 2004
Location: Colorado
Posts: 3,371
|
I initially thought it would be necessary to bolt the bearing down or make a frame for it. Rather, the outer ring is resting on top of the larger nylon washer. I did it temporarily as I tested the arm lengths and it worked so well I decided to keep it. The inner nylon ring is essentially pointless (it's thinner than the outer ring) other than to help keep out splashes and/or salt creep. One of my local Ace Hardwares has proven to be a great resource as of late. Their selection is awesome - they had all these washers (minor dremeling) in stock.
Andy - I forgot how resourceful you are.  Your build is looking great BTW. Your build is looking great BTW.
__________________
Mike On hiatus. I'm either out riding my bicycle, playing with my family, or throwing ferts in my planted tank. Or working. I hope I'm not doing that though. Current Tank Info: 140 DIY Cube |
|
|
|
|
11/07/2008, 03:30 PM
|
#96 |
|
Premium Member
Join Date: Jun 2005
Location: Kansas
Posts: 851
|
I gave it my best shot at video; it is grainy and just looks bad. One thing you will get some idea of how they move. Here is the link.
David http://s275.photobucket.com/albums/j...t=DSCF0001.flv
__________________
A real man builds it... Then his wife shows him what he did wrong. Current Tank Info: 210 RR, 75G sump, 350lbs DIY rock, DIY dual chamber calcium reactor, 7500 gph flow |
|
|
|
|
11/07/2008, 04:16 PM
|
#97 |
|
Registered Member
Join Date: Jul 2008
Location: Lee's Summit, Mo.
Posts: 197
|
Could you put the motor on a dimmer switch if you wanted to slow the rotation down?
__________________
semi-professional racecar driver and amatuer tattoo artist Current Tank Info: Oceanic 30 cube and 20H nanos |
|
|
|
|
11/09/2008, 09:07 PM
|
#98 |
|
Premium Member
Join Date: Jun 2005
Location: Kansas
Posts: 851
|
For the last couple of days I have been having trouble with the left Swirl. I keep breaking the ring around the down tube. The problem was the pumps are putting allot of force on the down tube which is causing down tube to press on the sides of the bushings, the parts that are glued to the box. This causes a bind at the weakest point, the top or bottom of the stroke. I did give some thought to this when I was building the units and put food grade grease inside those bushings and the down tube.
The fix, remove the ring and wipe that worthless grease off and use bearing grade lithium grease. They are running smoother and working less. I must have broken 3 of those stinking little rings. I am getting real good at making them too. I have beefed up the ring also, they do not look as cool but, you can bet that it is not going to break anymore. I have to say, those little microwave turn table motors have a bunch of torque for as little as they are.
__________________
A real man builds it... Then his wife shows him what he did wrong. Current Tank Info: 210 RR, 75G sump, 350lbs DIY rock, DIY dual chamber calcium reactor, 7500 gph flow |
|
|
|
|
11/09/2008, 09:52 PM
|
#99 | |
|
Registered Member
Join Date: Dec 2006
Location: kaukauna, wi.
Posts: 3,879
|
Quote:
|
|
|
|
|
|
11/09/2008, 10:15 PM
|
#100 |
|
Premium Member
Join Date: Jun 2005
Location: Boulder, CO
Posts: 4,112
|
McGuckin's guy: "It'll be fine on household current."
Motor: "Chug, chug, puff."  I guess that's why I bought three of them. I'll get with the electrician this time. 
__________________
--Andy "And chase the frothy bubbles, / While the world is full of troubles. . . ." --W. B. Yeats Current Tank Info: ~480 gal. display, ~1,400 gal. system |
|
|
|
 |
|
|


