
|
|
 07/18/2011, 11:37 AM
|
#1 |
|
Registered Member
Join Date: Jan 2009
Location: Columbus, OH
Posts: 376
|
Painting aluminum
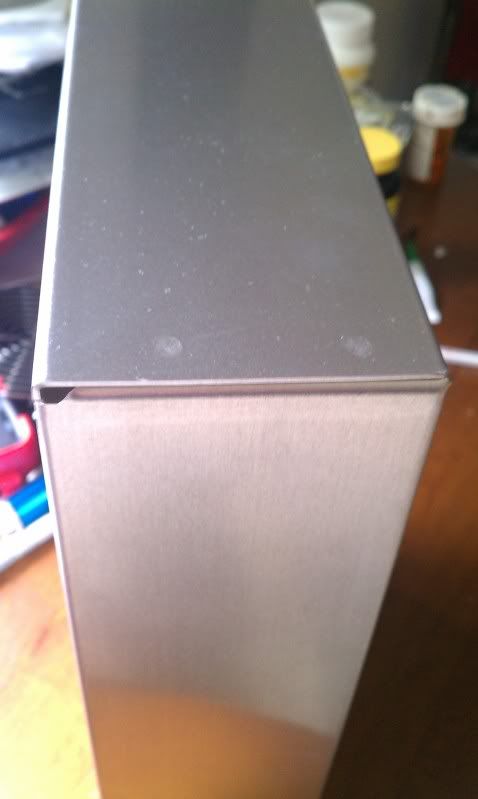
Hey guys. I am working on my DIY LED project and came across this aluminum project box that I am planning on using as my housing. I am a wood guy so I have not done much in the way of metal finishing. I am planning on priming and painting with automotive paint. I want to fill in the seams where the box was folded. What should I use for this? Bondo or something like JB Weld? Does bondo and automotive primer bond to aluminum or should I be looking for something else? I want a high gloss black finish as the end result. Thanks.
|

|

|
|
07/18/2011, 12:12 PM
|
#2 |
|
Registered Member
Join Date: Jan 2010
Location: nj
Posts: 334
|
JB weld would work, just fill and sand untill you get the desired finish, or you can use a tig welder capable of aluminum welding, but i doubt you have one. the paint would be fine
|
|
|
|
|
07/18/2011, 12:14 PM
|
#3 |
|
Megistered Rember
Join Date: Aug 2007
Location: Milwaukee, WI
Posts: 470
|
Filler will bond to that no problem. For something like that though I'd skip the bondo and use some poly glaze as there isn't much to fill, and you can put a skim coat over the entire exterior. Either route you go, be sure to put some tape on the inside of the little holes on the corners before trying to fill em - the tape will easily come off later.
|
|
|
|
|
07/18/2011, 12:21 PM
|
#4 | ||
|
Registered Member
Join Date: Jan 2009
Location: Columbus, OH
Posts: 376
|
Quote:
Quote:
|
||
|
|
|
|
07/18/2011, 12:41 PM
|
#5 | |
|
Megistered Rember
Join Date: Aug 2007
Location: Milwaukee, WI
Posts: 470
|
Quote:
You might try looking around locally if there are any automotive paint stores for the glaze. It's a 2-part so it'll come with a little tube of hardener. Just be sure to read the glaze for the ratio, it's not too hard to figure out but if anything error on the side of using too little hardener, and mix the glaze up in small batches so you don't end up wasting it because it starts to harden before you get to put in on the hood. |
|
|
|
|
|
07/18/2011, 01:01 PM
|
#6 | |
|
Registered Member
Join Date: Jan 2009
Location: Columbus, OH
Posts: 376
|
Quote:
http://www.autozone.com/autozone/acc...er=540155_0_0_ Is there any advantage to using a glaze over regular bondo? |
|
|
|
|
|
07/18/2011, 01:20 PM
|
#7 |
|
Registered Member
Join Date: Aug 2006
Location: Menifee,Ca.
Posts: 484
|
I would recommend the Evercoat glaze that Kyuss posted.I have never used the Autozone product,but I have used the Evercoat glaze for many years and is a top notch product.Glaze is a thinner(less build), finer(sands easier) and will feather-edge better than a "Bondo-type" filler
|
|
|
|
|
07/18/2011, 05:42 PM
|
#8 | |
|
Registered Member
Join Date: Jan 2009
Location: Columbus, OH
Posts: 376
|
Quote:
|
|
|
|
|
|
07/18/2011, 05:51 PM
|
#9 | |
|
-RT * ln(k)
Join Date: Sep 2010
Location: Little Rock
Posts: 9,705
|
Quote:
EDIT: On second thought, that may be why my fish tank lasted longer than my marriage.
__________________
David Current Tank: Undergoing reconstruction... Last edited by disc1; 07/18/2011 at 05:52 PM. Reason: To save the OP's life. |
|
|
|
|
|
07/18/2011, 06:05 PM
|
#10 | |
|
Megistered Rember
Join Date: Aug 2007
Location: Milwaukee, WI
Posts: 470
|
Quote:
EDIT: If money is tight on the project, this would be fine.. https://www.napaonline.com/Catalog/C...006436269&An=0 And you'd need this hardener https://www.napaonline.com/Catalog/C...006436368&An=0 Should run you about $15 total Last edited by Kyuss; 07/18/2011 at 06:34 PM. Reason: Added alternative |
|
|
|
|
|
07/18/2011, 10:40 PM
|
#11 |
|
Registered Member
Join Date: Dec 2006
Location: kaukauna, wi.
Posts: 3,879
|
if you where to use paint on the alum...you will need a special primer!!! normal auto primers are designed for steel bodies. Alum is a hole new tiger and has its own rules for body work and painting....i never tapped into it because i didnt want to buy the special primers!
__________________
PLEASE DONT USE GREAT STUFF (THE YELLOW STUFF) IN YOUR TANK........USE POND FOAM (THE BLACK STUFF).. I BEG YOU! Great stuff====$5 a can 24-48 hour cure Epoxy to cover it====little as $5 for small projects or up to $100+ for larger projects and another 24-48 hour cure I hope you covered it well cuz if you didnt it will start to break down in a few months sand is another added cost to cover up the yellow. Pond foams====$9-$15 a can 24-48 hour cure DONE! You can cover it with sand if you want to (YOU DONT HAVE TO) though but thats added cost again Current Tank Info: 75 gal under way |
|
|
|
|
07/18/2011, 11:53 PM
|
#12 |
|
Registered Member
Join Date: Dec 2010
Location: Portland, OR
Posts: 629
|
There's always anodizing too. Of course if you went that route you'd have to have it welded *if you wanted to hide those seems)
As a somewhat accomplished welder I would highly recommend against "learning" to TIG weld aluminum on anything you plan on as a finished product... the learning curve for aluminum is fairly high and it's very easy to destroy product
__________________
120g drilled, 30G sump, 20g Fuge, RO NWB200 Skimmer, Glass Holes Overflow, mag 12.0 return, Reeflo Dart closed loop, 6-bulb Sunlight Tek |
|
|
|
|
07/19/2011, 01:29 AM
|
#13 | |
|
Megistered Rember
Join Date: Aug 2007
Location: Milwaukee, WI
Posts: 470
|
Quote:
|
|
|
|
|
|
07/21/2011, 06:23 PM
|
#14 | |
|
Registered Member
Join Date: Oct 2006
Location: Barrie, Ontario, Canada
Posts: 6,639
|
Quote:
likely going to want to use high temp gloss paint too... |
|
|
|
|
|
07/21/2011, 06:27 PM
|
#15 |
|
Registered Member
Join Date: May 2009
Location: howell NJ
Posts: 106
|
Sand it with 180 grit and fill with bondo, Make sure you use an etching primer. It actually bites into the metal. I work in a bodyshop and I've used that on raw metal for years. Galvanized is probably the only thing it won't stick to.
|
|
|
|
|
07/22/2011, 03:59 PM
|
#16 | |
|
Registered Member
Join Date: Dec 2006
Location: kaukauna, wi.
Posts: 3,879
|
Quote:
__________________
PLEASE DONT USE GREAT STUFF (THE YELLOW STUFF) IN YOUR TANK........USE POND FOAM (THE BLACK STUFF).. I BEG YOU! Great stuff====$5 a can 24-48 hour cure Epoxy to cover it====little as $5 for small projects or up to $100+ for larger projects and another 24-48 hour cure I hope you covered it well cuz if you didnt it will start to break down in a few months sand is another added cost to cover up the yellow. Pond foams====$9-$15 a can 24-48 hour cure DONE! You can cover it with sand if you want to (YOU DONT HAVE TO) though but thats added cost again Current Tank Info: 75 gal under way |
|
|
|
|
 |
| Thread Tools | |
|
|
 Similar Threads
|
||||
| Thread | Thread Starter | Forum | Replies | Last Post |
| Non-Toxic paint for overflow...? | DezertRat | Do It Yourself |
2 | 07/03/2011 05:51 PM |
| What color should I paint my tank backround | fishyman12 | Do It Yourself |
6 | 05/31/2011 06:12 PM |
| Painting reef rock? | NYPIT | Do It Yourself |
9 | 12/16/2010 05:24 PM |
| spray paint | JStraz4991 | New to the Hobby | 7 | 10/18/2009 05:09 PM |


