
|
|
 10/05/2012, 09:41 PM
|
#76 |
|
Registered Member
Join Date: Oct 2011
Posts: 73
|
If anyone else is interested in a sculpting clay I thought I would post that the link MadBeach provided is actually for coating items sculpted from other materials (wood, foam, etc).
The upside is these guys also make a thicker clay that is designed for sculpting just like clay, which is exactly what I was looking for. I also wanted to note that if you don't need 2 gallons they have a 2 quart size for about a third the price. Thanks again MadBeach I've been looking for a while. http://store.polygem.com/productDeta...8&categoryID=5 |

|

|
|
10/06/2012, 05:53 AM
|
#77 | |
|
Registered Member
Join Date: Jan 2012
Location: London
Posts: 127
|
Quote:
The recipes tend to be based around a mixture of plaster, crushed oyster shell which is otherwise used for gardening, and really coarse rock salt. Generally you create a hollow in sand to act as the mold, pack the mixture into the mold and let it set, and then soak the completed piece for 60-90 days until it stops altering the ph. I believe the salt dissolves and therefore leaves you with a nicely porous structure which will function biologically as live rock does. You can see some nice examples which were created, and some not so nice examples as well. It's all a matter of artistry and craft at that point in terms of creating something which potentially looks fantastic. |
|
|
|
|
|
10/06/2012, 06:34 AM
|
#78 | |
|
Premium Member
 Join Date: Aug 2011
Location: Overland Park, KS
Posts: 1,030
|
Quote:
__________________
"...for it is not necessary that these hypotheses should be true, or even probably; but it is enough if they provide a calculus which fits the observations..."--Introduction (attributed to Andrew Osiander) to On the Revolutions of the Heavenly Sphere by Nicolaus Copernicus. Current Tank Info: 600g DT, 140g sump, 200g Cryptic, 90g Refugium, 3-400w MH, 2 Reeflo Barracudas, and 3 MP60s |
|
|
|
|
|
10/06/2012, 08:55 AM
|
#79 |
|
Registered Member
Join Date: Oct 2002
Location: South Euclid, OH
Posts: 4,281
|
A couple of things I wanted to add if they haven't been covered yet....
---If you go through all that effort to make a great aquascape don't put a frag rack in there.......it's kills all the work that was done. ---One simple way to set up bommies with impact is to think of triangles. They don't have to be equal sides but the points add to set it off more give it a nicer look than a round or squared off lump. ---Another thing to do is put a taller coral that grows up in the front area. The tallest pieces don't always have to be in the back. Similar to the gorgonians & the toadstool are used in these pics below. [IMG]  [/IMG] [/IMG][IMG]  [/IMG] [/IMG]---You can also scan through freshwater plant forums for ideas. They don't have a lot of color to work with so they focus a lot on shapes of the plants & artistic design.
__________________
80g Rimless Acropora System reefcentral.com/forums/showthread.php?t=2197142&page=31 Ed |
|
|
|
|
10/08/2012, 09:41 AM
|
#80 |
|
Registered Member
Join Date: Aug 2012
Location: FL
Posts: 54
|
I found a really nice hunk of live rock at my LFS on Saturday. I think it looks very cool in the 3 gallon picotope I was also compelled to buy. Only the main "trunk" is touching the bottom. Plan to keep it bare bottom. The "branch" on the right comes toward the front. It looks a little like bonsai to me. The pictures don't really do it justice. So many nooks, crannies and caves from all angles. Professional opinions?
  
|
|
|
|
|
10/08/2012, 09:52 AM
|
#81 |
|
Registered Member
Join Date: Aug 2012
Posts: 145
|
I think that's an awesome rock for a pico.
|
|
|
|
|
10/08/2012, 11:11 AM
|
#82 |
|
Registered Member
Join Date: Mar 2012
Location: Buffalo,ny
Posts: 543
|
Perfect rock for a pico. I wouldn't change a thing honestly.
|
|
|
|
|
10/08/2012, 11:35 AM
|
#83 |
|
Registered Member
Join Date: May 2012
Location: Southern California
Posts: 159
|
I just upgraded from a 55 to a 120. Thoughts?
[IMG]http://i50.*******.com/sy6nvt.jpg[/IMG] |
|
|
|
|
10/08/2012, 11:53 AM
|
#84 | |
|
Registered Member
Join Date: Aug 2012
Location: FL
Posts: 54
|
Quote:
|
|
|
|
|
|
10/08/2012, 12:48 PM
|
#85 |
|
Registered Member
Join Date: Aug 2005
Posts: 253
|
 Not 100% happy with it, but it is the best I've come up with thus far. Yes, the rock on the left is stable. 
|
|
|
|
|
10/08/2012, 12:52 PM
|
#86 | |
|
Registered Member
Join Date: Aug 2012
Posts: 145
|
Quote:
What up CB!  -Matt |
|
|
|
|
|
10/08/2012, 01:47 PM
|
#87 |
|
Registered Member
Join Date: May 2012
Location: Southern California
Posts: 159
|
Haha! What's up?!
|
|
|
|
|
10/08/2012, 02:12 PM
|
#88 | |
|
Moved On
Join Date: Sep 2012
Location: Tampa Fl
Posts: 1,659
|
Quote:
|
|
|
|
|
|
10/08/2012, 02:16 PM
|
#89 | |
|
Moved On
Join Date: Sep 2012
Location: Tampa Fl
Posts: 1,659
|
Quote:
Oh, I would clean the magfloat and powerheads to look brand new. |
|
|
|
|
|
10/08/2012, 02:27 PM
|
#90 |
|
Moved On
Join Date: Sep 2012
Location: Tampa Fl
Posts: 1,659
|
Something to also think about is the lighting of the tank... a crisp white light brings out much more vibrant color sharpness than a more muddled blue that so many favor...especially in your fish. Save the luminescence for when your moon lighting is on.
|
|
|
|
|
10/08/2012, 03:24 PM
|
#91 | |
|
Registered Member
Join Date: Aug 2012
Location: FL
Posts: 54
|
Quote:
|
|
|
|
|
|
10/08/2012, 03:40 PM
|
#92 | |
|
Moved On
Join Date: Sep 2012
Location: Tampa Fl
Posts: 1,659
|
Quote:
|
|
|
|
|
|
10/08/2012, 03:46 PM
|
#93 |
|
Registered Member
Join Date: Aug 2005
Posts: 253
|
Take fifteen

|
|
|
|
|
10/08/2012, 04:05 PM
|
#94 |
|
Acropora Nut
Join Date: Jul 2008
Location: Oklahoma City
Posts: 1,628
|
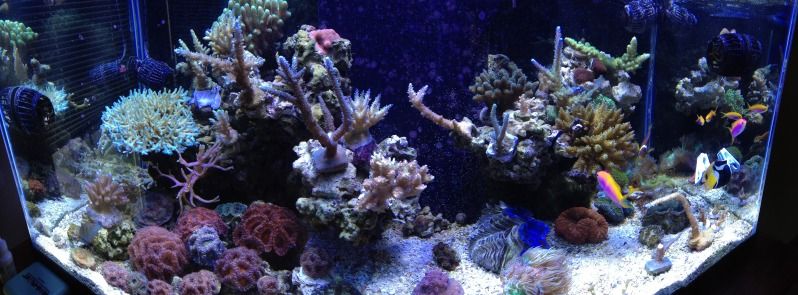
My 40 breeder scape.
__________________
211g Planet Aquariums Hybrid PVC bottom 48"x34"x30" and steel stand from CustomReefCreations - Reeflo Super Dart - OM 4way - SRO XP3000 External - ATI Dimmable 8x54w - Apex. |
|
|
|
|
10/08/2012, 04:36 PM
|
#95 | |
|
Registered Member
Join Date: Jan 2012
Location: London
Posts: 127
|
Quote:
Look up Zaha Hadid Architects for inspiration maybe!...  Of course, depends on what you're into and how you're planning to have this continue to grow out. Many prefer a more minimal and tranquil look. Nevertheless, wish my tank looked that good already... Someone had mentioned looking to freshwater planted tanks for inspiration, so everyhone, here is likely the best resource for looking at examples of these. - http://showcase.aquatic-gardeners.org/index.html Last edited by Mxx; 10/08/2012 at 04:47 PM. |
|
|
|
|
|
10/09/2012, 04:21 AM
|
#96 | |
|
Premium Member
Join Date: Aug 2011
Location: Overland Park, KS
Posts: 1,030
|
Quote:
__________________
"...for it is not necessary that these hypotheses should be true, or even probably; but it is enough if they provide a calculus which fits the observations..."--Introduction (attributed to Andrew Osiander) to On the Revolutions of the Heavenly Sphere by Nicolaus Copernicus. Current Tank Info: 600g DT, 140g sump, 200g Cryptic, 90g Refugium, 3-400w MH, 2 Reeflo Barracudas, and 3 MP60s |
|
|
|
|
|
10/09/2012, 05:29 AM
|
#97 |
|
Swede living in Finland
Join Date: Jan 2005
Location: Finland
Posts: 221
|
Great thread and insights!
You should write a book on the subject  . .I am currently cycling my 910L reef and the aquascape is a very important factor for me and the end result.  - All equipment and pumps have been placed behind a wall of reef ceramics on the right side to avoid visual interference. This also creates a dramatic reef wall going up to the surface of the tank. From the right side I have then made the other parts progressively smaller towards the left side and I will have this in mind when the corals grow.  - For the middle part I have tried to make a spiral formation that moves in a circular and upward movement. This is a bit hard to see in the photos but I think it will look good with the right corals/planning/trimming.  - On the left side I have tried to resemble the vertical islands seen outside Thailand for example and also try to add visual depth by placing a smaller rock in the foreground (the plan is for this rock to be covered in ricordea later for the size to remain small).  To add interest and improve circulation and hiding spots for the inhabitants I have chiseled out several kg of rock to make caves that run through the rocks. This also adds visual depth to the scene and a three dimensional feel to it (also hard to see in the photos). I have also added shelves to some of the rocks but these will likely be removed later when the corals have grown to avoid a cramped impression. I will try to keep the sand free of corals to keep the open spaces ... open  . .I would highly appreciate feedback and pointers from you guys at this stage and look forward to more inspiration in this thread. Greetings from Finland. Last edited by The Cardinal; 10/09/2012 at 06:08 AM. |
|
|
|
|
10/09/2012, 09:40 PM
|
#98 |
|
Registered Member
Join Date: Jul 2011
Location: Brooklyn, NY
Posts: 81
|
OP - Great post!!! This is perfect, as my dry rock is currently curing and I wil begin my aquascaping once it is ready.
I do have a question for you. What do you think about the background? Assuming the back glass is kept clear of algae and as pristine as the front, do you think keeping it clear adds or takes away from the contents of the tank. If so then considering color composition any thoughts on whether a black or blue background works better?I guess if I don't paint it the background would be white (the color of the wall). Also, I am still undecided about painting the background as I may place the tank up against a support column in the middle of the room that measures 15"x18". i have a 48"x24"x21" tank with a center overflow. The overflow would be the part up against the column. So one would be able to view the tank from the front, sides, and about 16" on each side of the back. |
|
|
|
|
10/10/2012, 01:30 AM
|
#99 | |||||
|
Registered Member
Join Date: Mar 2012
Location: Buffalo,ny
Posts: 543
|
Quote:
Quote:
Quote:
 Quote:
Personally i prefer clear backgrounds. I think it adds a sense of simplicity and cleanliness. As long as you are not running any cords behind the back glass and you have a nice solid color painted wall, then Clear is the way to go. Black will create contrast and make corals pop more so then normal. Blue works for some people but im not a fan personally. The only way i see blue working nicely would be on very deep tanks to make it look like a deep ocean. Another option that i think is very cool is a shadowbox background. There is a thread already created on here for them too. http://reefcentral.com/forums/showthread.php?t=1868825 If you are able to hide all the wiring behind the column somehow then i'd say clear would work nicely. But i think that black background against a wall would be better. I say this because it will help distract the viewer from the huge bulky black overflow. Thats my advice and what i would personally do. Blue will just bring out the overflow more. |
|||||
|
|
|
|
10/10/2012, 01:57 AM
|
#100 |
|
Registered Member
Join Date: Feb 2011
Location: Athens, Hellas
Posts: 684
|
Great thread guys!Thanx for the info!
__________________
If you're doing it, do it right!!!!!!! Current Tank: Beaver's Crazy Reef (51X39X25, powered by ATB , Hyperion R2, Tunze ) |
|
|
|
 |
|
|


