
|
|
|
|||||||
 |
| Thread Tools |
 10/01/2008, 10:17 PM
|
#76 |
|
Registered Member

Join Date: Oct 2006
Location: Peoria, AZ
Posts: 238
|
I keep getting emails of updates on this thread but dont see any on the thread. Is it just me? What am I doing wrong. All my other subscription work fine.......
__________________
--Ryan-- You say your wallets fat?? Get into the saltwater hobby. That'll cure it real quick (175g Bowfront coming soon. Click on the red house to see the build thread.) Current Tank Info: 175g Reef, 60g sump, 40g frag, 40g fuge. |

|

|
|
10/02/2008, 04:00 AM
|
#77 |
|
Make my Funk a P-Funk
Join Date: Feb 2003
Location: Electric Avenue
Posts: 5,092
|
I have been doing some welding, but I am having a terrible time keeping things square. Stainless draws much more than regular steel.
__________________
**************** "Work hard, rock hard, eat hard, sleep hard, grow big, wear glasses if you need 'em." -- The Webb Wilder Credo -- don't go ninjin' nobody that don't need ninjin'! Current Tank Info: 220g custom plywood. SPS heavy with Sequence Hammerhead return with 4-Way OM. Tunze 6100, 6200 and Wavebox. 5000btu DIY Chiller. Lighting is 10K mh 250W / VHO Actinic Skimer - H&S A200-2x1260 |
|
|
|
|
10/02/2008, 06:18 AM
|
#78 | |
|
Registered Member
Join Date: Jun 2005
Location: Oxford, CT
Posts: 1,565
|
I tried to make a post here yesterday, but got an error once I hit submit. The post never showed up, but now I get the email updates like I am subscribed to the thread now. RC glitch I guess....
Anyway, I was trying to post that I built a tank with similar construction methods. Mine is 55x40x28. I made a steel frame of 2x2x1/8wall angle. Welded it up, and fit the plywood to the inside. I drilled and counter sunk all edges for wood screws about every 3 inchs (took forever!). I thickened up some epoxy to the consistency of peanutbutter. I sanded the steel down to bare metal with my trusty angle grinder, put down a thick layer of the thickened epoxy, put in the plywood and pulled it tight with the screws (squeezes out excess epoxy). The epoxy acts as an adhesive and also fills and gaps between the steel and wood. I did a single external overflow also (of a more basic design). Instead of running a piece of angle along the back top edge, I lowered it down about a foot, and turned it out so it acts as a support for the external overflow. Hope this makes sense. I will try to post a pic or two later. Quote:
|
|
|
|
|
|
10/08/2008, 12:34 AM
|
#79 |
|
Registered Member
Join Date: Sep 2004
Location: Pennsylvania
Posts: 1,228
|
Still following as well
|
|
|
|
|
10/13/2008, 06:26 PM
|
#80 |
|
Make my Funk a P-Funk
Join Date: Feb 2003
Location: Electric Avenue
Posts: 5,092
|
Well, I have been having a terrible time welding this stainless steel. This is the 1st time I have used it for anything requiring tight tolerances. And boy, did I have some learning to do.
If you have welded before, you know that metal shrinks when you weld it. But stainless REALLY shrinks. I feel that I have reached a milestone today, even though I am not yet finished welding. After cutting apart several joints several times, I developed a procedure to get things spot on square.  The front lower left joint was cut apart and re-welded at least 5 times.  When I say I cut the joints apart, I only cut the "flat" position of it. This allowed me to adjust the angle without completely re-ding the joint. 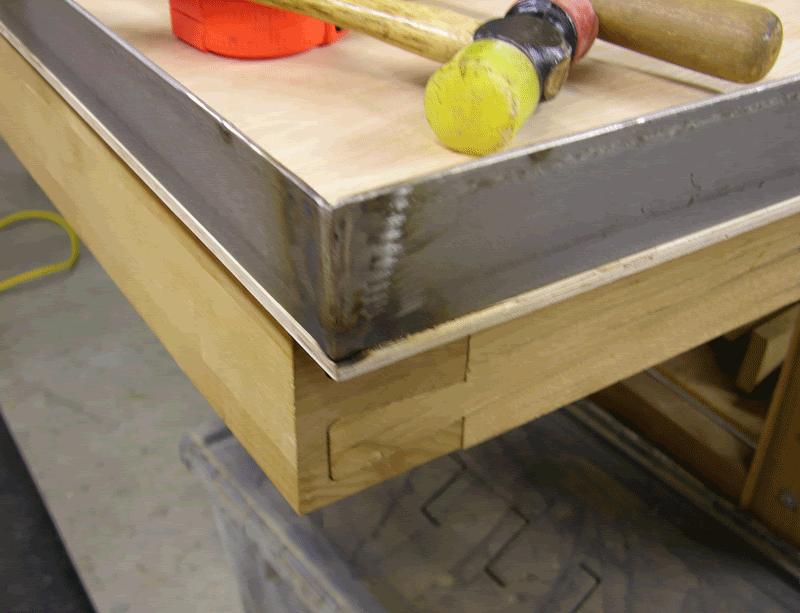 As I posted before, I had everything dry fit and clamped up on the plywood. I tack welded all the joints on the top perimeter and then filled in some of the welds before I removed the frame and finished welding it up. I had everything right on the money when I 1st started to weld and never re-checked it until I was almost done. I think I was about 3" out of sqaure by then.  That's when I started cutting some of the joints apart and trying again. Anyway, what ended up working was takin the frame outside and welding one joint at a time, a little at a time and cooling it off with a garden hose between welds. Before this, I had just cooled the joint down with a wet rag until it stopped sizzling. But the metal was still hot to the touch. This did not work. It has to get back to room temp. So, almost all the joints ended up just a little shy of 90deg. This is a good thing. I then beat the joints with a ball peen hammer to relive the stress. This also cased the angle to open up a little and I was able to get it right on 90deg after several good smacks. Anyway, i have a good procedure now and will finish up the welding soon. Here is a joint with some small tack welds.  Same joint after the 1st weld pass. Welding the whole joint in one pass makes a 90deg angle into about an 80deg joint.  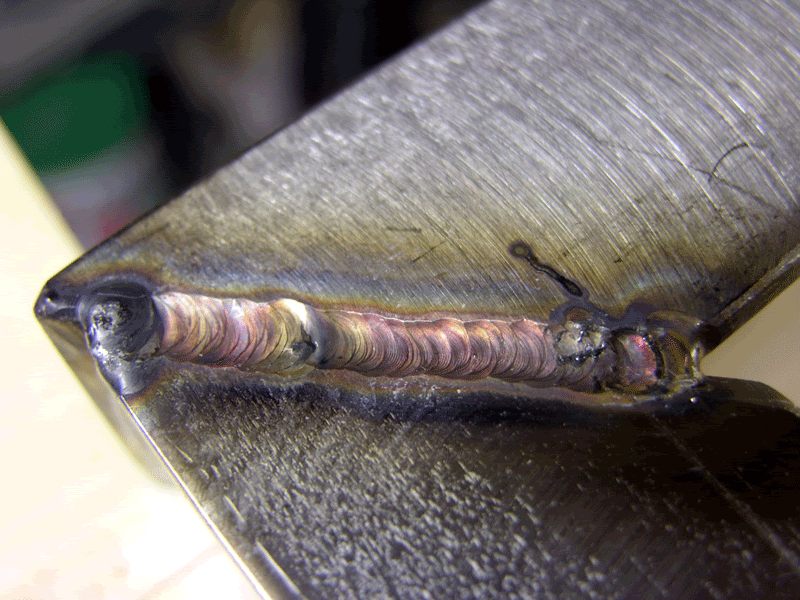 Here is the top perimeter frame. This will provide a significant portion of the structural integrity of the tank. You can make out the area above the overflow where I cut away some of the angle iron for some additional clearance. 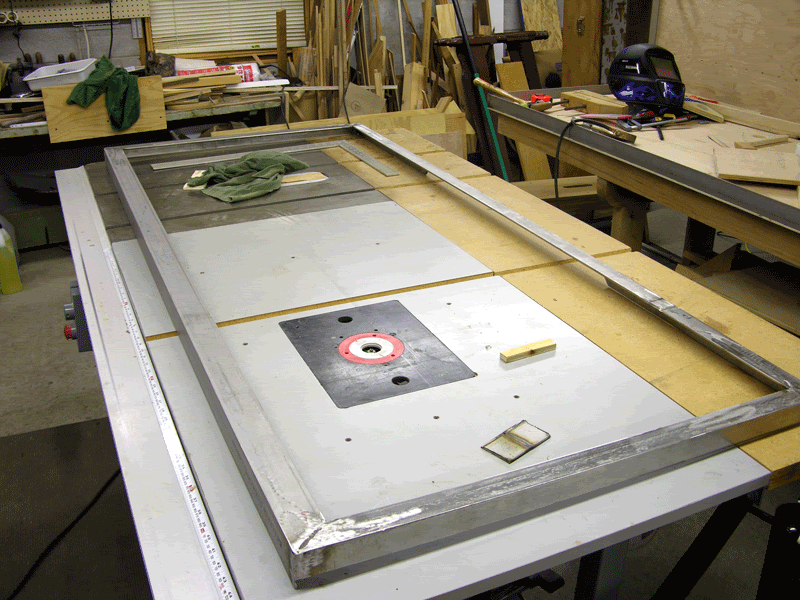 At this point, the euro brace is 1/16 out of square. Well within my target of 1/8" 
__________________
**************** "Work hard, rock hard, eat hard, sleep hard, grow big, wear glasses if you need 'em." -- The Webb Wilder Credo -- don't go ninjin' nobody that don't need ninjin'! Current Tank Info: 220g custom plywood. SPS heavy with Sequence Hammerhead return with 4-Way OM. Tunze 6100, 6200 and Wavebox. 5000btu DIY Chiller. Lighting is 10K mh 250W / VHO Actinic Skimer - H&S A200-2x1260 Last edited by AcroSteve; 10/13/2008 at 06:33 PM. |
|
|
|
|
10/13/2008, 08:40 PM
|
#81 |
|
reefkeeper// propagator
Join Date: Sep 2003
Location: illinois
Posts: 1,440
|
if your ship doesnt come in... swim out to it, i always say
__________________
Beware the hobby that eats- Benjamin Franklin Current Tank Info: 4 x 210 gallon prop system |
|
|
|
|
10/14/2008, 03:59 AM
|
#82 |
|
Registered Member
Join Date: Dec 2007
Location: Central California Coast.
Posts: 5,383
|
Thanks for the report. Nice perseverance!
|
|
|
|
|
10/15/2008, 01:08 AM
|
#83 |
|
Registered Member
Join Date: Sep 2004
Location: Pennsylvania
Posts: 1,228
|
Very nice!!!!!!
|
|
|
|
|
10/15/2008, 01:43 AM
|
#84 |
|
Premium Member
 Join Date: Oct 2007
Location: Cary, NC
Posts: 3,760
|
Good job Steve, I am glad to see you are overcoming the unforseen challenges. this is going to be one impressive tank.
welding looks hard 
__________________
- Ryan B "that is enough skimmate to ruin lives." - GSMguy Current Tank Info: 220g Display, 70g sump, 35g frag, 50g fuge, 2x250w MH, 1x400w MH, 2x80w T5, 2x140w VHO Actinic |
|
|
|
|
10/15/2008, 03:55 AM
|
#85 |
|
Registered Member
Join Date: Dec 2007
Location: Central California Coast.
Posts: 5,383
|
What's you tank dimensions?
I just got 3 quotes for a piece of low iron glass. 69"x35"x3/4"...... $936 $1,196 $1,310 |
|
|
|
|
10/19/2008, 05:29 AM
|
#86 |
|
Make my Funk a P-Funk
Join Date: Feb 2003
Location: Electric Avenue
Posts: 5,092
|
OUCH!!! have those prices increased much recently? I was thinking it would not be quite that much for low iron.
My tank dims are about 30x72 internal with a water level of about 25" My glass will be about 72"x27" and 29"x27" Well, after figuring out a method that works, I got most of the welding done, and fine tuned all of my corners to as close to 90 as I could get. I did this by literally beating the crap out of the metal where it was welded in the corners. This will case the angle to get larger or, open up. This way, most of my welds ended up just shy of 90 degrees. Then I could get them right on the money with some hammer work. This is what I ended up with. 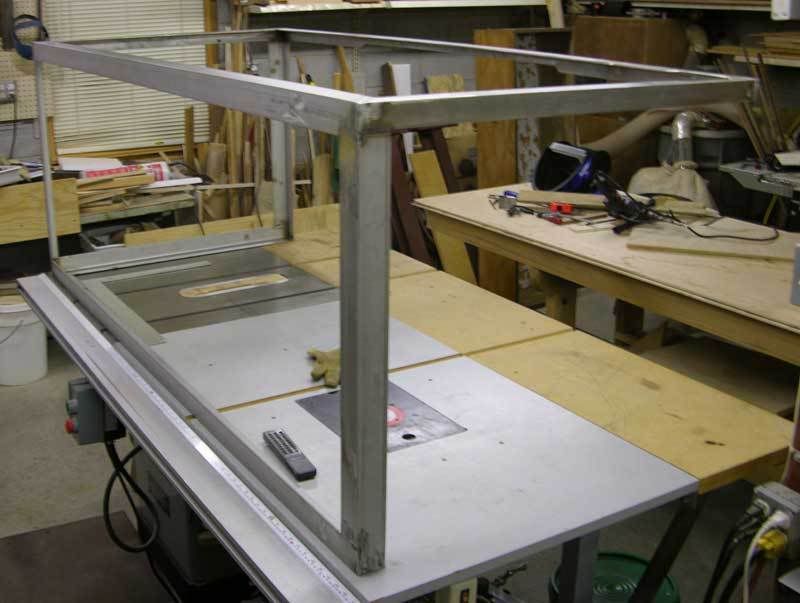 After getting it back inside where I could check it out, I was going to install the last piece of steel. This is the front corner where the two pieces of glass will meet. Originally, I did not think I wanted anything on the corner. I had thought about adding this piece temporarily for support of the top angle during construction. However, I plan on using 3/4 glass, and the angle will only cover the edges of the glass, and none of the viewing area. So, I am making it permanent. Anyway, the top and bottom did not line up quite right while keeping the viewing panels square. 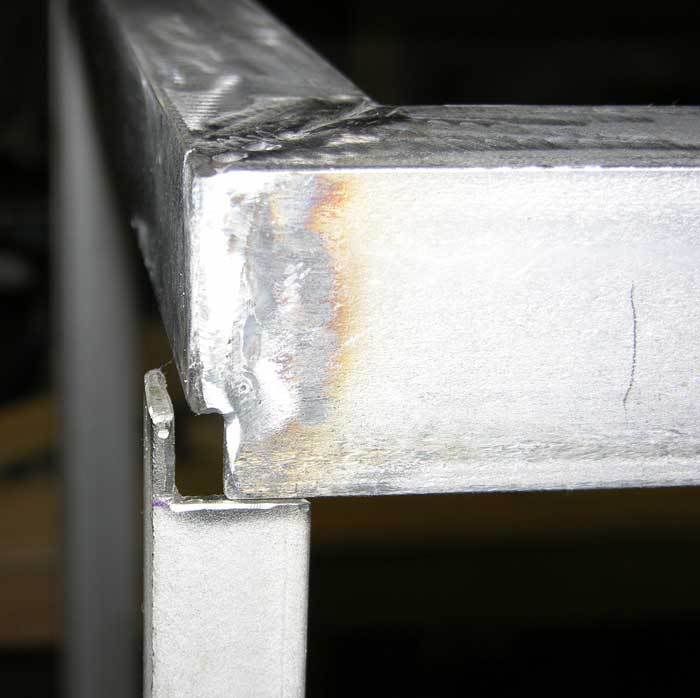 That difference is 1/4". So I had to cut the long angle in the front on top and extend it exactly 1/4". Here is how that worked out. I started with those marks 1-3/4" apart, and welded it so they would be 2" apart. 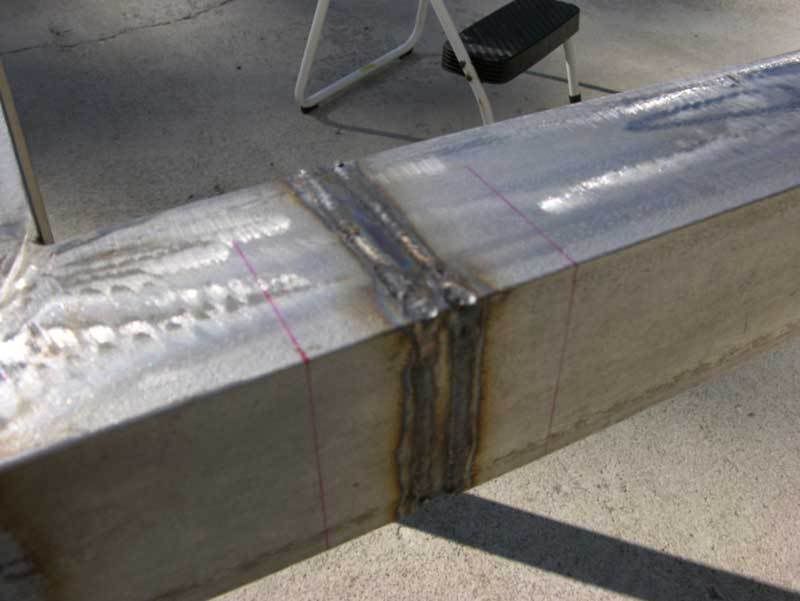 After just a few more hammer blows, I was ready for my last dry fit. After just a little trimming of the plywood, everything looked good, so I mixed up some epoxy and started the assembly.  I had drilled some 1/2" holes every 6" so I could pour the epoxy into the groove I had cut for the angle iron. I am pretty confident that I filled all the space with either angle or epoxy. The epoxy was thickened with some adhesive additive, that's why it is whitish. 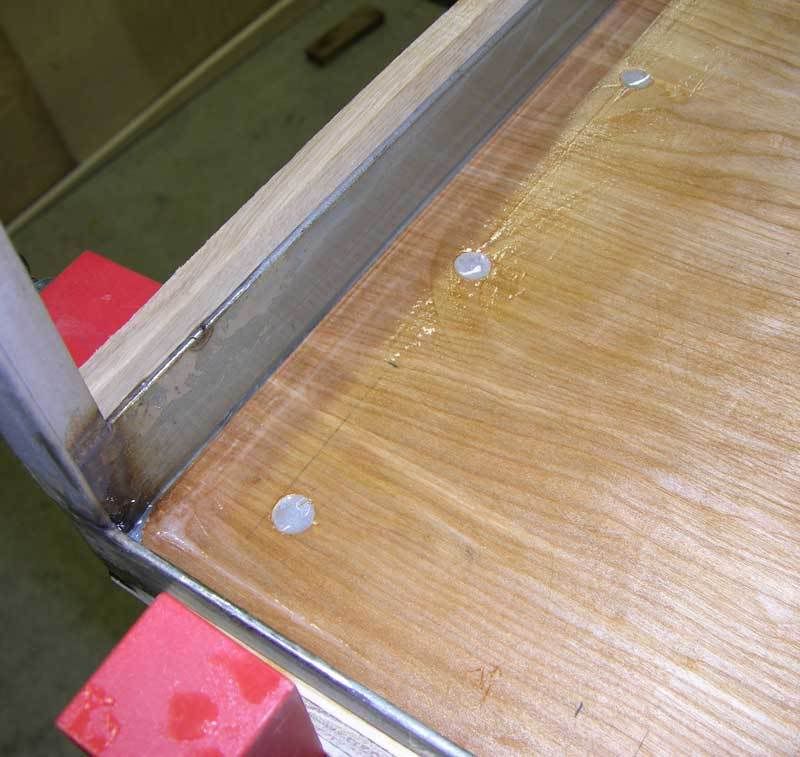 Here is what a side shot of the groove looked like. This is 1-1/2" angle, and I ended up with 2" 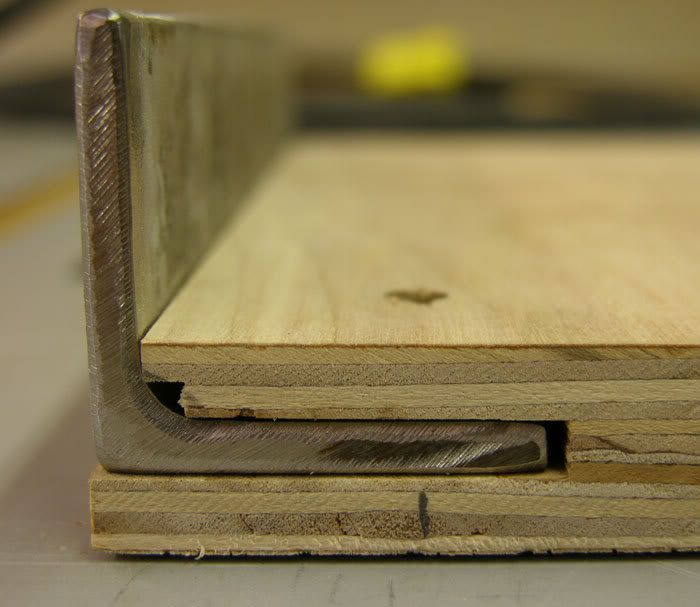 I think I am also going to drill some 3/8" holes completely through the bottom and angle. I will then glue in some dowels to positively lock in the angle iron. I just finished gluing in the top of the back piece, and should get the right side panel in today also. I guess I should be ordering some fiberglass cloth and more epoxy soon.
__________________
**************** "Work hard, rock hard, eat hard, sleep hard, grow big, wear glasses if you need 'em." -- The Webb Wilder Credo -- don't go ninjin' nobody that don't need ninjin'! Current Tank Info: 220g custom plywood. SPS heavy with Sequence Hammerhead return with 4-Way OM. Tunze 6100, 6200 and Wavebox. 5000btu DIY Chiller. Lighting is 10K mh 250W / VHO Actinic Skimer - H&S A200-2x1260 |
|
|
|
|
10/19/2008, 09:37 AM
|
#87 |
|
Premium Member
Join Date: Oct 1999
Location: Gananoque,ON
Posts: 845
|
Very nice work Steve. Are you going to do any Euro bracing on the top?
|
|
|
|
|
10/19/2008, 11:00 AM
|
#88 |
|
Registered Member

Join Date: Jan 2008
Location: Minor Hill, Tennessee
Posts: 133
|
This is a thread I will be following.. Subscribed..
I love seeing people start with an nothing but an idea and watching it come together... Good stuff. |
|
|
|
|
10/19/2008, 11:12 AM
|
#89 |
|
Registered Member
Join Date: Sep 2004
Location: Ohio
Posts: 1,167
|
Nice job!
Have to come see it
__________________
Romeo Current Tank Info: Pennisula Style 210G mixed reef, Primary lighting 250w MH 10k's, 160w VHO actinic supplement, custom 75G sump, |
|
|
|
|
10/19/2008, 11:32 AM
|
#90 | |
|
Make my Funk a P-Funk
Join Date: Feb 2003
Location: Electric Avenue
Posts: 5,092
|
Quote:
The construction method, angle and glass thickness alone is probably more than sufficient. The wood is just cosmetic.
__________________
**************** "Work hard, rock hard, eat hard, sleep hard, grow big, wear glasses if you need 'em." -- The Webb Wilder Credo -- don't go ninjin' nobody that don't need ninjin'! Current Tank Info: 220g custom plywood. SPS heavy with Sequence Hammerhead return with 4-Way OM. Tunze 6100, 6200 and Wavebox. 5000btu DIY Chiller. Lighting is 10K mh 250W / VHO Actinic Skimer - H&S A200-2x1260 |
|
|
|
|
|
10/19/2008, 11:38 AM
|
#91 | |
|
Make my Funk a P-Funk
Join Date: Feb 2003
Location: Electric Avenue
Posts: 5,092
|
Quote:
TIG is the way to go on something like this. Thanks 
__________________
**************** "Work hard, rock hard, eat hard, sleep hard, grow big, wear glasses if you need 'em." -- The Webb Wilder Credo -- don't go ninjin' nobody that don't need ninjin'! Current Tank Info: 220g custom plywood. SPS heavy with Sequence Hammerhead return with 4-Way OM. Tunze 6100, 6200 and Wavebox. 5000btu DIY Chiller. Lighting is 10K mh 250W / VHO Actinic Skimer - H&S A200-2x1260 |
|
|
|
|
|
10/19/2008, 11:57 AM
|
#92 |
|
Registered Member
Join Date: Jan 2004
Location: San Francisco
Posts: 9,103
|
Tagging along, I'm in the process of scouting out materials for a tank myself, although going a different direction than you. Anyways, with your tank height and bracing around it you can easily do with 1/2" glass which will bring down the cost per pane significantly.
__________________
Mike |
|
|
|
|
10/19/2008, 01:29 PM
|
#93 |
|
Registered Member
Join Date: Dec 2007
Location: Central California Coast.
Posts: 5,383
|
I'm surprised you didn't just use flat stock on the top so you don't have that dang angle into the top of the tank. You'd just tie the four corners together with flat stock instead of angle - nothing over the water.
Both will work of course. Just curious why? Where were you hitting with the hammer to open up the angles? On the corner? BTW looking good! |
|
|
|
|
10/19/2008, 01:43 PM
|
#94 |
|
Registered Member
Join Date: Sep 2004
Location: Ohio
Posts: 1,167
|
Just remember, I would like to be there when you start with the fiber glass. Need to learn how to do it.
Oh yeah, rental fees and consumables get expensive  I need a frag, pretty much lost the large leather 
__________________
Romeo Current Tank Info: Pennisula Style 210G mixed reef, Primary lighting 250w MH 10k's, 160w VHO actinic supplement, custom 75G sump, |
|
|
|
|
10/19/2008, 01:51 PM
|
#95 |
|
Registered Member
Join Date: Sep 2004
Location: Ohio
Posts: 1,167
|
One more thing Steve had to overcome was that he never used a Tig before so my hats off to you for pulling thru it.
If it came out like the rest of the stuff he builds it will hold up for many years. Can't wait to see the day the water gets added 
__________________
Romeo Current Tank Info: Pennisula Style 210G mixed reef, Primary lighting 250w MH 10k's, 160w VHO actinic supplement, custom 75G sump, |
|
|
|
|
10/19/2008, 02:09 PM
|
#96 |
|
Registered Member
Join Date: Sep 2005
Location: Oakdale, Long Island
Posts: 1,550
|
using flat stock wouldn't add any strength in the direction it's needed. The angle will help prevent the wall from wanting to bow out. Whether or not's it's necessarry I don't know, but it definitly makes it stronger, like small eurobracing.
__________________
-Scott Whenever Im about to do something, I think would an idiot do that? and if they would, I do not do that thing Current Tank Info: 120 gallon mixed reef |
|
|
|
|
10/19/2008, 04:44 PM
|
#97 | |
|
Registered Member
Join Date: Dec 2007
Location: Central California Coast.
Posts: 5,383
|
Quote:
Using any steel across the tops prevents the banana peeling aspects. The glass bowing in the middle of the display panel would require the corner piece to actually bow inward which is the opposite of what they really want to do. Heck! Physics doesn't think you need to tie the corner pieces together at all! I'm chicken on that though... |
|
|
|
|
|
10/19/2008, 07:14 PM
|
#98 | ||
|
Make my Funk a P-Funk
Join Date: Feb 2003
Location: Electric Avenue
Posts: 5,092
|
Quote:
And with the wavebox, I wanted a bombproof tank. Quote:
__________________
**************** "Work hard, rock hard, eat hard, sleep hard, grow big, wear glasses if you need 'em." -- The Webb Wilder Credo -- don't go ninjin' nobody that don't need ninjin'! Current Tank Info: 220g custom plywood. SPS heavy with Sequence Hammerhead return with 4-Way OM. Tunze 6100, 6200 and Wavebox. 5000btu DIY Chiller. Lighting is 10K mh 250W / VHO Actinic Skimer - H&S A200-2x1260 Last edited by AcroSteve; 10/19/2008 at 07:20 PM. |
||
|
|
|
|
10/19/2008, 07:15 PM
|
#99 | |
|
Make my Funk a P-Funk
Join Date: Feb 2003
Location: Electric Avenue
Posts: 5,092
|
Quote:
__________________
**************** "Work hard, rock hard, eat hard, sleep hard, grow big, wear glasses if you need 'em." -- The Webb Wilder Credo -- don't go ninjin' nobody that don't need ninjin'! Current Tank Info: 220g custom plywood. SPS heavy with Sequence Hammerhead return with 4-Way OM. Tunze 6100, 6200 and Wavebox. 5000btu DIY Chiller. Lighting is 10K mh 250W / VHO Actinic Skimer - H&S A200-2x1260 |
|
|
|
|
|
10/19/2008, 07:17 PM
|
#100 | |||
|
Make my Funk a P-Funk
Join Date: Feb 2003
Location: Electric Avenue
Posts: 5,092
|
Quote:
Get on day shift for a few weeks and we can get er done.I will be ordering some supplies this week - two types of glass cloth(37 oz for the interior and 8.2 oz for the exterior), 4 gal of resin with 2 gal of hardener(6 gallons total + some other odds and ends. Quote:
 What happened to the leather? I do have plenty when you need it. Quote:
 Something about the things on her honey-do list not being on my list too. I did plant three trees/bushes for her today and sawed up a bunch of logs that where an eyesore for her. Even stacked it on the woodpile.
__________________
**************** "Work hard, rock hard, eat hard, sleep hard, grow big, wear glasses if you need 'em." -- The Webb Wilder Credo -- don't go ninjin' nobody that don't need ninjin'! Current Tank Info: 220g custom plywood. SPS heavy with Sequence Hammerhead return with 4-Way OM. Tunze 6100, 6200 and Wavebox. 5000btu DIY Chiller. Lighting is 10K mh 250W / VHO Actinic Skimer - H&S A200-2x1260 Last edited by AcroSteve; 10/19/2008 at 07:27 PM. |
|||
|
|
|
|
|
|


