
|
|
 05/04/2011, 02:46 PM
|
#1 |
|
Registered Member
Join Date: Nov 2009
Posts: 60
|
LED Daylight Controller - A different take
Well my obsession with a simple LED daylight controller continues. My previous efforts at building a simple daylight controller worked well however I wanted better build quality and more options. So I took my earlier designs and combined them into one controller that can be used a number of ways.
This new version is a dimmer, daylight controller and driver for up to 24 X 3W 700mA LEDs. Additionally I added the ability to use it with other external drivers that take either a 5V or 10V PWM dimming source. The idea there is that I can build it to drive the LEDs on my nano then use the same controller to be a dimming source on that 100G I want to move into. I can also build it as a controller only for external drivers for systems I've already retro'ed. And in fact I can use the same controller to do both at the same time. So that means I can have two or more tanks with the daylight cycle synchronized! Once I had the design where I wanted it I wanted something cleaner than my previous wire wrap boards so I had a few PC Boards made. First PC board Ive ever had produced so I was pleasantly surprised at how well they turned out and that I didnt make any mistakes in the design so everything works with no modification to the board. 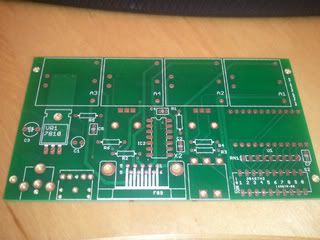 If youre not familiar with my previous versions, one of my main design concepts was to keep it simple. I wanted versatility but Im not going after an end all. I tried building a model with a real time clock, LED screen, input buttons etc. But I found that overly complex for what I wanted. I just want to set the brightness with a knob, give some parameters for how long I want it to run, how it should ramp up and ramp down and what kind of delay should there be between the different colors on the ramp up and ramp down. For that much control I decided to just use pots for the brightness controls and a dip switch to set all the timing parameters. Heres the top of the board 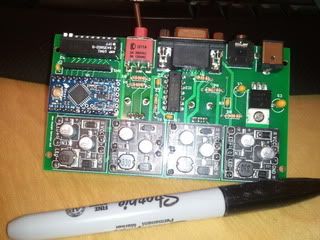 Pots mounted to bottom 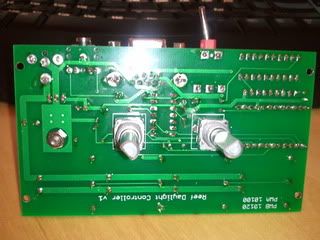 Heres my complete unit working right now 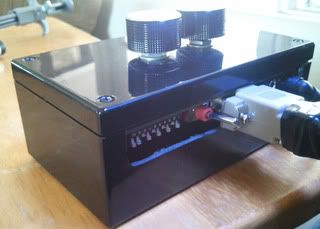 And for reference here is an older video I put together showing the kind of control Im talking about. Daylight Cycle Test Previous controller Now unrelated to the controller is the LED fixture retro itself which I detailed here Ive reworked this setup several times doing different things with controllers and driver combos. In the end it got to be a huge mess inside the hood. I had everything stuffed in the hood, drivers, power supplies etc. Every inch of space was used by something. Here's the before 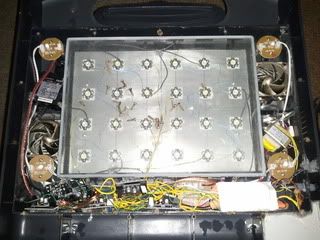 So now with the new setup everything is in the one controller box so I was able to pull everything out and clean it up a lot. Basically Im just making wire connections to the various components. I still loose style points for all the mismatched wire on LEDs themselves, but I wasnt willing to rewire the whole thing to just to make it pretty as I know I'll be back in there again soon. Here's the after  The LEDs have been great. They are the same high output SemiLEDs I used in earlier builds. These are the older versions, more recently Ive been getting some different color temps, some higher power Bridgelux LEDs (10W, 30W and 50W) and am doing some testing with those units. Most interesting lately is that I can now get these 3W SemiLEDs with a 60 degree viewing angle. Thats with no optics installed. They are getting tons of PAR to the sand and very efficiently. Here's a video explaining how it works. Caution, its a few minutes long and pretty geeked out and boring. When I show the cycle at the end, thats simulating over 90 seconds what would normally run over a full day. In this case I do the ramp up / down in 30 seconds each. The ramp up / down doesn't show so well on the camera as its trying to compensate for the brightness changes. In practice, I get a nice gradual change where everytime I look at the tank during the ramp up / down it looks a little different. The change is subtle and happens over time. In regular use I'm currently running a 30 minute ramp up and a 90 minute ramp down on my regular cycle. Click the pic to see the video if interested.  Daylight controller - link to video Thanks |

|

|
|
05/04/2011, 06:01 PM
|
#2 |
|
Registered Member
Join Date: Dec 2006
Location: kaukauna, wi.
Posts: 3,879
|
3 works for you.....
Sick Sick SICK!! ill say this....i want one 
__________________
PLEASE DONT USE GREAT STUFF (THE YELLOW STUFF) IN YOUR TANK........USE POND FOAM (THE BLACK STUFF).. I BEG YOU! Great stuff====$5 a can 24-48 hour cure Epoxy to cover it====little as $5 for small projects or up to $100+ for larger projects and another 24-48 hour cure I hope you covered it well cuz if you didnt it will start to break down in a few months sand is another added cost to cover up the yellow. Pond foams====$9-$15 a can 24-48 hour cure DONE! You can cover it with sand if you want to (YOU DONT HAVE TO) though but thats added cost again Current Tank Info: 75 gal under way |
|
|
|
|
05/04/2011, 06:31 PM
|
#3 |
|
Registered Member
Join Date: Feb 2009
Location: Greensboro, NC
Posts: 766
|
What type of drivers are you using?
-Dave
__________________
Dave Current Tank Info: 35g Shallow Reef Build/iTech 100/Tunze Osmolator/MP20/Sunpower |
|
|
|
|
05/04/2011, 08:31 PM
|
#4 | |
|
Registered Member
Join Date: Nov 2009
Posts: 60
|
Quote:
I'm using the little Sure Electronics drivers. I'll dig up a link if your not familiar with it. |
|
|
|
|
|
05/04/2011, 08:51 PM
|
#5 |
|
Registered Member
Join Date: Sep 2009
Location: Canada
Posts: 73
|
Wow, good job. I honestly have no idea how you guys have the ability to build such things, impressive indeed.
__________________
There's plenty of room for all God's creatures. Right next to the mashed potatoes. Current Tank Info: 65gal freshwater display |
|
|
|
|
05/04/2011, 09:31 PM
|
#6 |
|
Registered Member
Join Date: Mar 2011
Posts: 79
|
How much?
 Very cool, I'm very impressed. |
|
|
|
|
05/04/2011, 11:54 PM
|
#7 |
|
Registered Member
Join Date: Nov 2009
Posts: 60
|
Thanks. I do have enough parts to build a couple more of these. If you are interested let me know what you are trying to do and maybe we can work something out.
|
|
|
|
|
05/05/2011, 09:35 PM
|
#8 |
|
Registered Member
Join Date: Nov 2009
Posts: 60
|
A couple people asked me how this is controlled since it doesn't have a clock. I just use a wall timer to turn it on. Just need to make sure the wall timer is on long enough to let it run the whole cycle.
|
|
|
|
|
05/06/2011, 08:39 AM
|
#9 |
|
Registered Member
Join Date: Jan 2010
Posts: 117
|
Thanks for sharing
|
|
|
|
|
05/06/2011, 01:48 PM
|
#10 |
|
Registered Member
Join Date: Oct 2008
Location: Huntsville, AL
Posts: 2,736
|
Nice!
|
|
|
|
 |
| Tags |
| controllers, daylight, led |
|
|
 Similar Threads
|
||||
| Thread | Thread Starter | Forum | Replies | Last Post |
| rapidled daylight controller | T Diddy | Do It Yourself |
11 | 04/12/2011 09:13 PM |
| Need help on led lighting | scottchart | Lighting, Filtration & Other Equipment | 0 | 01/20/2011 09:06 AM |
| Adding second switch to aqualight for daylight control? | bbkid4 | Do It Yourself |
1 | 11/12/2010 04:46 PM |
| FS: 4x Daylights + 4x Actinic + 2x 660 Icecap Ballasts | Jboulerice | Florida Marine Aquarium Society (FMAS) - Miami/Ft. Lauderdale | 3 | 01/06/2010 02:35 PM |


