
|
|
 11/02/2009, 08:07 AM
|
#1 |
|
Registered Member
Join Date: Nov 2007
Location: Mt. Wolf, PA
Posts: 974
|
cutting glass
I am cutting slots in the back of my 75 gallon for an external overflow. I know I need a diamond saw. What I don't know is what blade/tool I should use. I am planning on using a 1/2" diamond hole saw for the ends, but it's the long cuts that I'm worried about. I don't feel that a dremel would be a good choice. The cut will be about 24" long, and trying to keep it straight might be problematic.
__________________
"What?!? Haven't you ever seen someone work on an engine with an axe before?" Mythbusters Current Tank Info: Biocube 29, Aurora puck LED |

|

|
|
11/02/2009, 08:23 AM
|
#2 |
|
Registered Member
Join Date: Jan 2008
Location: PA
Posts: 675
|
personally, i would rethink your need for a slot. Cutting this slot as a hobbyist is a high risk, low reward scenario.
|
|
|
|
|
11/02/2009, 08:39 AM
|
#3 |
|
Registered Member
Join Date: Nov 2007
Location: Mt. Wolf, PA
Posts: 974
|
The reason I'm doing it is because the 75gal tank is only 18" front to back. With the C2C which will be about 4" to 5" sticking into the tank, that's quite a lot of space taken up. By making the cut, I'll be able to put the overflow externally. I've also though about instead of making one big cut, I'll have two 12" slots with 8" in between them.
__________________
"What?!? Haven't you ever seen someone work on an engine with an axe before?" Mythbusters Current Tank Info: Biocube 29, Aurora puck LED |
|
|
|
|
11/02/2009, 09:37 AM
|
#4 |
|
Team RC Member
Join Date: Sep 2003
Location: NY
Posts: 17,749
|
How about this approach:
1) Build a small, low-profile C2C box inside the tank 2) Drill several holes in the wall of the tank, inside this box 3) Build a large external box, with holes in the bottom, for your standpipes The only cuts you have to make are holes, which are easy. It won't take up much room inside the tank, and you get all the benefit and flexibility of an external C2C. I've seen uncleof6 post designs similar to this several times, maybe he'll come along.
__________________
Inconveniencing marine life since 1992 "It is my personal belief that reef aquaria should be thriving communities of biodiversity, representative of their wild counterparts, and not merely collections of pretty specimens growing on tidy clean rock shelves covered in purple coralline algae." (Eric Borneman) |
|
|
|
|
11/02/2009, 10:01 AM
|
#5 | |
|
Registered Member
Join Date: Nov 2007
Location: Mt. Wolf, PA
Posts: 974
|
Quote:
__________________
"What?!? Haven't you ever seen someone work on an engine with an axe before?" Mythbusters Current Tank Info: Biocube 29, Aurora puck LED |
|
|
|
|
|
11/02/2009, 10:15 AM
|
#6 |
|
Registered Member
Join Date: Jan 2007
Location: Oakdale,Ct.
Posts: 2,772
|
glass holes makes a really nice low profile box
__________________
FUPA jealous;) Current Tank Info: Wish I had one building a house |
|
|
|
|
11/02/2009, 10:43 AM
|
#7 |
|
Team RC Member
Join Date: Sep 2003
Location: NY
Posts: 17,749
|
Definitely, but you pretty much have to use it with their durso-style drain. And they're not coast to coast. Not that there's anything wrong with that, but you're locked in.
__________________
Inconveniencing marine life since 1992 "It is my personal belief that reef aquaria should be thriving communities of biodiversity, representative of their wild counterparts, and not merely collections of pretty specimens growing on tidy clean rock shelves covered in purple coralline algae." (Eric Borneman) |
|
|
|
|
11/02/2009, 11:48 AM
|
#8 | |
|
Registered Member
Join Date: Jul 2004
Location: AWOL
Posts: 12,013
|
Quote:
__________________
"Things should be made as simple as possible, but not simpler." (oft attributed to Einstein; most likely paraphrasing by Roger Sessions; compactly articulates the principle of Occam's Razor) Current Tank Info: 325 6' wide Reef |
|
|
|
|
|
11/02/2009, 12:21 PM
|
#9 |
|
Registered Member
Join Date: Nov 2007
Location: Mt. Wolf, PA
Posts: 974
|
That looks good, and looks like it would work well. Since I'll be doing it on the back panel (48") and using Bean's overflow system, would you recommend drilling more than 2 holes...3 or 4, to aid in getting the flow to the external part?
__________________
"What?!? Haven't you ever seen someone work on an engine with an axe before?" Mythbusters Current Tank Info: Biocube 29, Aurora puck LED |
|
|
|
|
11/02/2009, 03:11 PM
|
#10 | |
|
Registered Member
Join Date: Jul 2004
Location: AWOL
Posts: 12,013
|
Quote:
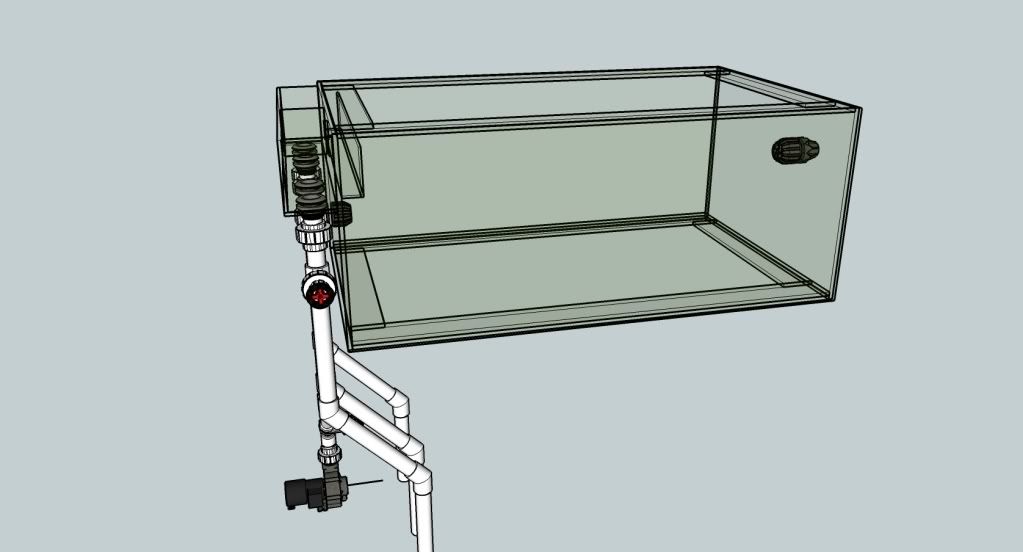
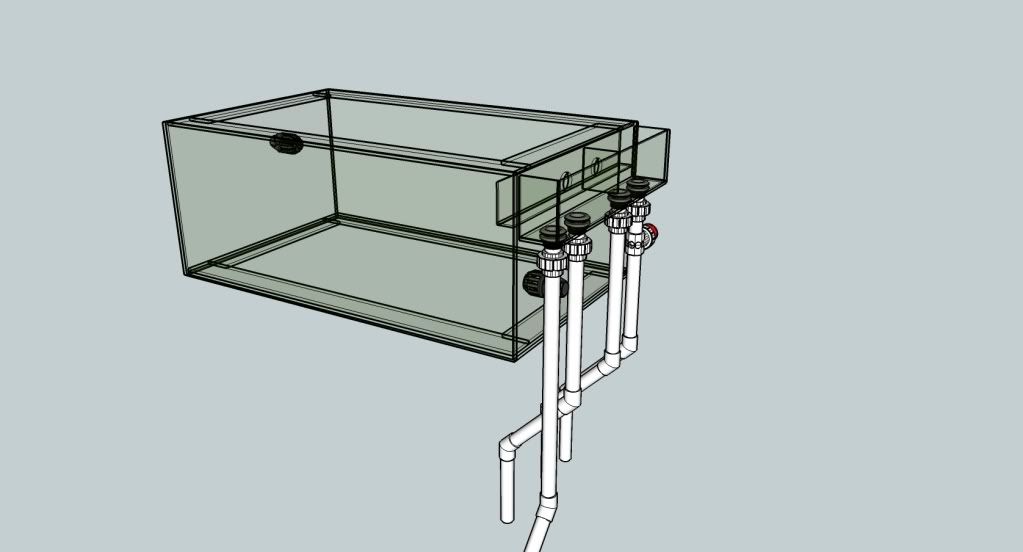
In talking with BeanAnimal about this particular design, some "design criteria" became apparent. (For safety with glass tanks, the holes need to be 1 - 1.5 x the hole diameter down from the top and edges of the glass.) The internal "weir" would be set (usually) at the bottom of the external rim of the tank (~1" down from the top of the glass) to hide the waterline, and the internal box would extend to below the holes in the back. The external box and standpipes, should be "situated" on the back so that the water level of the overflow system is at the vertical center of the hole. (the widest part.) The external box needs to extend above/below the holes enough to give you the vertical adjustment to dial the system in. Keeping the water level at or nearest to the centerline of the hole will give you the freest flow, and quietest operation between the internal and external box, while maintaining the surface skimming between the internal/external boxes. Key factors in this design is freeflow through the holes, and maintaining the surface skimming from internal to external. You don't want bulkheads in the holes, attaching the internal box to the back wall, such as in the gl*******s.com system, rather a blank hole. The bulkheads will inhibit the free flow. Just as the length of a "weir" affects the surface skimming of the DT, so would the number of holes between the internal and external boxes. The number of holes will also make it more freeflowing. So the simple answer would be 4 holes be better than 2, 6 holes be better than 4. But let's not get too carried away with it. This should give you a place to start using 5 holes. 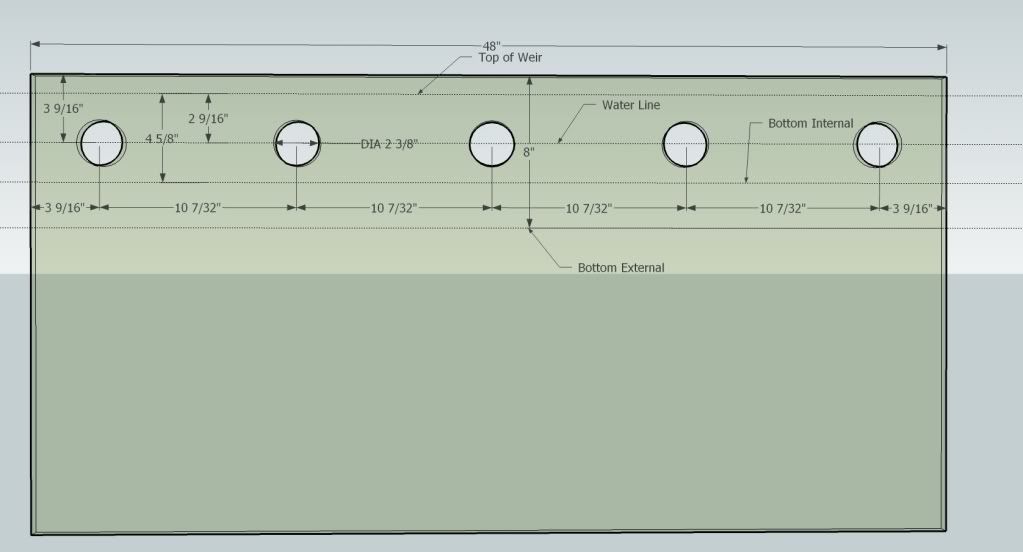 A system similar to this is under construction (60",) however the client is out of funds at the moment, (seems to be an epidemic w/associated collateral damage), and it is stalled. So ultimately how many holes there will be is uncertain yet. (or if it will ever be completed) Jim
__________________
"Things should be made as simple as possible, but not simpler." (oft attributed to Einstein; most likely paraphrasing by Roger Sessions; compactly articulates the principle of Occam's Razor) Current Tank Info: 325 6' wide Reef |
|
|
|
|
|
11/02/2009, 03:22 PM
|
#11 |
|
Registered Member
Join Date: Nov 2007
Location: Mt. Wolf, PA
Posts: 974
|
I must say Jim, you saved me some time.
"Just as the length of a "weir" affects the surface skimming of the DT, so would the number of holes between the internal and external boxes. The number of holes will also make it more freeflowing." My thoughts exactly. Many thanks. Looks like a winner to me. Joel
__________________
"What?!? Haven't you ever seen someone work on an engine with an axe before?" Mythbusters Current Tank Info: Biocube 29, Aurora puck LED |
|
|
|
|
11/09/2009, 02:18 PM
|
#12 |
|
Registered Member
Join Date: Aug 2001
Location: Vestal, NY
Posts: 3,679
|
Thanks for the link/diagram Jim!
I'm thinking about doing something VERY similar to the above diagram and have a few questions... Does the depth (front to back, not top to bottom) of the internal box affect flow rate to the external box? Could the inner box only be 1" deep and still get good flow and low noise? I got thinking about this after reading about Bean's overflow - I assume I'd still want to use his plumbing setup inside the external box to keep a continuous siphon and have 2 failsafes? I'm thinking about using bulkheads between the two boxes. I know they will reduce flow, but they will also help ensure water tightness, and give some stability/rigidity to the exterior box. Would some aquarium silicone + 2 bulkheads be reasonable for attaching the external box to the side of the tank? I suspect my external box will be something like 11"w x 4"d x 4"h, fwiw. I'm sure I'll have more questions as I get my head around this... TIA.
__________________
Jackson - All advice I give is based on my first hand experience. YMMV. Current Tank Info: 38g (mostly LPS) with a 20g sump/fuge and all the other standard goodies |
|
|
|
|
11/09/2009, 03:00 PM
|
#13 |
|
Registered Member
Join Date: Jul 2009
Location: Avondale, AZ
Posts: 162
|
Tagging along.
I'm on the verge of getting my tank wet to test my take on the Bean Animal Overflow. [IMG] 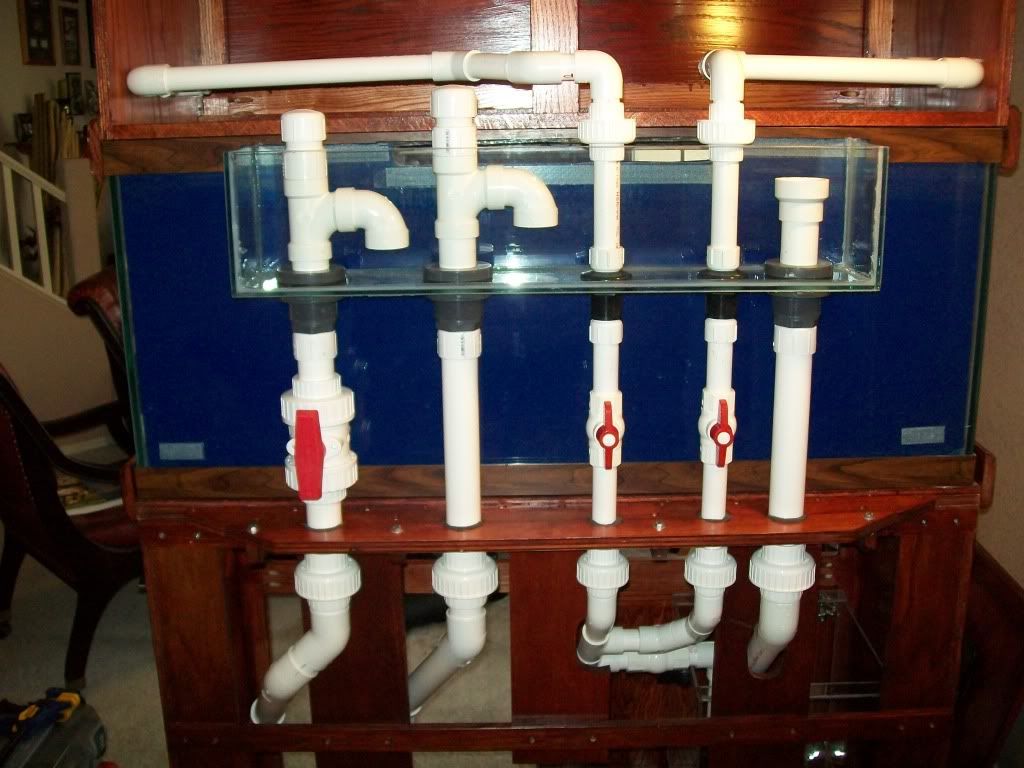 [/IMG] [/IMG]Since this pic I've changed the second pipe from the right and used bushings instead of drilling a cap for the John Guest fittings. I have a 1/4" ball valve and two 45 degree elbows sending the 1/4 tubing back down to break the siphon in an emergency. The pipe to the far right is the emergency pipe hence no T and turned down elbow. Will this make mine loud? I'm going to find out, I guess. Comments are welcomed. Some things are still not glued so I could still make some last minute modifications.
__________________
"I have people skills; I'm good at dealing with people. Can't you understand that? What the hell is wrong with you people?!" - Tom Smykowski Current Tank Info: 1986 glass 70g brought back to life, custom glass external overflow, DIY sump and refugium, Euro Reef CS100, Eheim 1262, IceCap 6 lamp T5 retro w/660 and 430 ballasts, MP40W-ES, Tunze ATO, Neptune Apex Controller, Spectrapure MaxCap |
|
|
|
|
11/09/2009, 04:52 PM
|
#14 | |
|
Registered Member
Join Date: Jul 2004
Location: AWOL
Posts: 12,013
|
Quote:
The dimensions of the external are dictated by the plumbing size, not by choice as it were, as there needs to be vertical adjustment, with the water line at the center of the flow through holes. The first drawing (linked) is pretty much what you got when using 1.5" pipe size. (To use a tee anyway.) Why a tee? You have to consider how to unplug a line if it gets clogged, and just an elbow in the external, would make that really hard, without taking the whole thing apart....... Jim
__________________
"Things should be made as simple as possible, but not simpler." (oft attributed to Einstein; most likely paraphrasing by Roger Sessions; compactly articulates the principle of Occam's Razor) Current Tank Info: 325 6' wide Reef |
|
|
|
|
|
11/09/2009, 05:12 PM
|
#15 | |
|
Registered Member
Join Date: May 2009
Posts: 61
|
Quote:
|
|
|
|
|
|
11/09/2009, 05:57 PM
|
#16 |
|
Registered Member
Join Date: Jul 2004
Location: AWOL
Posts: 12,013
|
Sorry for the redundant photos, sometimes I forget what thread I am in, or cross things up.
Jim
__________________
"Things should be made as simple as possible, but not simpler." (oft attributed to Einstein; most likely paraphrasing by Roger Sessions; compactly articulates the principle of Occam's Razor) Current Tank Info: 325 6' wide Reef |
|
|
|
|
11/10/2009, 10:07 AM
|
#17 | |
|
Registered Member
Join Date: Jul 2009
Location: Avondale, AZ
Posts: 162
|
Quote:
__________________
"I have people skills; I'm good at dealing with people. Can't you understand that? What the hell is wrong with you people?!" - Tom Smykowski Current Tank Info: 1986 glass 70g brought back to life, custom glass external overflow, DIY sump and refugium, Euro Reef CS100, Eheim 1262, IceCap 6 lamp T5 retro w/660 and 430 ballasts, MP40W-ES, Tunze ATO, Neptune Apex Controller, Spectrapure MaxCap |
|
|
|
|
|
11/20/2009, 05:38 PM
|
#18 |
|
Registered Member
Join Date: Oct 2006
Location: Bay Area, CA
Posts: 262
|
Jim,
To get the water line to be in the center of the drilled holes in the internal box, what are the heights of your 3 pipes. I guess mainly what is the height of the siphon line in the external box? Does the siphon line elbow need to be completely submerged in the external box when the water is at the center water line shown in your drawing? Thanks. |
|
|
|
|
11/20/2009, 09:17 PM
|
#19 | |
|
Registered Member
Join Date: Jul 2004
Location: AWOL
Posts: 12,013
|
Quote:
Jim
__________________
"Things should be made as simple as possible, but not simpler." (oft attributed to Einstein; most likely paraphrasing by Roger Sessions; compactly articulates the principle of Occam's Razor) Current Tank Info: 325 6' wide Reef |
|
|
|
|
|
11/20/2009, 11:50 PM
|
#20 | |
|
Registered Member
Join Date: Sep 2008
Posts: 1,840
|
Quote:
I am building a 75. I have it drilled for Beans system. The three holes like he pictured in his thread. I really like the idea you have up on here. I have drilled 2 3/8 " holes now and can add 2 -3 more if I need to, to employ this design. Since my holes are more or less on one side, do you think it would hurt me to add another three matching holes on the other side of my tank? Also, my sch 80 bulkheads that I am using, How wide do you think I should have the glass cut for the bottom of the externial portion of the OF box? I can post a pic if you would like. A pic of the holes that is, or give you measurements. |
|
|
|
|
|
11/22/2009, 11:25 PM
|
#21 |
|
Registered Member
Join Date: Oct 2006
Location: Bay Area, CA
Posts: 262
|
Thanks Jim.
|
|
|
|
|
11/22/2009, 11:40 PM
|
#22 | |
|
Registered Member
Join Date: Jul 2004
Location: AWOL
Posts: 12,013
|
Quote:
The Exterior should be wide enough to fit everything in, with wiggle room, be mindful though, that the holes in the floor of the external box violate the safe spacing rule around 5" front to back. Jim
__________________
"Things should be made as simple as possible, but not simpler." (oft attributed to Einstein; most likely paraphrasing by Roger Sessions; compactly articulates the principle of Occam's Razor) Current Tank Info: 325 6' wide Reef |
|
|
|
|
|
11/23/2009, 06:57 PM
|
#23 | |
|
Registered Member
Join Date: Sep 2008
Posts: 1,840
|
Quote:
Going with this type of setup I would like to see the holes evenly spaced as well but, I already drilled it. I kinda wish I would have seen this or thought of it sooner. In my excitement I drilled away. There is something about this system that I like, I like it just as much as I like Beans drain. 5" will give me 3/4" on either side of the bulkhead. The other thing is that the bottom of the box is held tight by a lot of silicone directly on the sides of the bulkheads. With the uprights (walls) of the box, the bottom panel wont be subjected to any real force since the walls act as strong backs. Right? |
|
|
|
|
|
11/23/2009, 08:53 PM
|
#24 | |
|
Registered Member
Join Date: Jul 2004
Location: AWOL
Posts: 12,013
|
Quote:
Jim
__________________
"Things should be made as simple as possible, but not simpler." (oft attributed to Einstein; most likely paraphrasing by Roger Sessions; compactly articulates the principle of Occam's Razor) Current Tank Info: 325 6' wide Reef |
|
|
|
|
|
11/23/2009, 10:02 PM
|
#25 | |
|
Registered Member
Join Date: Sep 2008
Posts: 1,840
|
Quote:
Will do on the thicker glass. Thanks for the heads up on it being bumped. I do however plan on securing my pipeing. I just don't like having plumbing floating in space. I think I have stolen enough of this thread. My appoliges to the OP of the thread. Thank you uncleof6 for all your help. |
|
|
|
|
 |
|
|


