
|
|
 02/25/2008, 05:40 PM
|
#1 |
|
Welcome to the next level
Join Date: Aug 2005
Posts: 2,412
|
Lets see those steel stands!
Im soon going to begin building a stand for a 120 gallon (60"x18")aquarium and would like to build it from steel tubing. Im also looking to have it powdercoated so it will stay nice for many years of exposure to a saltwater environment. Im not a "pro" welder but I have had some practice. I have a place local that does the powdercoating but have no idea what they will charge (or what I should be charged for something like this).
Here are some specs that may influence the design: - Tank is 60"x18" - Stand height is to be 32" tall - Stand will sit on Engineered Hardwood flooring - Some other things I havent thought about yet (or havent been reminded of by the RC community  ) )I know that I have seen many awesome steel stands here on RC and would appreciate any information (tubing size, costs, "lessons learned", etc) that I can get prior to diving into this project. So with that said.... Lets see some steel stands!
__________________
"Never be afraid to do something new. Remember, amateurs built the ark; professionals built the titanic." -Anonymous Current Tank Info: tankless |

|

|
|
02/25/2008, 07:09 PM
|
#2 |
|
Registered Member
Join Date: Apr 2006
Location: Surprise, AZ
Posts: 1,535
|
This is one that someone made for me.
  
|
|
|
|
|
02/25/2008, 08:18 PM
|
#3 |
|
Welcome to the next level
Join Date: Aug 2005
Posts: 2,412
|
Thanks for posting DarkFORCE. What size square tubing is it made out of and how big of a tank is that?
__________________
"Never be afraid to do something new. Remember, amateurs built the ark; professionals built the titanic." -Anonymous Current Tank Info: tankless |
|
|
|
|
02/26/2008, 02:13 PM
|
#4 |
|
Registered Member
Join Date: Dec 2007
Location: Central California Coast.
Posts: 5,383
|
Hi MeuserReef.
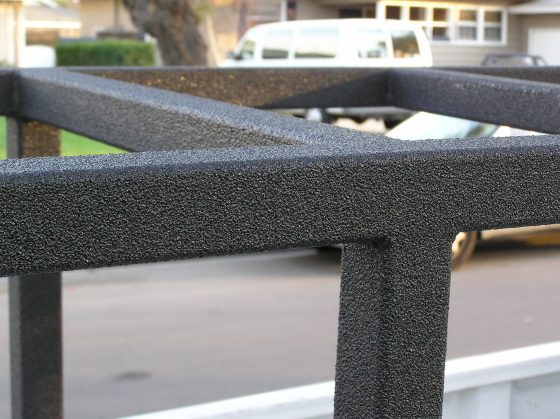
Whatever you do make sure you put in some shear bracing! I frequently see steel tubing stands that have none. All you need to do is lean on one end and you can get these stands to rack,(trapezoid to the floor). That would be really ugly, maybe even fatal if it racks onto someone. It can even just be a mostly solid plywood back, just something! I'd add steel diagonals myself. As for tubing. I would use 1-1/2" square. And since you say you aren't an experienced welder I would opt for thicker. Use 0.125" wall. It is heavier but much harder to blow through and mess up than the thinner walls. I'd expect to pay about $150-$200 for a powder coat job. You can ask around as almost all powder coaters do motorcycle frames and I would see them as being about the same. A motor cycle takes more effort as it has many hidden angles, but a stand may have more surface,(material cost). So you can probably ask, "How much to do a motorcycle frame"? And avoid the, "I don't know I have to see it first", responses. |
|
|
|
|
02/26/2008, 07:20 PM
|
#5 |
|
Registered Member

Join Date: Jun 2006
Location: Pasadena, Texas
Posts: 8,422
|
__________________
Click on my red house to see my 390 and 300 build thread. Those are my last 2 tanks in Tampa. Now in Pasadena waiting to buy a house to set up my next tank....anemones and clowns...probably a 3x3 150 gallon. |
|
|
|
|
02/26/2008, 07:30 PM
|
#6 | |
|
Welcome to the next level
Join Date: Aug 2005
Posts: 2,412
|
Quote:
mflamb.... What size tubing is that? It looks really good. If mine comes out even 1/2 as nice as that one, I will still be happy!
__________________
"Never be afraid to do something new. Remember, amateurs built the ark; professionals built the titanic." -Anonymous Current Tank Info: tankless |
|
|
|
|
|
02/26/2008, 07:49 PM
|
#7 | |
|
Registered Member
Join Date: Apr 2006
Location: Surprise, AZ
Posts: 1,535
|
Quote:
|
|
|
|
|
|
02/26/2008, 08:27 PM
|
#8 |
|
Registered Member
Join Date: Mar 2007
Location: Wichita, KS
Posts: 242
|
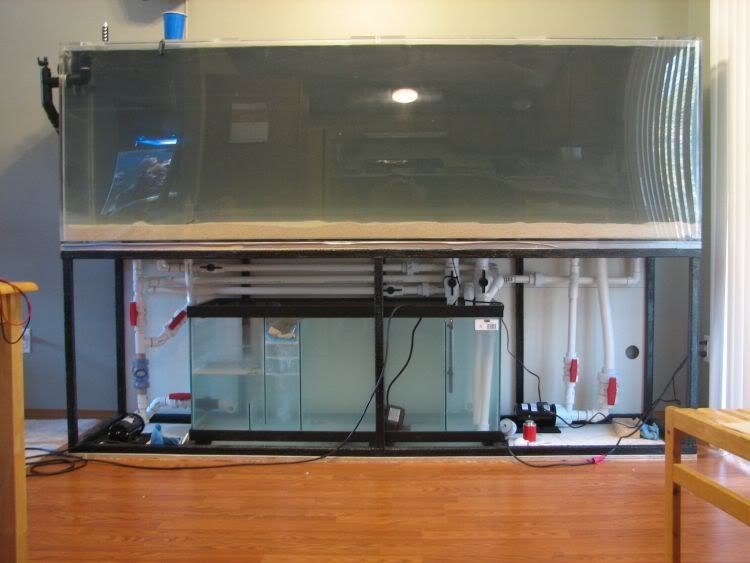
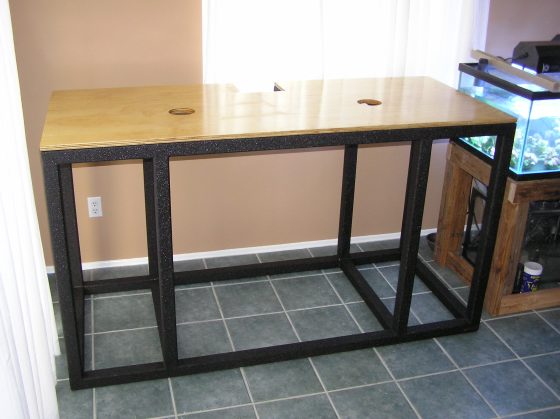
Here is one someone made for me. It was made out of 1.25 tubing. I decided to save some money and used a DIY pickup liner called Herculiner to protect the metal from the salt water.
|
|
|
|
|
02/26/2008, 09:06 PM
|
#9 | |
|
Registered Member
Join Date: Feb 2005
Location: Little Elm TX
Posts: 551
|
Quote:
|
|
|
|
|
|
02/26/2008, 09:35 PM
|
#10 | |
|
Registered Member
Join Date: Nov 2005
Location: Newark, DE
Posts: 1,105
|
Quote:
__________________
Al Current Tank Info: 75 gallon in wall working on a 220 gallon in wall tank |
|
|
|
|
|
02/26/2008, 10:04 PM
|
#11 | |
|
Welcome to the next level
Join Date: Aug 2005
Posts: 2,412
|
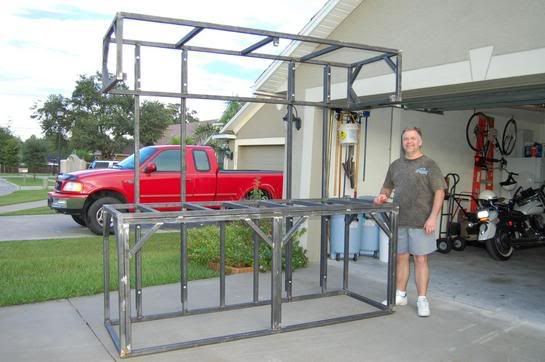
OK... so I finally got a chance to play around with Google SketchUp and here's what I came up with. It may be WAY overkill (perhaps not) but I think it will hold (especially after seeing the tank posted above
). FRONT VIEW  REAR VIEW  SIDE VIEW  kcress, whats your opinion on the steel diagonals? I used larger diagonals on the rear to add additional stability. mx36... Im not sure what impresses me more; Your stand, or your plumbing . Very neat and "clean" looking.Quote:
__________________
"Never be afraid to do something new. Remember, amateurs built the ark; professionals built the titanic." -Anonymous Current Tank Info: tankless Last edited by MeuserReef; 02/26/2008 at 10:12 PM. |
|
|
|
|
|
02/27/2008, 02:31 AM
|
#12 |
|
Registered Member
Join Date: Dec 2007
Location: Central California Coast.
Posts: 5,383
|
mx36!! I greatly suggest you quickly provide some shear bracing!! You are running on borrowed time. Please add some 1 inch flat stock. Drill holes and add one between each of the outer two verticals.
If that setup gets a side load your whole system will collapse, probably faster than your eye can follow. I could guarantee that stand would collapse in California sooner or later. Very scary. But yeah! You've got some nice plumbing going on there. Very neat.  MeuserReef; That looks great! You could service your main battle tank on top of that. If it would be easier a single diagonal on the back from one bottom corner to the opposite top works two. It would be six less welds actually 18 less weld lines and three less pieces. What you have is fine! Just an option to consider. You don't need the cross piece at the middle bottom. There is almost no force in play there and that cross piece will raise havoc with a sump. I'd put two more cross pieces at the top. Divide the two sides in half with them. This will support the plywood I expect you'll use much better than just the edges and one in the middle. If desired you can pitch the diagonals and use gussets instead. They're just a triangle of metal. You'd make them the same 0.125 thick steel and they'd go in all the vertical corners. They should be about five or six inches. Again just an option. If you put them out on the outer edge they can be used as easy wood mounting points, if that's a future desire. Hmmm. WHOA!! Just noticed you have no center braces. 1,200lbs would be a problem. If I got the math right you would be looking at about a 1/4" of deflection in the center. More than enough for most tanks to go south.. Or at least one side to go south while the other goes north. Picture your tank sitting on two 1/4" dowels at the ends on an otherwise flat surface. Not a pretty picture. You need center braces. If you can't get a sump in then you can make the front one removable. Just make sure you use two snug bolts in it. And don't consider pulling the brace with a full tank riding on the stand unless you do some serious, calculated, temporary auxiliary bracing. |
|
|
|
|
02/27/2008, 05:40 AM
|
#13 |
|
Registered Member
Join Date: Mar 2007
Location: Wichita, KS
Posts: 242
|
Thanks for all the comments on the plumbing.
As for how well the herculiner is holding up, so far very good but the tank has only been set up since Oct. 2007. kcress..... Thanks for the info i will get something added. |
|
|
|
|
02/27/2008, 09:17 AM
|
#14 | |
|
Welcome to the next level
Join Date: Aug 2005
Posts: 2,412
|
Quote:
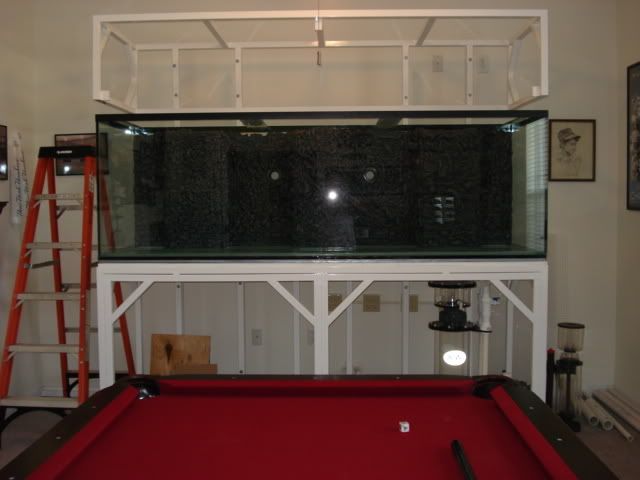
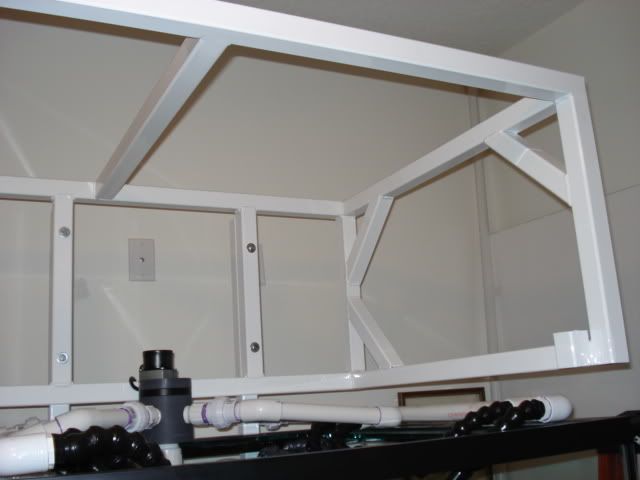
I like the changes that you suggested and have changed the design a bit. The corner braces are 6"x6"x8.5" triangles. FRONT VIEW (version 2) 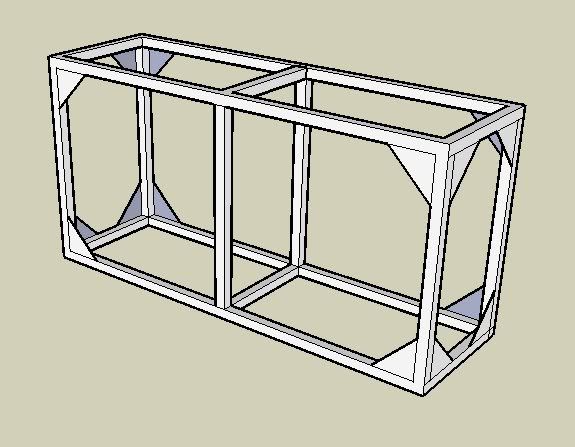 END VIEW (version 2) 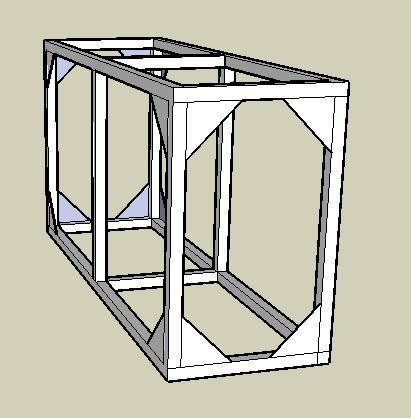 CORNER BRACE DETAIL 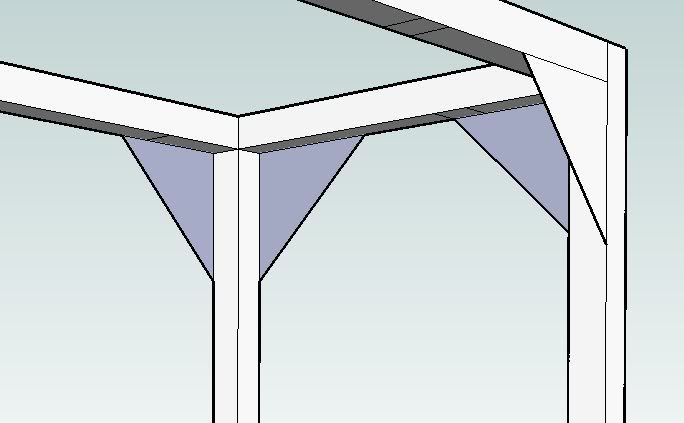 I liked the idea of using the flat angle pieces in the corners for mounting surfaces for my exterior cabinet that I will have covering this. Im planning on making the wooden exterior "skin" removable so I can maintenance the sump/components as well as clean any spills that will most definetly happen along the way. This tank will be in my living room that will have brand new hardwood flooring so I want to make sure that any spils wont hurt the floor (long term). As far as sump access, Im using a 20L for a sump so Im sure it will fit without having to remove the center brace. One challenge that I have is that ALL equipment (except DIY Chiller) will have to live in the stand under the tank. If this means that I have to have a smaller sump... so be it. I actually cant go too big with the sump as it will take up too much valuable space that could be used to house other equipment. With regards to your suggestion that I split the top section to provide additional support for potential plywood; Do I really need these supports if I dont plan on using plywood? My tank is made of glass and has the plastic trim that supports the weight of the tank along the perimeter. I have always made my stands for these types of tanks open so that they only support the tank under/along the trim. Suggestions/concerns with this? (The largest tank that I have built a stand for using this method is a 55 gallon, about 1/4 of the weight of my new tank )-Are these supports critical if Im not planning to use any sort of material between the tank and the stand? -Should I use plywood between the stand and tank? mx36... How easily does the liner scratch off if bumped/scraped? How much did the DIY liner cost you vs. the powdercoating?
__________________
"Never be afraid to do something new. Remember, amateurs built the ark; professionals built the titanic." -Anonymous Current Tank Info: tankless |
|
|
|
|
|
02/27/2008, 09:37 AM
|
#15 | |
|
Registered Member
Join Date: Mar 2007
Location: Wichita, KS
Posts: 242
|
Quote:
|
|
|
|
|
|
02/27/2008, 09:45 AM
|
#16 |
|
Registered Member
Join Date: Jun 2006
Location: Pasadena, Texas
Posts: 8,422
|
Mine is 1.5" square tube, 3/16" thick.
__________________
Click on my red house to see my 390 and 300 build thread. Those are my last 2 tanks in Tampa. Now in Pasadena waiting to buy a house to set up my next tank....anemones and clowns...probably a 3x3 150 gallon. |
|
|
|
|
02/27/2008, 10:05 AM
|
#17 |
|
Premium Member
 Join Date: Jun 2005
Location: Kansas
Posts: 851
|
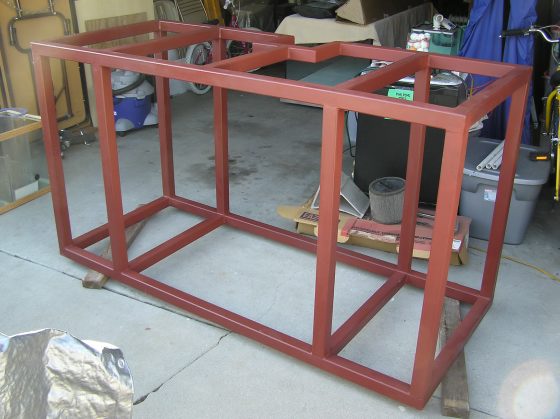
This is my stand before it was covered in 3/4 inch oak ply. The oak is fastened to the 1.25 inch tubing. The stand does not rack in any way.

__________________
A real man builds it... Then his wife shows him what he did wrong. Current Tank Info: 210 RR, 75G sump, 350lbs DIY rock, DIY dual chamber calcium reactor, 7500 gph flow |
|
|
|
|
02/27/2008, 10:41 AM
|
#18 | |
|
Welcome to the next level
Join Date: Aug 2005
Posts: 2,412
|
Quote:
I dont think that I will be able to find anyone that will powdercoat for $60!!! Now I have a low-cost alternative. Thanks. dngspot... thats a nice looking setup. How is the bare metal covered? Paint, powdercoat, etc?
__________________
"Never be afraid to do something new. Remember, amateurs built the ark; professionals built the titanic." -Anonymous Current Tank Info: tankless |
|
|
|
|
|
02/27/2008, 10:51 AM
|
#19 |
|
Master of the 16 hour day
|
Here's mine, sprayed with Line-x truck bed liner:
__________________
Save the Reefs................................................................Save the world! -Ken Current Tank Info: Currently tankless, and loving it! |
|
|
|
|
02/27/2008, 11:58 AM
|
#20 |
|
Registered Member
Join Date: Mar 2007
Location: Wichita, KS
Posts: 242
|
[QUOTE]Originally posted by MeuserReef
[B]Thanks for the tip on shaking the can. If you go with the diy bedliner you will be better off mixing it with a stick and Not shaking the can. The stuff is pretty thick on the bottom and doesn't mix well with shaking. |
|
|
|
|
02/27/2008, 12:05 PM
|
#21 |
|
Wag More; Bark Less
Join Date: Apr 2006
Location: NorCal
Posts: 3,602
|
how are you guys/gals attaching siding to these metal stands?
thinking through the next build, would like to do a metal stand but don't know how to attach wood siding to the stand. thanks.
__________________
Kenny Current Tank Info: 70g Shallow Reef [Home]; 15g Starfire Cube [Office] |
|
|
|
|
02/27/2008, 01:13 PM
|
#22 | |
|
Welcome to the next level
Join Date: Aug 2005
Posts: 2,412
|
Quote:
What size tank is that stand for? Did you weld it together yourself?
__________________
"Never be afraid to do something new. Remember, amateurs built the ark; professionals built the titanic." -Anonymous Current Tank Info: tankless |
|
|
|
|
|
02/27/2008, 01:18 PM
|
#23 |
|
Registered Member
Join Date: Feb 2005
Location: Little Elm TX
Posts: 551
|
I'll wait to hear a response from them, but I know you can buy spray cans of the bed liner, as well as gallon cans of them at the local auto parts store(oreilly,autozone, etc) I know the spray cans are 8-9 bucks a piece. Again, they could have used professionals but I know the auto parts stores are a option too.
|
|
|
|
|
02/27/2008, 02:22 PM
|
#24 |
|
Registered Member
Join Date: Mar 2007
Location: Denver, Colorado
Posts: 194
|
Nice thread, just subscribed!
|
|
|
|
|
02/27/2008, 02:56 PM
|
#25 |
|
Registered Member
Join Date: Dec 2007
Location: Central California Coast.
Posts: 5,383
|
[QUOTE]Originally posted by MeuserReef
[B]kcress, I appreciate your valuable assistance in this thread. I like the changes that you suggested and have changed the design a bit. The corner braces are 6"x6"x8.5" triangles. FRONT VIEW (version 2) Those look great and will work well too. I liked the idea of using the flat angle pieces in the corners for mounting surfaces for my exterior cabinet that I will have covering this. Im planning on making the wooden exterior "skin" removable so I can maintenance the sump/components as well as clean any spills that will most definetly happen along the way. This tank will be in my living room that will have brand new hardwood flooring so I want to make sure that any spils wont hurt the floor (long term). Nice idea. You might consider making a 1/8" thick plexy pan to contain the inevitable drips and spills. As far as sump access, Im using a 20L for a sump so Im sure it will fit without having to remove the center brace. One challenge that I have is that ALL equipment (except DIY Chiller) will have to live in the stand under the tank. If this means that I have to have a smaller sump... so be it. I actually cant go too big with the sump as it will take up too much valuable space that could be used to house other equipment. If your ends are removable then you can slide in the sump regardless of center bracing anyway. With regards to your suggestion that I split the top section to provide additional support for potential plywood; Do I really need these supports if I dont plan on using plywood? My tank is made of glass and has the plastic trim that supports the weight of the tank along the perimeter. I have always made my stands for these types of tanks open so that they only support the tank under/along the trim. Suggestions/concerns with this? (The largest tank that I have built a stand for using this method is a 55 gallon, about 1/4 of the weight of my new tank )Nope plywood need not apply. Nor more braces. Let me just check. Where abouts are you located? Earthquake possibilities would suggest a tiny mod that I would do, but otherwise is likely not needed. See, around here, an earthquake could actually move a tank. I had one move on me. Luckily it was on a large surface so it just moved elsewhere on the surface. It was a 55g. Of course a bunch of the water landed on my brand new phone/answering machine. This led to about 30 phone calls to people in my index, about 2 days later, unbenounced to me. LOL! Anyway, as you can imagine if a framed tank siting on that relatively small tubing area shifted you would have a big problem. So if there is any chance of movement, you would want some little tabs that would block the tank from shifting. You could put two on those back gussets and one each on the side gussets,(four total) and none on the front. They need be very little like one inch tabs that you screw on with a single screw, after the tank is in place. -Are these supports critical if Im not planning to use any sort of material between the tank and the stand? Nope, not in your case. -Should I use plywood between the stand and tank? I probably would, but it sure isn't required. You definitely want to make sure that top surface is FLAT though BTW be sure and pick up a bunch of scrap or short pieces of that tubing and practice until you are confident. You don't want to get 20 welds in and blunder away your material. Konadog; That looks like one stout stand. Crazy jink there in the back. Looks nice! That jink for your overflow? What wall thickness did you use? Looks like 3/16 or thicker.. That 1-1/2" tubing? Looks a little bigger in the pictures. dngspot; Yeah the shear there would be sadly lacking without your siding, which certainly works well too. Nice and clean setup. |
|
|
|
 |
| Thread Tools | |
|
|


