
|
|
 09/28/2017, 06:24 AM
|
#9501 | |
|
Registered Member
Join Date: Jul 2012
Location: Clearwater FL
Posts: 1,923
|
Quote:
http://www.reefcentral.com/forums/sh...postcount=9365 Your going to still need Open Channel and emergency channel. The 2nd gate valve is to handle whatever can't be handled by the first overflow. LSU is right - it's technically no longer a beananimal.
__________________
150 Gal Quarantine. 310 Main Display Tank Reefing since 2012 |
|

|

|
|
09/28/2017, 10:20 AM
|
#9502 |
|
Registered Member
Join Date: Jan 2017
Posts: 72
|
A thank you to BeanAnimal for this great design. My plumbing which is as close a copy of his design as possible, has worked flawlessly since January 2017... the only issue was my own dumb fault by not having a return pump as strong as I needed for my system.
It would take a long time, sometimes over an hour to equalize after feeding and I thought I must have created some flaw in the plumbing setup, but after increasing return pump flow rate 500 more GPH - It equalizes in less than a single MINUTE...and then whisper quiet. It's a beautiful design! |
|
|
|
|
09/28/2017, 01:18 PM
|
#9503 | |
|
Grizzled & Cynical
Join Date: Apr 2006
Location: Stamford, CT
Posts: 17,319
|
Quote:
__________________
Simon Got back into the hobby ..... planned to keep it simple ..... yeah, right ..... clearly I need a new plan! Pet peeve: anemones host clowns; clowns do not host anemones! Current Tank Info: 450 Reef; 120 refugium; 60 Frag Tank, 30 Introduction tank; multiple QTs Last edited by ca1ore; 09/28/2017 at 01:31 PM. |
|
|
|
|
|
10/01/2017, 05:14 PM
|
#9504 |
|
Registered Member
Join Date: Aug 2001
Location: California
Posts: 2,259
|
Quick question I hope. I have a 240 that I am starting to plumb this week. It is a peninsula style tank with the overflow on the side rather than the back. So not a traditional coast to coast. It has two 1" return lines on the outside of the overflow with 3 1 1/2" bulkhead/overflow drains in the middle.
My question is if I use the two 1" returns will the overflow natural direction cause problems? Or will it be counter productive? Not sure if I'm asking the question right. I apologize. I'm just thinking that the water direction entering the overflow will be greater than the return pump and 1" lines. I have a XF230 Gyre that will be the primary water circulation and a Jebao DC 12000 pump for return. At least that was my plan but could change if need be. This is for a 240 gallon tank that is 54" L x 30" H x 30" D.
__________________
-saf1 Current Tank Info: 210 gallon mixed reef |
|
|
|
|
10/01/2017, 09:15 PM
|
#9505 |
|
Registered Member
Join Date: Nov 2013
Location: Baton Rouge
Posts: 1,410
|
If I am understanding what u are saying then u will be fine. Most people's returns are on the same end as the overflow. On most setups they are both on the back glass, u will just be switching it around to where it is on the side pane of glass. They have quite a few peninsula tanks with it setup that way.
U will have to extend your returns from the bulkheads in the overflow box to where the water exits inside of the tank & not inside the overflow box. How u do this will depend if the tank is notched or u have pass through holes to get water from the tank to the overflow box. If u have pass through holes then u probably would have a bulkhead in the back of the tank for the returns. So u would connect the bulkhead in the overflow box to the bulkhead on the tank. If the tank is notched or u don't have a bulkhead on the tank itself for the return, then u would probably have to connect to the bulkhead in the overflow & go over the side of the tank to get the returns into the tank. |
|
|
|
|
10/01/2017, 09:36 PM
|
#9506 | |
|
Registered Member
Join Date: Aug 2001
Location: California
Posts: 2,259
|
Quote:
Thank you again.
__________________
-saf1 Current Tank Info: 210 gallon mixed reef |
|
|
|
|
|
10/02/2017, 09:38 AM
|
#9507 |
|
Registered Member
Join Date: Aug 2011
Location: New Brunswick, Canada
Posts: 93
|
I don't think this question has come up yet.
I'm in the middle of my 112g build. My external overflow box has 3 pre-drilled holes in the bottom for 1" bulkheads. I would like to increase my open channel size to 1.25" as 1" doesn't leave much room for air space. Would a 1" bulkhead with a reducing coupling to 1.25" create enough turbulence that might increase noise? My return flow should be around 700-900GPH  Here's another model I made of the reducer in the back. 
__________________
Current Tank Info: 72g Bow/20g sump - 75lbs Rock - 1" SB - RO NWB150 skimmer - Vinegar Dosing - Custom 54Wx4 T5 - Hippo Tang, Yellow Tang, 3 Chromis, Bi-color angel, YWG, Melanurus Wrasse, few softies Last edited by miroch; 10/02/2017 at 10:48 AM. |
|
|
|
|
10/02/2017, 06:31 PM
|
#9508 |
|
Registered Member
Join Date: Aug 2001
Location: California
Posts: 2,259
|
Looks like I may have a tight fit if I stay with the tanks 1 1/2" primary bulk head fitting. There is not enough room unless I vary the height. Is that a reliable option? Are there other PVC fittings that might work or is my best option to reduce inside the overflow to 1" pipe and leave the lower half 1 1/2"?
I'm not sure if that will cause noise or trouble or how fluid dynamics work (does it fill the pipe, does it matter, etc)? I've attached an image if it helps any although not sure how the size will scale. My apologies. Thanks for any tips or tricks.
__________________
-saf1 Current Tank Info: 210 gallon mixed reef |
|
|
|
|
10/09/2017, 04:19 PM
|
#9509 |
|
Registered Member
Join Date: Sep 2009
Location: Carefree, AZ
Posts: 15
|
Deja vu all over again
I am about to start back into the hobby after being out for the last 15 years. After several false starts, I believe that I will really do it this time.
So, I am rusty and dusty. Still, this style of moving water to the sump makes good sense. Thanks, Bean Animal and all of you who have added so much information over 400 pages, if you include the original thread. I have read the first thread, prior to the split, in entirety, and more than 10 pages after the split. Since I have not read the rest to discover answers to my questions, I am going to just ask, even if my questions have been answered before. I have a 90 gallon tall with starfire glass, begging to be pressed into service. Unfortunately it has an old-fashioned tower overflow which measures 7.5" (L) X 5.5" (W) X 22.5" (H); it is drilled with 1" schedule 80 bulkheads in the bottom. It has teeth along three sides of the top. I remember that they introduce noise. I may use a dremel to get rid of the teeth. I know that I must add a third pipe for the emergency channel. So, here we go: 1) Should I add a 1" or larger bulkhead through the back to serve as the emergency drain and use the two existing bulkheads in the overflow for the full siphon and open channel as is with 1" pipe and fittings? 2) Should I, instead, attempt 1.5" pipe and fittings in the overflow (if I can shave them enough to fit) and then go with a pipe reducing bushing to the 1" bulkheads in the bottom of the overflow? I am worried about venturi effect if I do this because of narrowing the flow after the siphon has been established. I also wonder about vortexing because of the limiting size of the overflow itself. 3) Another way to go would be to make the open channel 1.5" and leave the full siphon at 1". And I know that I could just plug the drains in the bottom of the overflow, add a coast-to-coast external, and plumb from there. What did you think? I am open to all suggestions.
__________________
Robert Hutson, Jr. |
|
|
|
|
10/09/2017, 04:23 PM
|
#9510 |
|
Registered Member
Join Date: Sep 2003
Location: North Carolina
Posts: 20,050
|
There is no need for anything more than 1" pipe on a 90G tank..
and before you do anything you need to ensure that the bottom (or whatever pane you plan to drill) isn't tempered..
__________________
Who me? |
|
|
|
|
10/09/2017, 06:35 PM
|
#9511 | |
|
Registered Member
Join Date: Sep 2009
Location: Carefree, AZ
Posts: 15
|
Quote:
I do hope though, given the size of the overflow tower, that I will not have an issue with vortexing. Anyone want to make a guess at what might be optimum depth below the surface in the overflow box that I ought to mount my siphon and open channels. I will have the siphon channel .5" to 1" below the open channel to facilitate purging of air from the siphon channel upon start up.
__________________
Robert Hutson, Jr. |
|
|
|
|
|
10/11/2017, 11:16 PM
|
#9512 | |
|
Registered Member
Join Date: Sep 2009
Location: Carefree, AZ
Posts: 15
|
Quote:
__________________
Robert Hutson, Jr. |
|
|
|
|
|
10/12/2017, 12:49 AM
|
#9513 | |
|
Registered Member
Join Date: Feb 2006
Location: Irvine, CA
Posts: 606
|
Quote:
If you don't want a loud waterfall sound, I'd try to keep this height between 1-2" from where the water enters the overflow box. I have it set at about 2" in my tanks and there is some amount of waterfall sound that is muffled when the top is on the return area and the canopy is closed. I traded the slight increase in sound for what I perceived to be more efficient surface skimming. However, since you are not going to glue these pipes (just press into the bulkhead), the height is easily adjustable to fit your preferences.
__________________
Bruce Current Tank Info: 150G mixed reef (6x Blue Acro 20K Pro COB LEDs, 4x 80W T5 supplement), 150g fw discus (T5 lighting), 110G fw Angelfish (DIY LED lighting), 4 x 40 g frag tanks (DIY LED). |
|
|
|
|
|
10/12/2017, 07:33 AM
|
#9514 | |
|
Registered Member
Join Date: Sep 2009
Location: Carefree, AZ
Posts: 15
|
Quote:
__________________
Robert Hutson, Jr. |
|
|
|
|
|
10/15/2017, 06:47 PM
|
#9515 |
|
Registered Member
Join Date: Aug 2001
Location: California
Posts: 2,259
|
Today I finished the plumbing in the overflow box and valves below. Thought I was going to be able to fill the tank and do a leak check but I didn't buy part to connect to the Jebao DCT 15000 return pump I was going to use. I think I need a 1 1/2" NPT female adapter then will add a union. That and there are is a connection I am not 100 percent thrilled at from one of the returns to the sump. I am using Flex PVC and it is a bit more difficult to work with than what I expected.
Also the overflow returns are 1" bulk heads while the overflows are 1 1/2". Originally I was going to use 1 1/2" for the overflows but there was just not enough room. So I had to reduce down to 1". Hopefully that will work ok. I'm going to change the returns to shorter pipe but threw these on just to let water return back into the tank. I'm considering adding a pair of Sea Swirls. If not I'll shorten them and try the RFG variable return nozzle. I think I have the height properly set. Only other thing now that I can see is I didn't add the valve/air tube on the emergency drain. Bit more work but will see what I can find to connect flex pvc to the Jebao and then do a quick lead check on the primary overflow and valves. Hopefully by next weekend...
__________________
-saf1 Current Tank Info: 210 gallon mixed reef |
|
|
|
|
10/16/2017, 08:17 PM
|
#9516 | |
|
Registered Member
Join Date: Aug 2001
Location: California
Posts: 2,259
|
Quote:
What is the proper way to adjust flow? I think I have a couple issues though so a couple questions. 1. First image is my sump. Should all of the return lines be submerged? Looking at the image the left return line is fully submerged. The one in the right is not. Not sure why they built it that way but maybe I can put a pipe in there and extend it if so. It is 1 1/2" PVC. 2. Second image and concern is the emergency overflow. I "know" it is supposed to handle the flow for a short time and be loud in doing so. This image is showing the vortex which I guess is correct? I ran it a couple other times to test and it is completely submerged under water and I didn't notice a vortex. That return is on the far right of the sump and not fully submerged either. Or is this the way it is supposed to be? 3. Final image is the fine tuning bit. Are both returns that are not the emergency (flipped upside down one) supposed to be flowing water? Also should I raise the height a bit more? It seems that there is room and it would lower the overflow noise a bit. I'm finding that I'm closing the ball valves more than what I expected and I'm not sure how this is balanced. Is the water level in the overflow box low to the base of the elbow because it is draining faster than the return pump can return? Or maybe higher than the top of the elbow in the picture because I'm returning too much and not draining? Or is this back to the sump and not properly submerged? I can see adjusting both return lines that are not emergency by closing is adjusting the water height and noise. I'm just not sure what is proper. I'm thinking of extending the two pipes by 1/4 to 1/2" so the top of the tee / elbow is parallel with the top of the upside down emergency. Maybe that is the right thing to do. Then find a way to extend the pipes in the sump a bit more that are not submerged. Nice system. Issues are my ignorance  But it is fun I must say and learning something new. I was buying parts at the local parts store. Plumbing stuff I forgot or wanted to change. Fella walks up - hey, you wouldn't be a plumber by any chance would you? Me, lol - no sir. I am the last person you want to ask for help We both laughed. But it is fun I must say and learning something new. I was buying parts at the local parts store. Plumbing stuff I forgot or wanted to change. Fella walks up - hey, you wouldn't be a plumber by any chance would you? Me, lol - no sir. I am the last person you want to ask for help We both laughed.Edit: Just re-read Bean's original post / blog explaining it. I found something I did backwards so going to go test....will update in a bit. UPDATE: Edit 2 & Final: Fixed a couple issues after re-reading original blog/instructions per edit above. Main issue was that I had the airline attached to the emergency drain. Since the end caps are not glued down I just moved it to the open channel and that did wonders. I also raised the full siphon and open channel pipes in the overflow by 1/2" which helped with some noise and splashing that was going on. Now after re-start from a off state it is silent. I mean the only thing I can hear is the DC pump. Very nice. I have a few plumbing mistakes I want to make neater but overall I'm pleased. I'll let it run over night and see how it looks in the morning. So far though the past hour it is running great! Thanks Bean and everyone who contributed to the thread.
__________________
-saf1 Current Tank Info: 210 gallon mixed reef Last edited by saf1; 10/16/2017 at 10:47 PM. Reason: Think I found it... |
|
|
|
|
|
10/17/2017, 02:31 PM
|
#9517 | |
|
Registered Member
 Join Date: Nov 2011
Location: Santa Rosa, CA
Posts: 2,727
|
Quote:
You only need to control (valve) the flow on the full siphon line. I see no advantage to constricting the other two. The siphon needs to be a 'u' configuration. It can be made with just two elbows, street and regular if you are short on space. In my setup the siphon has a strainer on it. The open line is topped with just an elbow. Only a small amount of water usually flows in this line. The amount of flow is controlled by the full siphon valve. If you open up the siphon, the open line will have less flow. The height of the open line controls the water level in the OF box. This also controls the amount of noise coming from the tank to OF box flow. The emergency is just an open pipe. No fitting on top. It's level is slightly above the open line. In practice this is what happens. If the siphon is blocked the open line starts to siphon but since it is not restricted, it siphons more than the inflow. This makes a loud sucking noise calling my attention to the problem. Think flushing toilet noise here! If for some reason the open would get blocked the emergency would finally see water and start sucking air and water and make an even louder flushing sound. Adjustment is really simple. Start with the valve open. As the valve is closed, water level in the OF box rises. Once the level reaches the open line it should not rise. If, for some reason it still is rising, open the valve slightly till the desired level is reached. This might not be a pure BA system but it is based on his great design. It's been set up since August 2013. I think I've adjusted it once but then I learned if it's acting up I need to either clean the return pump or the siphon strainer! 
__________________
John DT 120G. mixed reef w/ lots of automation + assorted FW and SW tanks. |
|
|
|
|
|
10/19/2017, 10:30 AM
|
#9518 |
|
Registered Member
Join Date: Nov 2013
Posts: 45
|
help fine tuning system!
Been lurking here off/on for 2 yrs, 400 pages is intimidating!
Finally got around to a system for my 55g tank and custom built 18g sump. The return pump moves an estimated 550-575 gph via 3/4" line to a spray bar. This is the prototype before venturing into it with my 8' 300g tank. I can't get the system quiet and not sure why. I can hear water splashing below the ball valve as well as in the open channel. I have played with the valve, raising and lowering the water height in my internal box but can't seem to find the right spot. I can get the syphon to not have any bubbles but I still hear water, not always constant, but as if it fills then overflows if that makes sense (i.e. not always a constant gurgling sound). If I restrict syphon flow I get bubbles in the open channel. If I open up the syphon more it bubbles. I'm stuck... Plumbing is 1 1/2" (smaller bulkheads as original plans), all bulkheads the same height. Stack caps on with Teflon tape. All joints in the syphon and open channel glued except the last short piece of 1 1/2" that drops into the sump (7/8" below water line). Both downturned 90's are made with teeth and sit about 3/8" off bottom of internal box. 1) How do I properly fine tune this system? 2) Can I get this system silent with such a low flow w.r.t. the plumbing size (575gph and 1 1/2" plumbing)? 3) I did not submerge the emergency channel due to space constraints. It empties into a different chamber than can have its water level fluctuate due to evaporation. I figure if the 1st 2 channels block and the emergency becomes functional it can handle 575 gph as an open channel not requiring an airtight full syphon. Is this correct? (the last 45 and short piece of 1 1/2" wasn't glued, everything above was). The tank is ready to be re assembled but I'd like to quiet down the system first, won't be easy to fine tune the valve once in place. Thank you in advance, hope the pics load!    
Last edited by Misled; 03/25/2018 at 07:33 PM. |
|
|
|
|
10/20/2017, 03:06 PM
|
#9519 |
|
Registered Member
Join Date: Nov 2013
Posts: 45
|
picture hosting site
My photos were originally showing up but now they seem blocked. I have used photobucket in the past. Now it says I have to upgrade for 3rd party posting for $400 per year! Can anyone suggest a new site to use so I may post pictures here for your help with my system.
Thank you. |
|
|
|
|
10/20/2017, 07:07 PM
|
#9520 |
|
Registered Member
Join Date: Nov 2013
Location: Baton Rouge
Posts: 1,410
|
If u are on a pc then a lot of people have went to imgur or Flickr. They don’t work well or at all on a mobile though. For mobile a lot of people use tapatalk. I don’t like how the forums are with tapatalk. I’m always on my mobile so I can’t use Flickr or imgur. What I found works best for me is Postimage. After photobucket made the switch I looked for a easy way to post pics for weeks. I finally found postimage & it was simple to post from.
|
|
|
|
|
10/20/2017, 09:43 PM
|
#9521 | |
|
Registered Member
Join Date: Nov 2013
Posts: 45
|
Thank you, I will look into your suggestions. I am usually on a Mac. I know my kids use Flickr but not for 3rd party hosting. Maybe I can figure it out!
 Quote:
|
|
|
|
|
|
10/25/2017, 04:53 PM
|
#9522 |
|
Registered Member
Join Date: Nov 2013
Posts: 45
|
Help fine tuning system!
Re-post, hopefully with pictures correctly. Wasn't able to embed them last time.
Finally got around to a system for my 55g tank and custom built 18g sump. The return pump moves an estimated 550-575 gph via 3/4" line to a spray bar. This is the prototype before venturing into it with my 8' 300g tank. I can't get the system quiet and not sure why. I can hear water splashing below the ball valve as well as in the open channel. I have played with the valve, raising and lowering the water height in my internal box but can't seem to find the right spot. I can get the syphon to not have any bubbles but I still hear water, not always constant, but as if it fills then overflows if that makes sense (i.e. not always a constant gurgling sound). If I restrict syphon flow I get bubbles in the open channel. If I open up the syphon more it bubbles. I'm stuck... Plumbing is 1 1/2" (smaller bulkheads as original plans), all bulkheads the same height. Stack caps on with Teflon tape. All joints in the syphon and open channel glued except the last short piece of 1 1/2" that drops into the sump (7/8" below water line). Both downturned 90's are made with teeth and sit about 3/8" off bottom of internal box. 1) How do I properly fine tune this system? 2) Can I get this system silent with such a low flow w.r.t. the plumbing size (575gph and 1 1/2" plumbing)? 3) I did not submerge the emergency channel due to space constraints. It empties into a different chamber than can have its water level fluctuate due to evaporation. I figure if the 1st 2 channels block and the emergency becomes functional it can handle 575 gph as an open channel not requiring an airtight full syphon. Is this correct? (the last 45 and short piece of 1 1/2" wasn't glued, everything above was).> Thank you for your help! 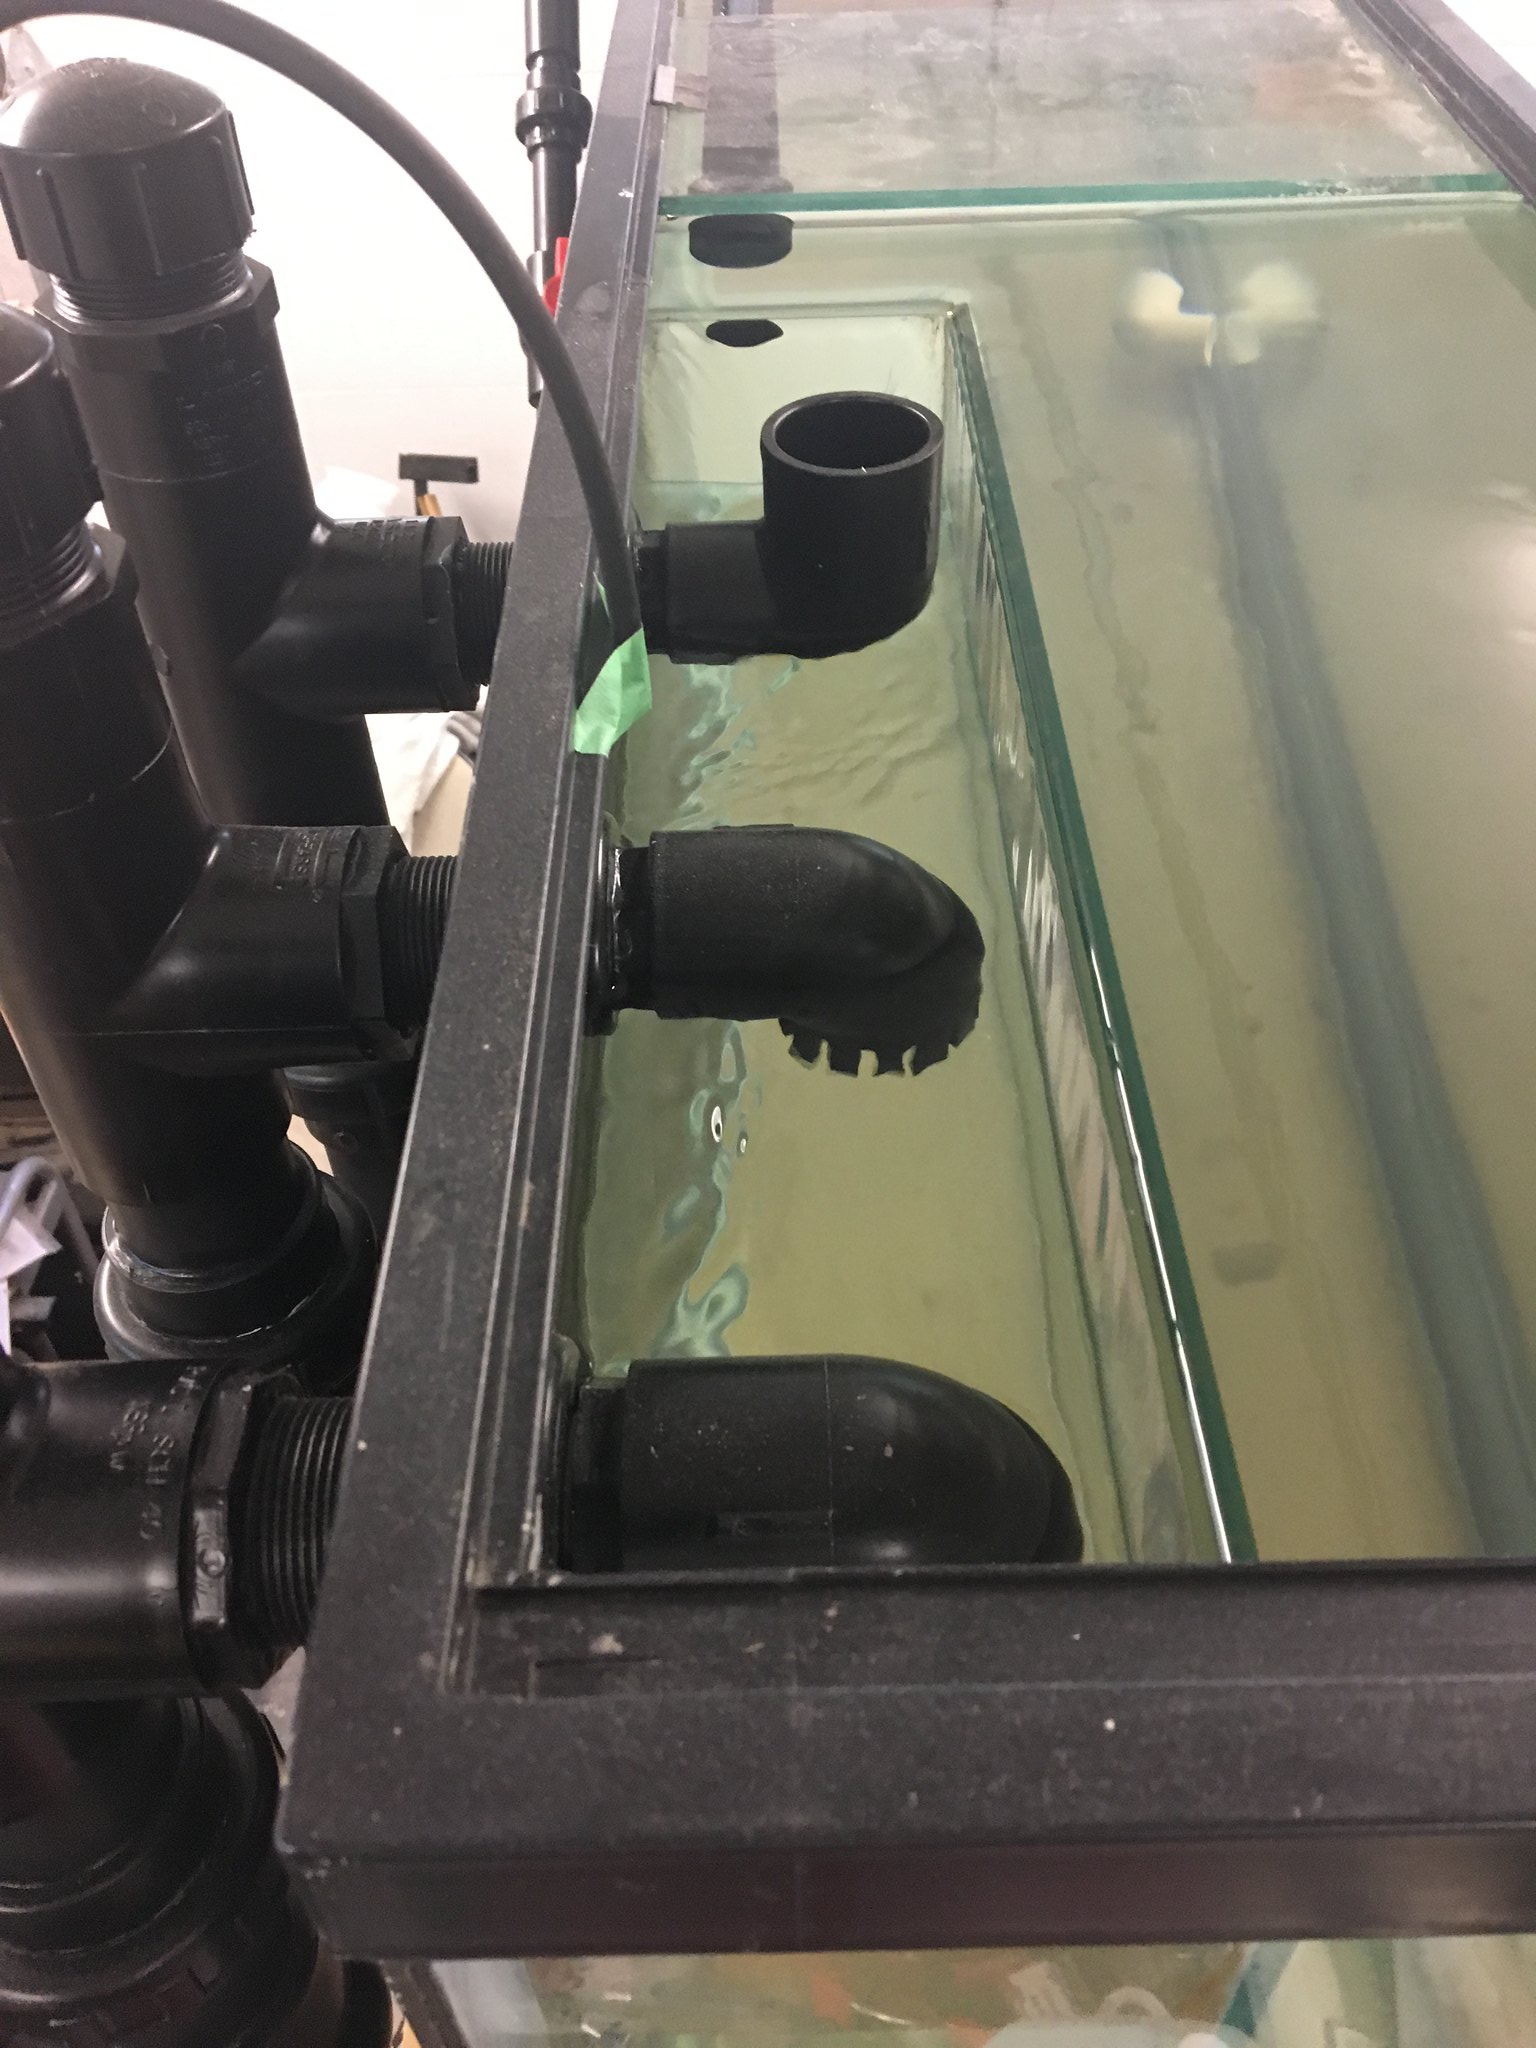 ******** async src="//embedr.flickr.com/assets/client-code.js" charset="utf-8"> ******** async src="//embedr.flickr.com/assets/client-code.js" charset="utf-8">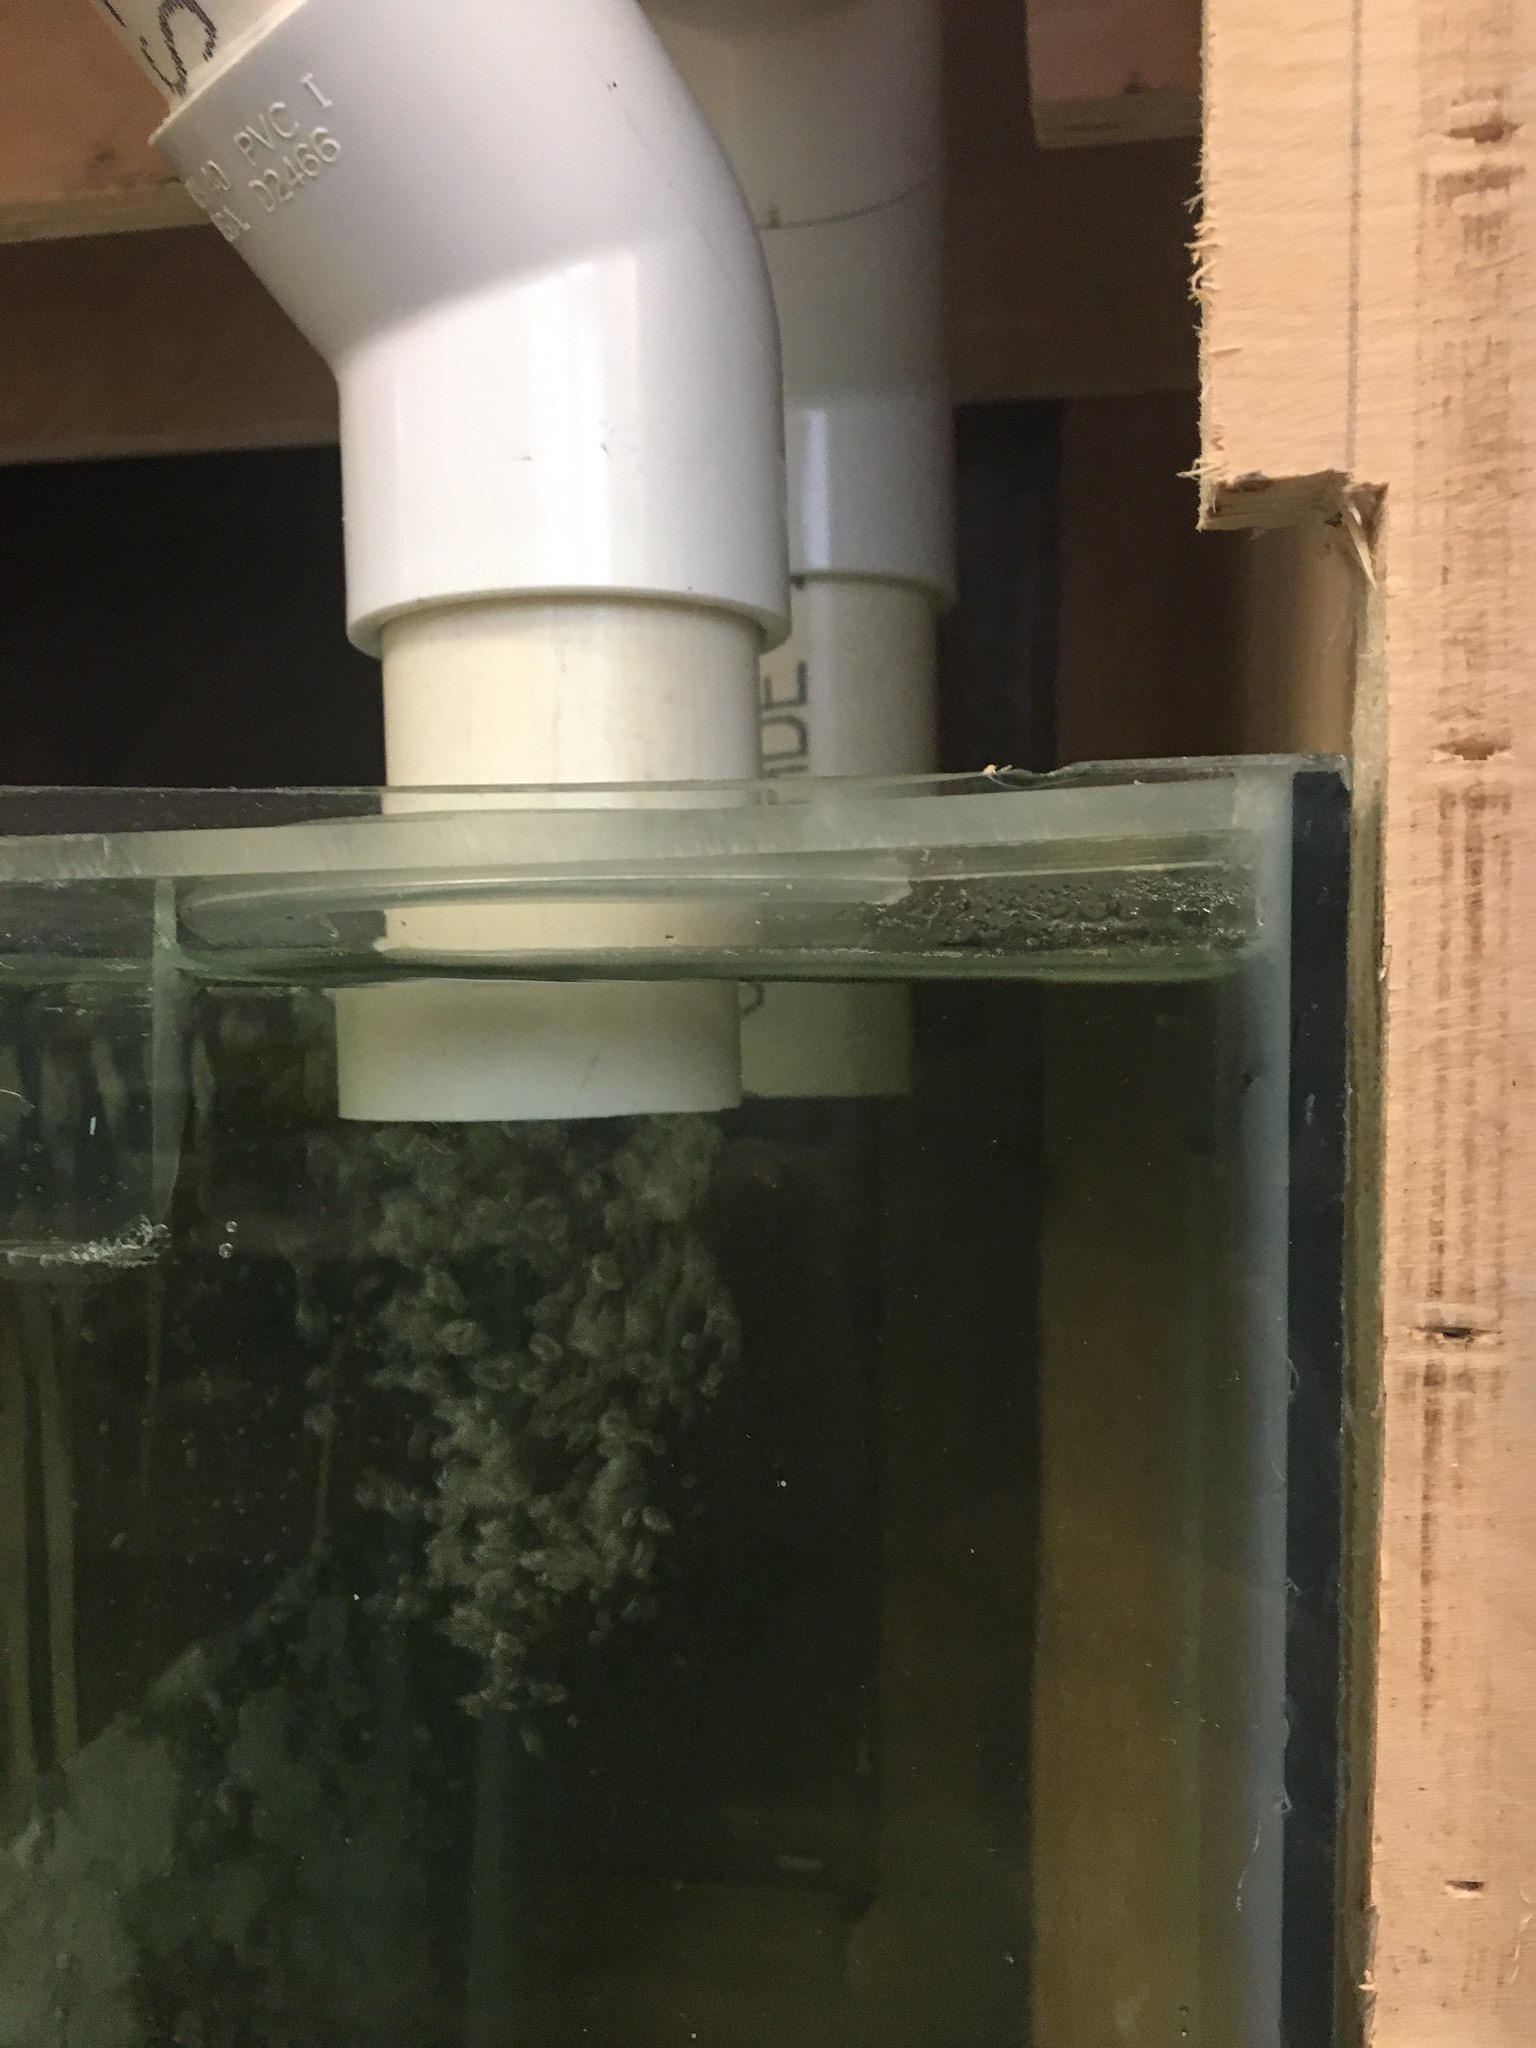 ******** async src="//embedr.flickr.com/assets/client-code.js" charset="utf-8"> ******** async src="//embedr.flickr.com/assets/client-code.js" charset="utf-8">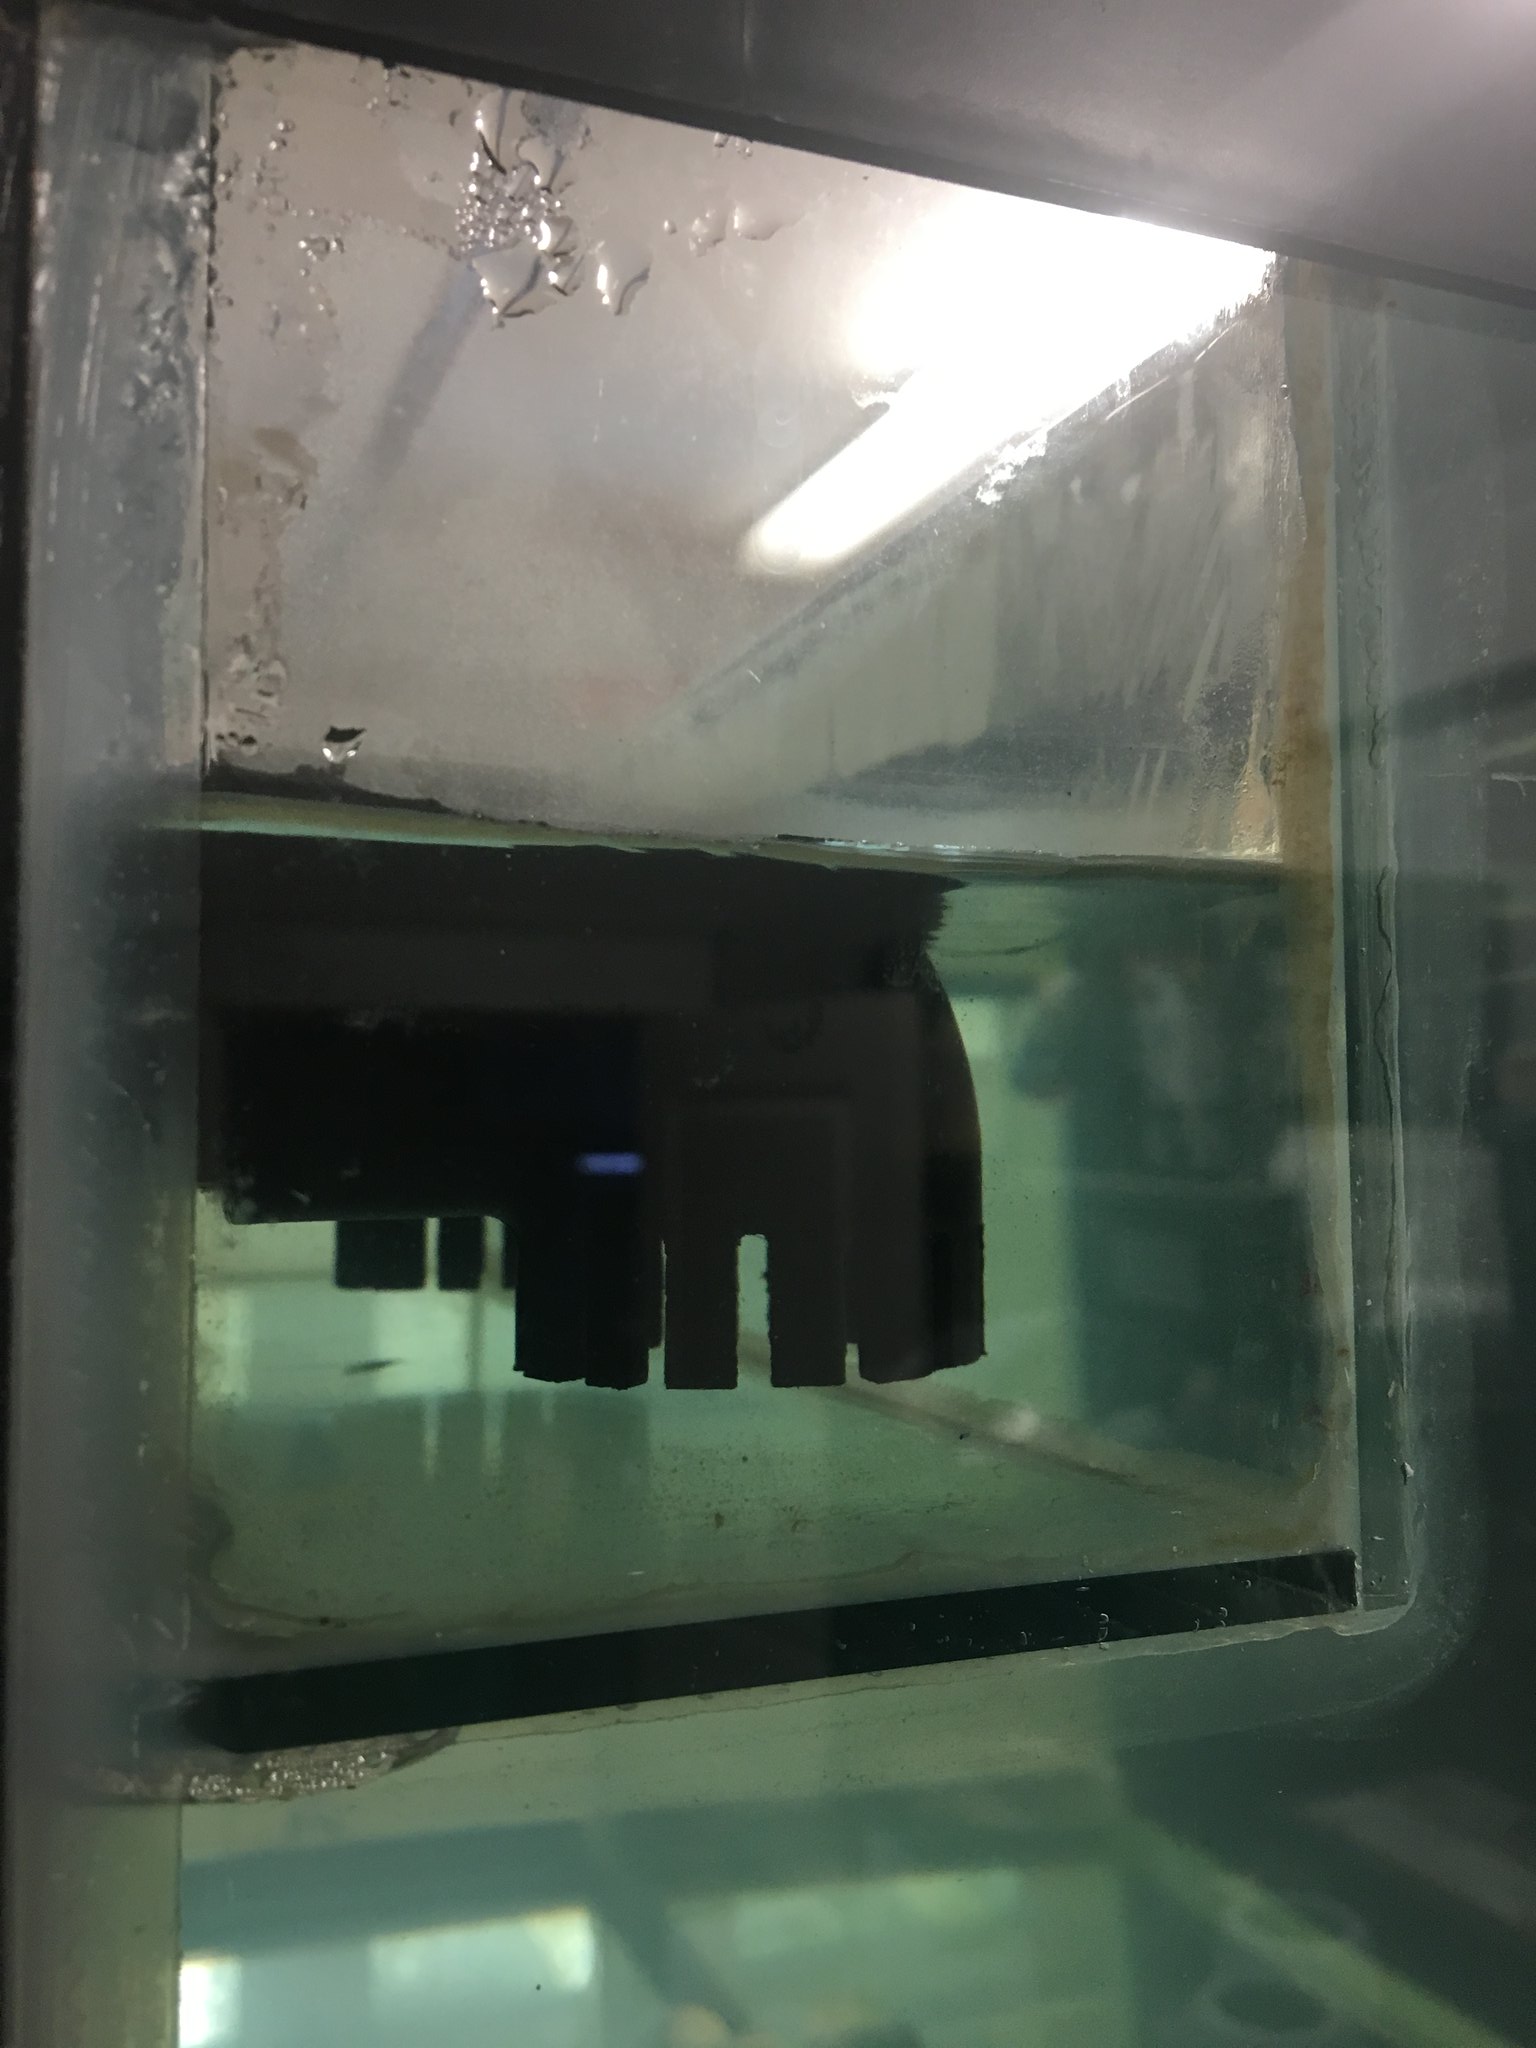 ******** async src="//embedr.flickr.com/assets/client-code.js" charset="utf-8"> ******** async src="//embedr.flickr.com/assets/client-code.js" charset="utf-8"> ******** async src="//embedr.flickr.com/assets/client-code.js" charset="utf-8"> ******** async src="//embedr.flickr.com/assets/client-code.js" charset="utf-8">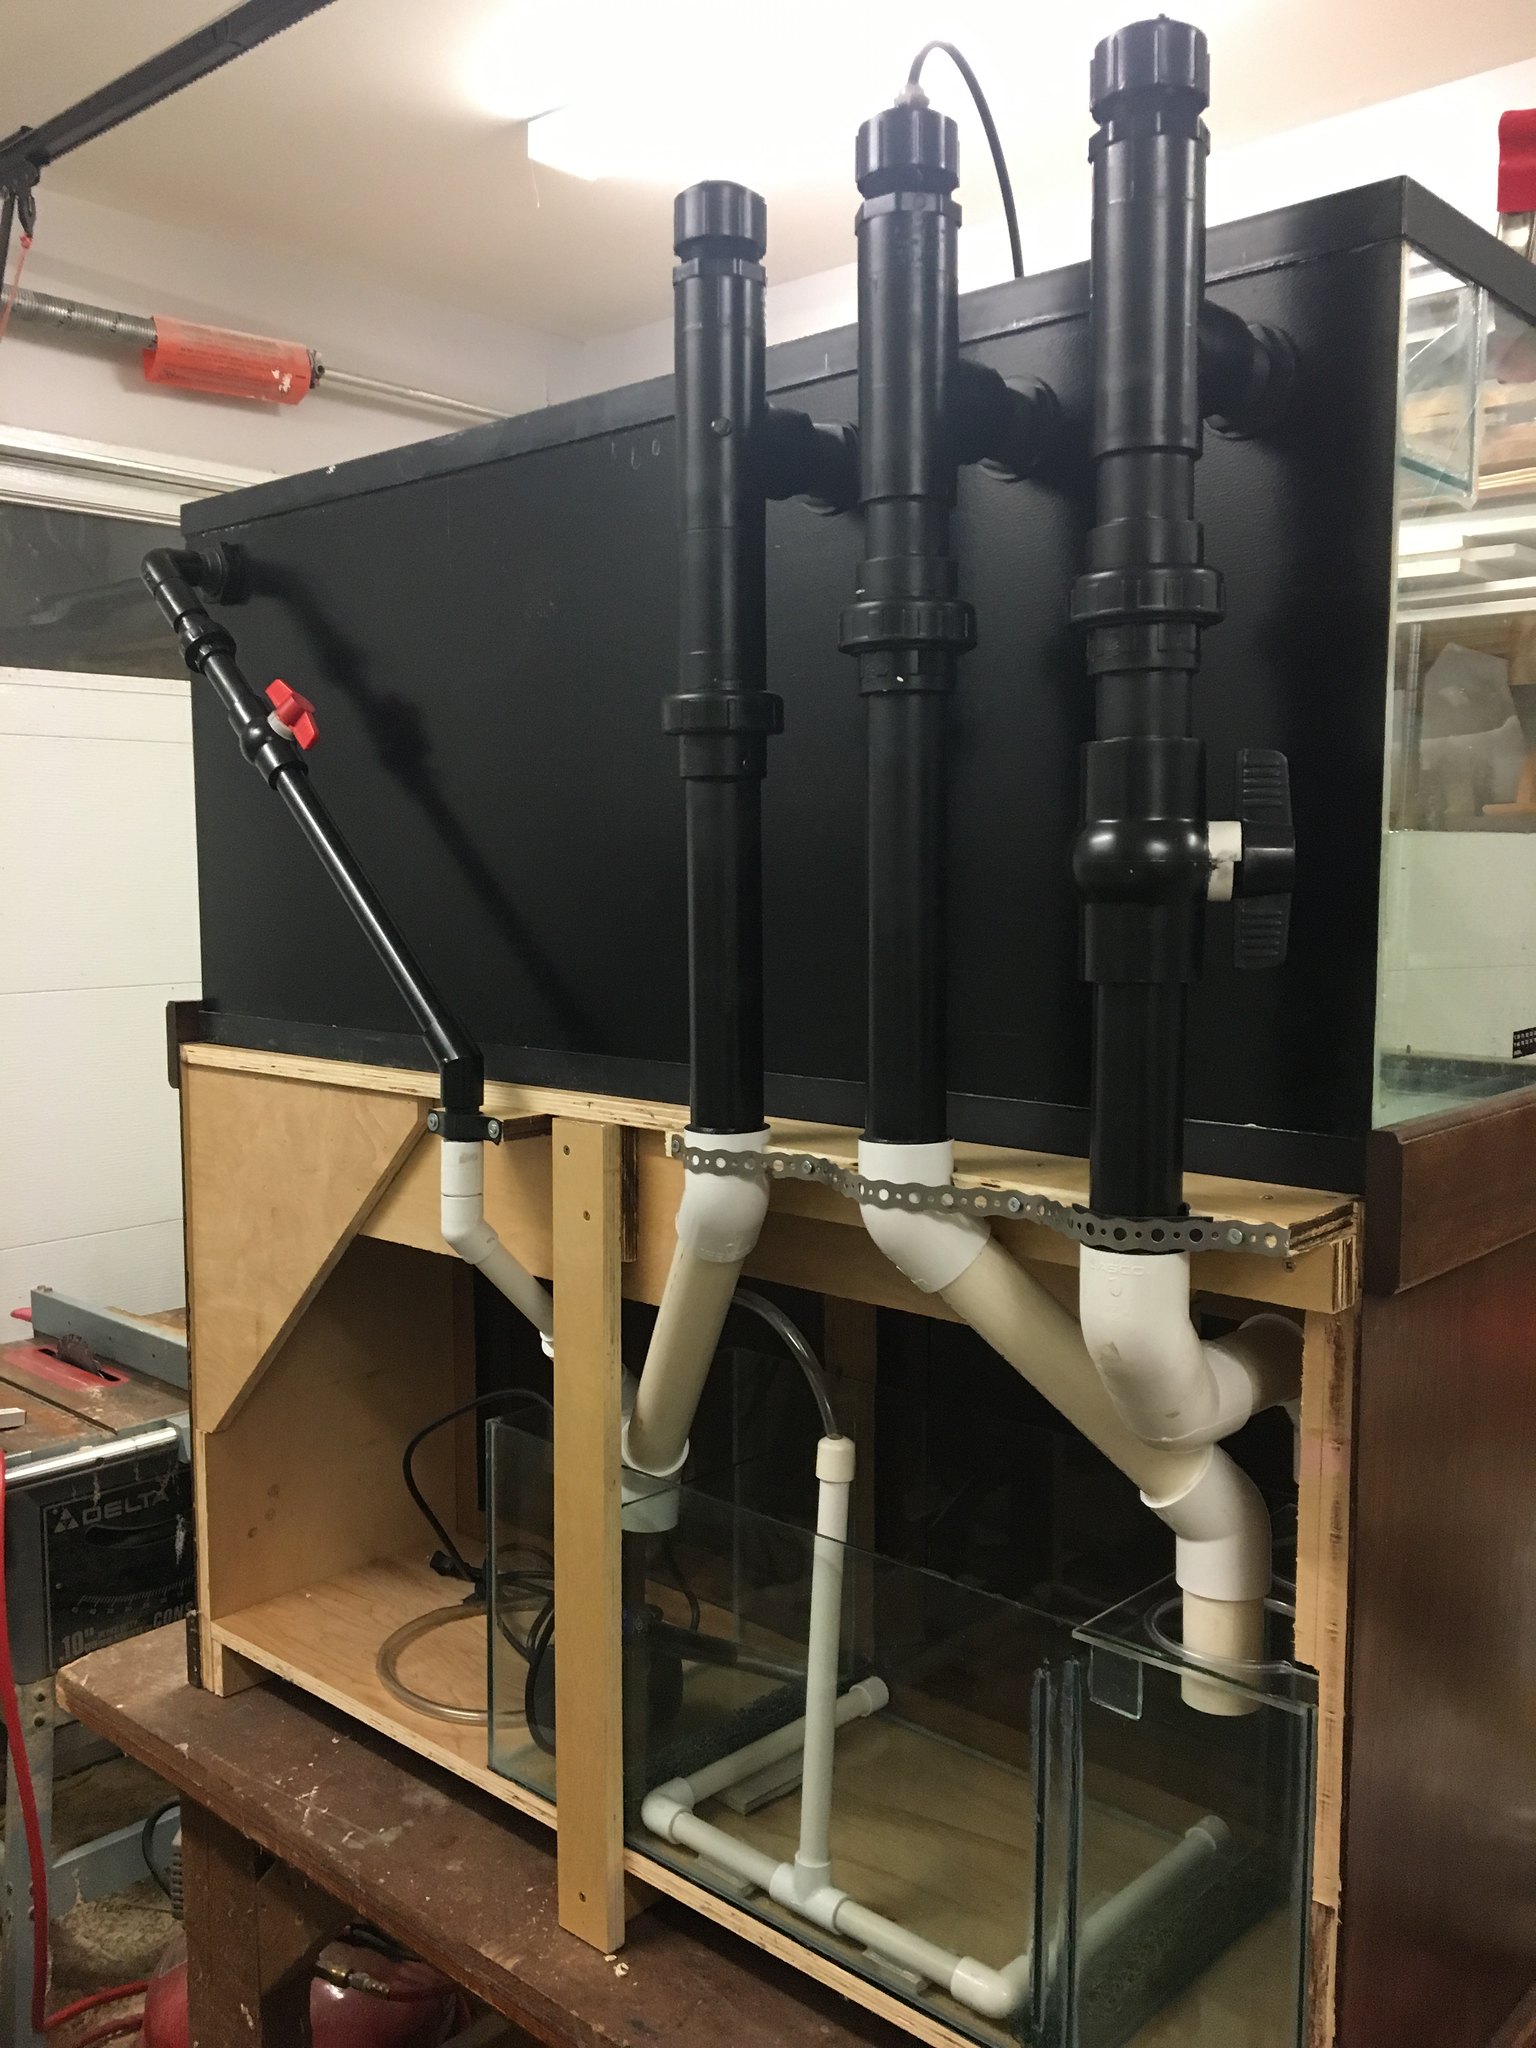 ******** async src="//embedr.flickr.com/assets/client-code.js" charset="utf-8"> ******** async src="//embedr.flickr.com/assets/client-code.js" charset="utf-8">
|
|
|
|
|
10/26/2017, 09:51 AM
|
#9523 |
|
Registered Member
Join Date: Nov 2013
Posts: 45
|
Is it possible the 1 1/2" full syphon is trying to pull more than the pump can provide? Is it possible there isn't enough flow into the syphon tube to purge all of the air in it? As I open up the ball valve the water level drops in the overflow box to the point where it will suck in air through my slotted downturned 90. So maybe I need to rebuild the 90 without slots (have to cut out the bulkhead and re plumb, or downside to a 1" line? Your thoughts?
|
|
|
|
|
10/26/2017, 05:12 PM
|
#9524 |
|
Registered Member
Join Date: Nov 2013
Location: Baton Rouge
Posts: 1,410
|
With the 1.5” plumbing & the lower flow u will have a difficult time adjusting the syphon with a ball valve. On your setup a gate valve would work a hole lot better. With the large plumbing & a ball valve u only turn the valve a small amount but it is making to much of a difference & eighther dropping the water level to much & causing the syphon to suck air, or raising the water level to where the open channel has to much water & is loud.
U really shouldn’t glue the plumbing inside the overflow box. If it isn’t glued what I would do as a test is turn the 90 on the open channel up to where it isn’t receiving any water. Then see if the syphon works right without any bubbles coming out in the sump & if it is quiet. If the syphon is still loud & still has bubbles then u know u have a air leak. If it is silent with no bubbles then u know it was the open channel making the noise & was taking on to much water. Set the water hieght in the overflow box to where the open channel is only taking a trickle of water. So basically around 1/8” to 1/4” above the bottom of the bulkhead. In your first picture it looks like the water level inside the overflow is about halfway on the bulkhead which is to high. It needs to be closer to the bottom of the bulkhead. The slots in the syphon downturned 90 will end up causing more issues then they are worth on a setup like yours. U can keep the one on the open channel but I would replace the one on the syphon. I would also add a short piece of pipe to the downturned 90 on the syphon to where it is only 1/4” to 3/8” off the bottom of the overflow box. Your main issue is the water level in the overflow box needs to be just above the top of the slots in the 90 for the open channel to be quiet. The problem is when u set the water level at that hieght the syphon will suck air because of the slots. For a temporary fix u can cut a piece of pipe just long enough to fit so u can slide it into the 90 on the syphon. For example, if the bottom of the 90 is 1” from the bottom of the overflow box, cut a piece of pipe 1” so u can fit it to slide it into the 90. It would essentially be removing the slots. Then see if u can tune it in. If u can then u know u only need to replace the 90 because of the slots. If u still can’t quite get it tuned u will know u need to replace the 90 & the ball valve with a gate valve Last edited by Lsufan; 10/26/2017 at 05:26 PM. |
|
|
|
|
10/27/2017, 10:23 AM
|
#9525 | |
|
Registered Member
Join Date: Nov 2013
Posts: 45
|
Quote:
We are on the same page...I can't turn the open channel 90 but I can block it off! I covered it with a baggie and elastic band and allowed the overflow box to fill and turned the emergency channel into the open channel. My syphon channel worked! No bubbles. And barely any water coming out of the "temporary open channel". The water was nearly at the top of my overflow box as my emerge 90 is about 3/16" below the box top. So no air leaks in the syphon channel. That tells me (I think?) I was not getting enough volume into the syphon for it to properly purge, correct??? With the overflow box fuller I had more water entering the syphon and it self purged. Based on the above test, I don't know if water at the height you suggest will work? I may need more for it to purge? Yes, the slots are trouble. If I have more height in the overflow box the teeth won't be an issue. I am trying to come up with a way to cover the slots without having to completely cut out the top 1/3 of that channel (all glued). I have thought of your idea about sliding a piece of pipe up into the 90. With 3/8" clearance I'm not sure if it will be successful or not. I may have to slide 3 pieces on top of each other. I will try this weekend. The bottom of the 90's are already about 3/8" off the bottom of the overflow box, however, the teeth create a problem. ***My thoughts moving forward: to replace the open channel 90 with a threaded bulkhead and then turn the 90 sideways to essentially be able to raise the overflow box water height before it enters the open channel. This will have more volume enter the syphon and hopefully purge itself. This would be similar to having raised the open channel bulkhead say 1/2" like many do, but I followed the original plans. I recognize this is opposite to what you suggest as far as overflow box water height. On second thought, my first step should be to try to slide a piece or 2 of pipe into the bottom of the syphon 90 to block the teeth and try to get it to full syphon. Potential problem with turning the open 90 sideways: if the syphon gets blocked will the open become a full syphon or will it suck air from the surface of the water like a vortex? My guess is it will syphon but this will be easily tested by turning the 90 sideways and blocking the syphon to see what happens. Even if it doesn't full syphon, I think I am still covered due to the low water flow of 550gph (probably less than the charts due to friction etc). I would have 2 open channels (open channel plus the emerge to handle 550gph). Your thoughts on these comments? My apologies for being lengthy but my wish is to be through and hopefully provide enough info to answer in advance questions you may have. Thank you. |
|
|
|
|
 |
| Tags |
| beananimal, plumbing |
|
|


