


|
 |
|
|
#1 |
|
Registered Member
Join Date: May 2006
Location: San Diego
Posts: 222
|
garrettm's 187g In-Wall Build
It's been two years since I moved into my house and since then I have been dreaming about an in-wall reef. Finally the time has come to start this project!
Let me start with a little background. I have always had a great appreciation for the ocean. Reef keeping started about 8 years ago when I took a trip to Hawaii and went scuba diving for the first time. I immediately came home, started researching, and bought a tank. I even worked at a local fish store on and off for about a year. More recently have been through many DIY home improvement projects including knocking out many walls and remodeling a master bath, however, I still consider myself a very amateur DIY'er. A lot of credit goes to my dad who will also be helping me extensively through this build. Anyways, I believe there is such a wealth of knowledge here on reefcentral and I appreciated and encourage any advice or ideas as I start this journey! Ok, enough of that, how about the tank.... Most of my inspiration for this build comes from drummereef's so you will hopefully be seeing a lot of similarities. http://reefcentral.com/forums/showthread.php?t=1599945 My plans are to make a clean system without clutter that will be easy to operate and maintain. It will probably be awhile before I see any water since i am still planning the details and want to do this right the first time. let's get started.... The tank will be 60x30x24, starphire front panel, and setup with a "ghost overflow" style overflow. I will bring two returns over the top with eventual plans for two sea swirls. I'm not the best at digital drawings, but here is my best shot. Top Down View: 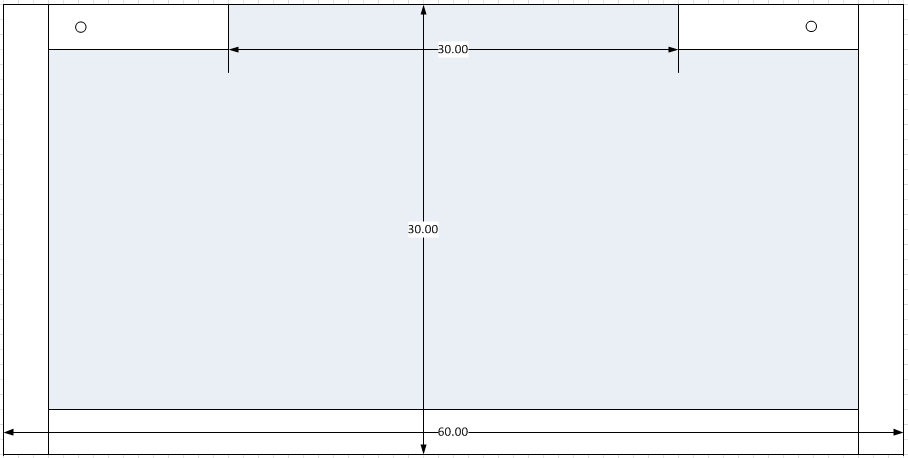 Back Wall: 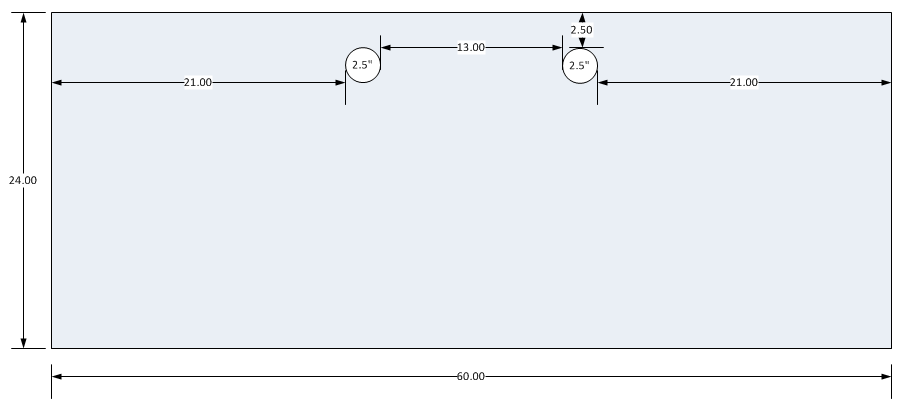
|
|
|

|
|
|
#2 |
|
Registered Member
Join Date: May 2006
Location: San Diego
Posts: 222
|
The visible part of the tank will be in the dinning room but can be seen all throughout the living room and bar area.
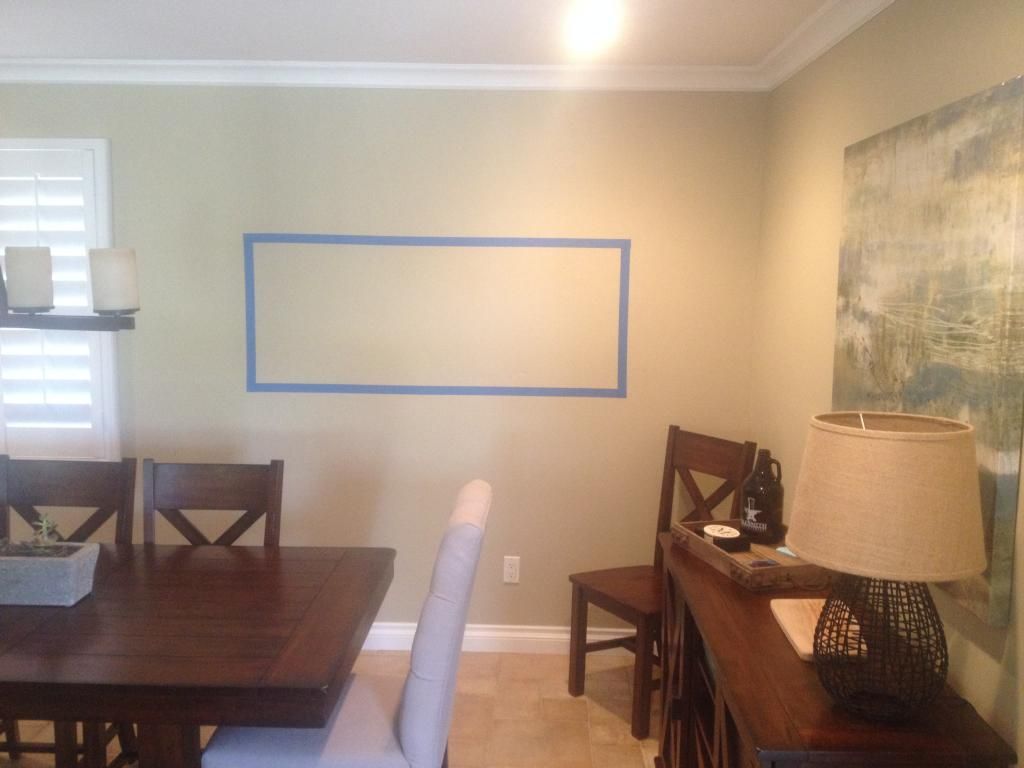 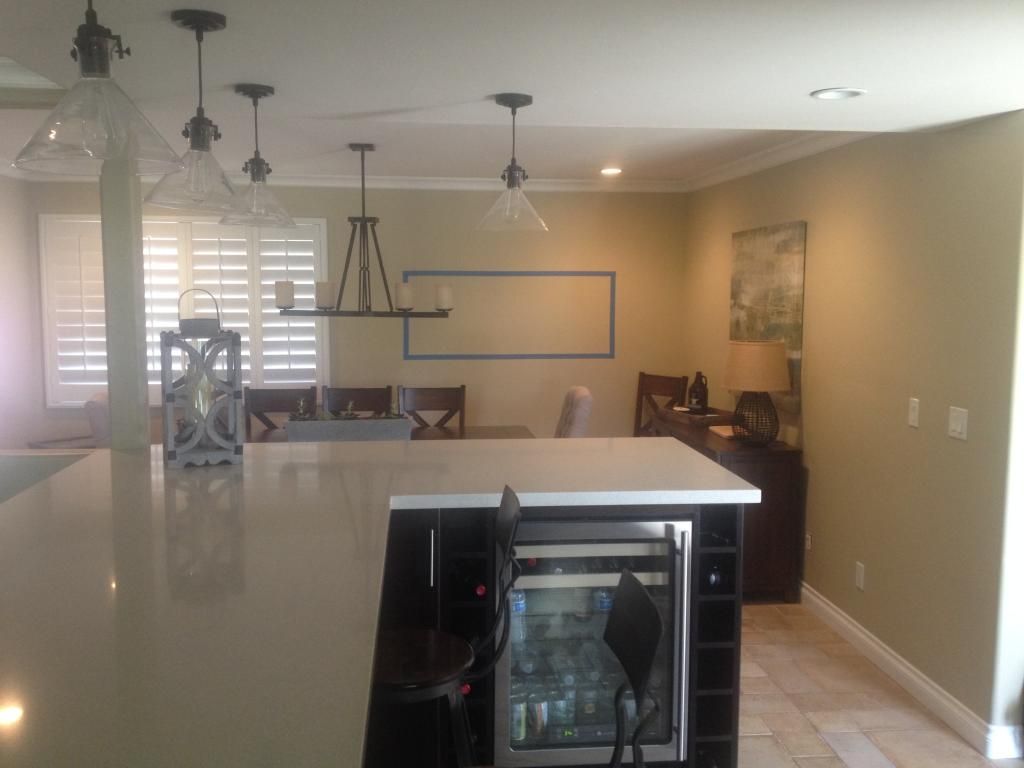 The tank and all associated equipment will be in the garage, right under where the surfing banner is now. 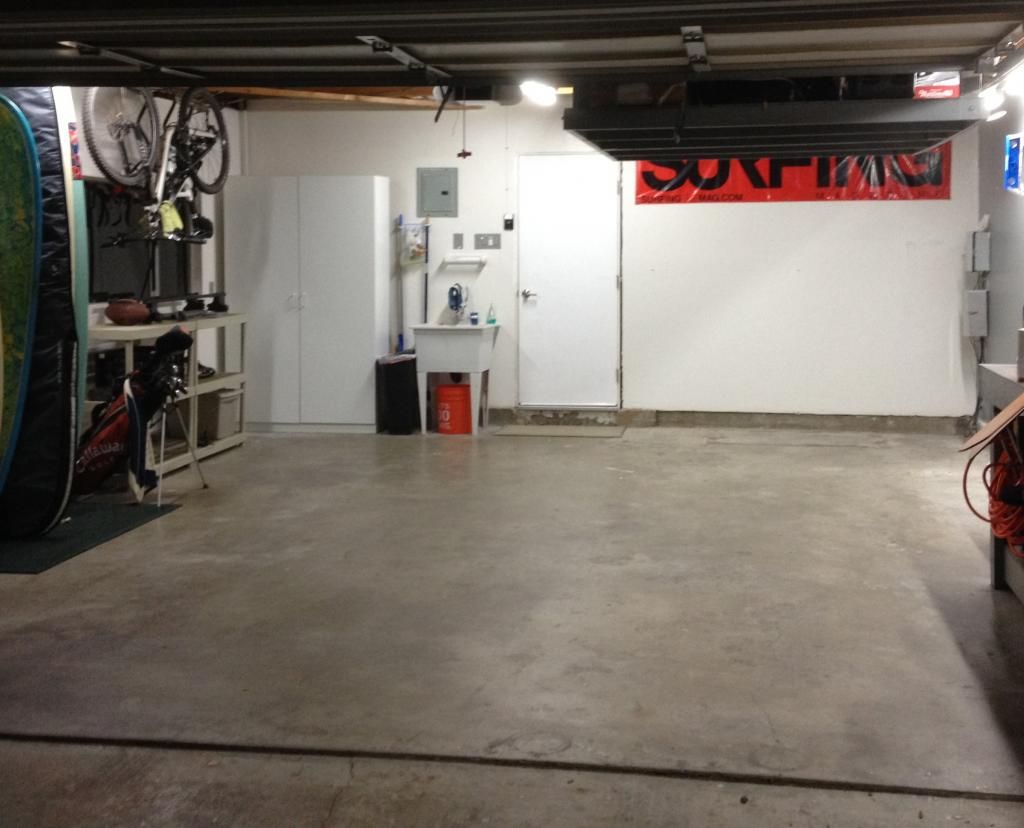 The sprinkler controller and low voltage lighting will be relocated to the side of the house. 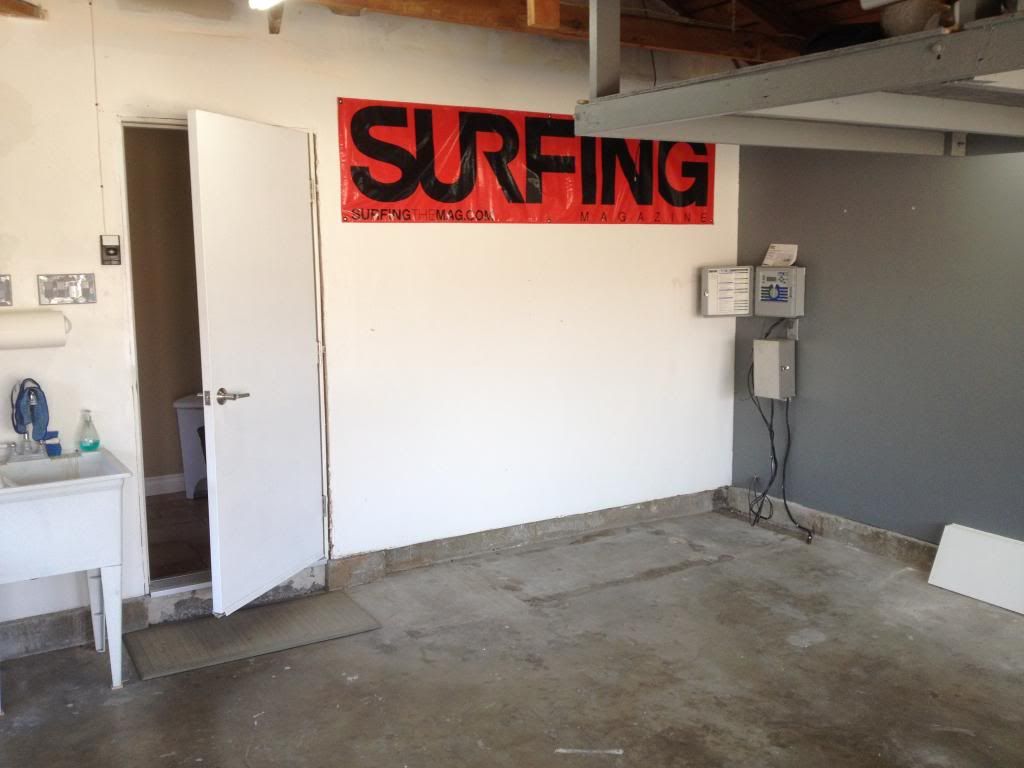
|
|
|

|
|
|
#3 |
|
MTS Sufferer!
Join Date: Feb 2005
Location: NW Ohio
Posts: 1,926
|
Nice dimensions! What are you planning on putting in it?
__________________
Next step on the system is adding A 90 gallon! Current Tank Info: 475 multitank system is now running! Several hundred gallons of additions planned! |
|
|

|
|
|
#4 |
|
Registered Member
Join Date: May 2006
Location: San Diego
Posts: 222
|
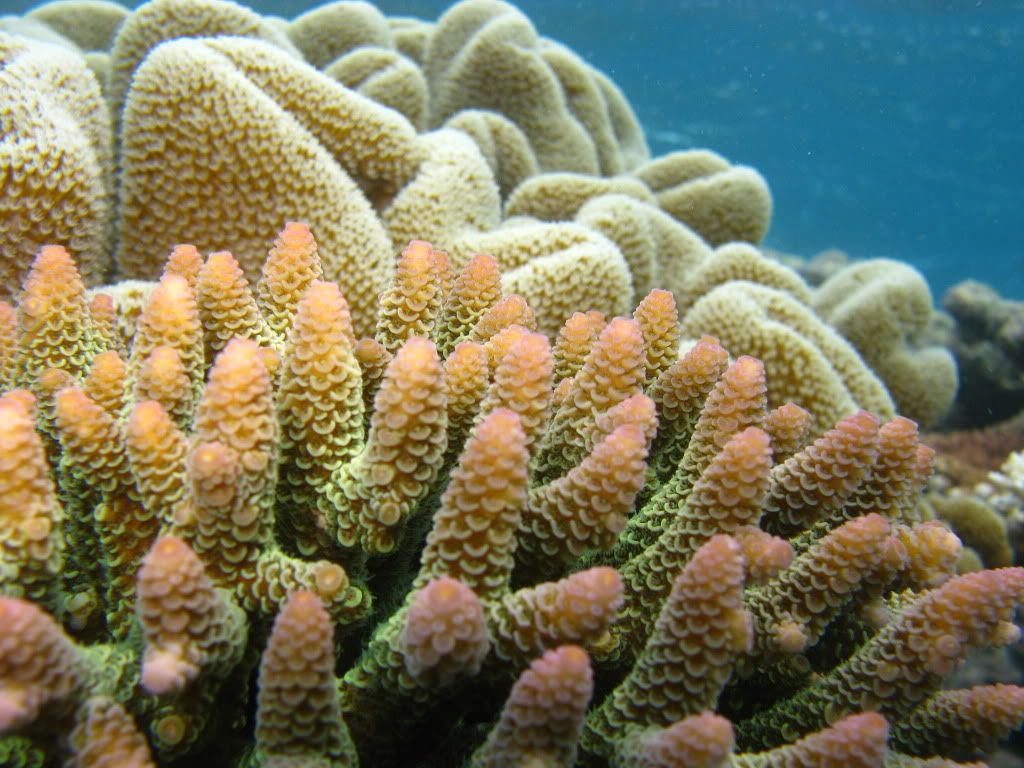
Thanks muttley. I plan on making this a mostly SPS dominant tank and if I can stay persistent on my selection I would like to choose only species that are found in the south pacific, more specifically the Great Barrier Reef. I took a dive trip down there a few years back and will be on the look out for some of the corals I saw. I was really surprised when I saw this acropopra (my favorite) in a LFS. Hopefully they will have more when I get this tank up and running.
|
|
|

|
|
|
#5 |
|
Registered Member
Join Date: May 2006
Location: San Diego
Posts: 222
|
I have a couple updates to share.
I have been looking on the local reefing websites to see if anything caught my eye for the build and I couldn't pass this up. My original plans were to have a frag tank/lagoon/refugium on the system using a 48"x18"x18" acrylic tank my friend was going to give me, but then I saw this..... 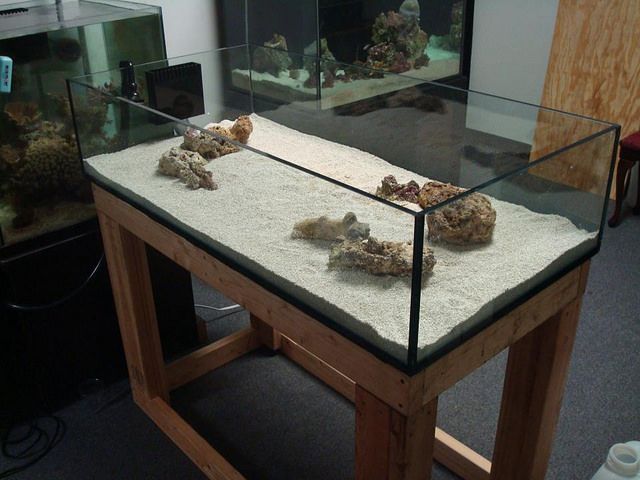 I will use this tank as a frag tank and also to look like a lagoon with sparsely placed rocks, some clowns, anemone, and softies. I plan on hanging a couple Kessils for lighting. The stand came with the tank so I will modify by raising it up by about a foot to make room for the fuge and hospital tank below. The reason I am doing this is to get proper fall from the fuge back to the main display. Plumbing Flow: I put together a rough outline of what the plumbing flow will be. I will have 5 tanks in total on the system with two resevoirs holding RO/DI and salt. 1. Display 2. Sump 3. Frag/Lagoon (picked this up yesterday) 4. Refugium 5. Hospital (will be supplied by auto water change waste water from main system) 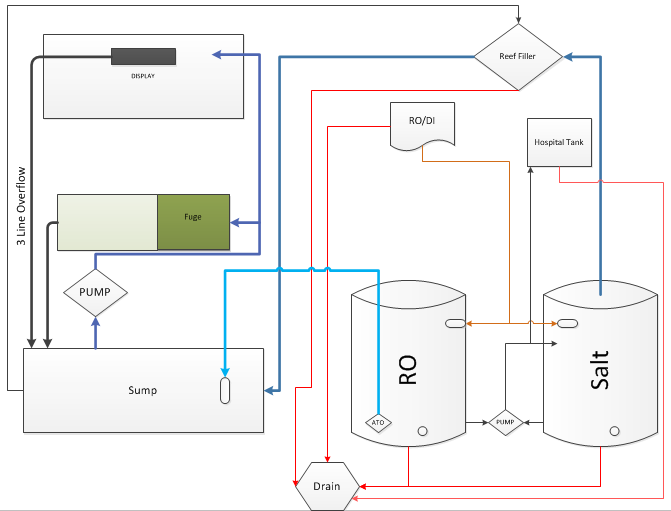
|
|
|

|
|
|
#6 |
|
Registered Member
Join Date: Jan 2010
Location: Canadia
Posts: 4,276
|
If it's not too late I would strongly suggest you add an access panel above the front of the tank on the dining room side. You will save yourself a lot of headaches down the road if you can easily reach the bottom front of your tank, and an access panel will do that for you.
Dave.M
__________________
My Gawd! It's full of corals! Current Tank Info: None. Nil. Zip. Nada. |
|
|

|
|
|
#7 |
|
Registered Member
Join Date: May 2006
Location: San Diego
Posts: 222
|
Thanks for the advice dave.m! I have thought about this option a lot and decided I like the look of a framed out tank without any extra material above. I do have access from 3 sides of the tank from the back so I am hoping that will be enough. Have you seen any access panels that look small and sleek?
|
|
|

|
|
|
#8 |
|
Registered Member
Join Date: Jan 2010
Location: Canadia
Posts: 4,276
|
You'd have to browse the other threads here on the big tank forum to see what moves you. There was one where they put in a panel of what appeared to be stained glass. It was illumined by the tank lights behind it. Really beautiful. Lots of other great ideas on here. Just look around.
Dave.M
__________________
My Gawd! It's full of corals! Current Tank Info: None. Nil. Zip. Nada. |
|
|

|
|
|
#9 |
|
Registered Member
Join Date: May 2006
Location: San Diego
Posts: 222
|
A little update...
So as any project goes in my house I get easily distracted and want to add on additional steps. Since I have been contemplating doing an epoxy coat to my garage floor I decided that right now would be the best time to lay it down. After a failed attempt last week that we won't talk about, haha, the base coat went down on Thursday and the top coat went down yesterday. I love how it turned out and will give a nice clean look the the tank and equipment area. Top coat going down over the base (beige): 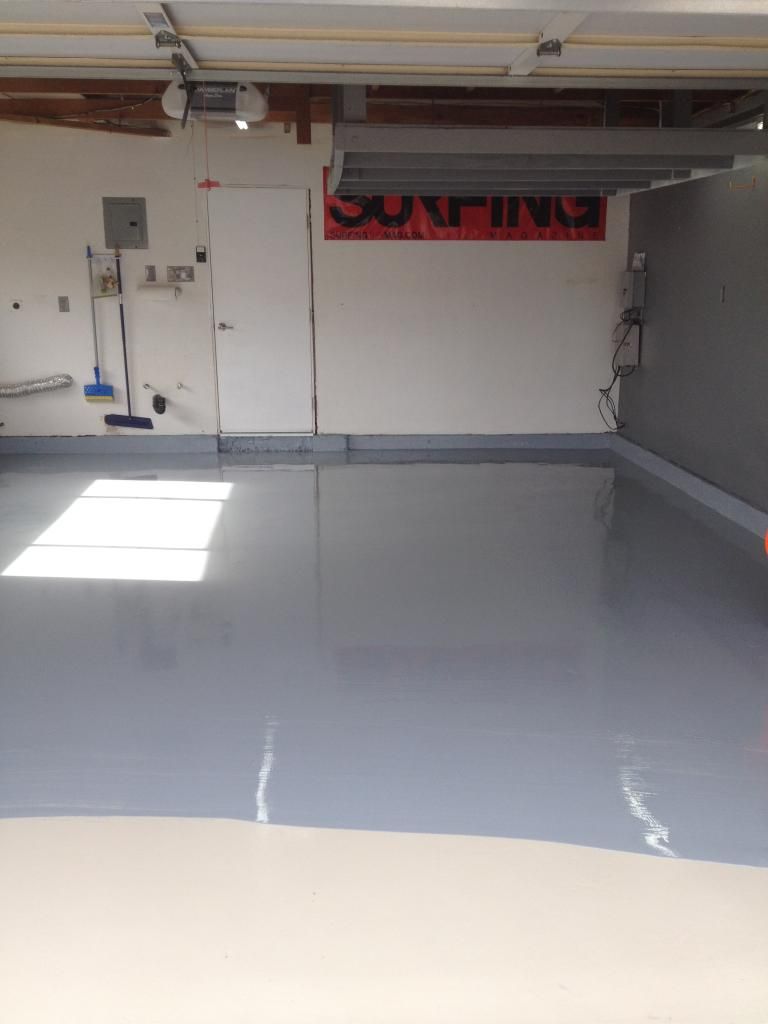 Finished and mostly dry: 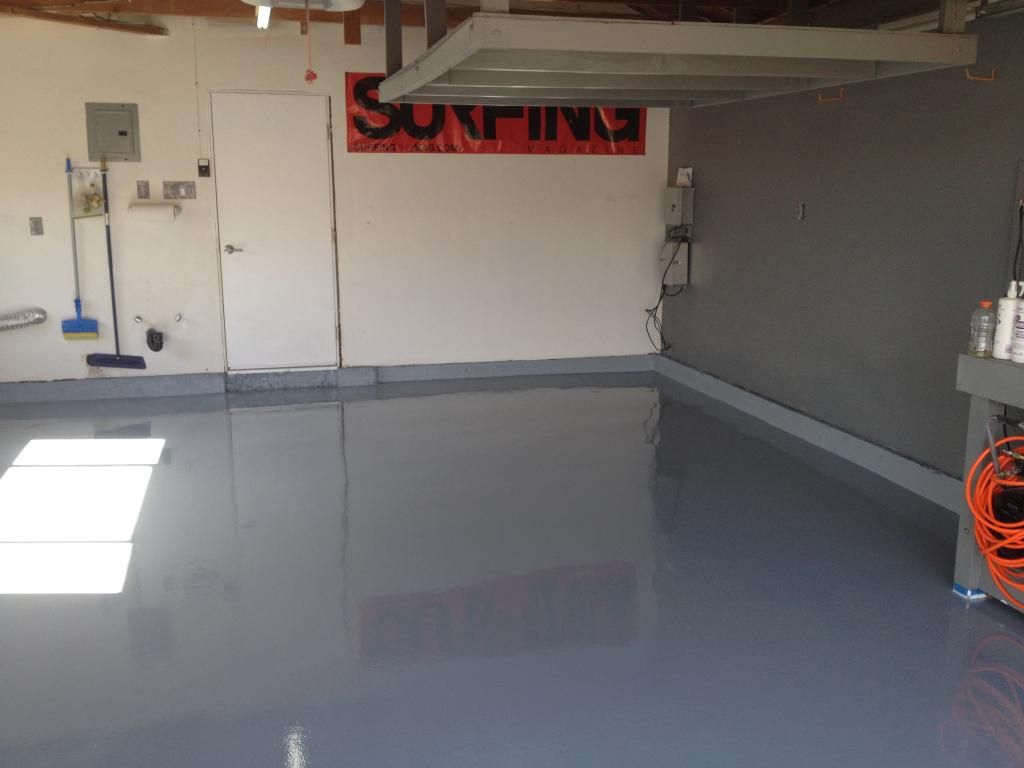 Ok, enough of that, how about some reer tank updates. I am slowly accumulating equipment for the build. Yet I am still hesitant to order the tank for two reasons. 1) I don't know how I should proceed with the return lines. My original plan was to have two holes drilled in the top of the back eurobraced panel. Eventually I would outfit with a couple of sea swirls. would this be the best way to mount these? My other option is to have no holes and just run the returns over the top. I think the holes is a cleaner look though. Would love some opinions here. 2) I am uncertain about the location of the two holes in the back panel for the "ghostlike" overflow. Below is a rough drawing of what it would look like. I plan on having an adjustable plate that can move up and down on the teeth of the overflow to adjust the water height if needed. I guess my concern here is that the two holes in the back of the tank are sitting too low, which would put the overflow too low. Right now in the drawing the top of the teeth would be 3/4" from the top of the tank. I don't know if I mentioned it but I will be building the overflow with a friend of mine who is an acrylic fabricator. 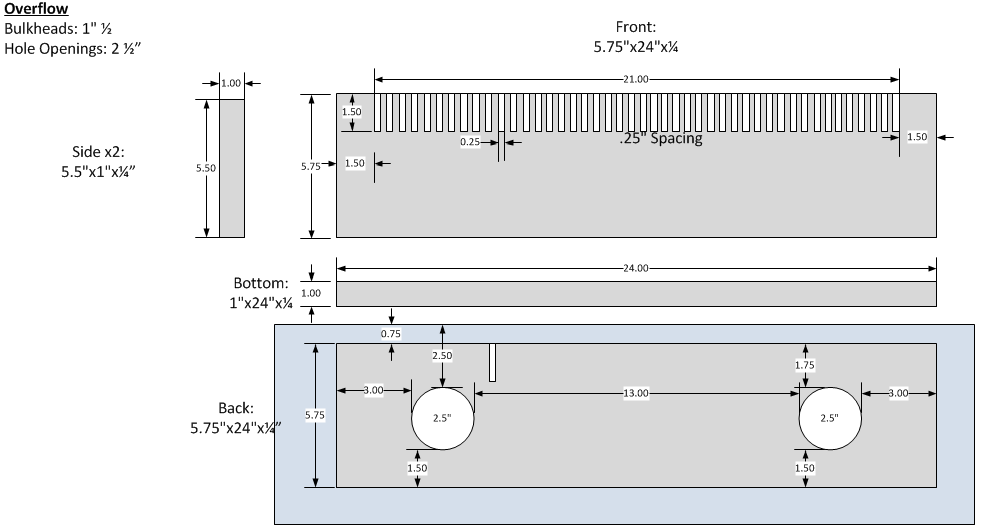
|
|
|

|
|
|
#10 |
|
Registered Member
Join Date: May 2004
Location: Montréal
Posts: 30
|
Keep the good work coming!!!

__________________
Vivre et laisser vivre Live and let live |
|
|

|
|
|
#11 |
|
Registered Member
Join Date: Nov 2013
Location: Austin, TX
Posts: 92
|
Looks great! I'm also debating how high to drill for an internal/external overflow, seems like a big decision because you can't exactly change your mind later! Good luck figuring it out

|
|
|

|
|
|
#12 |
|
Registered Member
Join Date: May 2006
Location: San Diego
Posts: 222
|
Something like an update but this is really just going to be me thinking out loud. I am somewhat indecisive so for anyone tagging along for the ride, this should be fun…or really annoying. Right now I am in a storm of indecision! I knew this would happen, just not this soon
 haha haha I am having trouble pulling the trigger on the actual DT. I am limited to a 60” long tank due to wall space and don’t want to go higher than 24”, however, the depth has no limitations since the actual tank will be in the garage. Originally I have been thinking 60x30x24 and right when I am about to pull the trigger at thought pops in my head, what if I go 60x36x24. This would give me extra water volume, a longer depth of viewing area, and I was originally thinking or lighting the tank with 3 Kessil A360we which was already stretching it with a 30” depth, so I might as well go 6” of more depth and cover the tank with 6 Kessil’s. All other aspects of the tank would remain the same…overflow design and returns. The price increase for the actual tank is a drop in the bucket compared to the entire build. But the lighting would cost a bit more… Any thoughts or suggestions? Lighting aside, This also made me think a little more about the flow for they system. I have a Dart/Snapper running at 3,600 as my return that will also feed a manifold, fuge (low flow), and frag/lagoon (lower flow, will supplement with power heads). I will run two returns from the top back on 1” sea swirls and then was planning on having 2 MP40s (1,000 -3,200gph) on either end of the tank. Below are the projections for the system total volume and estimated flow. Just hoping the dart will be enough to feed the entire system. Hopefully I won't have to go with something bigger like a barracuda and hopeully I did the math right  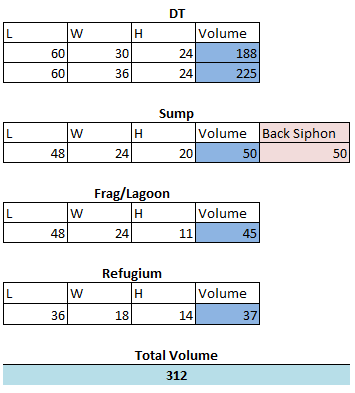 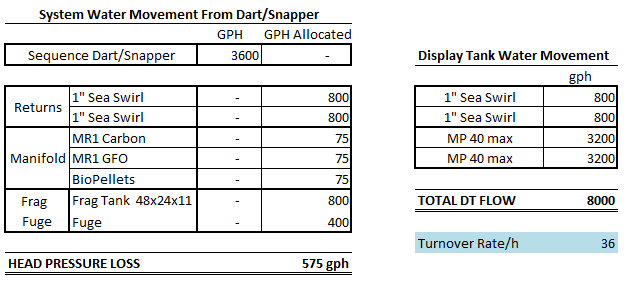
|
|
|

|
|
|
#13 |
|
MTS Sufferer!
Join Date: Feb 2005
Location: NW Ohio
Posts: 1,926
|
I think that extra 6" of depth would be awesome, and I don't believe you would regret it. The biggest downer I could see is reaching to the bottom of the far side. With access from the garage I am guessing you will be able to have a platform that will get you high enough to be able to reach to the front. I vote go for it!
On the flow, how did you come up with the head loss number?
__________________
Next step on the system is adding A 90 gallon! Current Tank Info: 475 multitank system is now running! Several hundred gallons of additions planned! |
|
|

|
|
|
#14 | |
|
Registered Member
Join Date: May 2006
Location: San Diego
Posts: 222
|
Quote:
 That's the way I'm leaning. It might be somewhat cumbersome to reach those hard spots however I will have access from at least 3 sides of the tank and might build the stand to come out 6" or so from the perimeter of the tank so I can put some weight there if I need to. From the garage the bottom of the tank will be about 50" making the top at 74". Regarding the head pressure. I just took a quick look at this flow chart and assumed I would be at about 4' of head pressure. I forgot to add the frag system and fuge into the equation which will add about another 4' horizontal and 4' vertical. Now I am at about 9 feet of head if I round up. That leaves me with roughly 2,160gph to play with on the whole system vs around 3,300 with the barracuda. I think I might need the bigger pump. Thoughts? 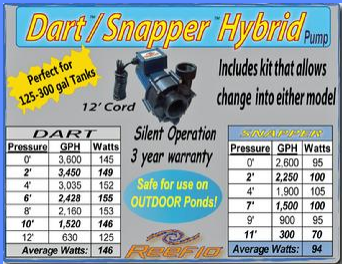 My revised flow would look something like this. 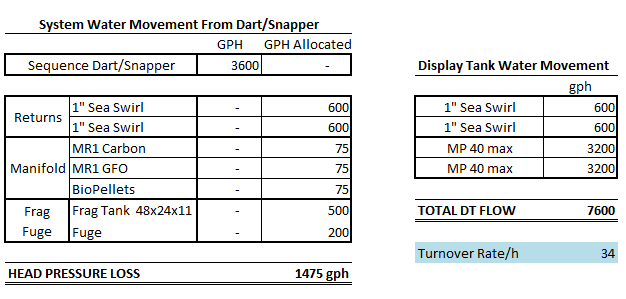
|
|
|
|

|
|
|
#15 |
|
MTS Sufferer!
Join Date: Feb 2005
Location: NW Ohio
Posts: 1,926
|
I personally would go with the bigger pump, even if you don't need it you will end up with a use for it sooner or later. Turning the flow down on a pump is much easier than turning it up! Interested in other peoples thoughts on this.
__________________
Next step on the system is adding A 90 gallon! Current Tank Info: 475 multitank system is now running! Several hundred gallons of additions planned! |
|
|

|
|
|
#16 |
|
Registered Member
Join Date: May 2011
Location: Southern California
Posts: 2,569
|
Make sure you have extra holes drilled in the Eurobrace. In case u ever wanna add extra pump like Tunzes. That way u won't have to run cables around the euro bracing. Also make sure the bracing is recessed.
ImageUploadedByTapatalk1406467663.096214.jpg Idk if u can tell by the picture, but I have 2 holes in each corner. One hole is for return lines, and one is for cables. I use Vortech pumps, but u never know what future equipment might come out and u might end up placing a pump inside the tank. |
|
|

|
|
|
#17 |
|
Registered Member
Join Date: May 2011
Location: Southern California
Posts: 2,569
|
ImageUploadedByTapatalk1406467796.224326.jpg
And def plumb the returns through the top. I think it looks way cleaner then returns on the back wall |
|
|

|
|
|
#18 | |||
|
Registered Member
Join Date: May 2006
Location: San Diego
Posts: 222
|
Quote:
Quote:
Quote:
I hadn't thought about extra holes but I'm glad you said something. Thanks for visuals. I will definitely be going with returns over the top. I spoke with the guy I am ordering the tank from today and I added a couple more holes to the top of the euro bracing. Two in the corners and two more towards the middle. I am going to go with a size big enough for an 1 1/2" bulkhead. Is that pretty standard? |
|||
|
|

|
|
|
#19 | |
|
Registered Member
Join Date: May 2011
Location: Southern California
Posts: 2,569
|
Quote:
Ya. Mine were 1.25". If you know what size your return plumbing is, make it the same size, makes it cleaner not having reducers and all that. My tank is leemar as well by the way. I had to ask for recessed euro bracing |
|
|
|

|
|
|
#20 |
|
Registered Member
Join Date: May 2006
Location: San Diego
Posts: 222
|
Well, it's been a very long 4 months since my last post and I have definitely underestimated the time it is taking to get all of this together. I did say this was going to be a very slow build though.
Not much has happened since my last post except for a little more thinking and planning. I am glad I didn't pull the trigger on some of my initial thoughts for equipment. For example, I was planning on two Vortech MP40s but now that the Maxspect Riptide is out I am going to plan on two of those on either sides of the tank alternation on long intervals. The reason I am all of a sudden posting is because I have finally had time to do some more work on the build! I started to overflow box for the main display and for the frag tank. My idea for the display was to do something similar to the ghost overflow. I used a table saw to make all of my cuts. The teeth were the most painful to cut but ended up turning out great. I started with a 24"X24"X1/4" sheet of black acrylic starting with the teeth, building a little jig out of a 2x4 to keep it straight and then cutting verticle. 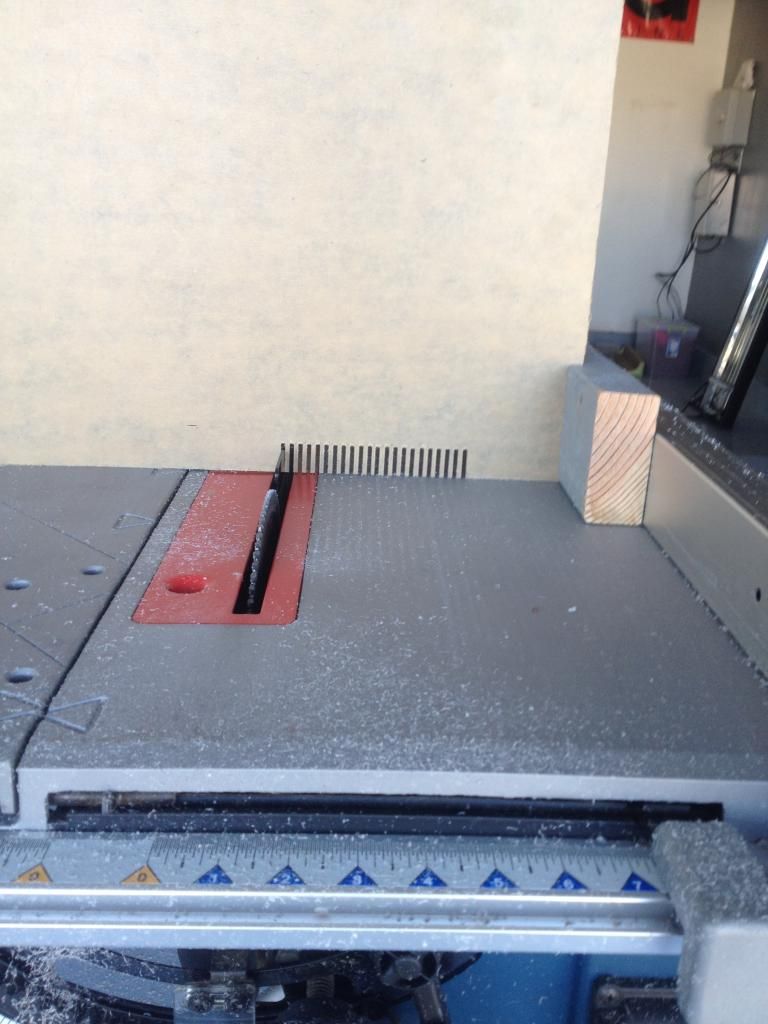 Once I made all my cuts I sanded down the sides I was going to glue and then setup using clamps to hold the pieces steady. I decided to give a shot at using acrylic solvent that is water thin but creates a weld between the pieces. After a quick youtube video and a couple practice runs I got th hang of it. This is what I used. didn't get any pictures of the gluing unfortunately. 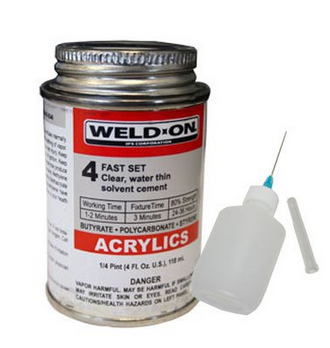 This is what the inside overflow looks like with the clamps. the dimensions are roughly 23"x5 1/2"x 1 1/2" I still need to make a back and drill holes for 2 1 1/2" bulkheads. after that is building the box for the outside of the tank. 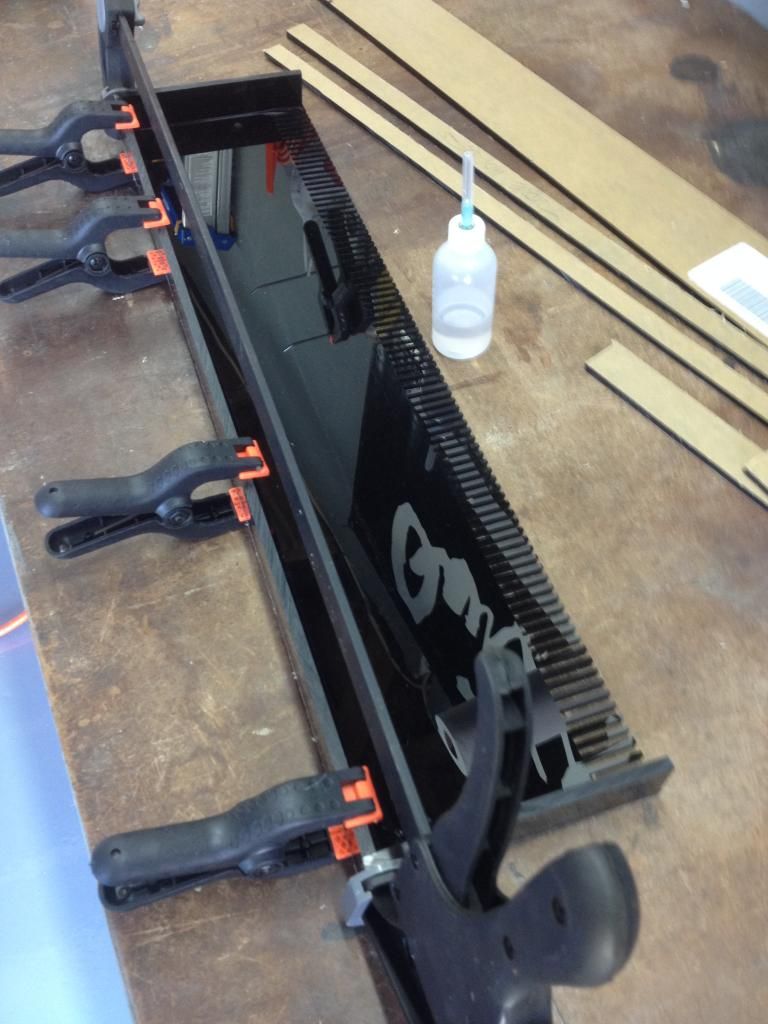 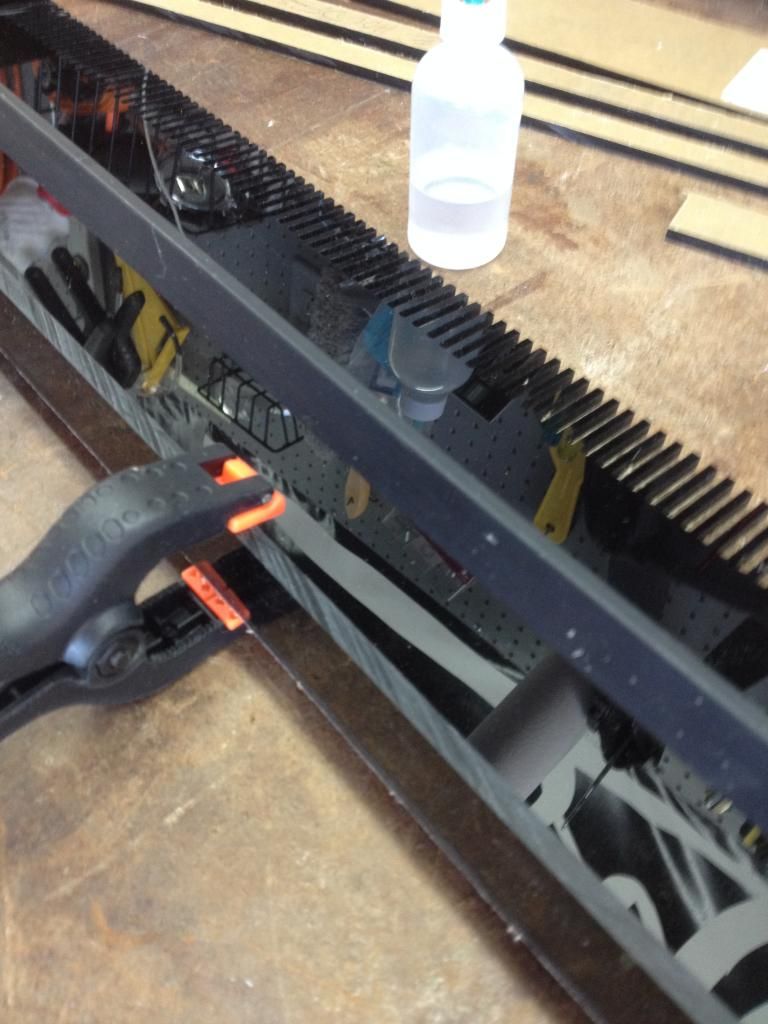
|
|
|

|
|
|
#21 |
|
Registered Member
Join Date: May 2006
Location: San Diego
Posts: 222
|
|
|
|

|
|
|
#22 |
|
Registered Member
Join Date: Mar 2007
Location: Gonubie,South Africa
Posts: 331
|
very very nice
|
|
|

|
|
|
#23 |
|
Registered Member
Join Date: May 2006
Location: San Diego
Posts: 222
|
The demo continued last night. After measuring I realized I am going to have to have to move a couple studs out to accomodate the tank so that mean more drywall cutting. This time I went all the way to the corner wall.
I also found my water line and plan on running some new copper piping from the corner to the end of the cut going along the gray wall. THis is where I will put in a diy service sink/workbench for drip acclimation, frag cutting, and drainage for water changes and RO/DI waste water. I will also connect my RO/DI here. 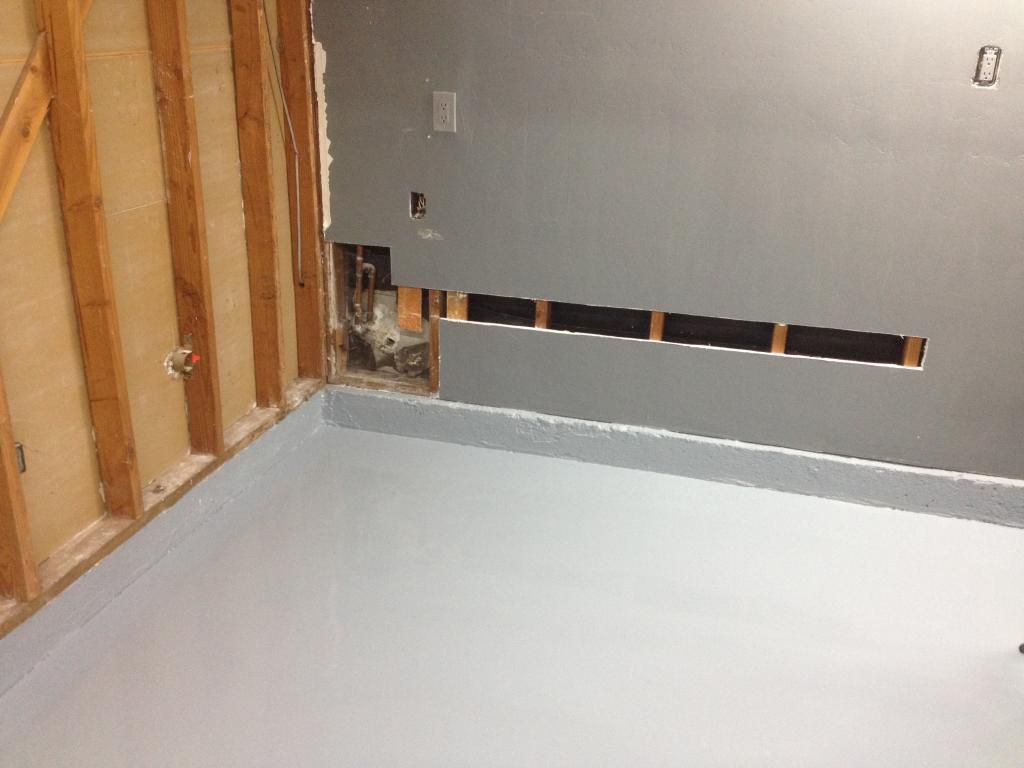 found this whole piping interesting....don't know what the previous owner was doing but it looks weird, haha. 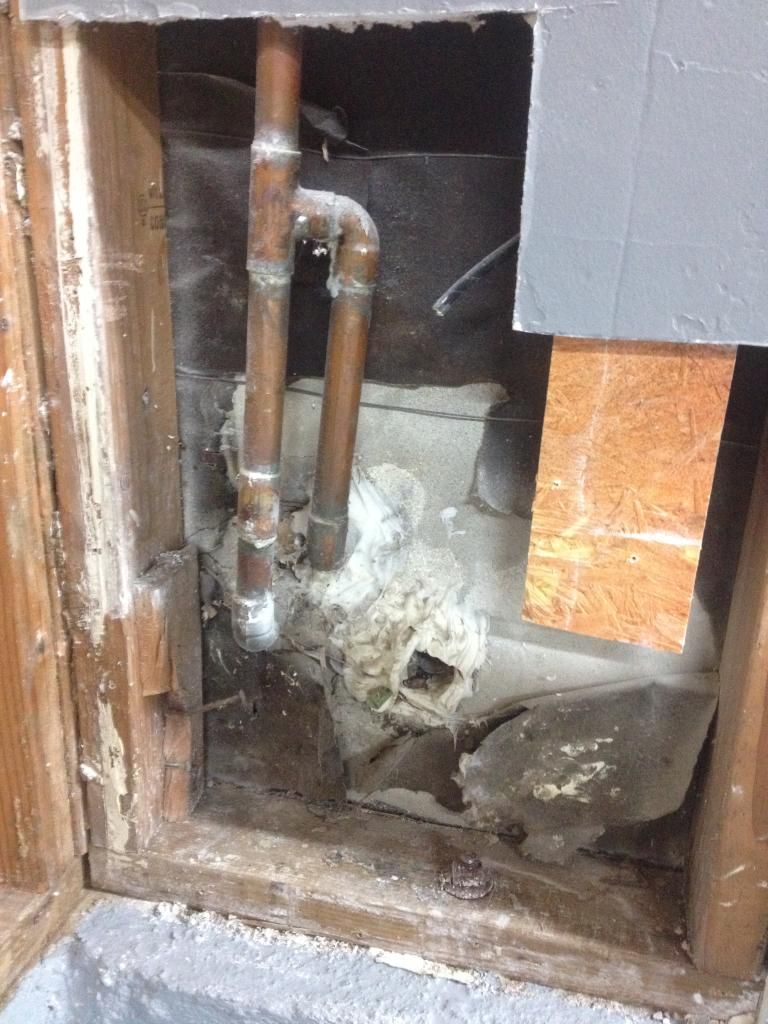
|
|
|

|
|
|
#24 |
|
Registered Member
Join Date: Feb 2010
Posts: 88
|
Looking good so far. Can't wait to see more progress.
|
|
|

|
|
|
#25 |
|
Registered Member
Join Date: May 2006
Location: San Diego
Posts: 222
|
With the help off my dad we finished up the wall plumbing to supply the service sink and RO/DI. I also decided on a more permanent layout plan for the frag tank, service sink, and mixing barrels which I will be staking. Pics of that setup to come.
We were initially planning on doing a lot less fittings but we assumed there were some interesting reducers and fittings somewhere in the wall because we were unable to move the pipe up at all to fit in a simple tee. Everything turned out well anyways. We almost had a huge problem though. When we started making my cut on the line and about three quarters of the way through we realized no one had shut off the water yet! Almost had a very wet afternoon. Next steps are to cover up the dry wall (which I will eventually cover with gray fiberglass reinforced panel, FRP) and install a GFI to the existing line on the wall. 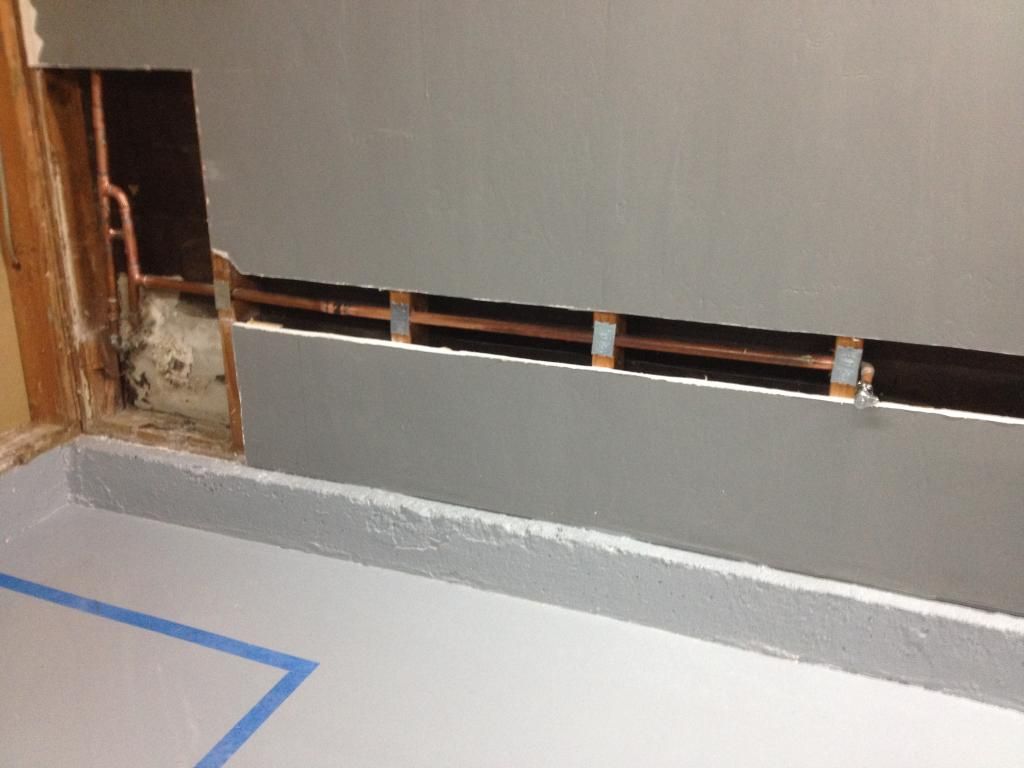 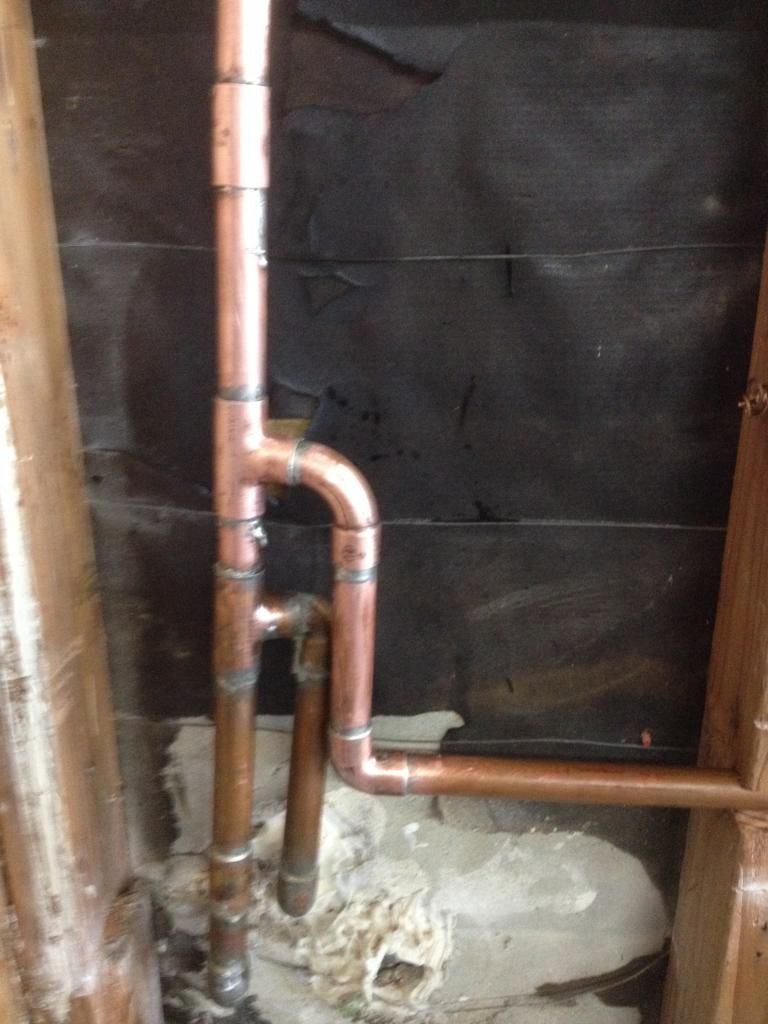
|
|
|

|
 |
|
|