
|
|
|
|||||||
 |
| Thread Tools |
 03/03/2012, 01:22 PM
|
#1 |
|
Registered Member
Join Date: Feb 2010
Location: Pleasant Prairie,WI
Posts: 228
|
ExFowlr's Biocube 29/Reefledlights.com LED upgrade & build
]I started this on the DIY forum and didn't get much interest so I'm reposting this here on the Nano. Hope it can be productive or give anyone idea's. I'm also open to any constructive critism.
After almost giving up the hobby from algae and cyano issues but not being able to part with my gorgeous snowflake clown I decided to go all in on a new build. We bought a new big screen tv and had to move the living room around and the 75g just wasn't compatible with our new design. At that point I said what the heck, my wife and I both love the fish and my little one seems to like it too so I decided to down size to a biocube. I picked up a BC 29 from a fellow RC'er and had to make a few slight repairs to the silicone. No leaks just loose baffle to the backside of the tank. Siliconed it but it still leaked inside- oh well it will be fine 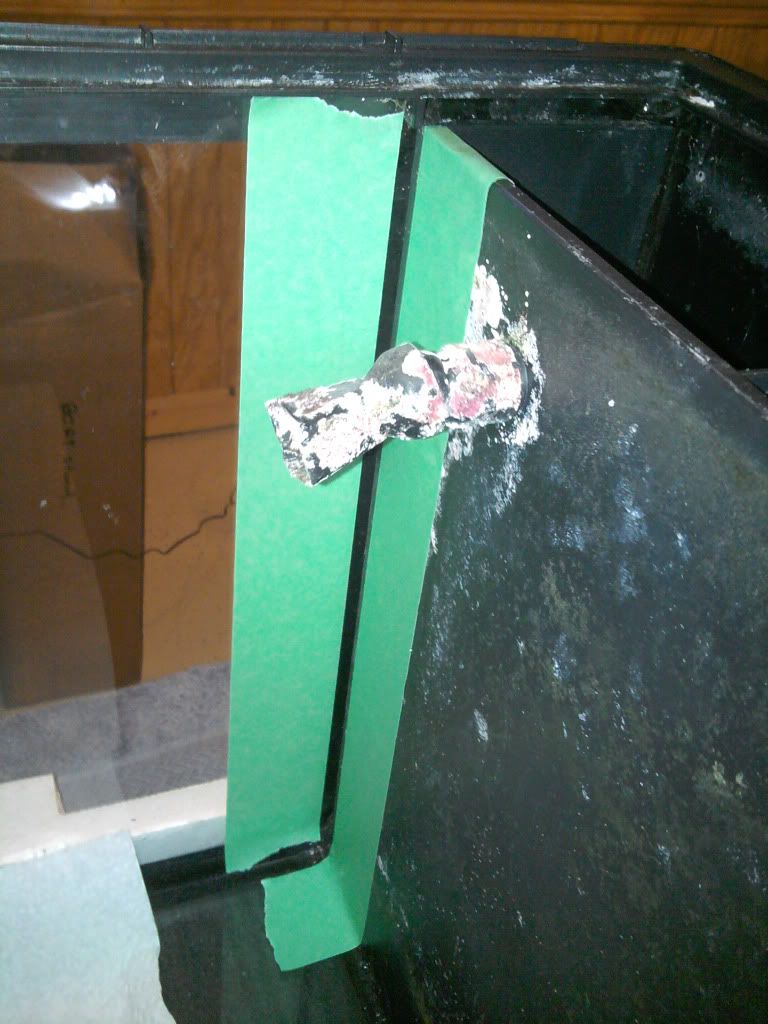 http://i1074.photobucket.com/albums/w420/peguesjc/silicone1.jpg http://i1074.photobucket.com/albums/w420/peguesjc/silicone1.jpg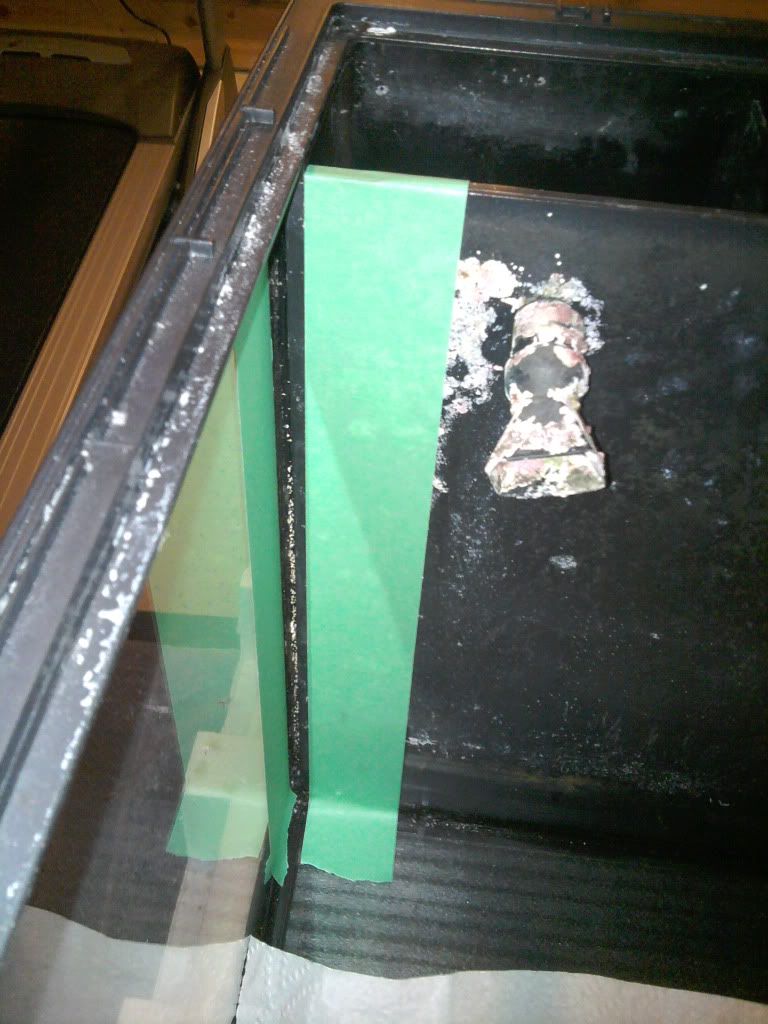
__________________
You shouldn't hang me on a hook, Johnny. My father hung me on a hook once. ONCE! Current Tank Info: 75g. |

|

|
|
03/03/2012, 01:24 PM
|
#2 |
|
Registered Member
Join Date: Feb 2010
Location: Pleasant Prairie,WI
Posts: 228
|
Took some of my infested rock from my 75g and soaked it in a 20% bleach solution for three days. Took it out and dunked it in buckets of fresh water about 3 times. lots of sand and detritus came out but I'm sure there is more. You can only clean it so much until your returns start to diminish. Let the rock dry out for a week and soaked it in RODI water for a few days. Water has a yellow tint and smells of dead rock and ammonia. Thats a good thing I think. Tested the nasty water for phosphate on my Hanna checker, came up 0.00- that is a good thing. after I measure no chlorine I'll put it in saltwater and start a cycle. Here's the rock soaking in the bleach
__________________
You shouldn't hang me on a hook, Johnny. My father hung me on a hook once. ONCE! Current Tank Info: 75g. |
|
|
|
|
03/03/2012, 01:30 PM
|
#3 |
|
Registered Member
Join Date: Feb 2010
Location: Pleasant Prairie,WI
Posts: 228
|
Ordered this kit from Reefledlight.com.
http://reefledlights.com/shop/diy_p25/ It's their premium 25 Led kit with 10 cool white XP-G's, 12 royal blue XT-E's, and 3 blue XT-E's. AQlso included all the requisite hardware for putting it together including solderless connectors. The solderless connectors are great because you can move the LED's around and you can take them apart if you screw something up like I did. My kit came with Inventronics dimmable drivers and a couple of pot switches. The Inventroncs drivers were nice in the fact it provides its own 10v output to connect to a pot switch or other dimming controller such as an Apex or other device. Here are the LED's with their bin #'s and my layout on the heat sink. 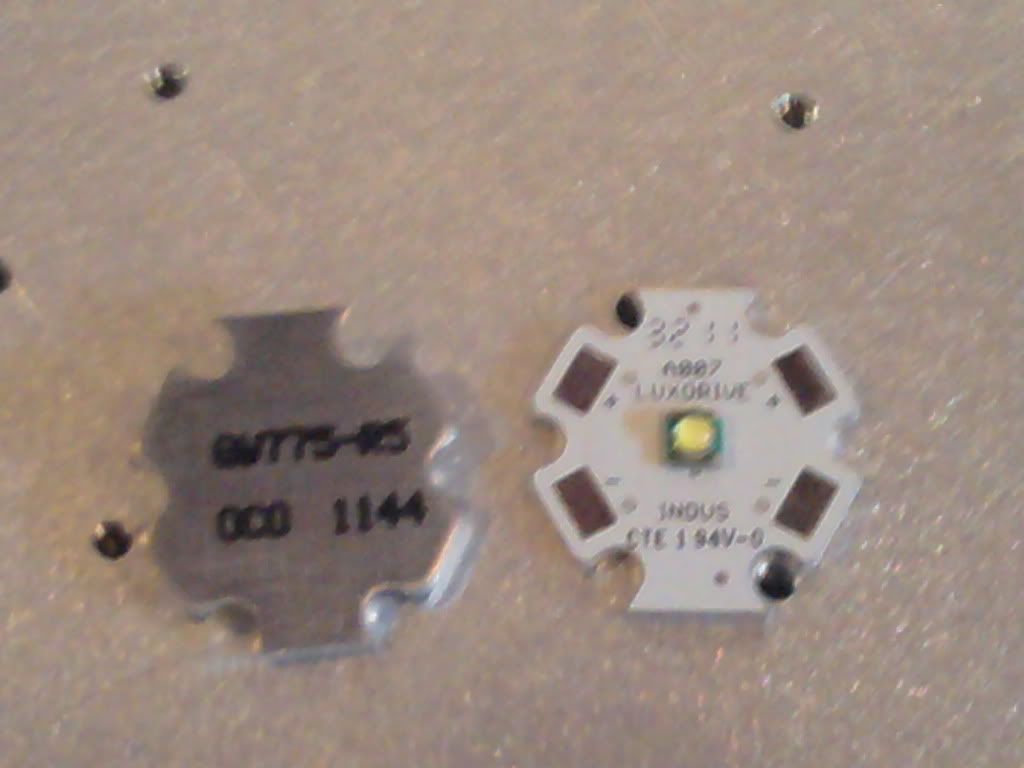 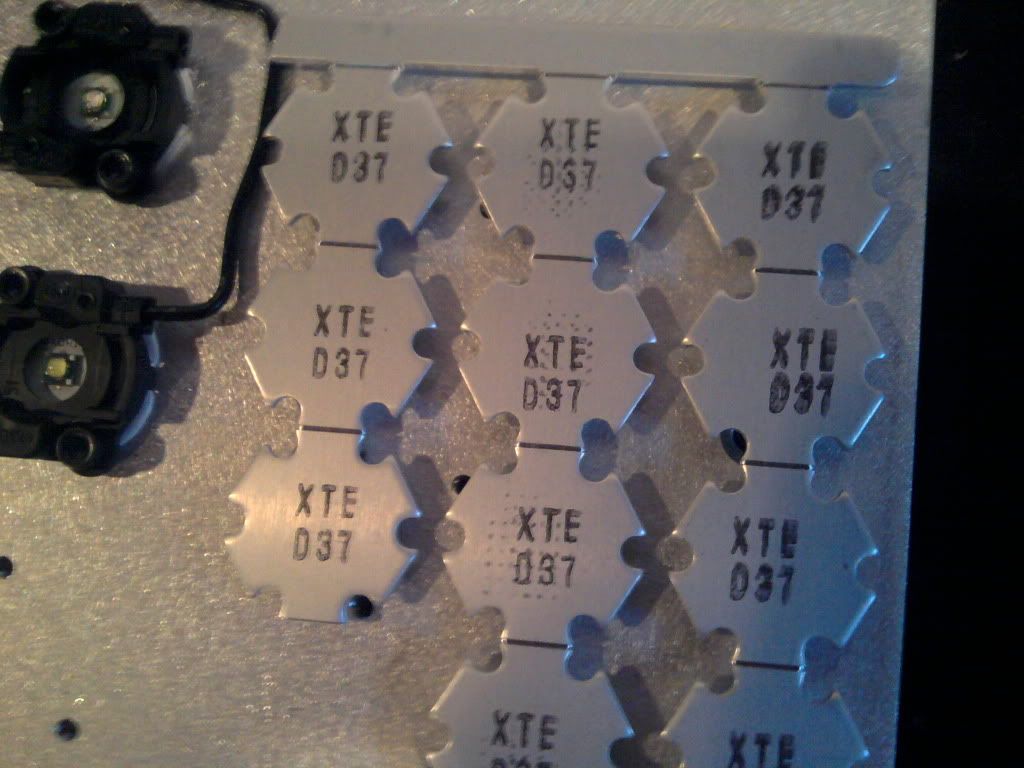 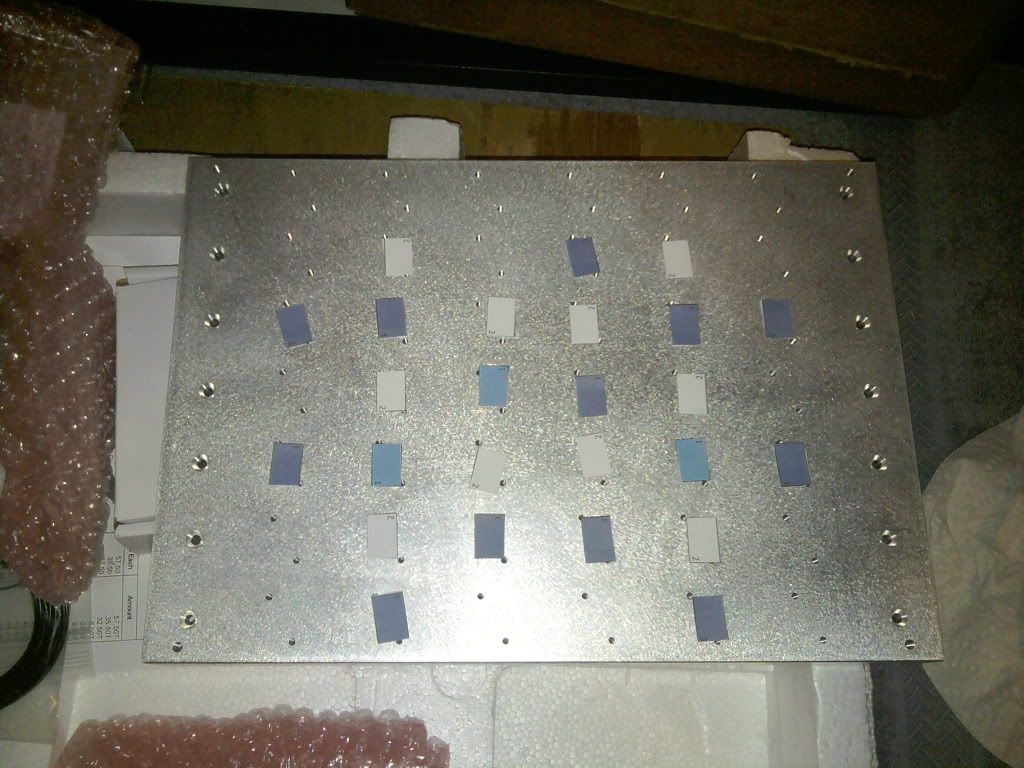
__________________
You shouldn't hang me on a hook, Johnny. My father hung me on a hook once. ONCE! Current Tank Info: 75g. Last edited by ExFOWLR; 03/03/2012 at 01:52 PM. |
|
|
|
|
03/03/2012, 01:45 PM
|
#4 |
|
Registered Member
Join Date: Feb 2010
Location: Pleasant Prairie,WI
Posts: 228
|
Took the biocube hood and gutted the internal parts. Removed the stock fans, moonlights, PC bulbs and reflectors. The 8 1/2"X 12heat sink just fits it the hood and has a lot of mass to it so it should do a good job removing heat from the LED's. The plan is to replace the fans with beefier 60mm computer fans. I used a couple of variable speed Vantech fans that the previous owner of the biocube was goingb to use but never did.
The hood has 2- 6 wire power cords from the stock ballasts. I removed one of the cords and kept the other in place. this worked out perfect because 2+ wires and 2- wires are needed for the LED drivers and 2 wires for the fans. The stock moonlights will also be used which has its own power supply and terminal block inside the hood. All this should fit under the stock splash guard. 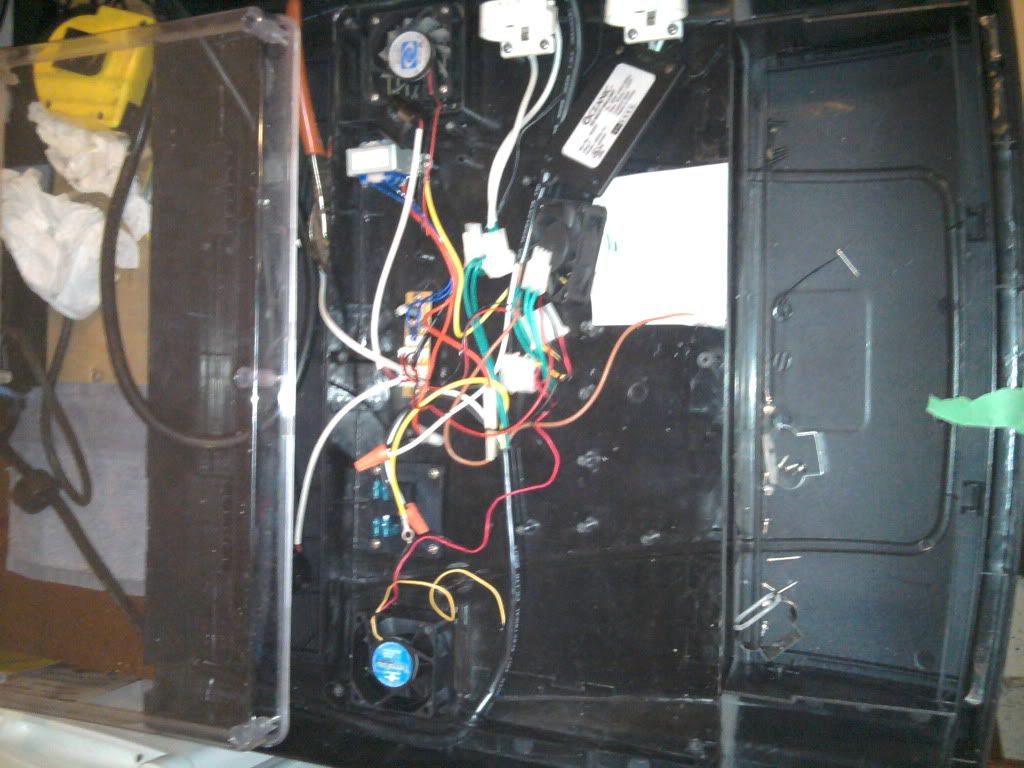 
__________________
You shouldn't hang me on a hook, Johnny. My father hung me on a hook once. ONCE! Current Tank Info: 75g. |
|
|
|
|
03/03/2012, 01:51 PM
|
#5 |
|
Registered Member
Join Date: Feb 2010
Location: Pleasant Prairie,WI
Posts: 228
|
I mounted the heatsink to the hood using the 4 8-32 threaded bosses on each of the corners. I simply drilled through the top of the hood and used black allen screws and black nylon washers to keep it clean on top.
Once the heatsink was mounted I could wire in the LED's. Let me stress again how great the solderless connectors are for installation. They secure the diodes to the heatsink, and your optics clip right on if you are using (I am not), and are removable if you want to change your placement. I wired in the cool white XP-G's first. It took about an hour to install the LED's with thermal compound, connectors, and cut and wire them in. Next went the blues and royal blues. The hardest part was figureing out the route the wire should run, keeping the shortes distance between them and keeping a semi clean look. after a while it went faster when I realized I had many of the same wire sizes and could precut, bend, and strip the ends. once the blues wer finished I attached the moonlights with some good 3M double sided tape. 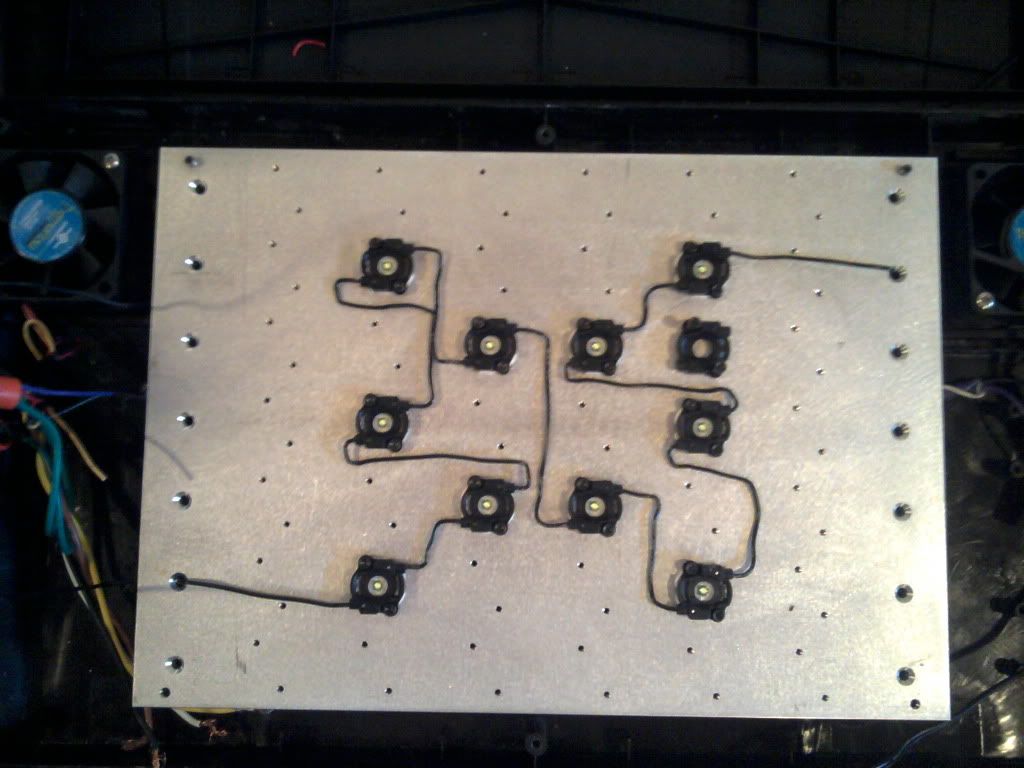 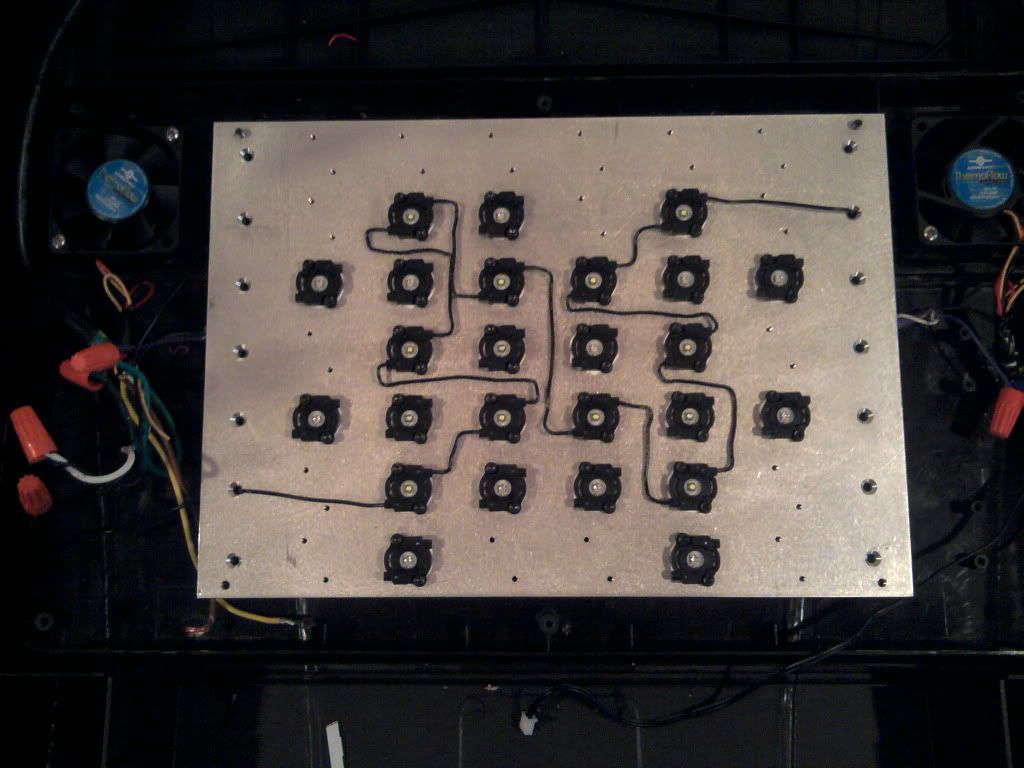 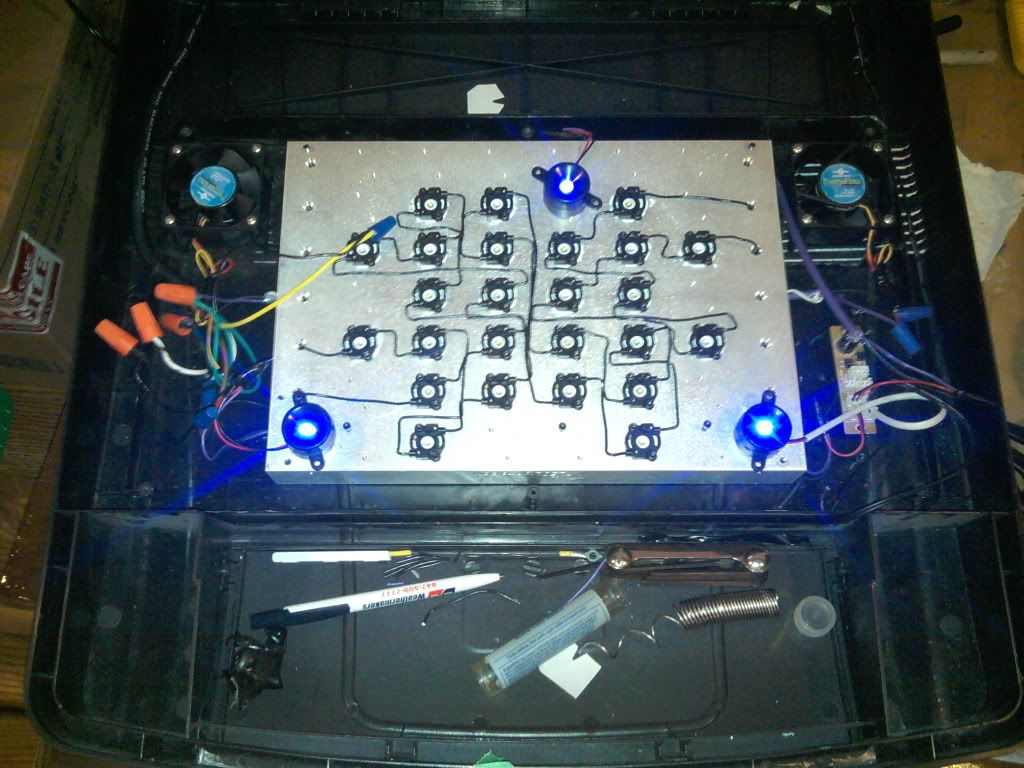
__________________
You shouldn't hang me on a hook, Johnny. My father hung me on a hook once. ONCE! Current Tank Info: 75g. |
|
|
|
|
03/03/2012, 02:34 PM
|
#6 |
|
Registered Member
Join Date: Feb 2010
Location: Pleasant Prairie,WI
Posts: 228
|
I needed to keep the drivers in some type of enclosure and keep the wiring mess to a minimum so I found a 6X6X4 outdoor electric enclosre at the local home center. I should be able to fit both drivers (white and blue) and some type of power supply for the fans.
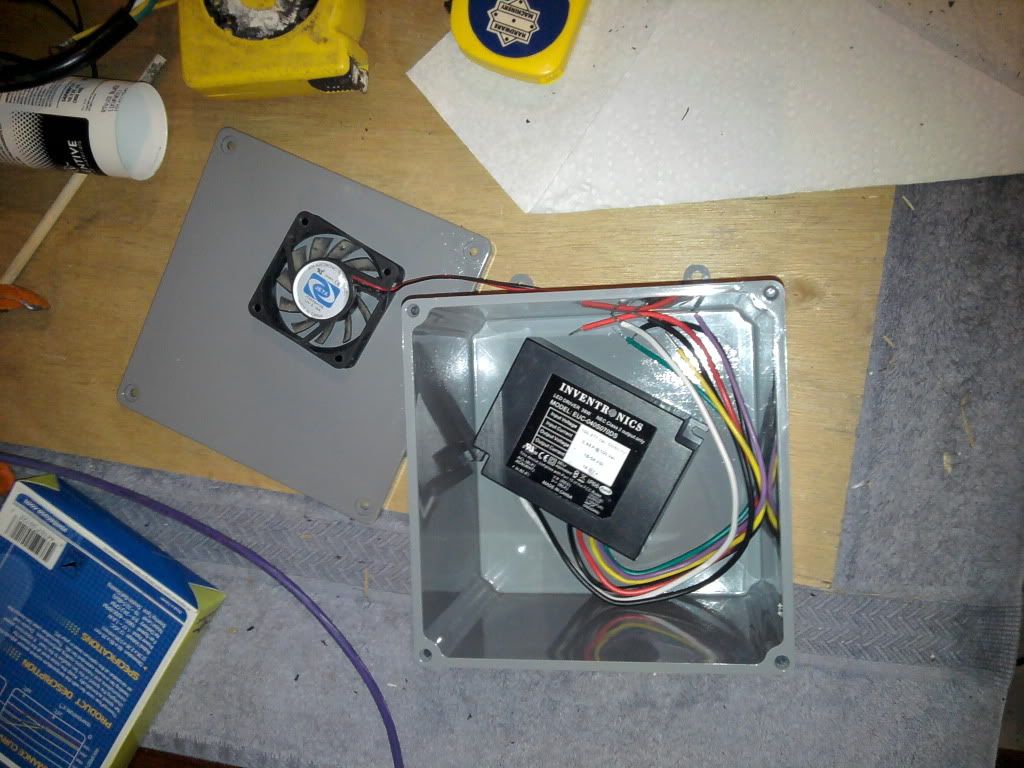 Installed 2 illuminated rocker switches and the pot switches for the dimmers in the cover. Drilled holes for the pots and cut out for the rockers with a dremel tool. 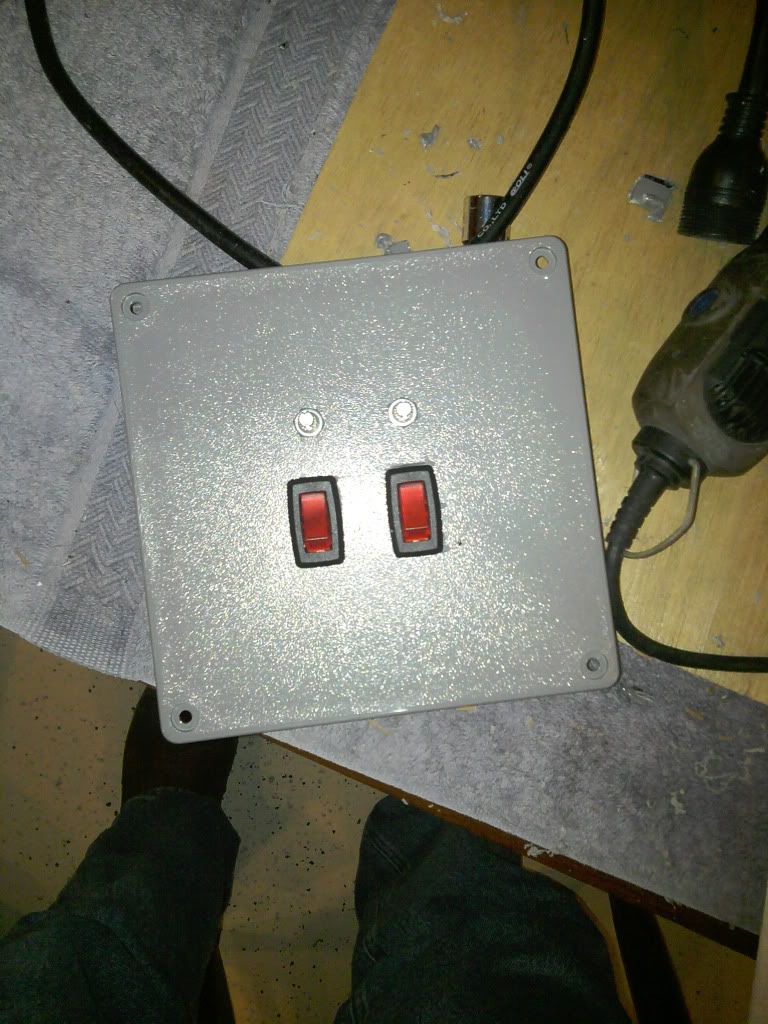 Mounted one of the old hood fans inside the box and measured. Drilled 3/16 holes for the fan to discharge through and 1/4 holes on the opposite side for fresh air to enter. 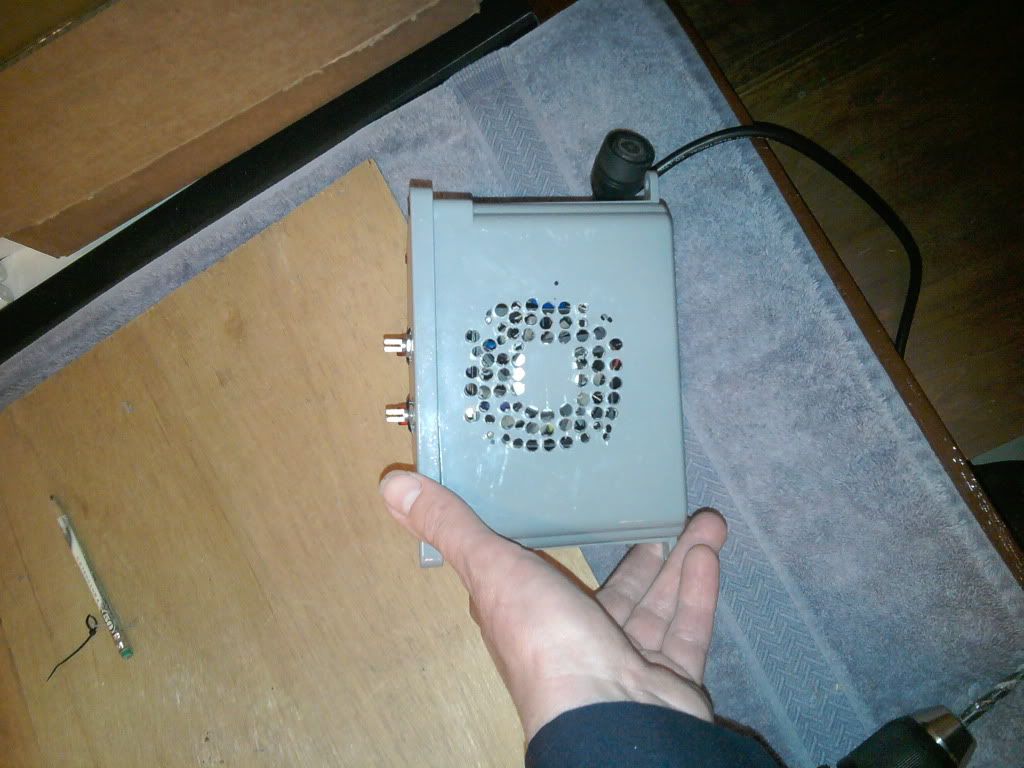 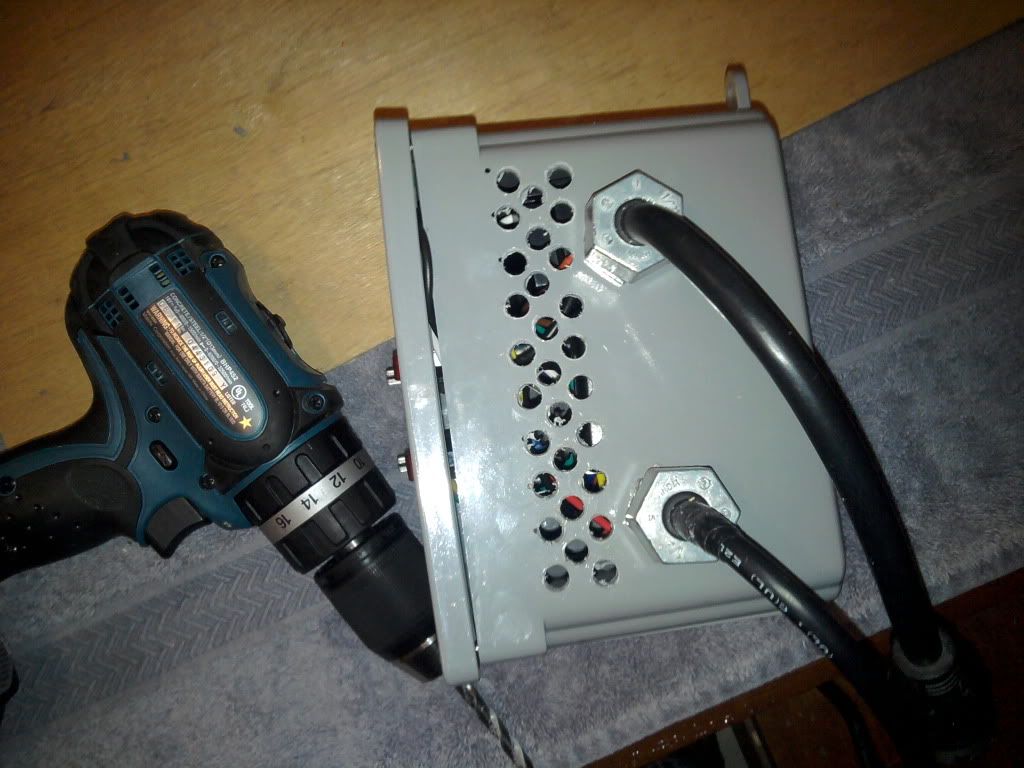
__________________
You shouldn't hang me on a hook, Johnny. My father hung me on a hook once. ONCE! Current Tank Info: 75g. |
|
|
|
|
03/04/2012, 12:37 PM
|
#7 |
|
Registered Member
Join Date: Feb 2010
Location: Pleasant Prairie,WI
Posts: 228
|
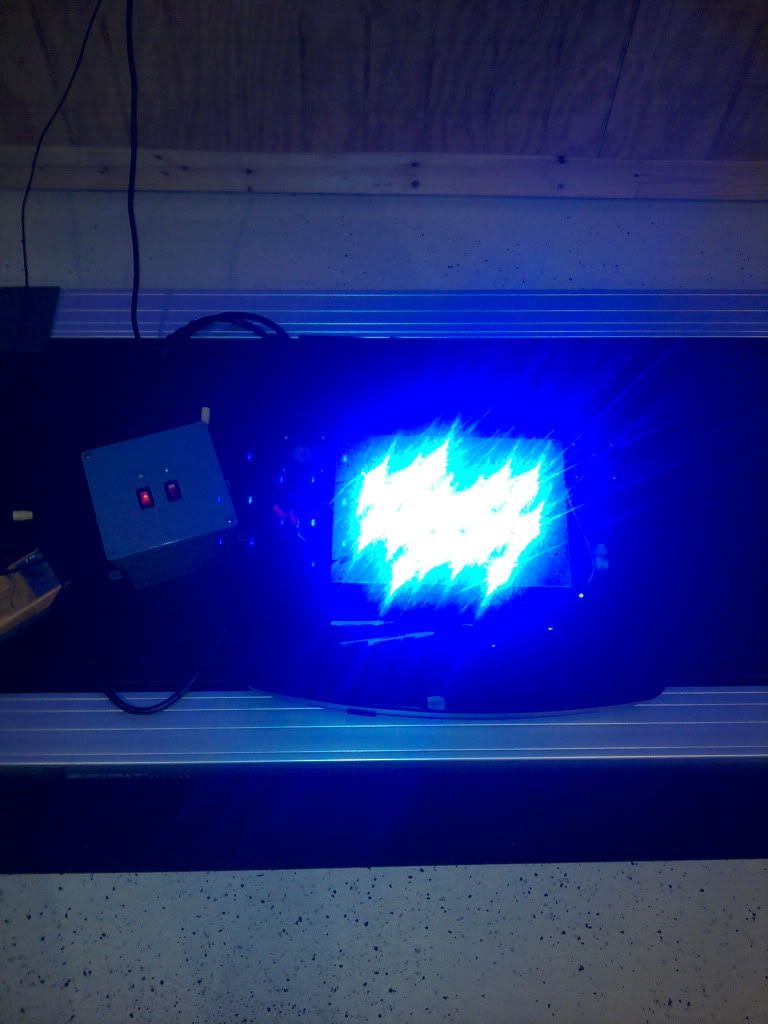
Success! After a couple of minor glitches the blues light up. Waiting for the 1050ma driver for the whites. That driver is on backorder but should be here in a couple of days. Reefledlights.com has been very responsive to any problems or questions, often emailing back within minutes of a question. Can't ask for much better than that. Should have a tunze skimmer here in a couple of days as well. Should be able to move the tank upstairs and start a cycle by next weekend.
__________________
You shouldn't hang me on a hook, Johnny. My father hung me on a hook once. ONCE! Current Tank Info: 75g. |
|
|
|
|
03/04/2012, 08:18 PM
|
#8 |
|
Mental Institution
Join Date: Jun 2004
Location: Kansas City, MO
Posts: 547
|
Looking great so far! Neat idea to keep the existing cables to run power for the new fixtures - that'll end up looking very clean. Where are you going to mount the box with the drivers?
|
|
|
|
|
03/05/2012, 10:08 PM
|
#9 |
|
Registered Member
Join Date: Feb 2010
Location: Pleasant Prairie,WI
Posts: 228
|
Thanks for the words of encouragment. I'm trying to Keep it clean looking as its going in my livingroom and should be a focal point. The box with the drivers will go inside the stand. The stock wiring had a connector plug that I kept intact so I can put the box in the stand and run the wires out the back. Its as simple as plugging it back together after that.
Bought a Tunze 9002 skimmer off of RC and should be here tomorrow. Now just need to find a 2 channel dosing pump for alk and calcuim and a controller for the lights.
__________________
You shouldn't hang me on a hook, Johnny. My father hung me on a hook once. ONCE! Current Tank Info: 75g. |
|
|
|
|
03/10/2012, 09:43 PM
|
#10 |
|
Registered Member
Join Date: Feb 2010
Location: Pleasant Prairie,WI
Posts: 228
|
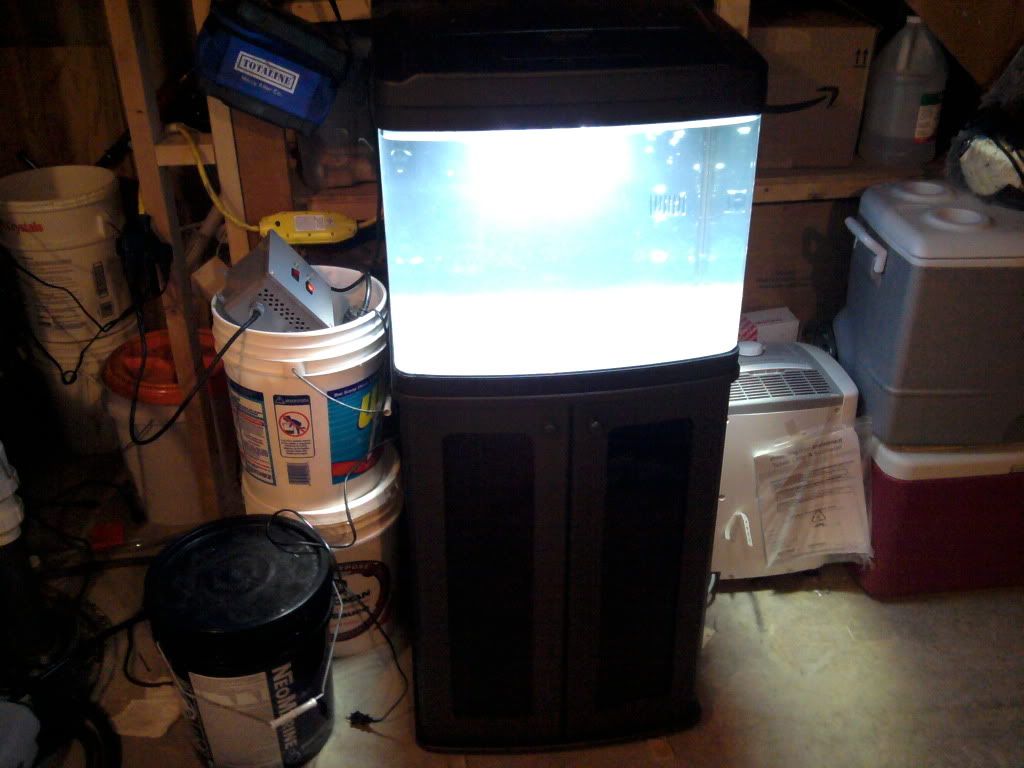
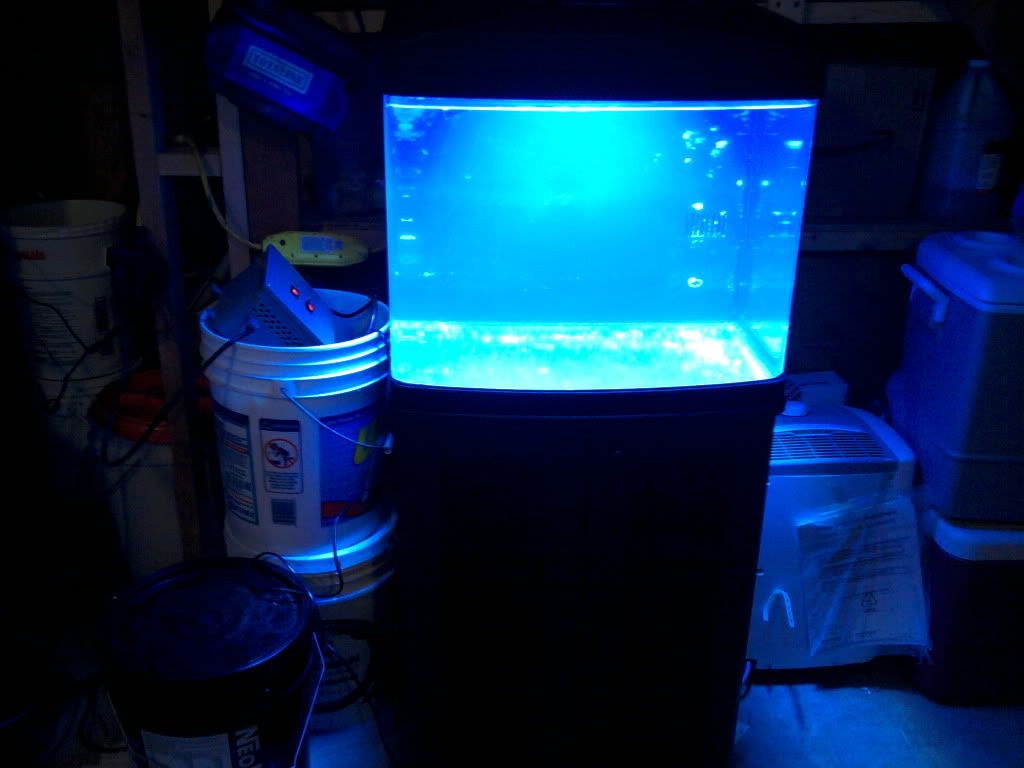
Got the CW driver the other day and wired it in but finally got around to posting pics today. Found a couple more leaks in the internal silicone baffle and took care of that this afternoon. Will probably move the tank upstairs tomorrow and possibly fill with rock and water to start a new cycle. Here are a couple of pics with just the whites and the blue and whites at 50%.
__________________
You shouldn't hang me on a hook, Johnny. My father hung me on a hook once. ONCE! Current Tank Info: 75g. |
|
|
|
|
03/18/2012, 08:05 PM
|
#11 |
|
Registered Member
Join Date: Feb 2010
Location: Pleasant Prairie,WI
Posts: 228
|
Got some goodies in the mail this week:
 And a couple of 1.1mm/min pumps from Bulk Reef Supply: 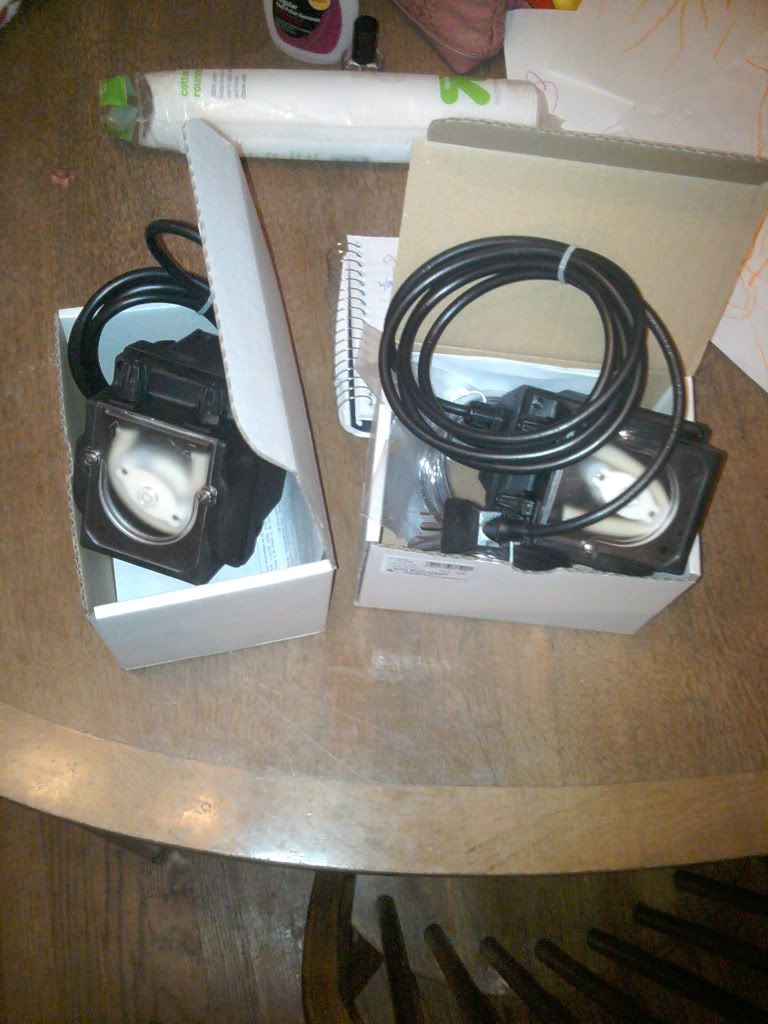
__________________
You shouldn't hang me on a hook, Johnny. My father hung me on a hook once. ONCE! Current Tank Info: 75g. |
|
|
|
|
03/18/2012, 08:23 PM
|
#12 |
|
Registered Member
Join Date: Feb 2010
Location: Pleasant Prairie,WI
Posts: 228
|
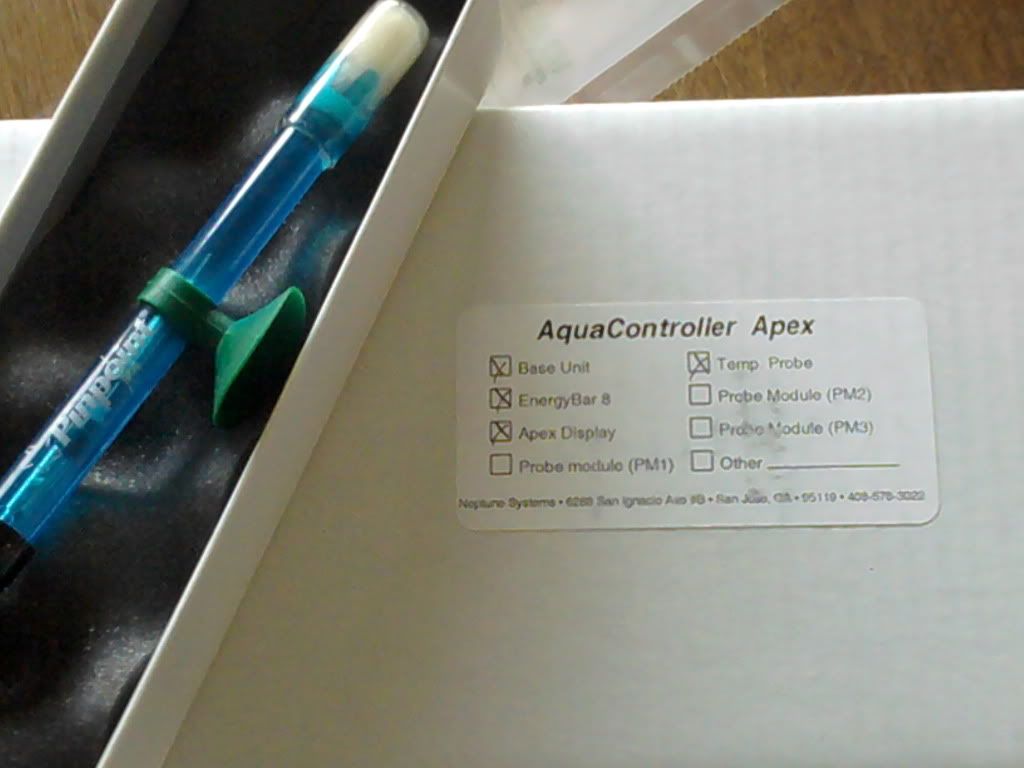
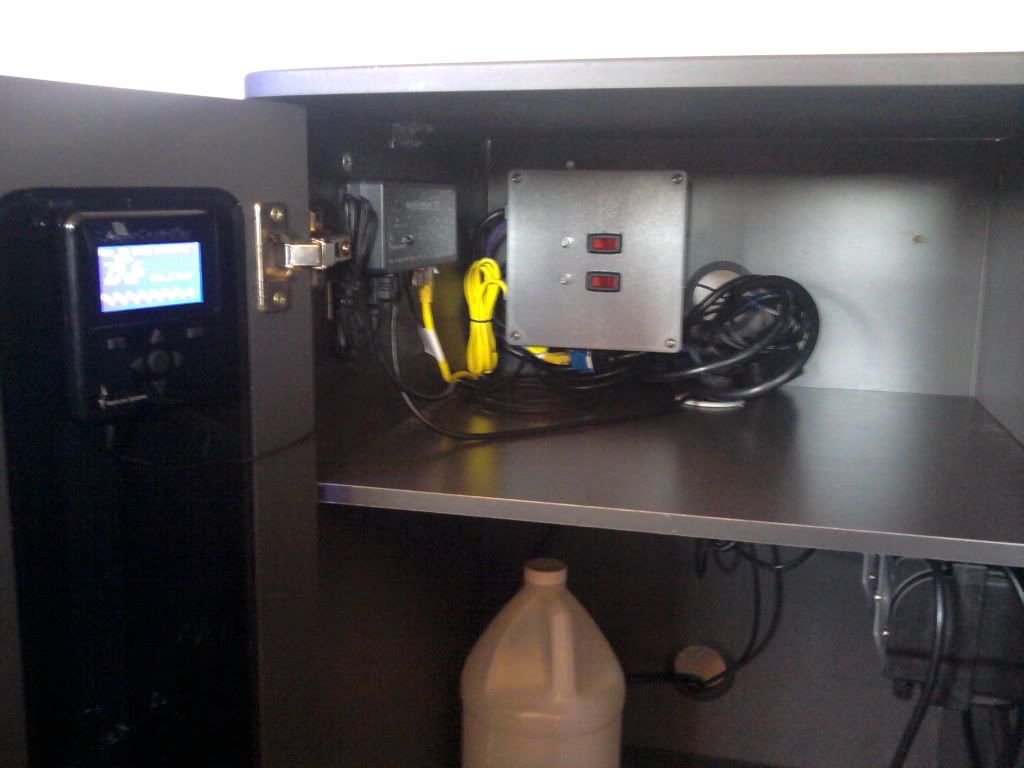
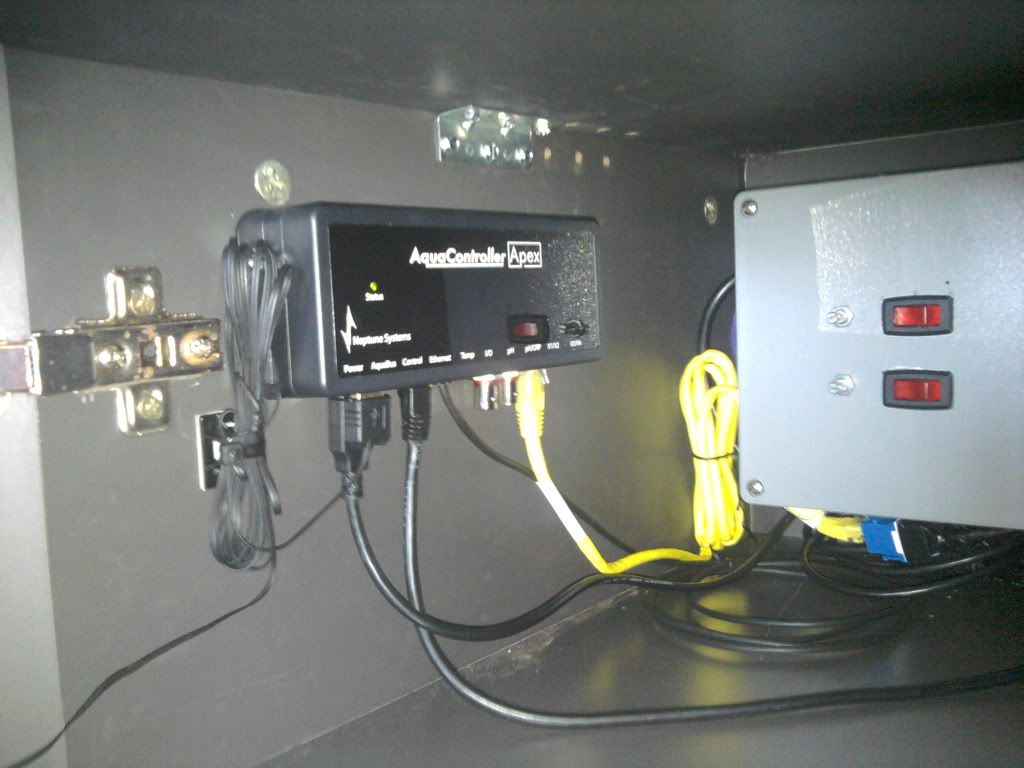
Now things are starting to come together. I have my live rock re-seeding in the basement tank with some rubble from the local coral farm and a shrimp. Started the Apex install this weekend. First put it all together and tested, slick piece of equipment. A little tough to figure out at first but pretty cool once you get the hang of it. The first thing I had to do was DIY a dimmer cable from the Apex to the LED drivers:
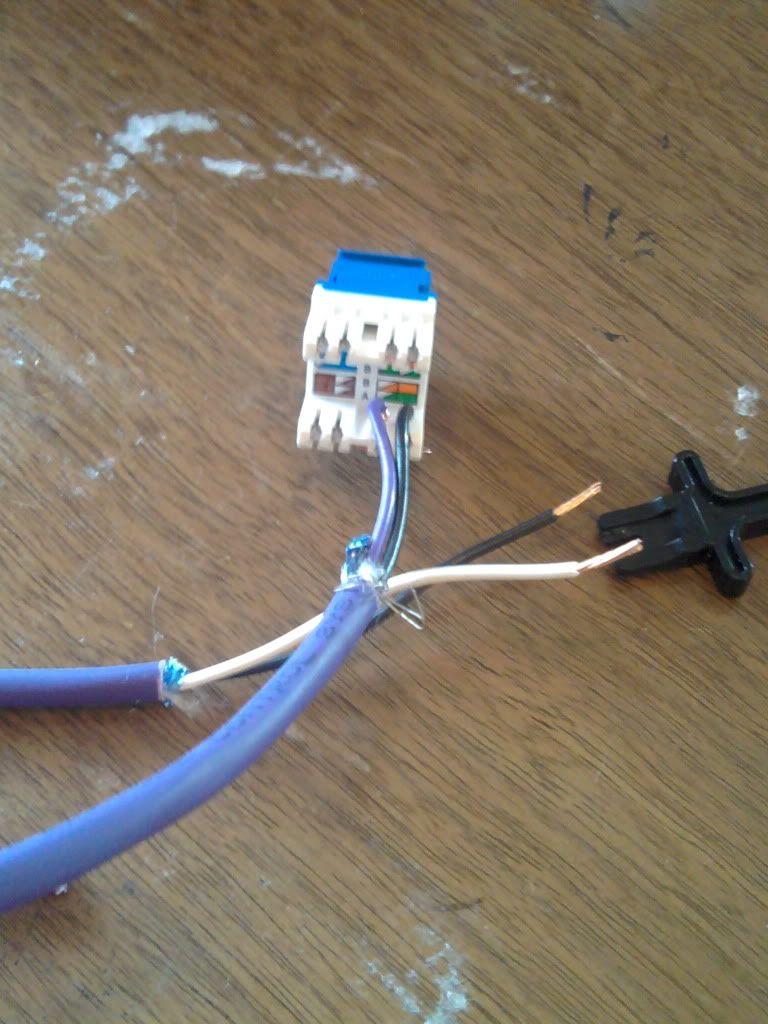 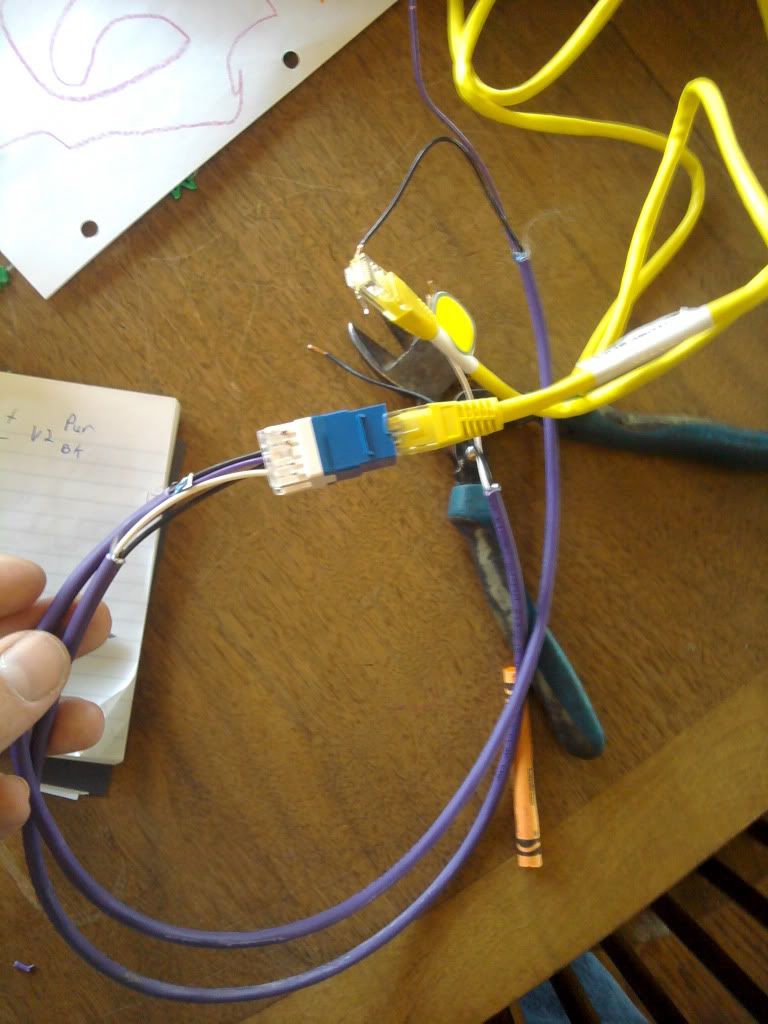 The Cable just uses a spare ethernet cable I had and just plugs right into the Apex control. Cost: $4.00 plus the $1.99 for the ethernet cable I bought from Monoprice.com When I bought my new TV last year. Next, the most important thing I am doing is installing a liner in the bottom of my stand. this consists of vinyl carpet runner from the Local Menards for about $5. This was the most intelligent thing I did on my last tank and saved my floors from water damage more than once. We all know with a sump how easy it is to get water inside the stand from time to time. 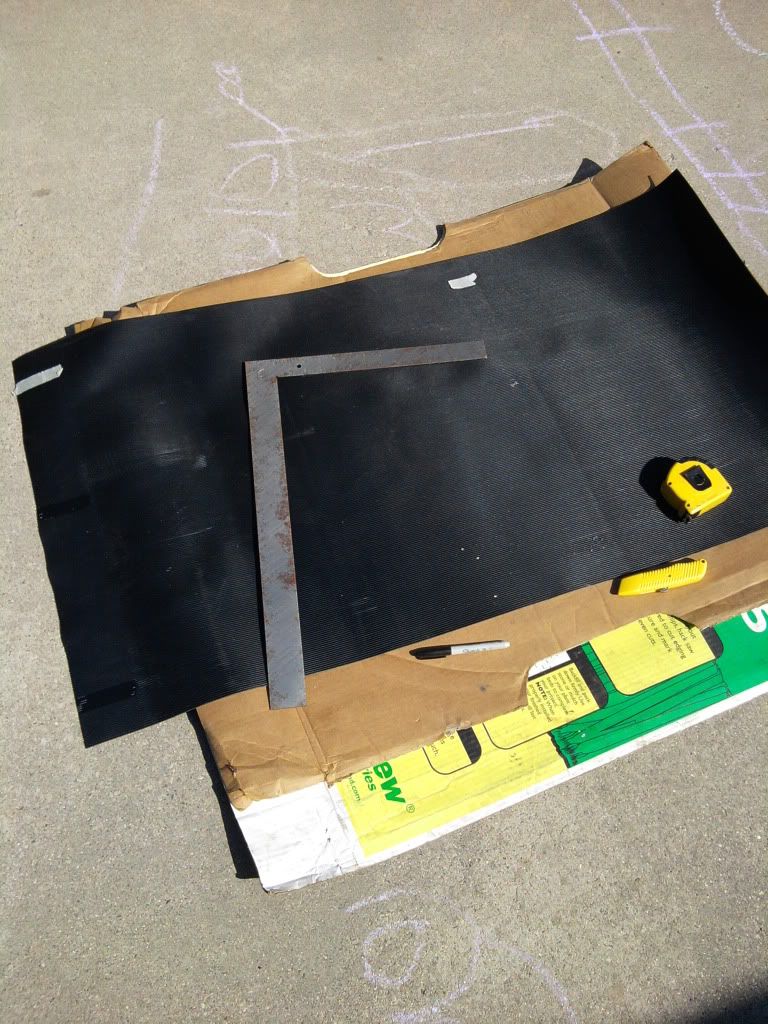 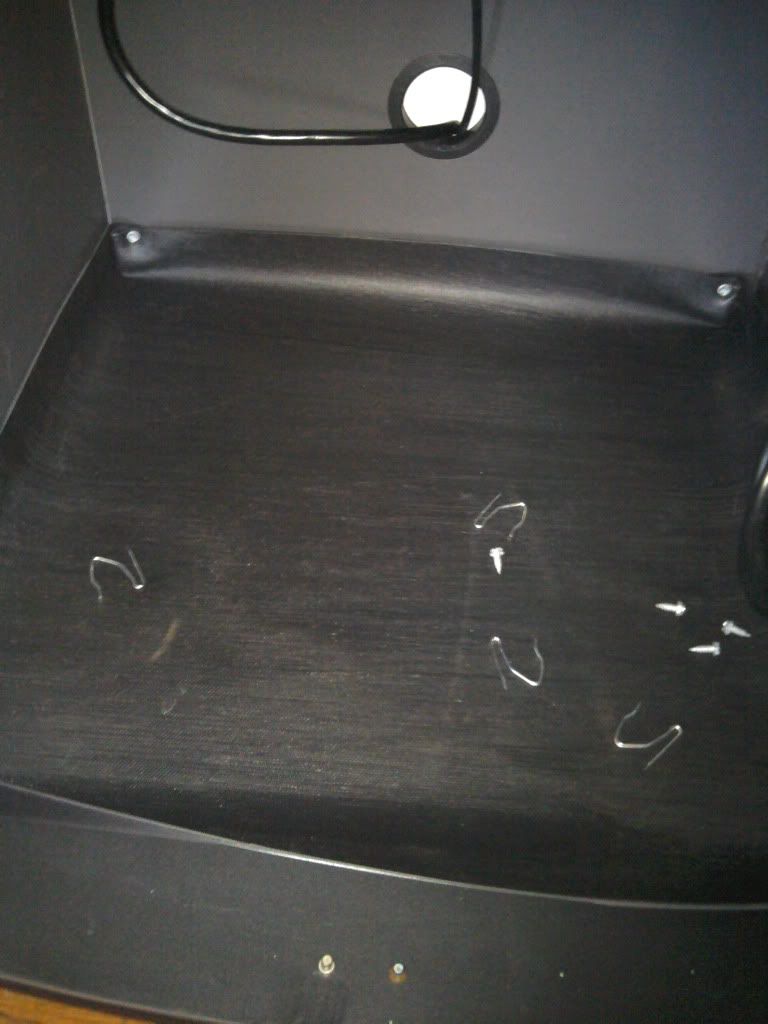
__________________
You shouldn't hang me on a hook, Johnny. My father hung me on a hook once. ONCE! Current Tank Info: 75g. |
|
|
|
|
03/18/2012, 08:42 PM
|
#13 |
|
Registered Member
Join Date: Feb 2010
Location: Pleasant Prairie,WI
Posts: 228
|
On to the install. Put the energy bar and the dosing pumps on the bottom as there wa smore room and I am keeping the bottles there. Eventually when I break down my 75g my Spectrapure UPTO control will be located there also. Thats the main reason for the liner. In case there is a leak from that then I won't get water all over my floor. The TO pump is located in the stand with a 30g resevior located down in the basement. The pump is capable of pumping from 20 feet below it and is self priming. Great purchase and keeps the water level in the sump dead on with no deviation ++++.
 After installing the BRS pumps and testing their operation, one of them will be returned. While one is silent and is almost inaudable the other one is terrible. I can hear it in the other room and the stand amplifies it like a speaker box! It has to be a defect beacause the other one is fine.
__________________
You shouldn't hang me on a hook, Johnny. My father hung me on a hook once. ONCE! Current Tank Info: 75g. |
|
|
|
|
03/18/2012, 08:54 PM
|
#14 |
|
Registered Member
Join Date: Feb 2010
Location: Pleasant Prairie,WI
Posts: 228
|
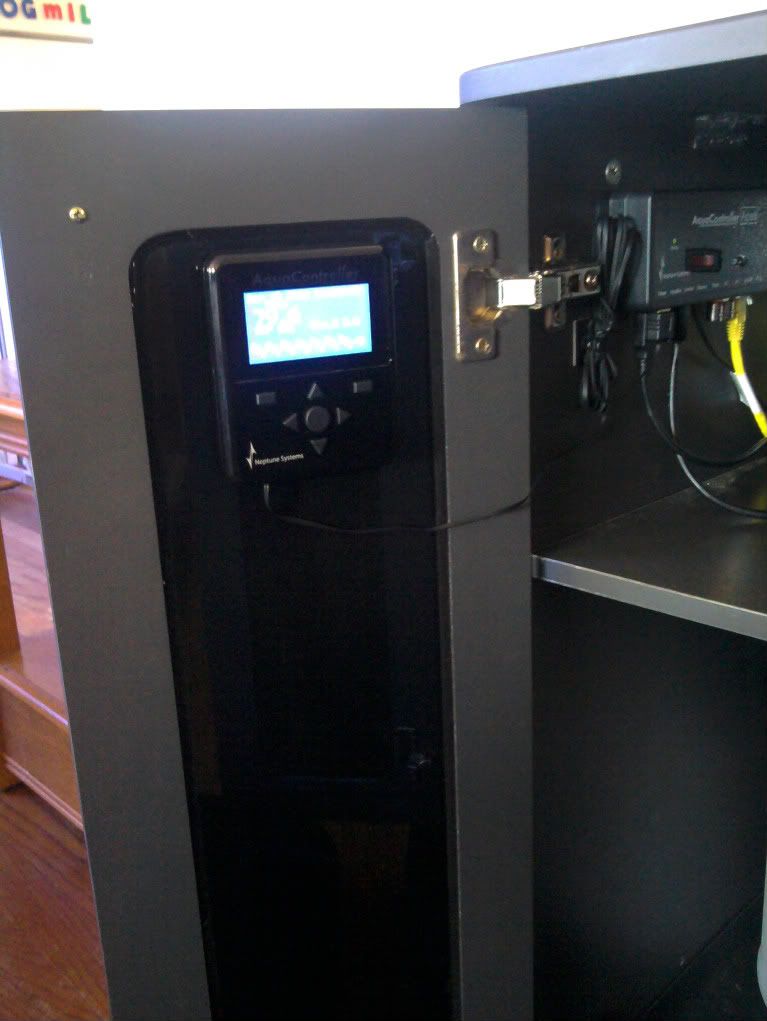
And finally today got the rest of the Apex and driver box installed. Put both of those on top and mounted the diplay inside the door. Once that was done I tried some simple code to program the dimmng control. After a few failed attemps I finally started to figure it out and the lights dimmed independant of one another and on the time schedule I chose. whoo hoo!
   Now just a few more things and thoughts to make sure I'm not forgetting anything and I think I can add water and live rock in a couple of days. 
__________________
You shouldn't hang me on a hook, Johnny. My father hung me on a hook once. ONCE! Current Tank Info: 75g. |
|
|
|
|
03/25/2012, 01:26 PM
|
#15 |
|
Registered Member
Join Date: Feb 2010
Location: Pleasant Prairie,WI
Posts: 228
|
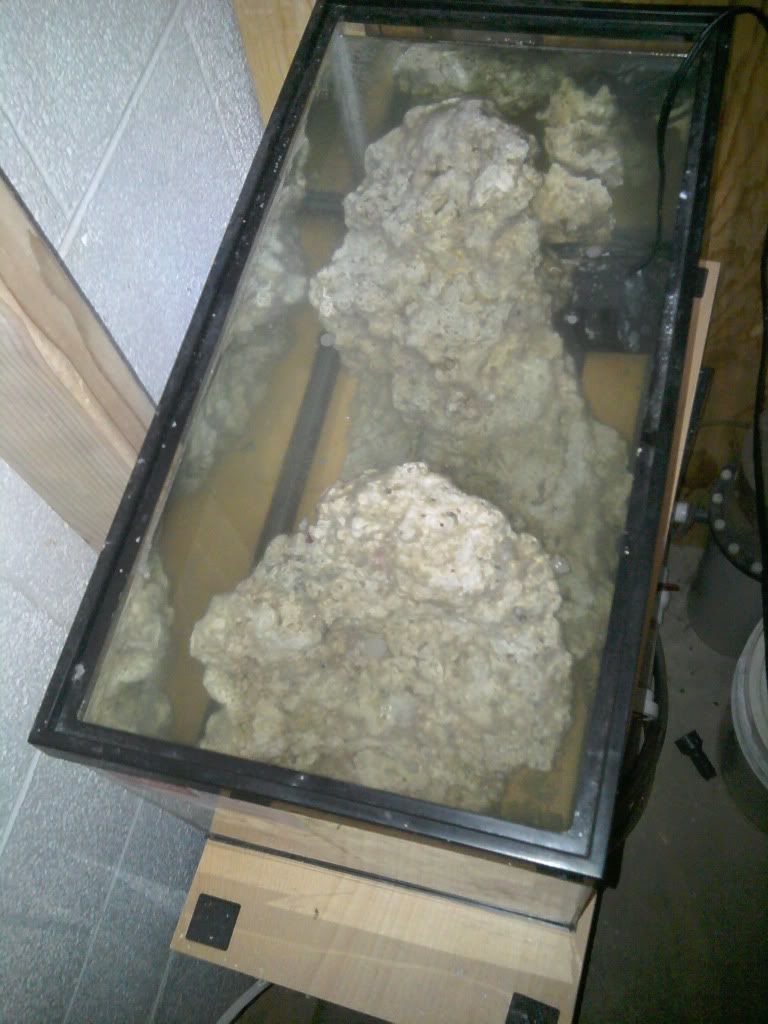
Finally got around to filling the tank and putting the rock. About a week and a half ago I put a small piece of shrimp in my 10g tank that the rock was soaking in and added some live rock rubble to seed the dead bleached rock. Put the rock in the tank and filled with SW and did the same thing. Will let it cycle and start to transfer my livestock over.
Here are some pics of the tank with rock now. It is basically 2 large pieces of live rock with some rubble in there for cycling. Feel free to critique the placement of the rock and if anyone has a better idea for placement I'm all ears. 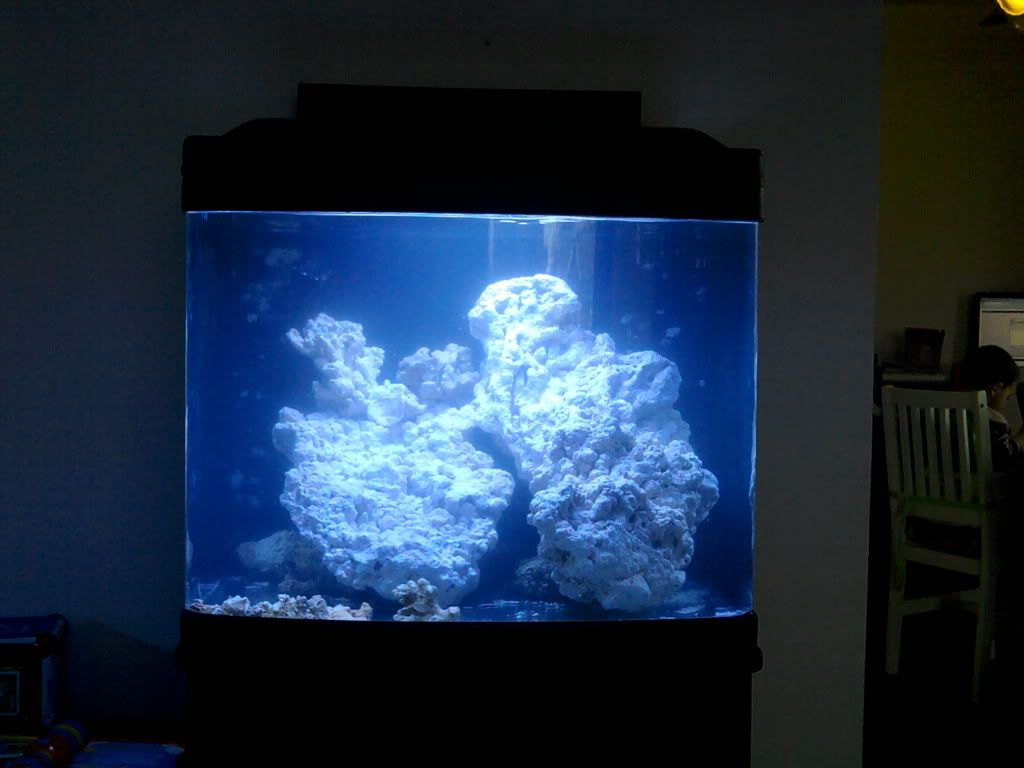 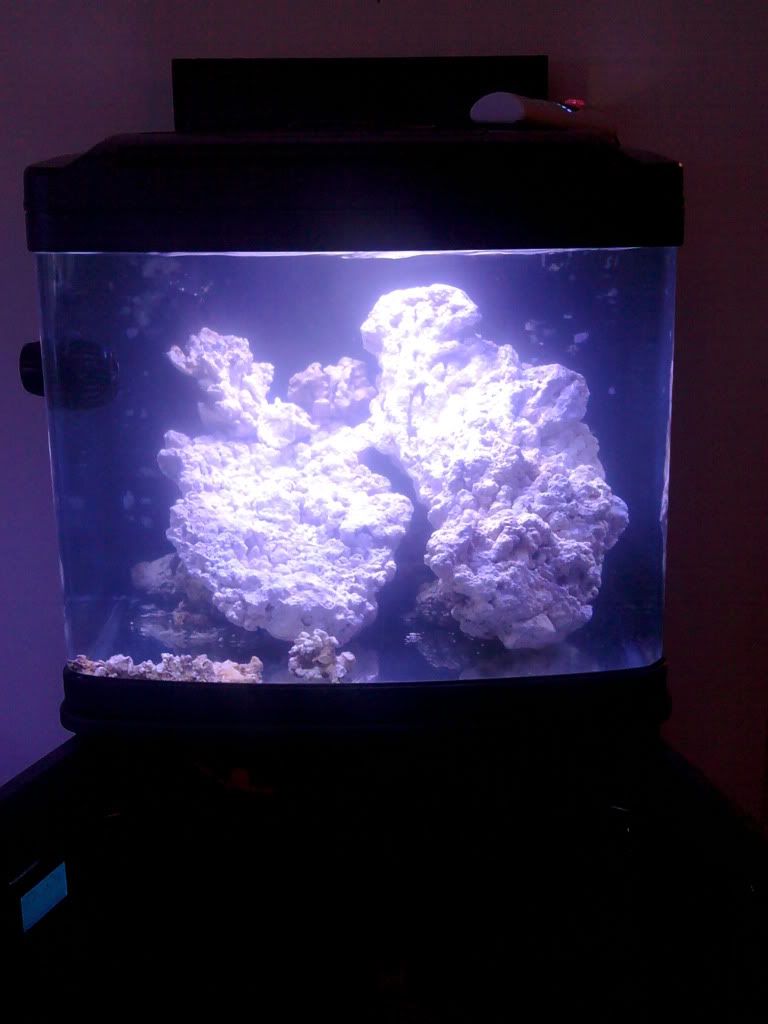
__________________
You shouldn't hang me on a hook, Johnny. My father hung me on a hook once. ONCE! Current Tank Info: 75g. |
|
|
|
|
|
|


