
|
|
 05/03/2016, 02:34 PM
|
#1 |
|
A-counting guy
 Join Date: Jul 2004
Location: Ottawa, Ontario, Canada
Posts: 673
|
A Capital Dream - 400g SPS build
The time has come to sit on my derrier and get this build journal start. I am not much of a journalist but I hope to update this on a regular basis. I am upgrading from a 220g to a 400g reef aquarium. The new tank is custom built and should arrive within 2 weeks. This will be an SPS dominant tank, as is the current 220g. However, before I entice you with the build details to date, I will bore you with a little history.
I call this thread A Capital Dream because I live in Ottawa, Canada's capital. I have lived here for 23 years. However, I grew up on the east coast of Canada, near the ocean. I lived 45 minutes from Shediac, the lobster capital of the world. There were great beaches there, and I came to love the smell and feel of the saltwater. It did not mean anything to me until I started a saltwater aquarium. tldr: History follows, so if you want to jump ahead, go for it. In fall 2003 I met someone at work that had a 55g saltwater aquarium. He had few corals, but a number of fish. I loved what I saw and that played on my mind for a while. I did a lot of reading on a local forum and here, on reef central. I took the plunge in the summer of 2004 with a 90g. This was not a reef ready tank, so I jumped into the fire drilling holes in the back of the tank for a single overflow and return. I don't have any pictures of that tank, but it is still with me as a refugium, skimmer sump. I learned a lot from that tank and kept mostly LSP and softies with a couple of monti's. That tank was later replaced with a saltwater "system". This system consisted of a 220g FOWLR, a 180 SPS and two 54g corner tanks. The 220g was in the living room with the others in the family room. At that time I moved the sump to the basement and built a "wall" that had the 180 bookended with the 54g corner units.  IN time, my son went out of town to University and we agreed to pay half of the cost. To help ease expenses, I sold off the 3 coral tanks and contents and we kept the FOWLR. He graduated in April 2012, so my wife and I were thinking of setting up a coral tank, now that we would have money again.  This thinking came to an abrupt end late June of that year when I landed in the hospital for emergency surgery. I had a sudden perforation in my small intestine. Subsequent to the surgery, an infection set in. I was in the hospital for a week and my wife looked after the tank. She did a great job, but the day after I came home, the return pump died. I was unable to do anything physical and did not have a pump available. I knew the recovery period would be long so we made the decision to shut down the FOWLR. I called a local LFS I dealt with and they came over to save the fish. They also took the live rock and drained tanks for me. I am still grateful for their help. This thinking came to an abrupt end late June of that year when I landed in the hospital for emergency surgery. I had a sudden perforation in my small intestine. Subsequent to the surgery, an infection set in. I was in the hospital for a week and my wife looked after the tank. She did a great job, but the day after I came home, the return pump died. I was unable to do anything physical and did not have a pump available. I knew the recovery period would be long so we made the decision to shut down the FOWLR. I called a local LFS I dealt with and they came over to save the fish. They also took the live rock and drained tanks for me. I am still grateful for their help.In the spring of 2014, I could not take it any more. I wanted my tank back.  This time, I was going to focus on SPS. I never did sell the 220g so I resurrected it. Over the past two years, I have been adding fish and corals. My kids have grown up and left the nest, I am a few years away from retirement and my wife and I have decided to spend the kid's inheritance on a dream. (A friend once said it is better to die with a million in debt than a million in the bank....let the kids sort it out This time, I was going to focus on SPS. I never did sell the 220g so I resurrected it. Over the past two years, I have been adding fish and corals. My kids have grown up and left the nest, I am a few years away from retirement and my wife and I have decided to spend the kid's inheritance on a dream. (A friend once said it is better to die with a million in debt than a million in the bank....let the kids sort it out  ) ) There, the history lesson is over. More to come, because I have already made progress on the build.
__________________
You can see my 400g build thread here: http://www.reefcentral.com/forums/showthread.php?t=2577596 Current Tank Info: 400g SPS and 75g non SPS |

|

|
|
05/03/2016, 03:01 PM
|
#2 |
|
A-counting guy
Join Date: Jul 2004
Location: Ottawa, Ontario, Canada
Posts: 673
|
Now that the history lesson is over, here is where I am today. The current tank is a 220g SPS tank that has been running for two years.
 This is an older pic but I will update it with new photos in the next couple of days. The tank is on the main level with the sump in the basement. The sump consists of two tanks: the 90g which is a refugium and catch for the external skimmer discharge and a 65g which houses reactors and additional bio media. Current equipment list: Tank: std 220g - 72" x 24"x 30" Light: 3 250w radiums in lumnbright mini reflectors powered by coralvue dimmable ballast (150 - 250w) set to 250w hqi and 72" Reefbrite XHO Blue led Protein skimmer: Reeflo Orca 250 pro (rated for 800g) Return pump: Reeflo Hammerhead/Barracuda Gold Hybrid with hammerhead impeller. PH: Maxspect Gyre 150 + Tunze 6101 Controller: Profilux 3ex Doser: 2 x profilux 4 head (gen 1) CA reactor: Reef Octopus SRO CR 3000 Kalk reactor: Precision Marine Media reactors: 2 x precision marine SR45S and Two Little Fishies Media Phosban Reactor 550 I am probably missing something, but will remember later.
__________________
You can see my 400g build thread here: http://www.reefcentral.com/forums/showthread.php?t=2577596 Current Tank Info: 400g SPS and 75g non SPS |
|
|
|
|
05/03/2016, 04:32 PM
|
#3 |
|
A-counting guy
Join Date: Jul 2004
Location: Ottawa, Ontario, Canada
Posts: 673
|
The 400g will be setup in the family room, which happens to be a converted single car garage.
 The wall is 18' long between the left wall and the window on the right. You can see some of the remnants from my earlier system. The single 150 MH on the left had a plant table under it. I reinstalled the 6 ft fixture so (I would have some better light to work with. In the end, I only need the 2 T5HO, but saved buying another temporary work light. These will stay up until I get the light rack prepared. You can also see a hole in the wall at the bottom centre. The sump sits directly below this hole to minimize distance.
__________________
You can see my 400g build thread here: http://www.reefcentral.com/forums/showthread.php?t=2577596 Current Tank Info: 400g SPS and 75g non SPS |
|
|
|
|
05/03/2016, 05:59 PM
|
#4 |
|
A-counting guy
Join Date: Jul 2004
Location: Ottawa, Ontario, Canada
Posts: 673
|
Ok. So what is this new tank of which ye speak? The tank is 96" x 36" x 27" three side starphire, with two overflows, one at each end. It will look like this:
 The room is only 10 feet wide, the size of a single car garage, so I wanted the tank as close to the wall as possible. This precludes using a coast to coast with back overflow. I originally was only going to go with 30" wide, but that is only 6 inches wider than the 220g. I wanted some depth to work with, so I decided to go the full 3 feet. I also did not want a 30" tall tank. I have that now and it is frustrating trying to work with. I am always getting the underarms soaked and then water running down inside my shirt when I stood up. Now I lose the shirt, but the water still runs. I settled on the 27" height. With a 2" sand bed, I will only have to reach 25". My sleeve length is 29", so I should be less wet with maintenance. I want the tank to have a "built-in appearance". I plan to build cabinetry at the end which hides the overflows and returns and that has storage and bookshelves. The front 16" (oops, just noticed drawing says 15". s/b 16") will be open so that a side view is available. This will mimic the built in look.
__________________
You can see my 400g build thread here: http://www.reefcentral.com/forums/showthread.php?t=2577596 Current Tank Info: 400g SPS and 75g non SPS |
|
|
|
|
05/03/2016, 06:20 PM
|
#5 |
|
A-counting guy
Join Date: Jul 2004
Location: Ottawa, Ontario, Canada
Posts: 673
|
The first order was to build the stand. This was a bit of a challenge because the stand had to be built in the room where it was to sit. This room also had two computer workstations, an entertainment centre, two upright freezers and 4 old small tanks. While my wife loves having a reef, she informed me that the freezers, entertainment unit and computers had to stay in that room. After 27 years of marriage, I know better than to argue.
My other hobby is building computers, so a little housecleaning was in order. I knocked down one of my computers then went through all my "spare parts" and got rid of most of them. I also got rid of a few tanks. I then moved everything else around and the build began. I tend to the side of caution and overbuild. I used 2 x 6 for the upper and lower frame. All the long boards were supported with 2 x 4 standing on the upright 2 x 6 every 2 feet. The end result:  I ran into a minor problem on the centre long board. It was a crowned about an 1/8" and a level rocked in the middle 4 feet. At the same time there were some small gaps between the upright 2 x 4 that were held in place by strapping boards. These gaps mirrored the crown. This bothered me because I felt that too much stress would be put on the tank with the crown and there is no guarantee the gap would close before the tank cracked. I went out and bought an electric hand planer and planed off 1/64" until the board was straight and flat. I then filled the gaps with cedar shims to ensure the booard would not sag under the weight. I test fitted a plywood top and it was flat all across.
__________________
You can see my 400g build thread here: http://www.reefcentral.com/forums/showthread.php?t=2577596 Current Tank Info: 400g SPS and 75g non SPS |
|
|
|
|
05/03/2016, 06:40 PM
|
#6 |
|
A-counting guy
Join Date: Jul 2004
Location: Ottawa, Ontario, Canada
Posts: 673
|
The next step was rough in the plumbing. The sump is in the basement directly behind, then below, the new tank. Each overflow has a single 1" return and 2 x 1.5" drains. I think I have one more drain than I need, but I will make do. I am not sure that I will go with a bean or herbie drain. I may just stick with durso because the overflows will be inside a cabinet so sound will hopefully not be an issue. If it is an issue, then I will change the planned setup.
The 2 x 1.0" returns will be split off a 1.5" return line from the Hammerhead pump. These lines will be plumbed over the tank (i.e. run the back wall rather than through the walls from the overflow). The 4 drains will be plumbed as follows: 1 - Emergency. 1 - Straight to external skimmer. The skimmer input is tee'd so that excess flow, that the skimmer cannot handle, will drop into sump. 2 - Will be merged into a 2" drain that will run to the sump. I hope to have some pictures of the sump up tomorrow so this will make a little more sense. I had to drill additional holes through the wall and ended up with the following layout:  From left to right: drain to skimmer, 1.5" return, 2" drain (for 2 into 1) and emergency drain.n That little electric box you see is dead. I had an electrician in years earlier to disconnect all the floor plugs (was ok for code when house was built in 1978). A little aside: the floor is laminate floor. I installed it after we moved into the house, before we had clik lock or other snap in place flooring. The laminate is all glued and practically waterproof. I decided that I would leave it rather than replacing with new flooring.
__________________
You can see my 400g build thread here: http://www.reefcentral.com/forums/showthread.php?t=2577596 Current Tank Info: 400g SPS and 75g non SPS |
|
|
|
|
05/03/2016, 06:48 PM
|
#7 |
|
A-counting guy
Join Date: Jul 2004
Location: Ottawa, Ontario, Canada
Posts: 673
|
Now that the plumbing is roughed in, I can finish the stand structure.
 I glued and screwed the back panel leaving a 3" gap at the bottom so that the plumbing could fit through. The panel is also raised 3" above the back of the stand to help ensure a proper alignment of the tank at the back. The floor was fitted and inserted and the top plywood was laid. The plywood is 5/8" and is flat. I am glad I have a 6 ft level. It helps with determining flatness.
__________________
You can see my 400g build thread here: http://www.reefcentral.com/forums/showthread.php?t=2577596 Current Tank Info: 400g SPS and 75g non SPS |
|
|
|
|
05/04/2016, 10:29 AM
|
#8 |
|
Registered Member
Join Date: Apr 2009
Location: Ottawa, Canada
Posts: 1,642
|
Nice start. You can't see me, but I'm green with envy.
If you find yourself needing a hand or need someone to drool over everything, I'm available. Would love to help out on a project like this. Jerry
__________________
120G Mixed Reef, 28G AIO zoa/pipefish tank |
|
|
|
|
05/04/2016, 12:38 PM
|
#9 | |
|
A-counting guy
Join Date: Jul 2004
Location: Ottawa, Ontario, Canada
Posts: 673
|
Quote:
__________________
You can see my 400g build thread here: http://www.reefcentral.com/forums/showthread.php?t=2577596 Current Tank Info: 400g SPS and 75g non SPS |
|
|
|
|
|
05/04/2016, 04:07 PM
|
#10 |
|
Registered Member

Join Date: Aug 2006
Location: TUCSON
Posts: 569
|
Will you have a fish room? The stand is so well built. Will a sump be used?
|
|
|
|
|
05/04/2016, 04:53 PM
|
#11 | |
|
Registered Member
Join Date: Apr 2009
Location: Ottawa, Canada
Posts: 1,642
|
Quote:
__________________
120G Mixed Reef, 28G AIO zoa/pipefish tank |
|
|
|
|
|
05/04/2016, 05:32 PM
|
#12 | |
|
A-counting guy
Join Date: Jul 2004
Location: Ottawa, Ontario, Canada
Posts: 673
|
Quote:
I took pictures of the sump today so just need to resize them and upload to photobucket. Thank you for the complement on the stand. I tend to overbuild for strength and rigidity. While there wont be a sump, I have lots of storage room. 
__________________
You can see my 400g build thread here: http://www.reefcentral.com/forums/showthread.php?t=2577596 Current Tank Info: 400g SPS and 75g non SPS |
|
|
|
|
|
05/04/2016, 08:00 PM
|
#13 |
|
A-counting guy
Join Date: Jul 2004
Location: Ottawa, Ontario, Canada
Posts: 673
|
Mad science realm
It is time to venture into my mad science realm. Otherwise known as the swamp because I have flooded more times than I care to admit.
First, in my own defense, I had to move wiring and dosing lines in order to rough plumb for the new tank. My semi-elegant solution was to disconnect them, pull them out of their position and reconnect them where they landed. The plumbing runs between floor joists, where most of the lines were kept, and I did not want to disconnect them by mistake. This is what the swamp looks like:  The 50 cent tour begins on the left. A heavy duty resin shelf unit holds (top to bottom) the Profilux 3EX, vinegar, 4 pump doser, kalk stirrer, calcium reactor, and unseen at the bottom, a 10lb CO2 bottle with Milwaukee regulator. Straight ahead is the 90g refugium. (this was my first reef tank back in 2005). It is lit by an old 150w hqi fixture. Someday I will change it for an led grow light. To the left of the tank is the skimmer.  The skimmer is gravity fed from the tank. A ball valve is used at the skimmer intake to regulate the water flow. It can then be fine tuned using the riser pipe on the right. A tee carries any diverted water to the 90g Back to the first picture, to the right of the 90g is a 65g that houses reactors. I have a GFO reactor and 2 PM reactors that house Seachem Matrix bio media. There is 4 litres of matrix and there is also an 8x8x4 Marinepure block. The two tanks are joined together by a 1.5" pipe and ball valve. Finally, you can see forward of the 65g is the face of the hammerhead.  The first branch to the left leads to a manifold for the reactors and one additional outlet, because you can never have too many free outlets. The second branch currently leads to ther 220g which is located on the opposite side of the house. This will become another spare outlet when I shut down the 220. Finally, the return goes up into the family room where the 400g will sit.  And this finishes the 50 cent tour. For 5 dollars, I will provide a lengthy detailed tour of each wire and dosing tube.  (not) (not)
__________________
You can see my 400g build thread here: http://www.reefcentral.com/forums/showthread.php?t=2577596 Current Tank Info: 400g SPS and 75g non SPS |
|
|
|
|
05/06/2016, 05:45 PM
|
#14 |
|
Registered Member
Join Date: Apr 2009
Location: Ottawa, Canada
Posts: 1,642
|
Ward, what happened to the photo from your last post? The one that made me feel good about my mess
Looks like the boys and I are going to take advantage of the warm weather to take a run up to the cottage tomorrow to see how it fared over the winter. Don't know what your plans are for Sunday (Mother's Day in case you forgot), but I may be able to swing by. Jerry
__________________
120G Mixed Reef, 28G AIO zoa/pipefish tank |
|
|
|
|
05/06/2016, 05:55 PM
|
#15 | |
|
A-counting guy
Join Date: Jul 2004
Location: Ottawa, Ontario, Canada
Posts: 673
|
Quote:
 Sunday is fine for us. Both of our moms live on the east coast and our kids work. No visits required. ): Enjoy your time with the boys. Sunday is fine for us. Both of our moms live on the east coast and our kids work. No visits required. ): Enjoy your time with the boys.
__________________
You can see my 400g build thread here: http://www.reefcentral.com/forums/showthread.php?t=2577596 Current Tank Info: 400g SPS and 75g non SPS |
|
|
|
|
|
05/06/2016, 06:48 PM
|
#16 |
|
Registered Member
Join Date: Apr 2009
Location: Ottawa, Canada
Posts: 1,642
|
Hmm. The photos are back. Must have been my browser.
Will give you a call.
__________________
120G Mixed Reef, 28G AIO zoa/pipefish tank |
|
|
|
|
05/07/2016, 06:51 PM
|
#17 |
|
A-counting guy
Join Date: Jul 2004
Location: Ottawa, Ontario, Canada
Posts: 673
|
It has been a couple days and nope, I have not been goofing off. Well, maybe a little bit. I had a little side project to undertake. As I mentioned before, the 220g is coming down after I set up the new tank. This will leave the living room barren of any fish. Well, this just cannot be. I just so happened to have a 75g reef ready tank and cabinet lying around. (No obsession here
 ). I few years back I got a great deal on a tank that someone had knocked down. I bought it, sold off some equipment and kept the tank and stand. ). I few years back I got a great deal on a tank that someone had knocked down. I bought it, sold off some equipment and kept the tank and stand. I set the tank up this week and connected it to the current system. It has a single drain and single return. I used flex pipe for this one because the existing bulkheads were the pronged type. I also just used the existing durso. You can see the lines inside the cabinet.  Note the black poly pipe on the left. This pipe runs from the outside left of the tank straight to the laundry sink. I can use this if I need to bypass the sump and dump water. I used this with my QT and will use it with the 400g.  I just put an MJ in the tank, connect the clear hose and run it straight into the laundry sink. Now I can still have a couple fishies and corals in the living room.
__________________
You can see my 400g build thread here: http://www.reefcentral.com/forums/showthread.php?t=2577596 Current Tank Info: 400g SPS and 75g non SPS Last edited by rockworm; 05/07/2016 at 06:53 PM. Reason: typos |
|
|
|
|
05/07/2016, 07:32 PM
|
#18 |
|
A-counting guy
Join Date: Jul 2004
Location: Ottawa, Ontario, Canada
Posts: 673
|
Lighting
I am fortunate in that I do not have to upgrade a lot of my equipment. However, lighting is undertaking a big change.
I current use Lumenbright mini reflectors for the 250M lights. I like these reflectors but they are only 16" wide. They will definitely not work over a 36" wide tank. I decided to both stick with MH and stick with Lumenbright so I ordered the LB large reflectors. One noticeable issue I find with the LB's is shadowing. These reflectors direct the light into a narrower band than other reflectors. So I will be supplementing with T5HOs and Reefbrite XHO blues. I have used a 6' XHO over the 220g and really like the t the colour of the corals. The new setup will include: 4 x 250w Radiums in LB large reflectors, 8 x 54w (48") T5HO using LET retrofit pkg 2 x 48" Reefbrite XHO 1 x 72" Reefbrite XHO I will use the 72" Reefbrite at the back of the tank in case it does not provide full 8' width coverage. It will not be that noticable. I intend to build a light rack to mount the lights and ballasts. I also want to be able to access the lights easily. The light rack will be suspended from the ceiling where you see the fixture in the picture: I want these lights accessible for easy maintenance and change. I do not like the idea of having to stretch across the tank to replace a T5 bulb. I will accomplish this accessibility by suspending the light rack from two barn door hardware kits mounted parallel to each other and perpendicular to the wall. I will be able to then just slide the lights forward of the tank and do whatever has to be done.
__________________
You can see my 400g build thread here: http://www.reefcentral.com/forums/showthread.php?t=2577596 Current Tank Info: 400g SPS and 75g non SPS |
|
|
|
|
05/10/2016, 07:41 PM
|
#19 |
|
A-counting guy
Join Date: Jul 2004
Location: Ottawa, Ontario, Canada
Posts: 673
|
The light rack is well under way. I will build the rack in three components. The centre component will hold the four Lumenbright reflectors. The other two components will have 2 rows of T5HO and one row of Reefbrite Blue LED's. The Lumenbrights need to be mounted with the bulb about 16" from the water. The bottom of the reflector will therefore hang 12" above the water line. I want the T5's and LED to sit closer to the water, leading me to build the rack in three parts.
I tackled the Lumenbright's first. I happened to have 36" wide heavy paper that is used under hardwood flooring. I laid an 8' length on of the stand top and used this to draw out and configure measurements. 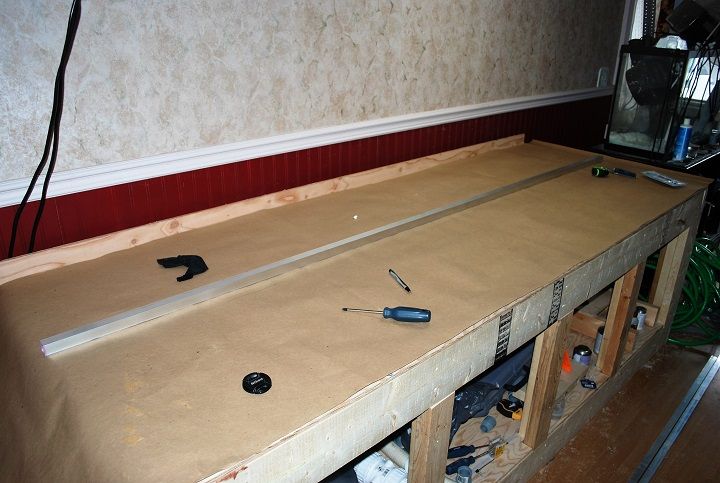 That is an 8' x 1" aluminum tube running up the centre. I used 1" aluminum tube to make a rectangular frame with outside dimensions of 96" x 22". The Lumenbright reflectors are 20" wide (really about 19.75") and will fit within the 20" width (22" less the width of the tube times 2). I am not a welder so I used L shaped reinforcement brackets. I used self tapping metal screws to secure them in place.  The next step was to quadrant off 24" segments along the full length. I did this on the paper so I could make changes, if necessary, before I screwed the whole thing together (or before I screwed the measurements up). I ended up with the following: 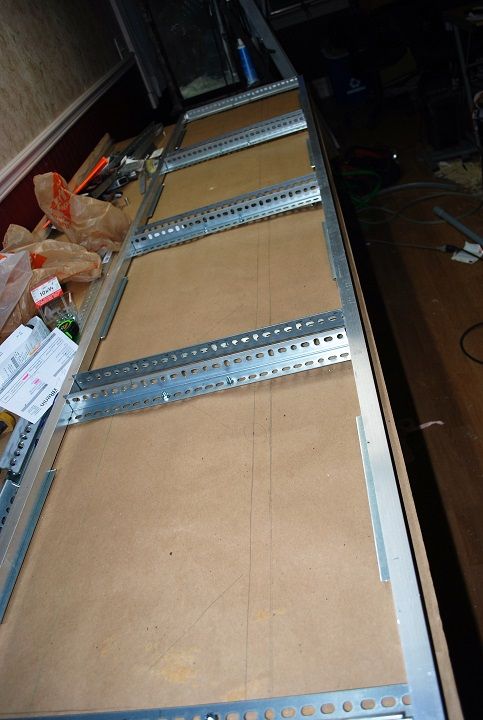 I used 1.5" slotted angle iron to provide a platform on which each pendant will rest. At this point, the width still presented a problem. Each quadrant was 23" wide. The two angle irons that hold each side totaled 3" width. That would still leave me with a 20" wide gap to hold a pendant that is 19.75". Basically, after all the math I set the angle iron so that each side of the pendant would rest on a 1/4" lip. I then placed metal screws in the slots to prevent the pendant from sliding around. This is a close up showing how the screws act as a reference: 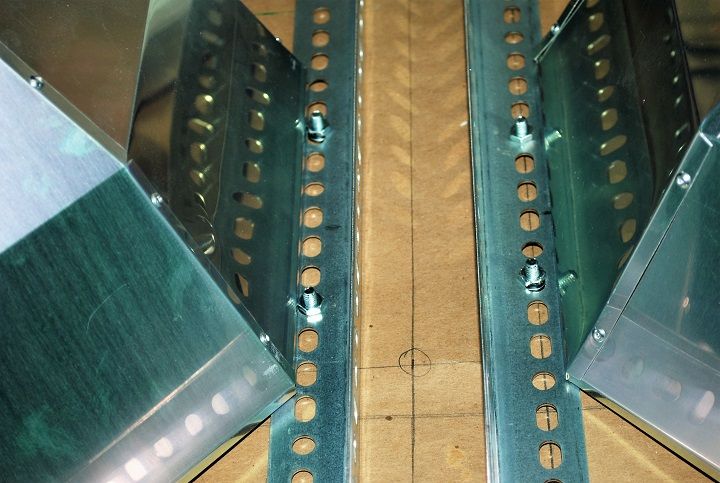 All 4 pendants will now sit snugly in place and the first stage is complete: 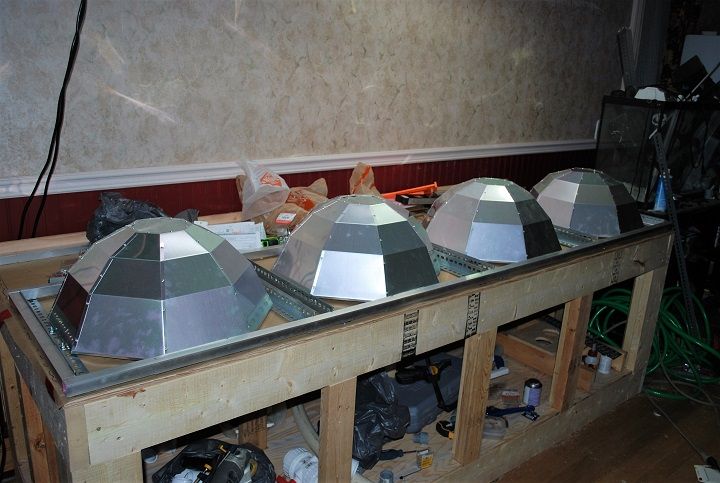 Next will be the supplementary light, but not tonight. 
__________________
You can see my 400g build thread here: http://www.reefcentral.com/forums/showthread.php?t=2577596 Current Tank Info: 400g SPS and 75g non SPS |
|
|
|
|
05/11/2016, 07:16 PM
|
#20 |
|
Premium Member
Join Date: Nov 2004
Location: Calgary, Canada
Posts: 4,479
|
Welcome to the 400 gallon club.
 Your new tank's dimensions are the same as mine. Good luck with your build.
__________________
______________________ Greg ~ June 2015 TOTM ~ ~ April 2010 TOTM ~ |
|
|
|
|
05/11/2016, 07:22 PM
|
#21 | |
|
A-counting guy
Join Date: Jul 2004
Location: Ottawa, Ontario, Canada
Posts: 673
|
Quote:
__________________
You can see my 400g build thread here: http://www.reefcentral.com/forums/showthread.php?t=2577596 Current Tank Info: 400g SPS and 75g non SPS |
|
|
|
|
|
05/14/2016, 04:18 PM
|
#22 |
|
A-counting guy
Join Date: Jul 2004
Location: Ottawa, Ontario, Canada
Posts: 673
|
I previously mentioned that I wanted the lights to be accessible. The easiest way for me to do this was mount them from the ceiling on sliding door hardware. The plan was to mount the kits parallel to each other and hang the light rack from them.
System accomplished 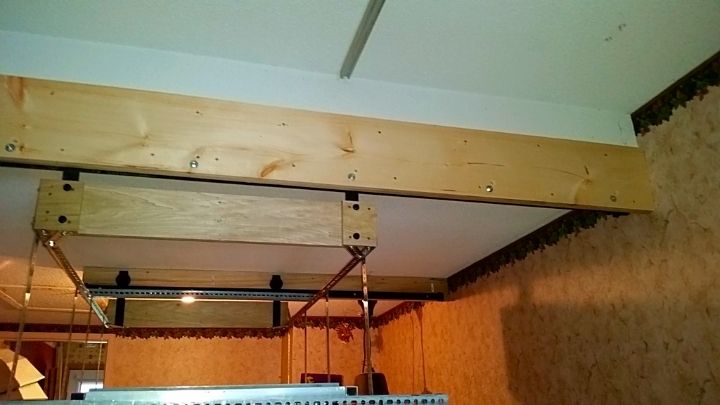 This was a challenge. It is important that both rails be square to the wall and equidistant between each other at all points on the length, otherwise the rack would snag up and not travel the full length. I spent a lot of time measuring and remeasuring before everything was snugged down. The rails are supported on a 1.5" thick board. I could not get a 2 x 6 that was not twisted. I used poplar hardwood and pine. The poplar 1" would probably have worked by itself, but I added a little extra for greater strength. The wood that is forefront in the picture is securely attached to the false header that you see. The wood in the background had top be set into the ceiling drywall had to be anchored. I was concerned about the weight pulling on the anchors, so I used 5 that are rated for 200 lbs each. That ought to hold for a while. I should note that the each barn door hardware kit is rated for 250 lbs. The roller is a hang down type. 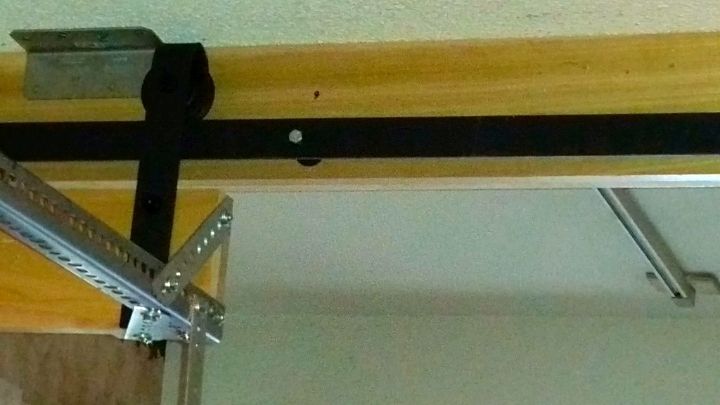 Everything is level, square and plumb. The track rolls very smooth.
__________________
You can see my 400g build thread here: http://www.reefcentral.com/forums/showthread.php?t=2577596 Current Tank Info: 400g SPS and 75g non SPS |
|
|
|
|
05/14/2016, 04:51 PM
|
#23 |
|
Registered Member
Join Date: Dec 2013
Location: Kenosha WI
Posts: 985
|
Subscribed.
I like the mad science realm. 
|
|
|
|
|
05/14/2016, 05:55 PM
|
#24 | |
|
A-counting guy
Join Date: Jul 2004
Location: Ottawa, Ontario, Canada
Posts: 673
|
Quote:

__________________
You can see my 400g build thread here: http://www.reefcentral.com/forums/showthread.php?t=2577596 Current Tank Info: 400g SPS and 75g non SPS |
|
|
|
|
|
05/14/2016, 07:03 PM
|
#25 |
|
Registered Member
Join Date: Apr 2009
Location: Ottawa, Canada
Posts: 1,642
|
It's coming along nicely.
__________________
120G Mixed Reef, 28G AIO zoa/pipefish tank |
|
|
|
 |
| Thread Tools | |
|
|


