|
|
 11/21/2012, 03:47 PM
|
#51 |
|
Registered Member
Join Date: May 2012
Location: Galloway, OH
Posts: 103
|
Thanks Karim. Your mock ups are amazing and well though out. Please keep us updated with your progress as things come together
|

|

|
|
11/24/2012, 12:16 AM
|
#52 |
|
Registered Member
Join Date: May 2004
Location: Dallas, TX
Posts: 11,033
|
The green drywall is up.
The extra stand supports are in. The overhead resevoir platform frames are installed 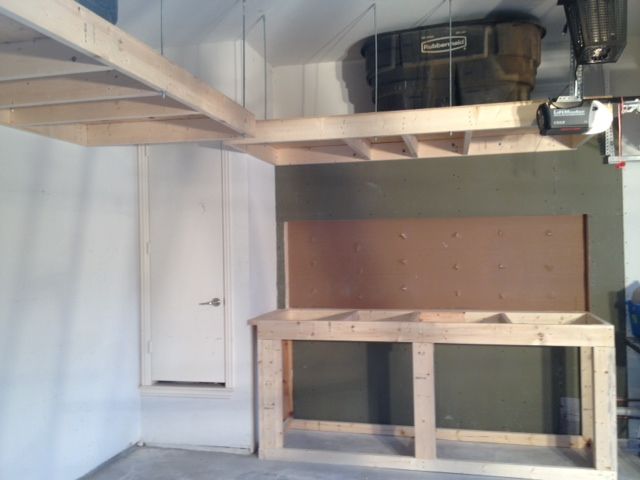  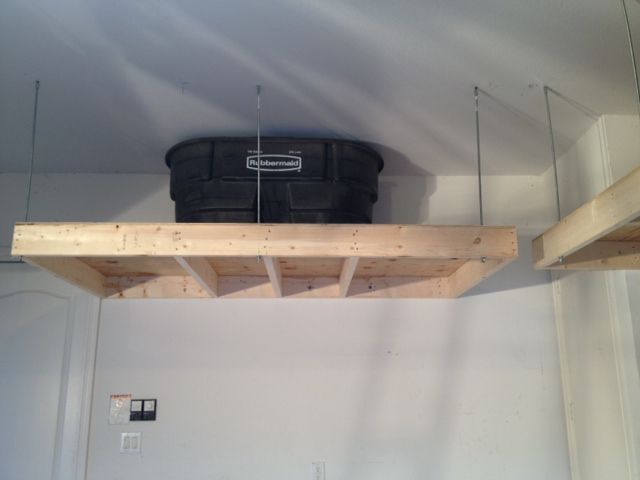 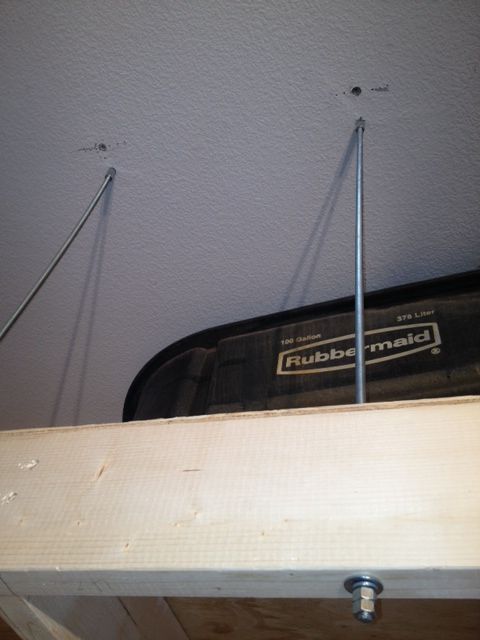
|
|
|
|
|
11/24/2012, 08:19 AM
|
#53 |
|
Registered Member
Join Date: May 2004
Location: Dallas, TX
Posts: 11,033
|
I am thinking of painting the frame with epoxy paint to guard against water damage. It's exposed studs and will remain this way except for 1/2" plywood on top and bottom.
I'm going for the consumer grade stuff used to paint garage floors. Anyone tried the stuff? |
|
|
|
|
11/24/2012, 12:57 PM
|
#54 |
|
Registered Member
Join Date: May 2004
Location: Dallas, TX
Posts: 11,033
|
I usually hose down my garage floor with a hose since dust irritates my lungs badly. Tried this last night and the 2x4s on the bottom got water logged until I vacuumed up the water inside and around it. It's dry now but I can see a maintenance issue with lumber directly on concrete (that might get wet).
Since the tank is not here yet, I plan to lift the frame slightly off the concrete and slide a 1/32 flexible plastic sheet under it. Then I'll paint it with the consumer grade epoxy paint. After it dries, I can cut out the excess sheet around it. I will use this same kind of sheet as a barrier between the tank and the rest of the garage when I hose it down in the future. That'll shield everything up from the ground and the epoxy should shield the stand from the ground runoff. That's the plan at least... |
|
|
|
|
11/24/2012, 01:22 PM
|
#55 |
|
Premium Member
 Join Date: Aug 2011
Location: Overland Park, KS
Posts: 1,030
|
Sounds like a good plan. I've not epoxied my garage floor (yet) but I've seen in done and it not only looks good but keeps everything cleaner.
__________________
"...for it is not necessary that these hypotheses should be true, or even probably; but it is enough if they provide a calculus which fits the observations..."--Introduction (attributed to Andrew Osiander) to On the Revolutions of the Heavenly Sphere by Nicolaus Copernicus. Current Tank Info: 600g DT, 140g sump, 200g Cryptic, 90g Refugium, 3-400w MH, 2 Reeflo Barracudas, and 3 MP60s |
|
|
|
|
11/24/2012, 03:41 PM
|
#56 |
|
Registered Member
Join Date: Nov 2011
Location: Santa Rosa, CA
Posts: 2,727
|
Looks good. Impressive 'flying stock tanks' !
 Are you going to put vertical supports on the long sides of the stock tank shelves? I would be worried about putting all that weight up there and hanging it from ceiling joists. Ceiling joists are usually not over engineered enough to handle that much weight. It's hard to tell from the pics. How much room do you have above the two stock tanks? Will you ever have to maintain what's in them? How have you attached them to the walls? Screws, nails or lag bolts? |
|
|
|
|
11/24/2012, 04:28 PM
|
#57 |
|
Registered Member
Join Date: May 2004
Location: Dallas, TX
Posts: 11,033
|
The ceiling joists should be ok given that they are only carrying about 500lbs max (2 guys standing side by side). The other 500lbs are carried by the walls.
I used nails, screws and lag bolts all into structural studs or headers. They are reservoirs only (only water). I have about 3" with these containers but I'm downsizing one of them. |
|
|
|
|
11/24/2012, 09:21 PM
|
#58 | |
|
More Idiot Than Savant
Join Date: Nov 2005
Location: Billings, MT
Posts: 560
|
Quote:
Something to think about. If I understand what you're going to do correctly, you won't be painting the very bottom of the wood that comes in contact with the concrete. Although you plan to shield it from water, if the bottom of those 2x4's do get wet, it will just wick up in to the wood from the bottom and will probably never really dry out. Even if you had to fully disassemble your stand to paint the bottom of those 2x4's, it might be worth the effort and save you from a rotted out stand holding up your 380 gal tank.
__________________
Current tank- 300 gal with enough critters to fill a 50 gal....barely. 30+ years in the hobby (man I'm getting old), former LFS manager, and oh.... I'm Batman. |
|
|
|
|
|
11/24/2012, 09:41 PM
|
#59 |
|
Registered Member
Join Date: May 2004
Location: Dallas, TX
Posts: 11,033
|
Cyclist - that is why I'm adding the plastic sheet and painting between the sheet and wood bottom. I can still lift the tank and plan to do so while I am painting it to allow the epoxy paint to reach underneath the wood and above the plastic.
So water on the concrete will find the plastic sheet glued with the epoxy paint to the bottom wood. The side of the wood will be painted and contiguous with the paint that is between the wood and plastic. I would have raised the stand and just put the epoxy paint between wood and concrete but I don't want to permanently bond them. The plastic sheet+epoxy paint should be a good water shield. |
|
|
|
|
11/24/2012, 09:50 PM
|
#60 |
|
Registered Member
Join Date: May 2004
Location: Dallas, TX
Posts: 11,033
|
To be clear, the epoxy may sometimes only contact the plastic at the periphery of the wood. But this still keeps the wood dry. In that case I am using the plastic sheet to be the barrier alone.
It's pretty tough stuff and doesn't tear easily, but it could. Then it's a question of chance that I have a small year in the plastic in the exact location where my paint didn't completely penetrate... Feels like a birth control box... Effective 99% of the time... Lol. I'll have to avoid deluges and put a little more muscle into raising the tank while painting under it. |
|
|
|
|
11/27/2012, 02:24 PM
|
#61 |
|
Registered Member
Join Date: May 2004
Location: Dallas, TX
Posts: 11,033
|
Cyclist - I am having some difficulty with my original plan but the idea of a complete stand tear down is as unappealing as the vision of water wicking up the inside of my stand...
So how about using silicone between the concrete and wood? GE professional window silicone should do the job. What do you think? Will the silicone adhere well to the concrete an epoxy-painted wood? |
|
|
|
|
11/27/2012, 09:53 PM
|
#62 | |
|
Registered Member
Join Date: Oct 2012
Location: Augusta, Ga
Posts: 473
|
Quote:
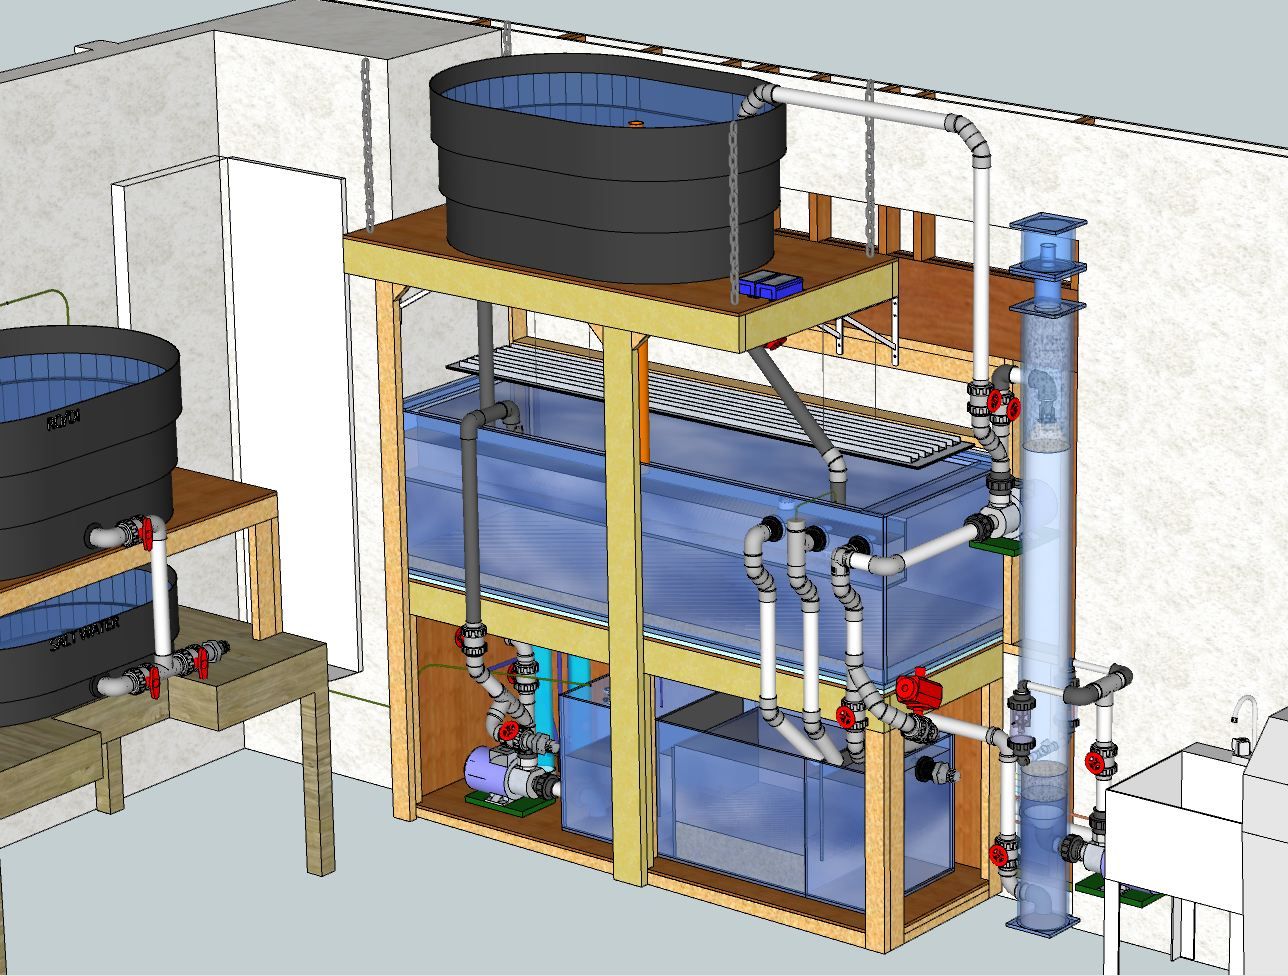
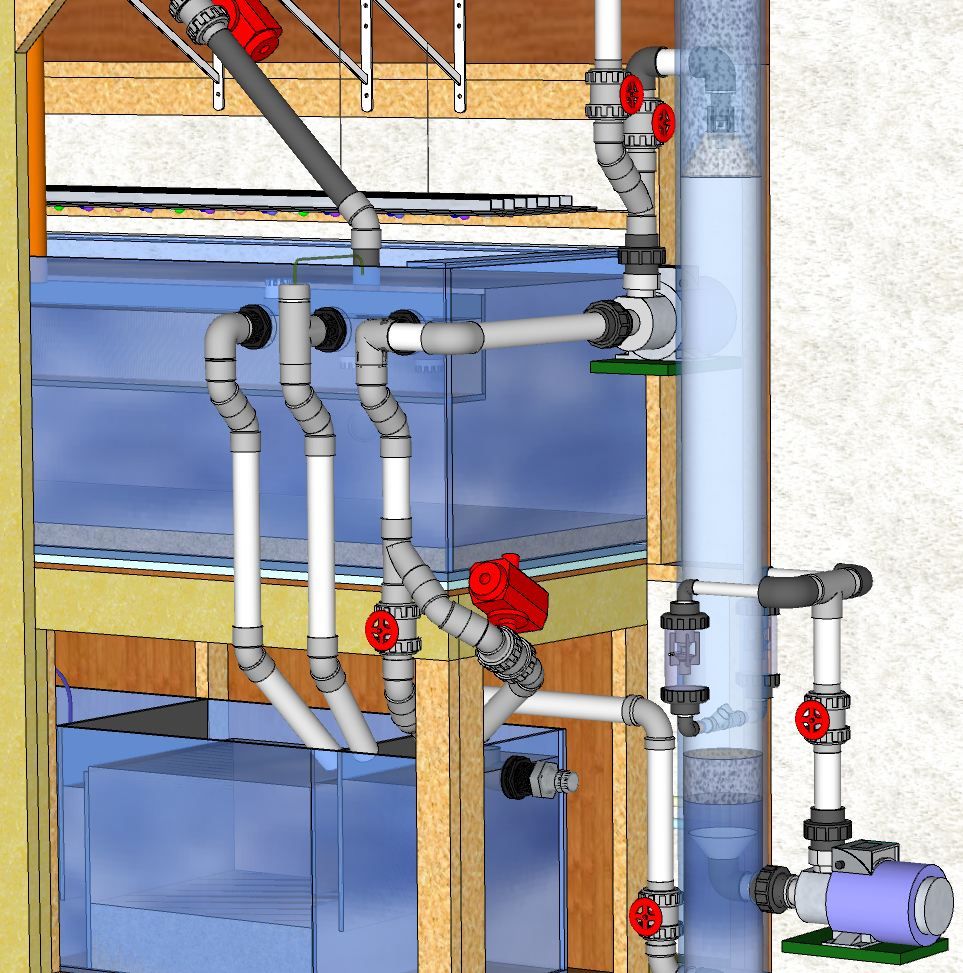
I just wanted to point out if I'm not mistaken I believe if you plumb the return for the skimmer out and straight into the sump as it is drawn here the water level in your skimmer will only be that high. I think in order to maintain the proper water level in the skimmer the return pipe needs be plumbed as high as the desired water level. |
|
|
|
|
|
11/27/2012, 11:19 PM
|
#63 | ||
|
More Idiot Than Savant
Join Date: Nov 2005
Location: Billings, MT
Posts: 560
|
Quote:
Quote:
I know, I know, I sound like Chicken Little (THE SKY IS FALLING!) but you really need to think this one through. NOW is the time to make the right fix since the tank is not yet on the stand. If it was me, I would cuss and moan about it, heave a big sigh, have a beer or two, and tear into the next day by pulling the stand apart and painting where ever the wood touches concrete.
__________________
Current tank- 300 gal with enough critters to fill a 50 gal....barely. 30+ years in the hobby (man I'm getting old), former LFS manager, and oh.... I'm Batman. |
||
|
|
|
|
11/28/2012, 12:04 AM
|
#64 |
|
Registered Member
Join Date: May 2004
Location: Dallas, TX
Posts: 11,033
|
The wood will all be painted except the flat bottom against the concrete. So the silicone will bridge concrete to epoxy painted wood...
We use silicone for aquariums, and this is a much more benign application. |
|
|
|
|
11/28/2012, 02:21 AM
|
#65 |
|
Registered Member
Join Date: Aug 2012
Posts: 22
|
Some serious reefing going on here. Feel like i have a 125g goldfish bowl now

|
|
|
|
|
11/28/2012, 02:39 PM
|
#66 |
|
Registered Member
Join Date: May 2004
Location: Dallas, TX
Posts: 11,033
|
Thanks. Sunday is T-day when the 700lbs of glass and Starphire makes it way here. More pics to come...
|
|
|
|
|
11/28/2012, 08:22 PM
|
#67 |
|
Registered Member
Join Date: Jan 2012
Location: New York
Posts: 76
|
I would do preasure treated wood where it is in contact with concrete. Concrete is poarse so even thought it seems dry sometimes it is still gonna be damp.
|
|
|
|
|
11/29/2012, 11:49 AM
|
#68 |
|
Registered Member
Join Date: Jan 2006
Location: Toledo OH
Posts: 2,466
|
I have epoxied my grage floors. It adheres well to wood too. I had wood step leading from garage into house. Don't get the cheap stuff you find at home depot or lowes if you plan to do the garage floor, as it will peel up from hot tires.
I would suggest maybe using treated lumber that touches the grage floor as mentioned. You also could put some flat aluminum stock between the floor and wood as well. That will hold up very well too
__________________
Inwall Basement Setup w/ Growout Tank & Common Acrylic sump, SRO XP3000E, Neptune Apex, Bubble Magus Triple Doser, CLS- Super Dart Gold + OM 4way, 2-400w MH & 4-80w T-5, ROX .08 carbon... |
|
|
|
|
11/29/2012, 03:37 PM
|
#69 |
|
Registered Member
Join Date: May 2004
Location: Dallas, TX
Posts: 11,033
|
Thank you. I wish I had used treated lumber but it is too late now.
I will have to use paint and caulk to make it as water resistant as possible. |
|
|
|
|
11/29/2012, 06:54 PM
|
#70 | |
|
Registered Member
Join Date: Jan 2006
Location: Toledo OH
Posts: 2,466
|
Quote:
You may want to epoxy the garage floor and onto the wood base atleast so water doesnt soak into concrete than into wood. Especially if you plan to wash the floor down often. Or don't get the concrete near the stand wet very often and when you do make sure to put a fan there and dry it very well.
__________________
Inwall Basement Setup w/ Growout Tank & Common Acrylic sump, SRO XP3000E, Neptune Apex, Bubble Magus Triple Doser, CLS- Super Dart Gold + OM 4way, 2-400w MH & 4-80w T-5, ROX .08 carbon... |
|
|
|
|
|
11/29/2012, 06:56 PM
|
#71 |
|
Registered Member
Join Date: Jan 2006
Location: Toledo OH
Posts: 2,466
|
double post
__________________
Inwall Basement Setup w/ Growout Tank & Common Acrylic sump, SRO XP3000E, Neptune Apex, Bubble Magus Triple Doser, CLS- Super Dart Gold + OM 4way, 2-400w MH & 4-80w T-5, ROX .08 carbon... |
|
|
|
|
12/01/2012, 01:45 PM
|
#72 |
|
Registered Member
Join Date: May 2004
Location: Dallas, TX
Posts: 11,033
|
thanks for the feedback. I'll have to be careful with my garage floor going forward. I looked into painting it but it'll take some conditioning first.
|
|
|
|
|
12/01/2012, 01:50 PM
|
#73 |
|
Registered Member
Join Date: May 2004
Location: Dallas, TX
Posts: 11,033
|
Ok. Progress update.
Taped up the green drywall with green tape.  Pink mud (still wet)  Filled, dried and sanded  3/4" plywood top glued and screwed  Painted with water-protectant  1" foam top  Might go back for a second coat and touch ups. Still need to silicone the base and edges. The tank is delayed (freight) so might be in next week. |
|
|
|
|
12/01/2012, 03:00 PM
|
#74 |
|
Premium Member
Join Date: Aug 2011
Location: Overland Park, KS
Posts: 1,030
|
Nice work! (Since the tank is delayed, a second coat never hurts). What a joy to see this come together.
__________________
"...for it is not necessary that these hypotheses should be true, or even probably; but it is enough if they provide a calculus which fits the observations..."--Introduction (attributed to Andrew Osiander) to On the Revolutions of the Heavenly Sphere by Nicolaus Copernicus. Current Tank Info: 600g DT, 140g sump, 200g Cryptic, 90g Refugium, 3-400w MH, 2 Reeflo Barracudas, and 3 MP60s |
|
|
|
|
12/02/2012, 10:13 AM
|
#75 |
|
Registered Member
Join Date: May 2004
Location: Dallas, TX
Posts: 11,033
|
Thanks Lavoisier. Since this is my first in-wall (vs. free standing), I have to say that there is a lot more work involved. It's a marriage between a home renovation and a tank build with all the work of both. It feels good to make some progress, even if it is slow.
Does anyone have an off-the-shelf silicone recommendation for concrete to painted wood? |
|
|
|
 |
| Thread Tools | |
|
|