
|
|
|
|||||||
 |
| Thread Tools |
 01/10/2013, 09:34 PM
|
#26 | |
|
Registered Member
 Join Date: Apr 2012
Posts: 2,258
|
Quote:
This is the sainsmart relay module I grabbed: http://www.amazon.com/SainSmart-8-Ch.../dp/B0057OC5WK They have 2/4/6/8 channel versions. for $12 I figured if I didn't use them all I wouldn't feel bad. The thrifty could make their own, or not use a PCB or ..... I save money where I think it makes sense and leave some of the other things to those who are smarter than I. To give you an idea, I grabbed a 1wire library that uses the native 1 wire stuff in .netmf, as well as a DS18B20 library for the temp sensor, and with this litttle snipit I'm setting the onboard clock via NTP and testing temp every 3 seconds lighting the onboard LED in case of out of range: Code:
using System;
using System.Threading;
using Toolbox.NETMF.NET;
using Microsoft.SPOT;
using Microsoft.SPOT.Hardware;
using SecretLabs.NETMF.Hardware.Netduino;

namespace Hello_World
{
    public class Program
    {
        private readonly SNTP_Client TimeClient = new SNTP_Client(new IntegratedSocket("time-a.nist.gov", 123));
        OutputPort led = new OutputPort(Pins.ONBOARD_LED, false);
        DS18B20 t = new DS18B20(Pins.GPIO_PIN_D0);
        public void checkTemp()
        {
            try
            {

                var temp = t.ConvertAndReadTemperature();
                temp = temp / 5 * 9 + 32;
                Debug.Print("At " + System.DateTime.Now.TimeOfDay + " It is " + temp + " in the Biocube.");
                //t.Dispose();
                if (temp > 80 || temp < 77)
                {
                    led.Write(true);
                }
                //Debug.Print("Memory available: " + Debug.GC(true));
            }
            catch (Exception ex)
            {
                Debug.Print("Error Caught Getting Temp");
            }
        }
        public void syncTime()
        {
            TimeClient.Synchronize();
        }
        public static void Main()
        {
            // dont write code here
            Program program = new Program();
            program.TimeClient.Synchronize();
            while (true)
            {
                program.checkTemp();
                Thread.Sleep(1000*3);
            }
        }

    }
}
The above code leaves about 96KB of the 100KB I've got to work with free. |
|

|

|
|
01/11/2013, 02:43 PM
|
#27 |
|
Registered Member
Join Date: Mar 2010
Posts: 137
|
double post

Last edited by porksmash; 01/11/2013 at 03:19 PM. |
|
|
|
|
01/11/2013, 02:44 PM
|
#28 |
|
Registered Member
Join Date: Mar 2010
Posts: 137
|
Ah ok. That looks incredibly similar if not identical to the relay module I have now. I was hoping you found a magic relay board that worked over some sort of communication interface instead of requiring a digital output for each relay. Have you worked out how you're going to fit all that onto the netduino? The I/O count is pretty limited and seems to be filling up fast. I know the atlas scientific modules will require a serial port each, 8 digital outs for the relays, then all the float switches and things. The LEDs are all on a separate board, but do you have any plans for digital I/O expanders?
I've also been looking into the reef angel module for controlling my VorTechs and Radion, and I dug into the schematics enough to determine that the RF module (the EcoTech one, not the reef angel box) just communicates over serial. I wasn't able to find the software that actually resides on the reef angel module, though, so the HOW of talking to it is still a mystery to me. I haven't looked into this for a while, though. Last edited by porksmash; 01/11/2013 at 02:52 PM. |
|
|
|
|
01/11/2013, 04:08 PM
|
#29 |
|
Registered Member
Join Date: Jun 2011
Location: South Texas
Posts: 2,159
|
Subbed.
I was going to go with the netduino, but I wanted WiFi so I didn't have to run a drop to my reef room, thus I opted for a LinkSprite DiamondBack. A little pricier ($90), but it is an arduino duemilanove clone with wifi baked onto the board. I picked up this sainsmart relay board last year to control these outlets: http://www.amazon.com/gp/product/B00...ls_o05_s00_i01 http://www.amazon.com/gp/product/B00...ls_o05_s00_i00 I only have two PWM channels so I don't need any expansion there, but I do need more GPIO pins for relays and sensors, so I chose these for that: http://adafruit.com/products/732 Thanks for linking the PWM expander, didn't realize adafruit had those or I would have picked some up in my last order. Now I just need to get off my lazy butt and start working on it. O2, I have a pretty solid sketch I use for my lighting, fairly lightweight and easy to modify. It's capable of supporting multiple strings of each color, but I only use one for each. It's a modified version of something I found here on RC. I can help you get going with it if you are interested. You basically just have to set your PWM pins, max values, as well as start and run durations.
__________________
-You had me at PWM |
|
|
|
|
01/17/2013, 08:31 PM
|
#30 | ||
|
Registered Member
Join Date: Apr 2012
Posts: 2,258
|
Quote:
I will likely use the reefangel module for my Vortechs that I do not yet own. There are sketches on the RA forum for it, if you dig a bit. Quote:
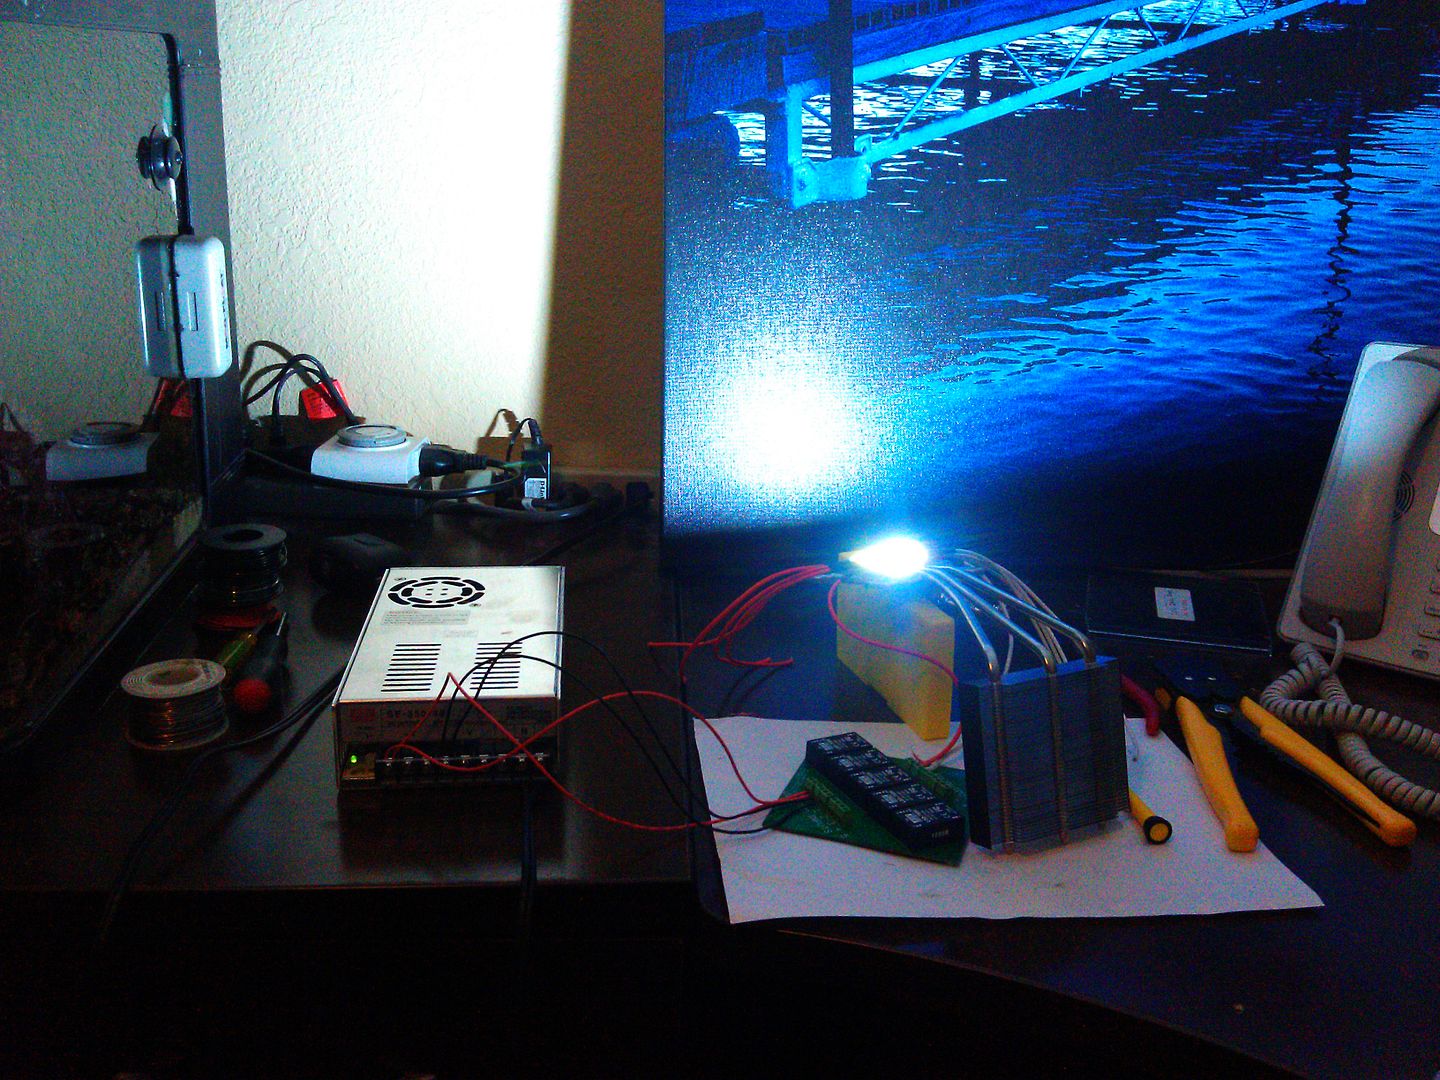
 I have book marked the GPIO board, thanks for that, it looks very useful if I wanted to run all 8 of my relays off one chip. I'm waffling on the power strip that I'll use with the relays, I have a couple possibilities, including the one you linked. Now I just need to read and see which hookup leaves me in "default off" vs "default on" and get to playing! Too much real work right now but here is a hint at what I've been up to as well: 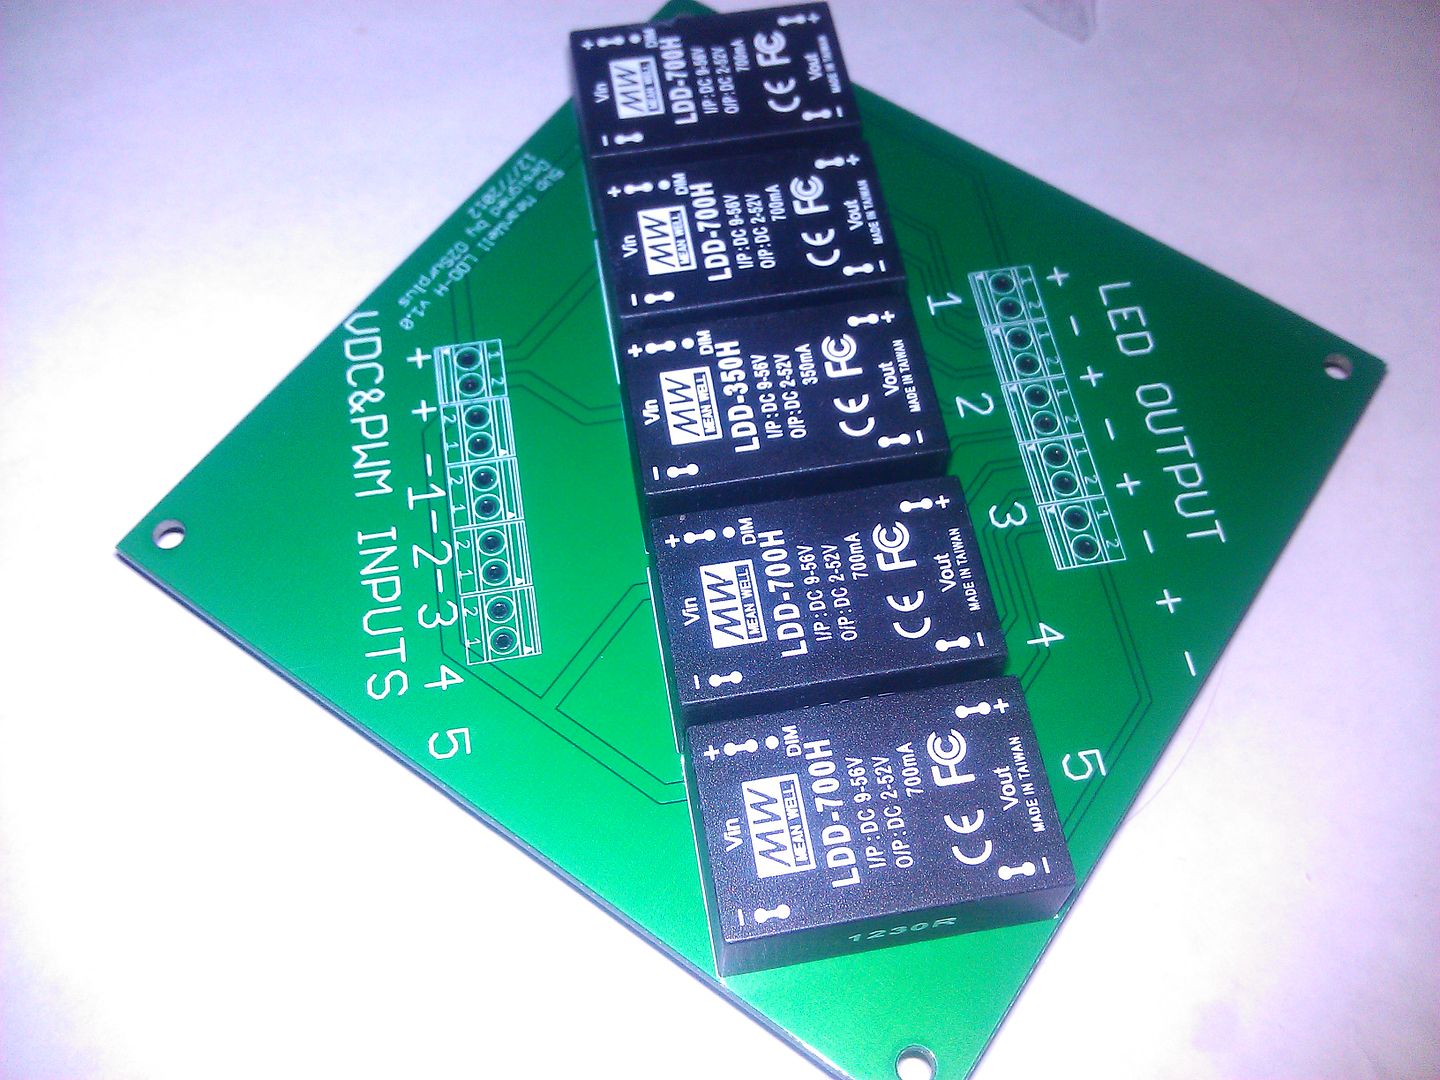 
|
||
|
|
|
|
01/17/2013, 09:15 PM
|
#31 |
|
Registered Member
Join Date: Apr 2012
Posts: 2,258
|
Soldered up my PWM controller. I'm out of practice, that's all I can say.
|
|
|
|
|
01/22/2013, 11:53 AM
|
#32 |
|
Registered Member
Join Date: Apr 2012
Posts: 2,258
|
 LED has arrived, waiting on some screw terminals now.. LED has arrived, waiting on some screw terminals now.. 
|
|
|
|
|
01/23/2013, 10:11 PM
|
#33 |
|
Registered Member
Join Date: Apr 2012
Posts: 2,258
|
My screw terminals will hopefully arrive tomorrow, also arriving tomorrow is my power strip for my relay setup.
|
|
|
|
|
01/24/2013, 10:47 AM
|
#34 |
|
Registered Member
Join Date: Jun 2011
Location: South Texas
Posts: 2,159
|
Don't you hate waiting for parts!?!?!
__________________
-You had me at PWM |
|
|
|
|
01/24/2013, 11:01 AM
|
#35 | |
|
Registered Member
Join Date: Aug 2011
Location: "The Land of Fruits & Nuts"
Posts: 879
|
Quote:
|
|
|
|
|
|
01/24/2013, 01:01 PM
|
#36 |
|
Registered Member
Join Date: Apr 2012
Posts: 2,258
|
Yea it's good for me to have to wait. I have too many other things to do in the mean time. If everything were here NOW I'd take a couple days off work and .... you get the picture.
|
|
|
|
|
01/24/2013, 01:02 PM
|
#37 |
|
Registered Member
Join Date: Apr 2012
Posts: 2,258
|
Oh and my power bar came today. Haven't torn into it but looks like it'll work nicely.
|
|
|
|
|
01/24/2013, 01:35 PM
|
#38 |
|
Registered Member
Join Date: Jun 2011
Location: South Texas
Posts: 2,159
|
I just hate waiting on that one part that is holding up a build. Of course, I say that and I've had all the parts for my new controller for about 2 months now and have not started.
__________________
-You had me at PWM |
|
|
|
|
01/28/2013, 03:40 PM
|
#39 |
|
Registered Member
Join Date: Apr 2012
Posts: 2,258
|
    ooohhh yeaa. |
|
|
|
|
01/28/2013, 04:24 PM
|
#40 |
|
Registered Member
Join Date: Apr 2012
Posts: 2,258
|
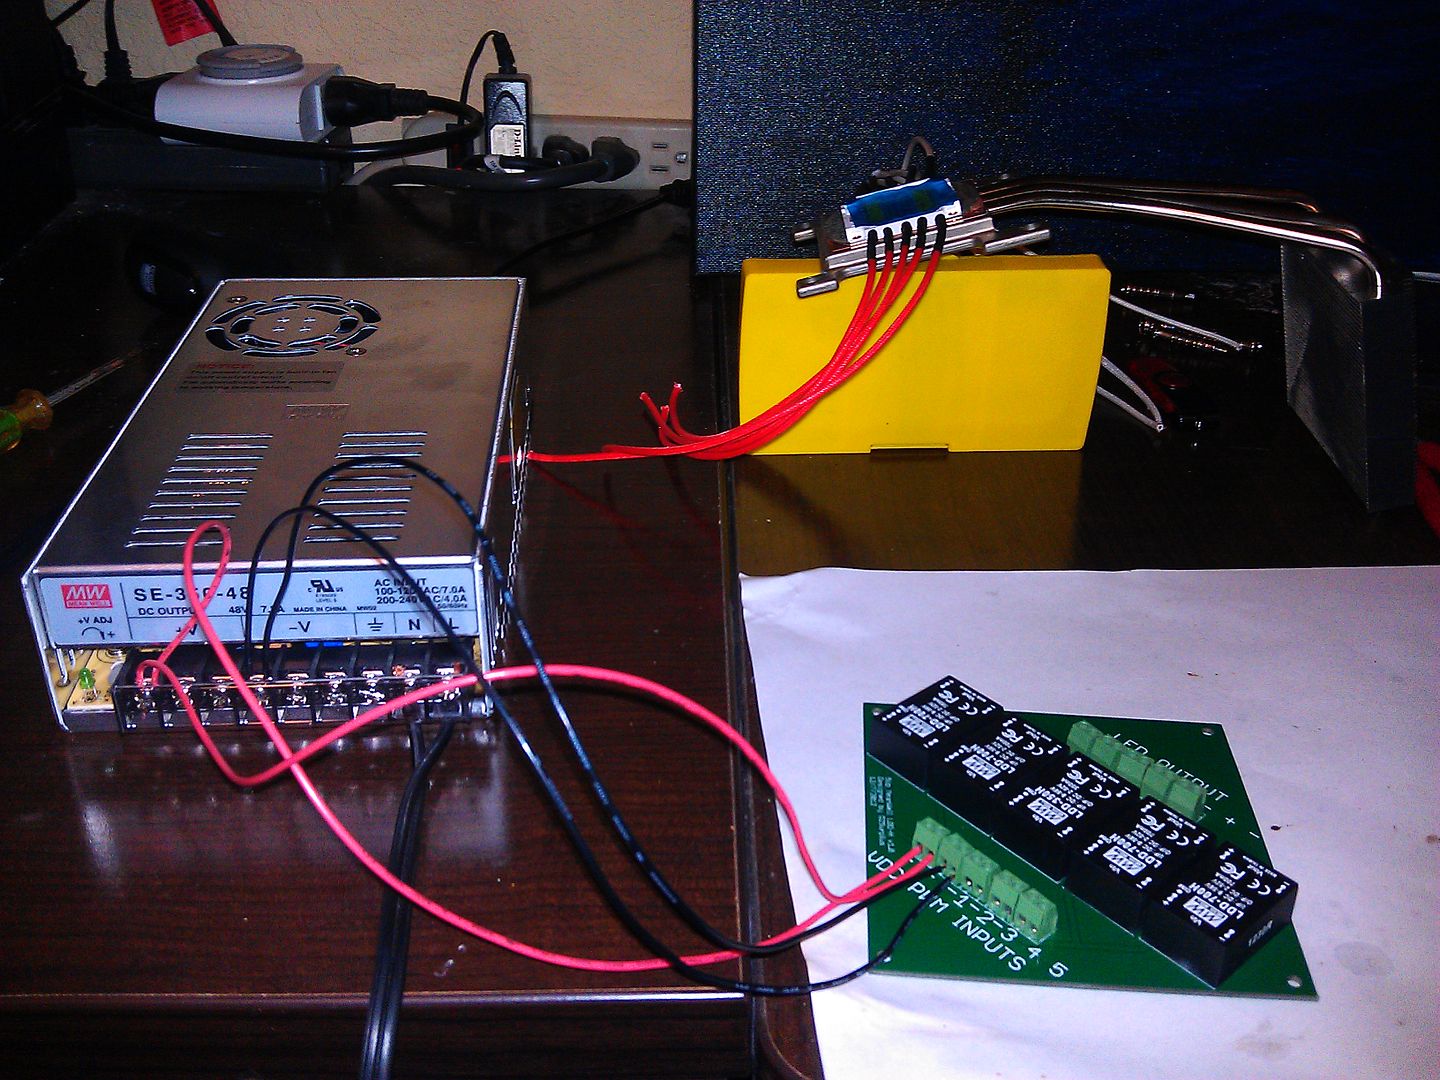
|
|
|
|
|
01/28/2013, 04:31 PM
|
#41 |
|
Registered Member
Join Date: Oct 2005
Posts: 444
|
are you getting good separation on each channel? can you take a close up of the led?
|
|
|
|
|
01/28/2013, 04:36 PM
|
#42 | |
|
Registered Member
Join Date: Apr 2012
Posts: 2,258
|
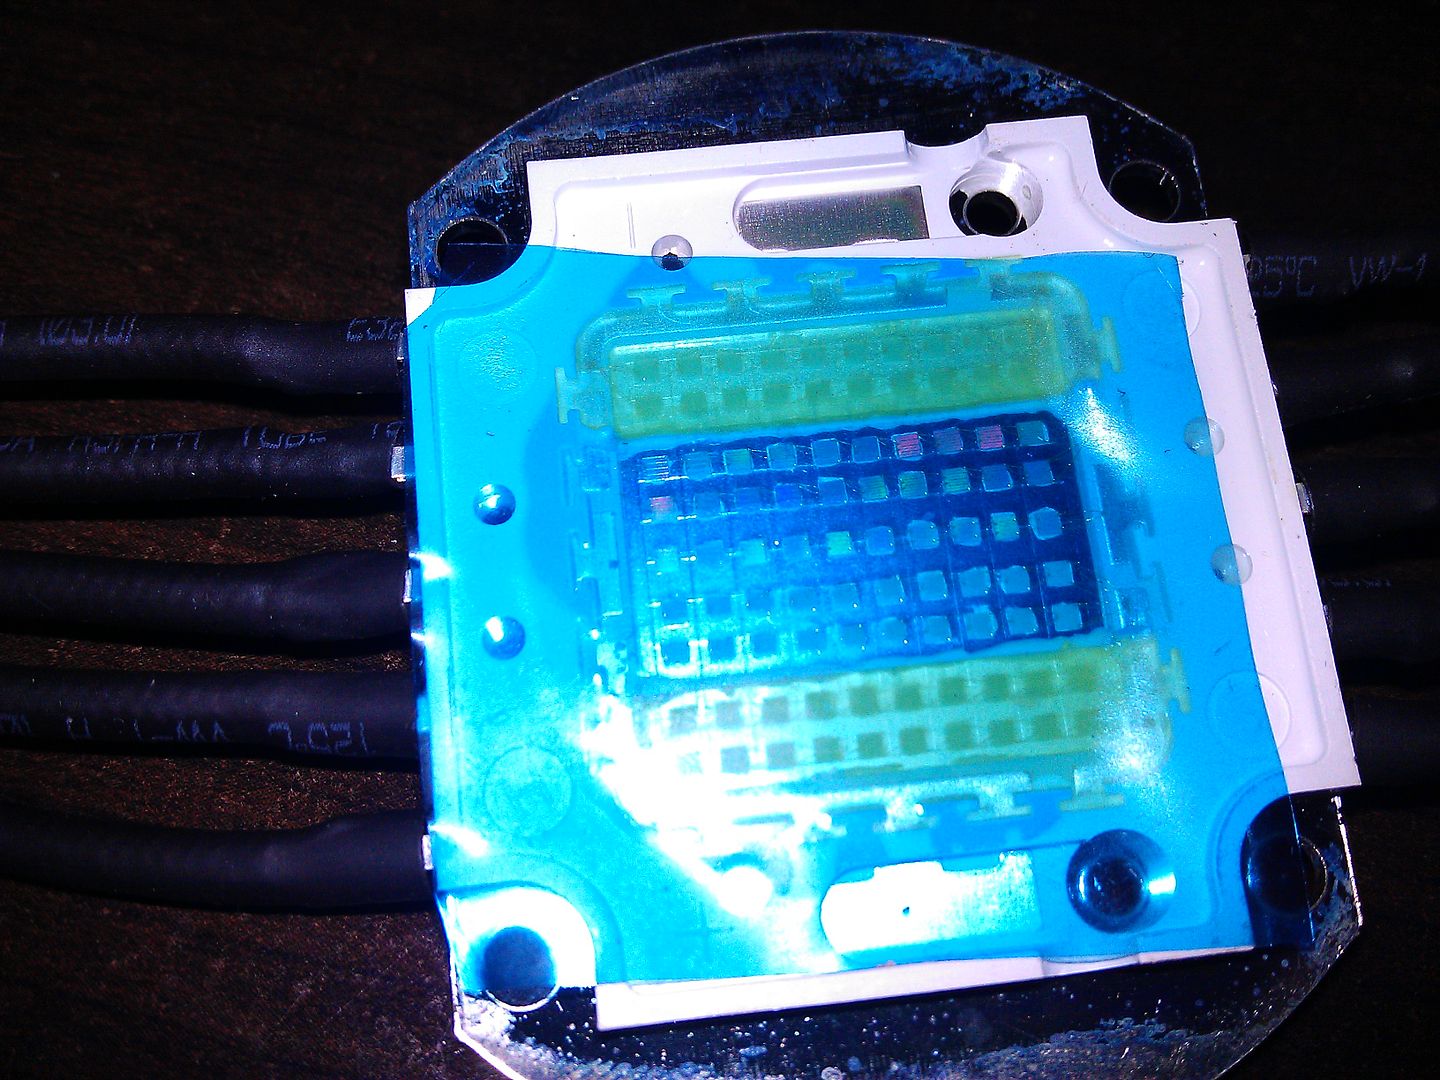
Quote:
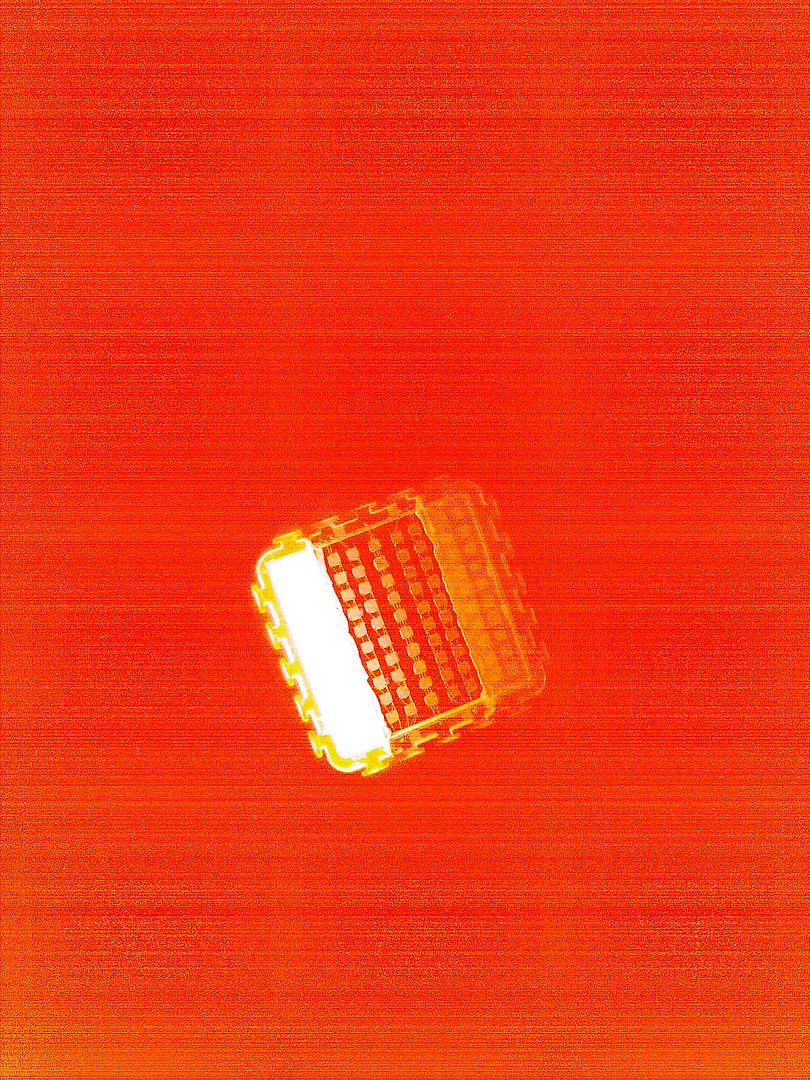 Here is the best I can do for closeup until I have something handy other than my phone. 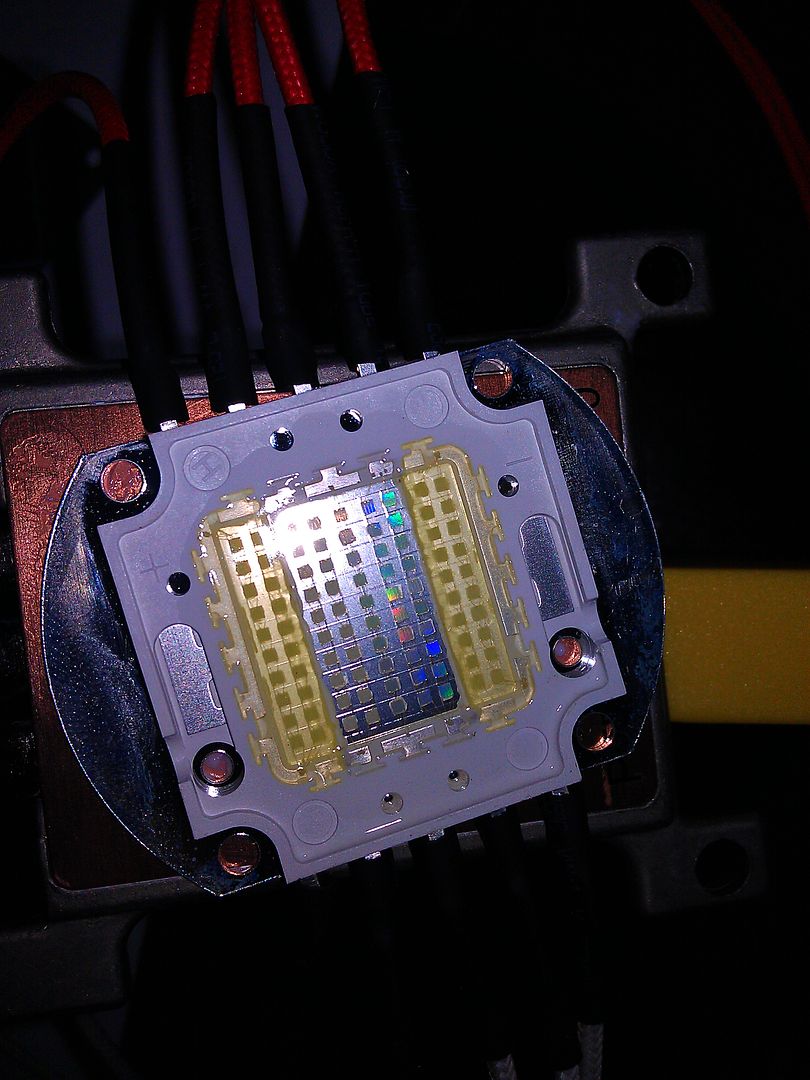 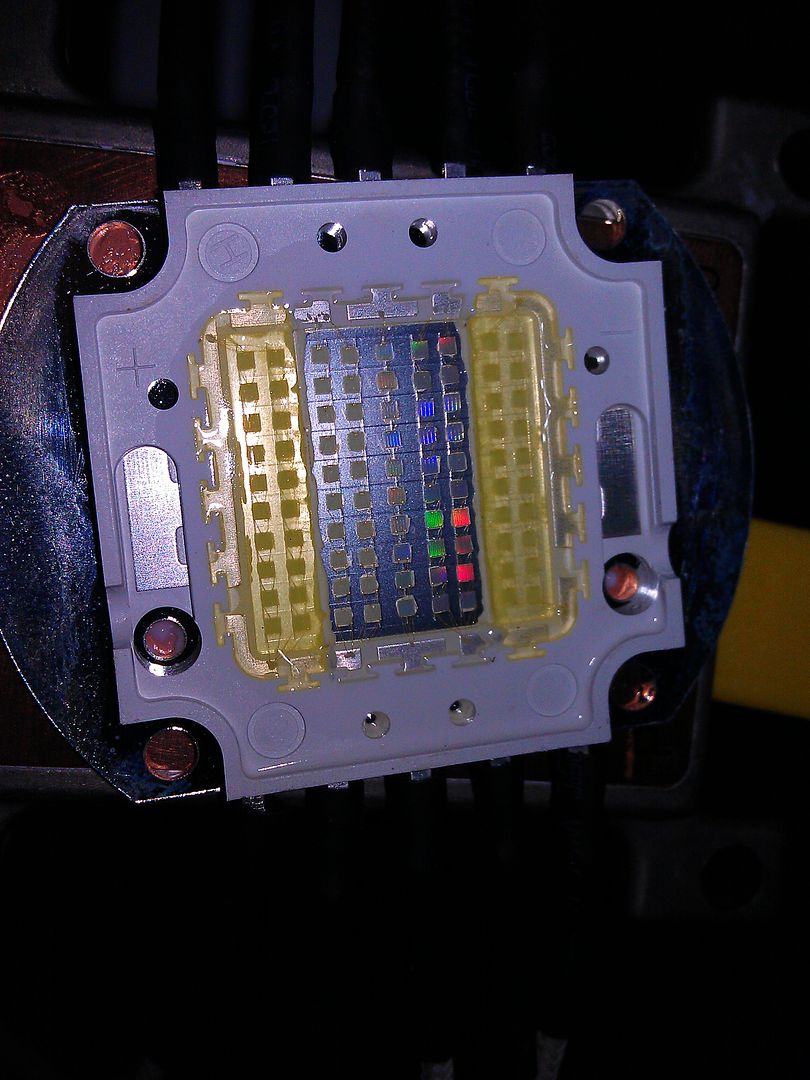
|
|
|
|
|
|
01/30/2013, 08:52 PM
|
#43 |
|
Registered Member
Join Date: Apr 2012
Posts: 2,258
|
Small setback, an improperly secured ground wire did a little damage, fried one driver , so instead of the pretty dimming and alternating light show video I was getting ready to film I'm ordering parts.
A low blow on a day like today but a valuable lesson. I ordered the rest of the stuff that I need to shore up the wiring side for the light so that the next time I fire everything up nothing goes wrong. First night in a long time I've had the opportunity to work on it too |
|
|
|
|
02/03/2013, 10:28 AM
|
#44 |
|
Registered Member
Join Date: Apr 2012
Posts: 2,258
|
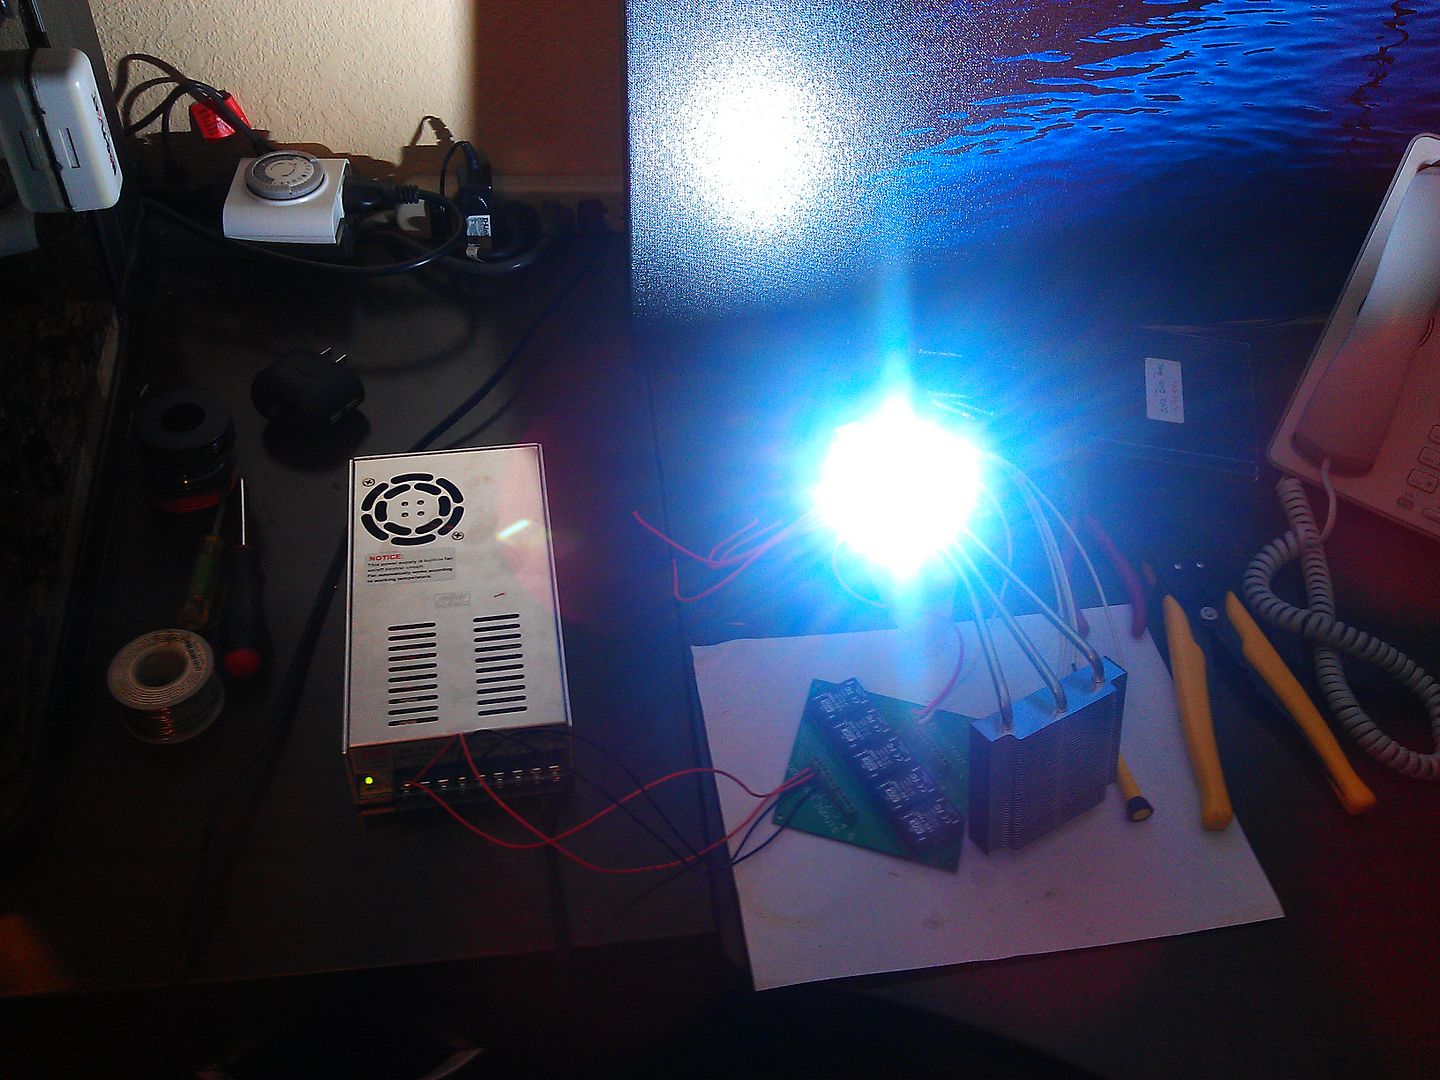
|
|
|
|
|
02/04/2013, 03:20 AM
|
#45 |
|
Registered Member

Join Date: Aug 2004
Location: eisenstadt - austria
Posts: 649
|
subscribed, this is exactly what i want to do!
thanks, martin |
|
|
|
|
02/04/2013, 01:53 PM
|
#46 |
|
Registered Member
Join Date: Apr 2012
Posts: 2,258
|
Thanks man, things are looking good, working on getting the chip more securely mounted on a new heatsink and fan combo right now so I can get it up over the tank and take a look at the coloration we've got and start on a scheduler for the controller.
|
|
|
|
|
02/04/2013, 03:56 PM
|
#47 |
|
Registered Member
Join Date: Oct 2005
Posts: 444
|
the layout on your chip is different from the dreamchip, it has 5 channels with 2 banks of led per channel
is that center led channel the 420nm? |
|
|
|
|
02/04/2013, 04:08 PM
|
#48 | |
|
Registered Member
Join Date: Apr 2012
Posts: 2,258
|
Quote:
Last edited by iced98lx; 02/04/2013 at 04:26 PM. |
|
|
|
|
|
02/20/2013, 11:12 PM
|
#49 |
|
Registered Member
Join Date: Aug 2010
Posts: 55
|
Just found this thread. I made my own LED drivers that use the PCA9685 and wrote an arduino library for them. I've recently gotten interested in the netduino and got a N+2. Do you have your code on github or anywhere else? I would be interested in working on the code with you to add support for the PCA9685 to the netduino.
I currently have 24 channels of LED's running off 4 PCA9685 based driver boards. I need to get the dusk/dawn and moonlight programming done. Would also like to add cloud and storm support too. I'm waiting on parts for 2 more led fixtures so I'll be adding at least 12 more channels soon. |
|
|
|
|
02/21/2013, 12:01 PM
|
#50 |
|
Registered Member
Join Date: Apr 2012
Posts: 2,258
|
@KRavEN
http://forums.netduino.com/index.php...-pwms/?p=37047 keep me up to date on your progress and uses, the netduino is fantastic! |
|
|
|
|
| Thread Tools | |
|
|


