
|
|
 04/06/2014, 04:39 PM
|
#101 |
|
Registered Member
Join Date: May 2004
Location: Dallas, TX
Posts: 11,033
|
Also, based on what I've seen so far, I think a concrete "paint" is viable... Basically, use the cement slurry and paint the rock work. Then use coarse sand. This might also work as a finish for other rock walls like pond foam and gorilla glue.
The consistency is the trick. It can't be watery and it can't be muddy. It needs to be 'painty' like a can of thick paint. Not sure it that makes sense, but it's the closest I can get to it. |

|

|
|
04/06/2014, 06:26 PM
|
#102 |
|
Registered Member
Join Date: May 2004
Location: Dallas, TX
Posts: 11,033
|
Ok... Another interesting observation:
My protein skimmer has 2 3/4" air inlets (yes, they consume a lot of air). The entire back and plumbing is in my garage. Today, I opened the garage door while working and noted the time. Within 20 mins, the pH began to drop linearly and continued to drop until I closed the door.  So, fresh air is effecting the pH? How? This is just fresh water and absolutely nothing in it except for the concrete rocks I have curing, so there has to be a good chemistry explanation. |
|
|
|
|
04/06/2014, 06:34 PM
|
#103 |
|
Registered Member
Join Date: May 2004
Location: Dallas, TX
Posts: 11,033
|
Maybe a sudden influx of mosquito bodies?
|
|
|
|
|
04/07/2014, 05:16 AM
|
#104 |
|
Registered Member
Join Date: May 2004
Location: Dallas, TX
Posts: 11,033
|
Given the scale of the build and the difficulty of planning rock locations, etc... I'm going to build a life size mock tank made of heavy cardboard to simulate the tank on the ground. I can't build the big PVC returns but I should get an idea of the rest.
The weir overflow will be difficult to build since it needs to be structural enough to carry the 3 ledges. It also needs to be collapsible for storage during the week and fast to set up again during the weekend. Anyone have any ideas or experience on the easiest way to do this? |
|
|
|
|
04/07/2014, 05:21 AM
|
#105 |
|
Registered Member
Join Date: May 2004
Location: Dallas, TX
Posts: 11,033
|
The tank is 34" deep x 27" high x 96" wide. The end to end weir overflow box is 2" from the top and 9" high x 6" deep.
|
|
|
|
|
04/07/2014, 09:06 AM
|
#106 | |
|
Registered Member
Join Date: Dec 2013
Location: Bloomington, Indiana
Posts: 312
|
Quote:
|
|
|
|
|
|
04/07/2014, 09:22 AM
|
#107 |
|
Registered Member
Join Date: May 2004
Location: Dallas, TX
Posts: 11,033
|
Thanks. I think I'll use a composite - wood for the structural, cardboard for the spatial elements.
|
|
|
|
|
04/10/2014, 07:21 AM
|
#108 |
|
Registered Member
Join Date: May 2004
Location: Dallas, TX
Posts: 11,033
|
Soaking to prep for adding to the tank on the weekend.

|
|
|
|
|
04/11/2014, 07:38 AM
|
#109 |
|
Registered Member
Join Date: May 2004
Location: Dallas, TX
Posts: 11,033
|
I decided to use 1/2" pressed wood sheet for the mock tank. It cost $8.60 (4' x 8'), which is actually less than cardboard $8.90 and would be able to hold up the weight of the concrete shelves.
To make it collapsible, I cut it into 24" sections that stack in a corner, but can unfold during the weekend. Pictures to come... |
|
|
|
|
04/11/2014, 07:04 PM
|
#110 |
|
Registered Member
Join Date: May 2004
Location: Dallas, TX
Posts: 11,033
|
Ok. New rock ledges and coral trunk in the tank.
Here are the new pictures... Front, back and above  
Last edited by karimwassef; 04/11/2014 at 07:13 PM. |
|
|
|
|
04/11/2014, 07:08 PM
|
#111 |
|
Registered Member
Join Date: May 2004
Location: Dallas, TX
Posts: 11,033
|
    
|
|
|
|
|
04/11/2014, 07:10 PM
|
#112 |
|
Registered Member
Join Date: May 2004
Location: Dallas, TX
Posts: 11,033
|
    
|
|
|
|
|
04/11/2014, 07:11 PM
|
#113 |
|
Registered Member
Join Date: May 2004
Location: Dallas, TX
Posts: 11,033
|
   
|
|
|
|
|
04/11/2014, 08:45 PM
|
#114 |
|
Registered Member
Join Date: Mar 2014
Location: Oswego, Ny
Posts: 610
|
Sweet build but I'm sure I'm apart of the many who couldn't justify the time for a project this size.
Now I know back on page 3 there was mention of po4, and you were just running fresh water for now and you'll test in RO later... But just my thoughts... Shouldn't you at least test a little bit to see if anything leaches before finding out it's all a waste of time?
__________________
Support your local Reef Club! Upstate Ny - Lake Ontario Reef Society Current: 40B- Fish, Water, Rocks, Sand, Pumps, Heaters, Skimmer, Coral 93C build coming soon |
|
|
|
|
04/11/2014, 09:59 PM
|
#115 |
|
Registered Member
Join Date: May 2004
Location: Dallas, TX
Posts: 11,033
|
Sure. I'll test once I get some RO made.
Realistically, I'm not doing anything new. Live rock made of cement and oyster shells have been around for years. The only new thing is the method of applying it via cloth and the the PVC/eggcrate skeleton (even that's been done, but I'll claim an application innovation). This is not a very time consuming project. I just work a lot so there are long periods between updates. From gravel to formed concrete takes about an hour per part to make... 2 days to dry (no work). One day to soak (no work). I just have the benefit of an unstocked tank to let it cycle in. |
|
|
|
|
04/11/2014, 10:00 PM
|
#116 |
|
Registered Member
Join Date: May 2004
Location: Dallas, TX
Posts: 11,033
|
Here's the mock tank. Cost ~$20
 It's detachable with 2 screws so all the parts pancake to a little wood stack and the 8' bar against a wall. |
|
|
|
|
04/11/2014, 10:23 PM
|
#117 |
|
Registered Member
Join Date: May 2004
Location: Dallas, TX
Posts: 11,033
|
Immediately after adding the rock, the pH began to spike and the protein skimmer level dropped by a couple of feet.
4 hours later, the pH is back down. Normally, this would have gone up to 9.5 Still no explanation why 
|
|
|
|
|
04/12/2014, 09:47 AM
|
#118 |
|
Registered Member
Join Date: May 2004
Location: Dallas, TX
Posts: 11,033
|
Hasn't anyone in the DIY forum made their own live rock?
|
|
|
|
|
04/13/2014, 05:47 PM
|
#119 |
|
Registered Member
Join Date: May 2004
Location: Dallas, TX
Posts: 11,033
|
Ok. Starting to play around with the branches and overhangs. Here's the basic idea:
 Imagine it covered in rock and with some platforms |
|
|
|
|
04/13/2014, 06:31 PM
|
#120 |
|
Registered Member
Join Date: May 2004
Location: Dallas, TX
Posts: 11,033
|
That was an outcropping from the wall.
Here's one from a ledge: 
|
|
|
|
|
04/13/2014, 08:44 PM
|
#121 |
|
Registered Member
Join Date: May 2004
Location: Dallas, TX
Posts: 11,033
|
Here's the top pedestal attempt:
 
|
|
|
|
|
04/13/2014, 08:48 PM
|
#122 |
|
Registered Member
Join Date: May 2004
Location: Dallas, TX
Posts: 11,033
|
These are still concepts at this point. I'm looking for creative input...
Too busy? Too many layers? Too many straight lines? The rock work will create webs and round corners, but the main flow will still be determined by the PVC skeleton. |
|
|
|
|
04/14/2014, 02:55 PM
|
#123 |
|
Registered Member
Join Date: Dec 2012
Location: Quebec, Canada
Posts: 387
|
This thread, this thread is awesome!
You just gave me the best idea to hide my overflow. But I have a couple questions. This is what I'm looking to do. 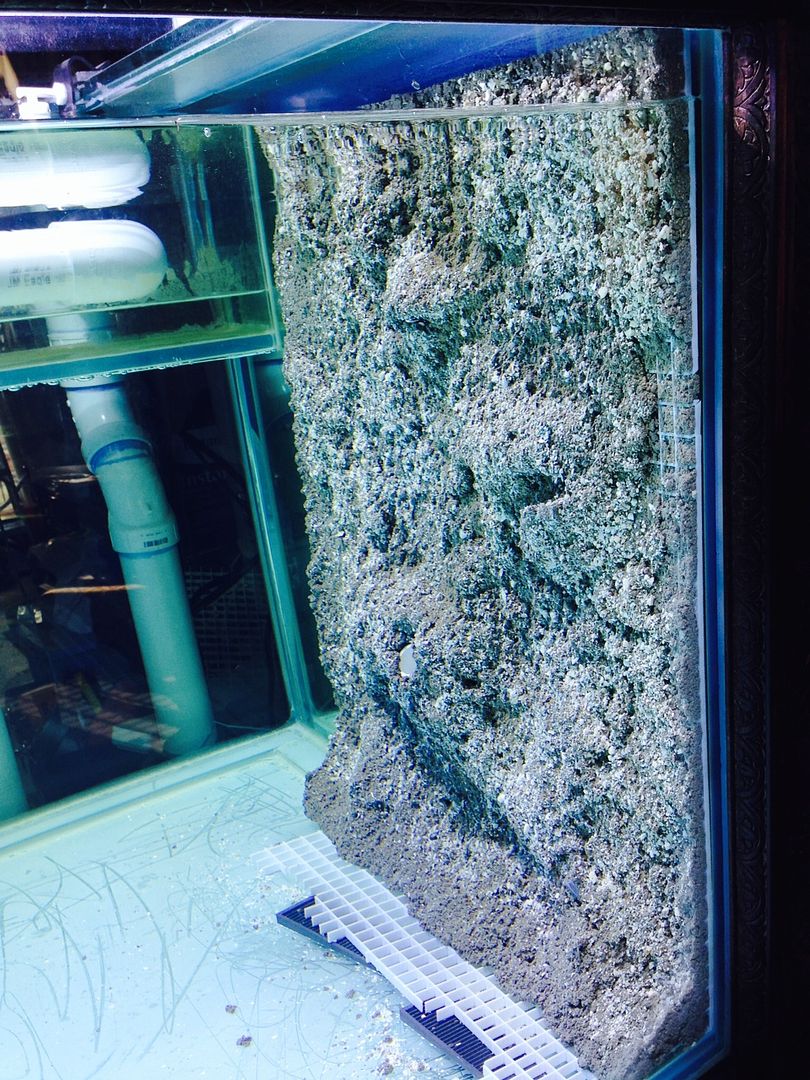 On the four walls of this tank's overflow.  Q 1: Do you think that using base rock (or macro rock) to make outcroppings would hold with only the cement or would you secure them to the egg crate using either plastic anchors and screws into pre-drilled holes into the rock or use zip ties? Q 2:How are you curing the cement? How long do you have to keep it in water to get all the bad stuff out? Also, the drop in PH from the door open might be more O2 in the water hence the pH drops due to it's higher ratio vs CO2? Thanks!
__________________
Fish Stock: N/A, starting over Corals: Want SPS, LPS with zoas Current Tank Info: Custom 145 gallon. |
|
|
|
|
04/14/2014, 04:14 PM
|
#124 |
|
Registered Member
Join Date: May 2004
Location: Dallas, TX
Posts: 11,033
|
Thanks.
I always use a structure to hold the rocks together, especially with overhangs. 1/2" PVC allows you to connect and reconnect at will. Most other posts say to leave it in water for months. I've gotten pH back to normal in a day with my monster protein skimmer (mechanism unknown). But to be honest, I have no livestock so there's no absolute confirmation yet. I'll be running my first DI water test this weekend on a small sample. |
|
|
|
|
04/14/2014, 09:39 PM
|
#125 | |
|
Registered Member
Join Date: Jul 2013
Posts: 110
|
Quote:
|
|
|
|
|
 |
| Tags |
| concrete, diy, live rock, thorite |
|
|


