
|
|
|
|||||||
 |
| Thread Tools |
 03/06/2011, 02:03 PM
|
#1 |
|
Moved On
Join Date: Feb 2003
Location: Kent, WA
Posts: 1,548
|
(Another) DIY LED Controller - Simple Arduino Style
Hello to all... its me again,
I was asked if I can make another thread about DIY, this time concentrating on the Arduino LED Controller. I guess they really like how I explained things when I build my DIY LED on this thread. Well I will try my best to do the same easy to understand way for those people "like me" havent done this before. History: I just wanted to build a LED lighting for my 75 gallon mixed reef tank. Just simple LED lighting that will turn on and off like my old T5 rig. But I have a habit of "FUTURE PROOFING" things if I can so that when time comes, I dont have to redo or purchase things again. So I ended up going with the DIMMABLE drivers specifically ELN60-48D. Yes 48D because I just want to dim it manually in case where I want to acclimatize my corals, etc. Well, I was wrong. When I learned about Arduino, I became hooked. Imagine a small smart computer for $20-$30. Nobody told me that this will be very addictive. To my limited knowledge, it was a nightmare but I believe its worth it. So enough with my ba ba bla ba bla.... Lets start. I hope you can follow me on this one and hope that i can explain it well to you too.... Disclaimer... Im a total newbie with Arduino. So if you think you have a stupid question.... ask away! I bet I dont know the answer too... hahaha... But Im sure experts here will be kind enough to help us in our journey... References... Here are some that are related or similar Arduino projects going around... a) Who wants a cheap, simple, Arduino-based LED controller? - Very good thread to read and follow. Specially if you are into electronics and programming. But to some people like me, this is a bit overwhelming. b) The Hydra Project - Another detailed blow by blow thread about making a Reef Controller based on Arduino environment. Ha ha, this is way to much for me... so if you have plenty of time to kill, and have the itch to create a controller for your tank, then that thread is for you. c) Open Source Aquarium Controller Project - Hoping that someday will be able to do the same. The good thing with Arduino, is its modular. You can add more features as you learn more. d) Aquarium Controller based on the Arduino Microcontroller - Another build that I believe is very similar to what Im doing. e) Arduino - . A very simple and cheap computer. Remember... This project is for you if you have similar or exactly the same hardware that I have... Meanwell Dimmable Drivers - ELN60-48D or 48P. I believe the key here is that if your driver requires 0-10 volt signal. In case with 48D... 0-10 volt analog signal. And with 48P... 0-10 volts PWM signal. Also, some people told me that it is not good to use Arduino with 48D. Because Arduino have PWM signal and 48D requires analog signal. Its not good but it also does not mean that it wont work... So warning, please use your own disgression if you want to do it or not. Hehehe, I did, and so far so good. Dont blame me ok if you kill your driver.... Arduino Hardware - Im using duemilanove. This is very similar with other Arduino Hardware found here. Here are the parts... - The reason I chose this components and stores is because they are the cost effective at that time. So if you know a better deal, let us know. 1) DFRDUINO DUEMILANOVE 328 (ARDUINO COMPATIBLE) - $24.00 - DFRobot (china, very fast shipping)  2) LCD SHIELD FOR ARDUINO - $17.00 - DFRobot (china, very fast shipping) Maybe I can use the buttons in the future?  3) DS1307 Real Time Clock breakout board kit - $9.00 - Adafruit  4) Generic NPN Transistor Switch - NPN 2N2222 or similar at local electronic stores. I believe Radio Shack has some equivalent. How many? Well how many channels you want to control independently. On my 3 rails, I have two channel. One channel to control Blue (2 rails), and another one to control white (1 rail). 5) 1K Resistor - How many? 1 for each transistor.  Thats it... Shipping cost for DFRobot (china) is $14.00 for both items (arduino+lcd). So please consider that also when looking where to buy. Here is another site that sells Arduino based in San Diego... Hacktronics. . Last edited by katchupoy; 03/06/2011 at 03:02 PM. |

|

|
|
03/06/2011, 03:19 PM
|
#2 |
|
Registered Member
Join Date: Sep 2006
Location: Ca
Posts: 1,310
|
I am not sure it works with Cat4101 but I follow anyway. Thanks for sharing.
|
|
|
|
|
03/06/2011, 03:29 PM
|
#3 |
|
Moved On
Join Date: Feb 2003
Location: Kent, WA
Posts: 1,548
|
Not really familiar with CAT4101, but here is another thread that says it does.
http://www.reefcentral.com/forums/sh...php?p=17002181 |
|
|
|
|
03/06/2011, 03:37 PM
|
#4 |
|
Registered Member
Join Date: Aug 2009
Location: Northern VA
Posts: 4,618
|
It will work with the CAT. The uses a 5 volt PWM signal so it can be connected directly to the Atmega 328's PWM pins. I forgot the exact number each pin can drive, but IIRC it was either 10 or 50.
|
|
|
|
|
03/06/2011, 04:19 PM
|
#5 |
|
Registered Member
Join Date: Sep 2006
Location: Ca
Posts: 1,310
|
Glad to here that, slowly learning now.
|
|
|
|
|
03/06/2011, 04:22 PM
|
#6 |
|
Moved On
Join Date: Feb 2003
Location: Kent, WA
Posts: 1,548
|
Terminology
Terminologies to learn first.
Arduino - a small computer that you can program or assign tasks. It will just keep doing it until you program it again for a different task. It has several input (sense environment) and output (control hardwares) so it can do a wide range of tasks. Sketch - This is not like a drawing or a diagram. In the Arduino world, this means "code" or line of codes. This is where you see a lot of "if" "else" etc. etc. This is also the part where my head starts to spin. Ha ha... Transistor - In our purpose for this project, we can call it simply a "switch". Like a mechanical light switch, they turn on or off what ever is connected to them. Another example is, imagine you are the "arduino" and the wall light switch is the "transistor". You control the switch. Arduino controls the transistor. PWM - Pulse-Width Modulation. A very fast on/off signal. Its so fast, that we dont see it by our naked eyes. Very common in controlling motors. Since you cannot just change the volts to control motor speed, they use PWM or they just turn it on of off so fast that the motor speed changes. This is the same concept we are going to use for our LEDs. POT - or Potentiometer. Its like those one found on old stereos where you turn the knob to change the volume. Its actually variable resistors, that can adjust voltage and/or current of the device or circuit. (thanks Fishman) RELAY - Another form of a switch. This is very common if you want to control high voltage appliances with low voltage controller. Very useful with Arduino in controlling 110 Volt appliances. SHIELD - These are boards that can plugged on top of the Arduino PCB. More info here. You can keep adding shields or features to your Arduino. Modular approach... Maybe LED light dimmer for now, but full blown Reef Controller in the future.... . Last edited by katchupoy; 03/06/2011 at 05:08 PM. |
|
|
|
|
03/06/2011, 04:47 PM
|
#7 |
|
Registered Member
Join Date: Aug 2009
Location: Northern VA
Posts: 4,618
|
Katchup you must be really young. Old stereos had knobs you turned to adjust the volume
 . You might want to mention that they are variable resistors. They are used as adjustments to change the voltage and therefore the current to a device usually. In the case of stereos the voltage and current going to the speakers. . You might want to mention that they are variable resistors. They are used as adjustments to change the voltage and therefore the current to a device usually. In the case of stereos the voltage and current going to the speakers.
__________________
Click my home page for Thread Summaries Current Tank Info: 75 gallon lps and fish |
|
|
|
|
03/06/2011, 04:54 PM
|
#8 | |
|
Moved On
Join Date: Feb 2003
Location: Kent, WA
Posts: 1,548
|
Quote:
Haha... I just want to make it as easy as possible to understand... knobs... lol... |
|
|
|
|
|
03/06/2011, 05:26 PM
|
#9 |
|
Moved On
Join Date: Feb 2003
Location: Kent, WA
Posts: 1,548
|
Arduino...
Lets talk more about Arduino...
Arduino comes with different flavors. You can have it as very basic and small like this one (below)... almost the same size as the chip itself.  Or you can simply just buy the parts and put it on a breadboard. Very cheap approach  or typical Arduino that you can buy pre-made like this one... 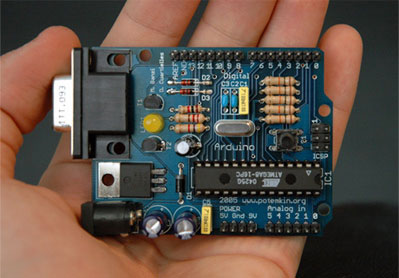 or the big sister Mega 2560 (bigger board compared to regular one). difference is the chip... What do you mean? Well bigger chip means more input/output. Which means more functions that we can assign. Which also means more expensive.  Its actually your pick. I ended up buying "duemilanove" because its the cheapest at the time. I was looking for "uno" but they are more expensive... You will ask why not just buy this one which is just $9 dollars. Well, I need to have a USB connection to it so I can program it easily. In other words, this one in particular needs external USB-to-TTL FTDI-type cable or adapter to communicate. |
|
|
|
|
03/06/2011, 05:43 PM
|
#10 |
|
Moved On
Join Date: Feb 2003
Location: Kent, WA
Posts: 1,548
|
Still with me???
This is a good example of how you can expand your arduino as you progress with your skills.
 It keeps going up and up... lol... so many possibilities. It can even be a robot??? lol  Close up with an Arduino Board...  Please look very carefully on this picture... Very important to know is where are the DIGITAL pins and where are the ANALOG pins. DIGITAL pins - are the output. this is where the signal will be coming from for our devices. ANALOG pins - are the input. This is where arduino sense its environment... maybe a "temp sensor" ? or maybe a "PH" meter? etc. Also pay special attention to where all the PWM pins are... Very handy if you know this now before you continue... Do you see it? Look at the digital pins (upper right)... you will see PWM written on the board.... and these repeats on PINS 3, 5, 6, 9, 10, and 11. Only 6 PWM pins for those boards that uses atmega168. I believe this is more than enough for our LED DIMMING CONTROLLER project. Last edited by katchupoy; 03/06/2011 at 05:52 PM. |
|
|
|
|
03/07/2011, 02:17 AM
|
#11 |
|
Registered Member
Join Date: Sep 2010
Posts: 6
|
I wait with impatience the rest!
thank you! |
|
|
|
|
03/07/2011, 11:11 AM
|
#12 |
|
Moved On
Join Date: Feb 2003
Location: Kent, WA
Posts: 1,548
|
Panagiotis07,
Welcome! Welcome! Welcome! Welcome! Welcome! Hope you like your stay here... I will hurry up!!! dont worry.... |
|
|
|
|
03/07/2011, 11:49 AM
|
#13 |
|
Registered Member
Join Date: Aug 2009
Location: Northern VA
Posts: 4,618
|
katchup,
Would you see if you can help NamesBrucey on the Typhoon thread. I tried, but I am not familiar enough with the code for his issue. Maybe you are. Thanks
__________________
Click my home page for Thread Summaries Current Tank Info: 75 gallon lps and fish |
|
|
|
|
03/07/2011, 12:11 PM
|
#14 |
|
Moved On
Join Date: Feb 2003
Location: Kent, WA
Posts: 1,548
|
LCD Types...
There are several LCD or LCD shield you can buy right now. The two major types that I know of are the "SERIAL" and "PARALLEL" types.
Whats the difference??? Parallel - have more wires thus will use more pins in our arduino. Maybe 6 pins or more will be utilized. This is what we are using on this project. We will probably have more pins used because of the buttons. More tutorial here... Serial - have fewer pins. 3 or 4 wires. More tutorial here... There is a big difference with writing the code for SERIAL against PARALLEL. And Im not really familiar with SERIAL codes, so please dont get frustrated if I cant help you on that part. But I will try my best... or we will have a shout out from the experts here. Remember - As long as you have the parallel LCD and its HD44780-compatible, even if you dont have the buttons (just the simple ones) , you can follow us on this project. Normally we will just put our LCD shield on top of our Arduino (see image below).  We will not be doing that on our project, because for some weird reason, this particular shield is using all of the pins. We also need some pins for our DS1307 RTC clock. So we will do it remotely by means of wires and/or breadboard to save those PWM pins. (example below - not mine) 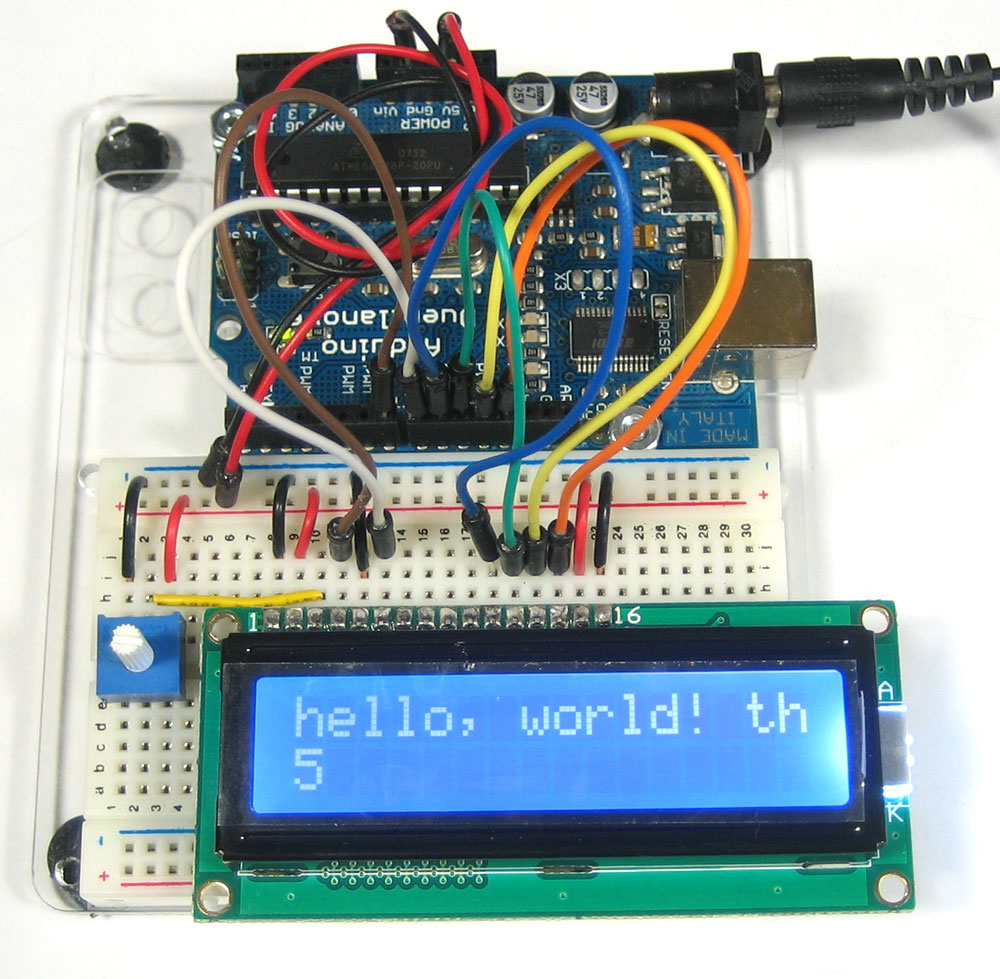 . |
|
|
|
|
03/07/2011, 08:36 PM
|
#15 |
|
Registered Member

Join Date: Oct 2003
Location: Hamilton,ON.Canada
Posts: 527
|
wowow thanks Cesar...
mega subscribed
__________________
lets save the reef Current Tank Info: Hardware: 125g Reef,Mak4 for return,DIY 20G sump,DIY Beckett Skimmer(AF30) driven by a Mak4,DIY S.Denitrator,DIY Calcium reactor(PM), wavemaker .MJ mods on Swirlestein,Jebao WP 20,Lighting: 60 LEDs, moon lights |
|
|
|
|
03/08/2011, 12:15 AM
|
#16 |
|
Moved On
Join Date: Feb 2003
Location: Kent, WA
Posts: 1,548
|
Lets continue...
It all boils down to where are you going to house this Arduino devices. This way you can plan ahead of time how are you going to arrange your setup...
Here is my TEST setup I have using breadboard. Just to make sure everything is working before i solder things up.... Actually you can keep using this way so that any time you want to change something, its going to be easy.   Its kinda messy, but thats ok... we are just playing with arduino sketch right now... I FORGOT TO MENTION... (I cant edit my old posts... sorry...) You need to buy a... 1) Breadboard - price here, picture here and here... maybe Radio shack or Frys Electornics. Tutorial on how to use it here. 2) Male/Female wire jumpers - At least 10 pcs... buy extra if you can... Price here and here or equivalent... maybe Radio shack or Frys Electornics 3) GA 20 or 22 Wire (solid) - not stranded. You can also use this as breadboard (male) jumper wires. You just need to solder these to your LCD Shield pins/legs... If you do it this way, then you dont need to buy the female jumpers (above) Price here Not really that much money to add, just a few here and there. If you are good with electronics, then you can get away without using breadboard and use this one instead. Because after I finalized everything I ended up using that board for my final project. But for those beginners like me, breadboard is a must... Actually, you can just keep everything in there. You just need a bigger box/case for your project. I apologize for being slow... really busy right now with life.... will try harder.... patience... Last edited by katchupoy; 03/08/2011 at 12:36 AM. |
|
|
|
|
03/08/2011, 07:00 AM
|
#17 |
|
Registered Member
Join Date: May 2010
Posts: 26
|
Looks well got it booked marked, I built one using the nokia 3310 shield but currently altering the code to use a 2.4" tft colour touch screen
      Going to use 6 x 50w leds on a 60x30x30  
|
|
|
|
|
03/08/2011, 07:00 AM
|
#18 |
|
Registered Member
Join Date: May 2010
Posts: 26
|
Just one 50w led
    The led buckpucs capable of 36v @ 1550ma  Looking forward to the rest of your build |
|
|
|
|
03/08/2011, 04:36 PM
|
#19 |
|
Registered Member
Join Date: Jan 2008
Location: Orange County, CA
Posts: 151
|
Nice job Cesar... Subscribed!
__________________
JP * Hundred gallons FOWLR and 'shrooms * DIY LED (http://reefcentral.com/forums/showthread.php?t=1973462) * 10g sump w/ protein skimmer * 8g refugium w/ Chaeto |
|
|
|
|
03/08/2011, 05:52 PM
|
#20 |
|
Registered Member
Join Date: Jul 2008
Posts: 524
|
thats is very cool looking.
hopefully you will have time to make a super dummy tutorial for all the electronical dummies out there. can't wait to see the final product. keep up the good work. |
|
|
|
|
03/08/2011, 08:45 PM
|
#21 |
|
Registered Member
Join Date: Oct 2009
Location: Findlay, OH
Posts: 851
|
Subscribed, can't see this one come together as I've been afraid to start in on mine.
Thanks, Scott |
|
|
|
|
03/08/2011, 09:43 PM
|
#22 |
|
Master Blaster!
Join Date: Jan 2008
Location: Aurora, IL
Posts: 3,641
|
Thanks for the post! are there any boards that do analog 0-10v instead of PWM? Most people are utilizing 48ds nowadays so trying to find a solution for that.
Thank you again for simplifying things! the other thread was getting looooong.
__________________
120g Rimless Rimless Aquarium Club Member ATB Club Member Ecotech Vortech Member Current Tank Info: 120g rimless |
|
|
|
|
03/08/2011, 10:25 PM
|
#23 | |
|
Moved On
Join Date: Feb 2003
Location: Kent, WA
Posts: 1,548
|
Quote:
|
|
|
|
|
|
03/08/2011, 10:27 PM
|
#24 |
|
Moved On
Join Date: Feb 2003
Location: Kent, WA
Posts: 1,548
|
@ KTNCH,
Thats a very cool setup.... I want the Nokia one too, but its way over my head... maybe next time in the future. |
|
|
|
|
03/08/2011, 11:09 PM
|
#25 |
|
Imagination superfreak
Join Date: Jan 2011
Location: West Chicago, IL. near RT. 59 and RT. 64
Posts: 1,698
|
Ok so I am looking into ordering all this stuff.... like I have the tabs open in FF ready to order...... Should i get these exact parts? what If I would like temp monitoring?
__________________
Regards, Tom Current tank: 45g acrylic cube, Sunpod 150w 14k bulb Current Fish: Hey I gots some fish.. |
|
|
|
|
| Thread Tools | |
|
|
 Similar Threads
|
||||
| Thread | Thread Starter | Forum | Replies | Last Post |
| DIY Led Build of the Month | plankton99 | Do It Yourself |
11 | 11/20/2011 08:21 AM |
| DIY leds...now with arduino Controlled lights... | António Vitor | Do It Yourself |
4 | 05/18/2011 02:13 AM |
| Yet Another DIY LED Build Thread | csarkar001 | Do It Yourself |
54 | 05/11/2011 05:55 PM |
| One quick DIY LED question | Impossible | Do It Yourself |
4 | 10/27/2010 09:50 AM |
| Anyone DIY LEDs in their Biocube? | bassplaya12 | Do It Yourself |
13 | 08/15/2010 01:03 PM |


