
|
|
 11/04/2012, 09:10 PM
|
#26 |
|
Registered Member
Join Date: May 2004
Location: Dallas, TX
Posts: 11,033
|
peppie - It's either 100 gallon or 150 gallon resevoir. It should hold 80 to 120 gallons.
Since it is up against a corner, I was planning on using a plywood and 2x6 platform that is supported 3 different ways: 1. 5 Bottom braces pushing down and back on the wall studs. These are on both walls (1 on the short wall, 5 on the long wall). The long wall has a header made of 2 2x12s and this is currently carrying the weight of the ceiling and the floor above. 2. 4 heavy duty chains bolted through the ceiling studs. 3. Two 2x6 studs connected to the 2x6 frame of the platform. 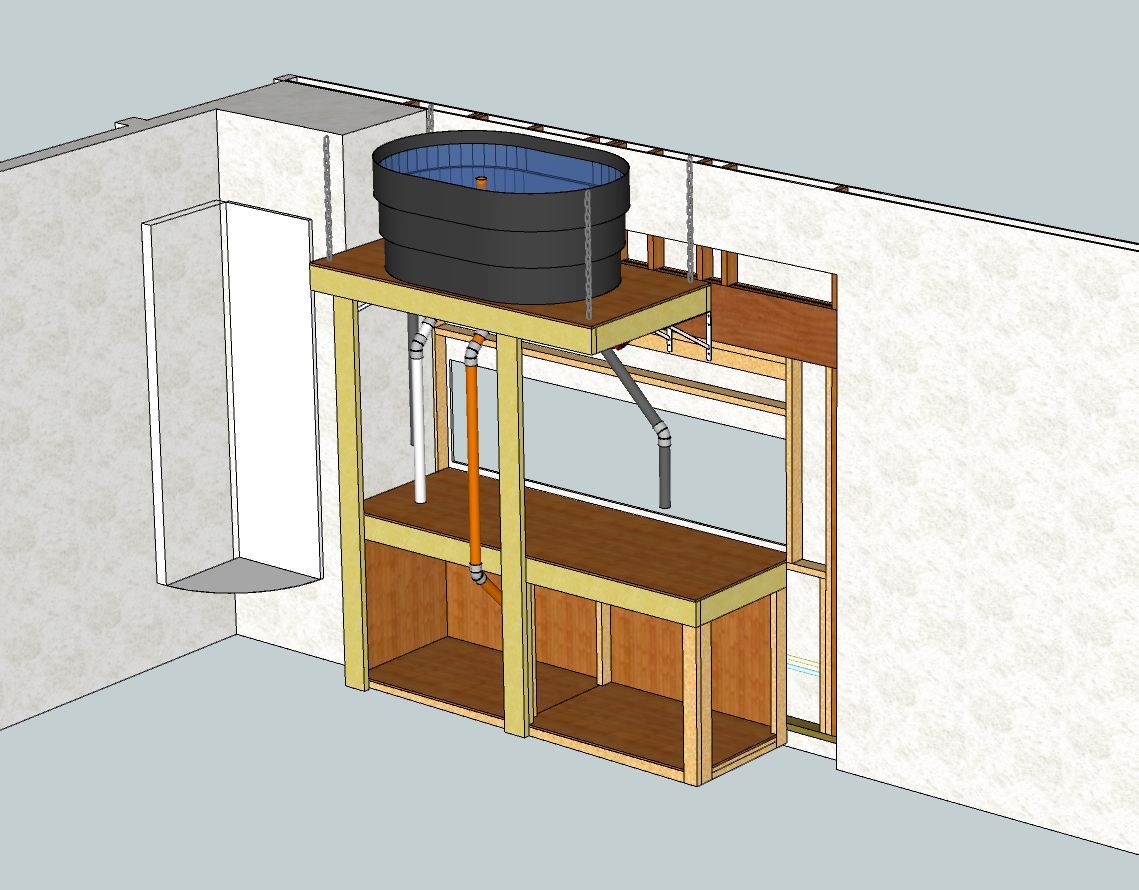 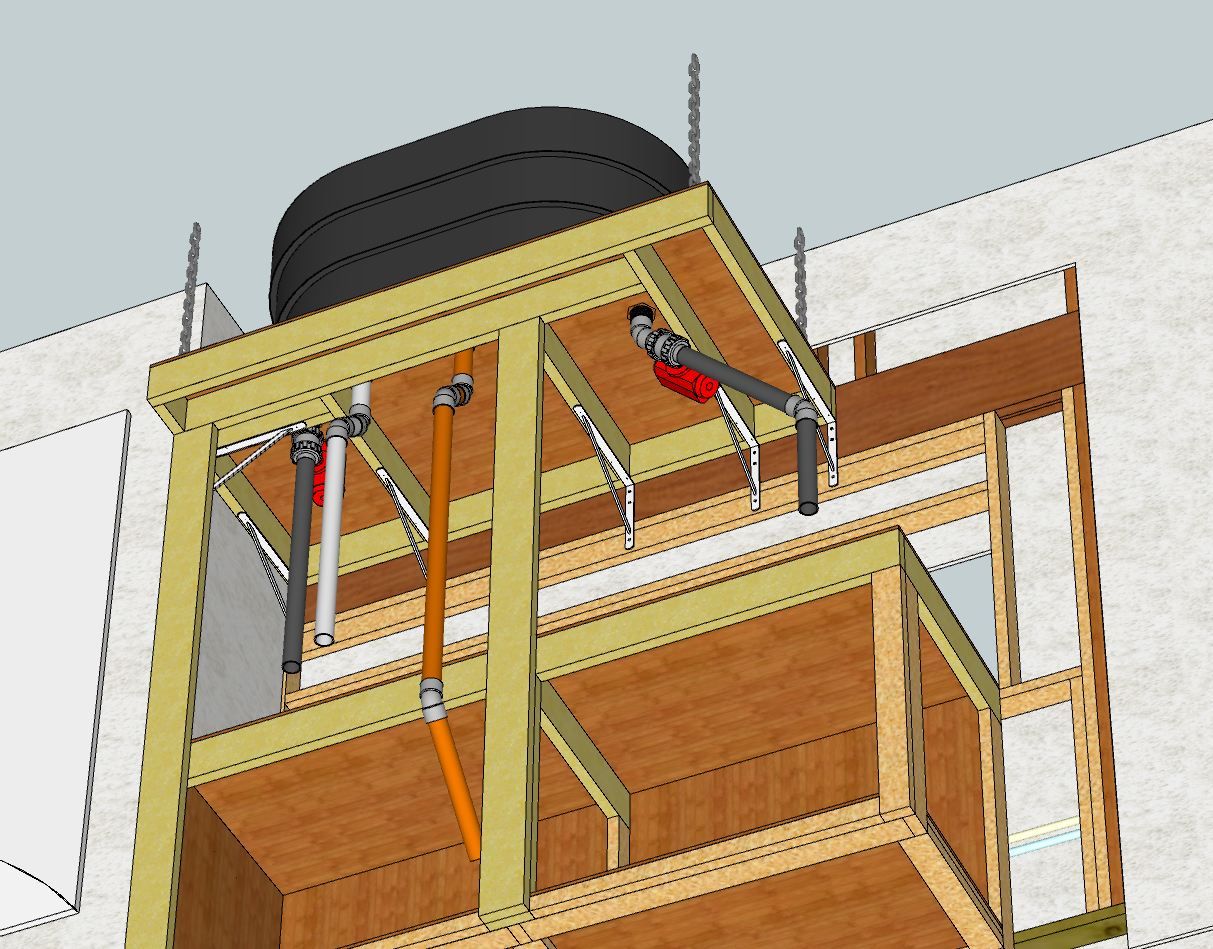 My concern is balancing the distribution of the load between the three mechanisms so none experience the full weight of the resevoir. wood color code: pink = 2x4s, yellow = 2x6, brown = 2x12 Last edited by karimwassef; 11/04/2012 at 09:16 PM. |

|

|
|
11/05/2012, 12:06 AM
|
#27 |
|
Registered Member
Join Date: May 2004
Location: Dallas, TX
Posts: 11,033
|
It's getting a little cramped - moved things around a bit
|
|
|
|
|
11/05/2012, 12:22 PM
|
#28 |
|
Premium Member
 Join Date: Aug 2011
Location: Overland Park, KS
Posts: 1,030
|
I may have missed it in the thread but why did you decide to go with a single surge tank? Originally, you had planned on two smaller tanks.
__________________
"...for it is not necessary that these hypotheses should be true, or even probably; but it is enough if they provide a calculus which fits the observations..."--Introduction (attributed to Andrew Osiander) to On the Revolutions of the Heavenly Sphere by Nicolaus Copernicus. Current Tank Info: 600g DT, 140g sump, 200g Cryptic, 90g Refugium, 3-400w MH, 2 Reeflo Barracudas, and 3 MP60s |
|
|
|
|
11/05/2012, 12:34 PM
|
#29 |
|
Registered Member
Join Date: May 2004
Location: Dallas, TX
Posts: 11,033
|
Lavoisier. I originally had two tanks that would fill and be actuated by a level sensor to release and then stop. I began constructing the matrix of the safety/controls I would need to make this work and it became very complex. There are 2 actuators on each tank, then there's the sensors on the main tank and the sump. I also added an unrestricted main drain path that is also actuated...
To simplify, I moved to a single resevoir with two actuated outlets. The on/off sequence is now controlled actively based on timers with the sensors only interfering if things are out of wack. This simplified the logic (and physical implementation) tremendously and gave me many more option - like running one outlet for a longer surge .. or running both intentionally .. or creating a short cycle/long cycle mix between the two. I don't need to vary the valve ratios on the pump filling the resevoir. All these options become programmable with fewer variables to measure and control. I like to experiment to find optima, and this gives the most flexibility too. |
|
|
|
|
11/05/2012, 12:44 PM
|
#30 |
|
Premium Member
Join Date: Aug 2011
Location: Overland Park, KS
Posts: 1,030
|
Ingenious! Like I said earlier I am looking forward to your build and the video of your surge(s) in action.
__________________
"...for it is not necessary that these hypotheses should be true, or even probably; but it is enough if they provide a calculus which fits the observations..."--Introduction (attributed to Andrew Osiander) to On the Revolutions of the Heavenly Sphere by Nicolaus Copernicus. Current Tank Info: 600g DT, 140g sump, 200g Cryptic, 90g Refugium, 3-400w MH, 2 Reeflo Barracudas, and 3 MP60s Last edited by Lavoisier; 11/05/2012 at 12:45 PM. Reason: misspell |
|
|
|
|
11/05/2012, 12:52 PM
|
#31 |
|
Registered Member
Join Date: May 2004
Location: Dallas, TX
Posts: 11,033
|
What would be great is if I can find an actuated butterfly valve to minimize the ramp time. That may be a separate DIY project using a standard valve with an external (dry) solenoid actuator. I expect the force required to make that work would be quite large.
The commercial ones are so expensive, I might as well buy a Tunze powerhead http://viewer.zmags.com/publication/...#/d4e3ccef/204 Last edited by karimwassef; 11/05/2012 at 01:07 PM. |
|
|
|
|
11/05/2012, 01:10 PM
|
#32 | |
|
Registered Member
Join Date: Jan 2006
Location: Toledo OH
Posts: 2,466
|
Quote:
http://www.usplastic.com/catalog/def...arentcatid=870 maybe something here will help? I am not fully aware of what you need for this setup but hope it helps? I use this on my pool and maybe takes 10 secs to fully open/close? ~ $150 for actuator http://www.pentairpool.com/pool-owne...tuator-186.htm and use on a valve like this ~ $35 for valve http://www.pentairpool.com/pool-owne...d-3-way-39.htm click on specs for all the valve, probably just need a 2 way. Not a butterfly, but ball valves?
__________________
Inwall Basement Setup w/ Growout Tank & Common Acrylic sump, SRO XP3000E, Neptune Apex, Bubble Magus Triple Doser, CLS- Super Dart Gold + OM 4way, 2-400w MH & 4-80w T-5, ROX .08 carbon... |
|
|
|
|
|
11/05/2012, 01:13 PM
|
#33 |
|
Registered Member
Join Date: May 2004
Location: Dallas, TX
Posts: 11,033
|
I have a Hayward actuated ball valve that should work. The problem with all the pool valves is that they take between 2.5 and 10 seconds to open and close. I would like something that is in the 0-1.5 sec range.
|
|
|
|
|
11/05/2012, 01:26 PM
|
#34 |
|
Registered Member
Join Date: Jan 2006
Location: Toledo OH
Posts: 2,466
|
http://www.usplastic.com/catalog/ite...5802&catid=803
1.25 secs...not sure if this works reasonably priced
__________________
Inwall Basement Setup w/ Growout Tank & Common Acrylic sump, SRO XP3000E, Neptune Apex, Bubble Magus Triple Doser, CLS- Super Dart Gold + OM 4way, 2-400w MH & 4-80w T-5, ROX .08 carbon... |
|
|
|
|
11/05/2012, 03:04 PM
|
#35 |
|
Registered Member
Join Date: May 2004
Location: Dallas, TX
Posts: 11,033
|
Stainless steel. Need an all plastic valve for saltwater.
|
|
|
|
|
11/05/2012, 05:45 PM
|
#36 | |
|
Premium Member
Join Date: Aug 2011
Location: Overland Park, KS
Posts: 1,030
|
Quote:
__________________
"...for it is not necessary that these hypotheses should be true, or even probably; but it is enough if they provide a calculus which fits the observations..."--Introduction (attributed to Andrew Osiander) to On the Revolutions of the Heavenly Sphere by Nicolaus Copernicus. Current Tank Info: 600g DT, 140g sump, 200g Cryptic, 90g Refugium, 3-400w MH, 2 Reeflo Barracudas, and 3 MP60s |
|
|
|
|
|
11/06/2012, 09:01 PM
|
#37 |
|
Registered Member
Join Date: May 2004
Location: Dallas, TX
Posts: 11,033
|
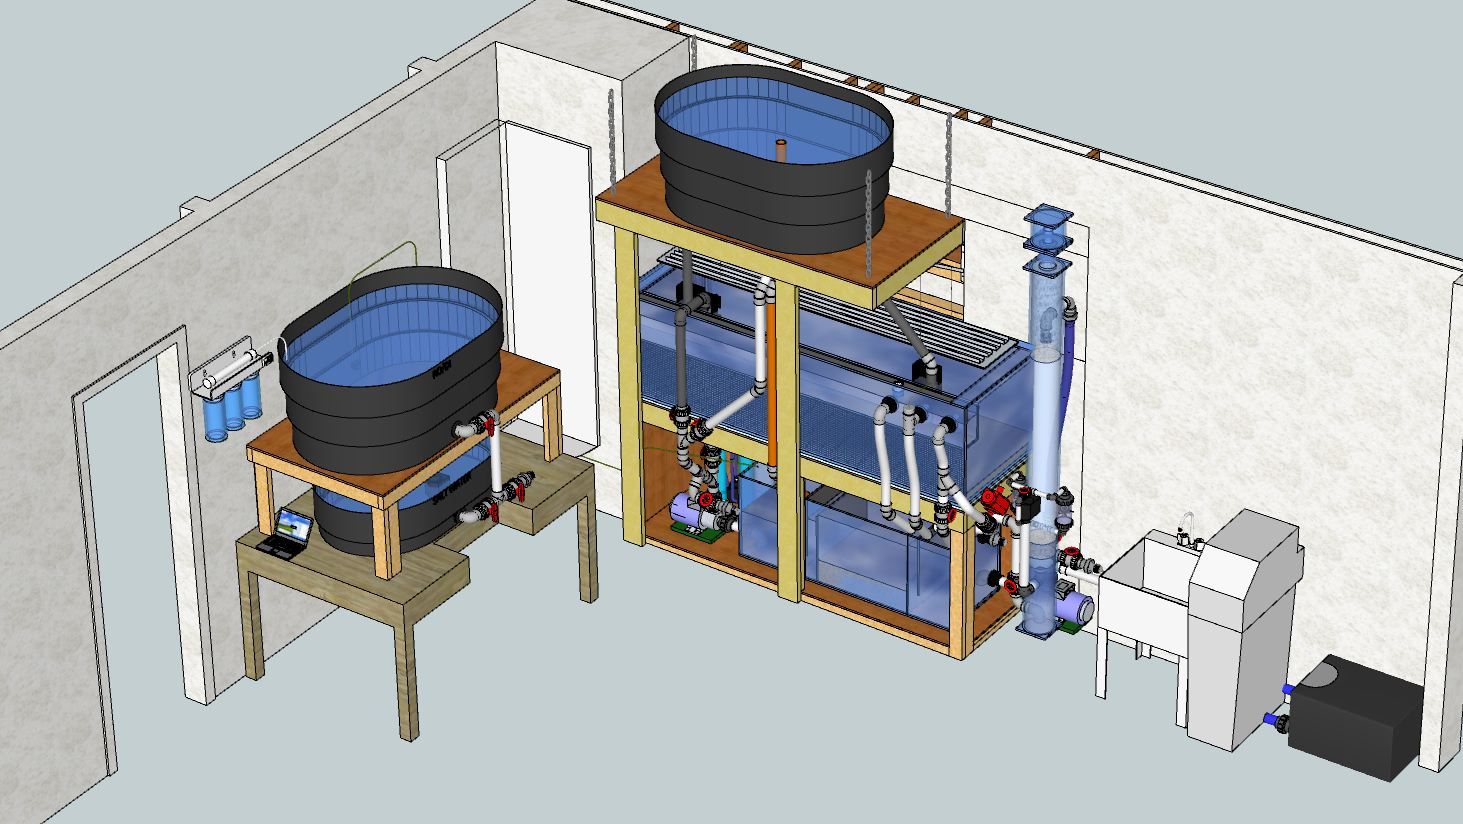
When I first needed to move the tank into the garage, I copied the design and just stacked the components behind the wall. Now that I'm looking at it from a more objective view, I'm considering different plumbing
 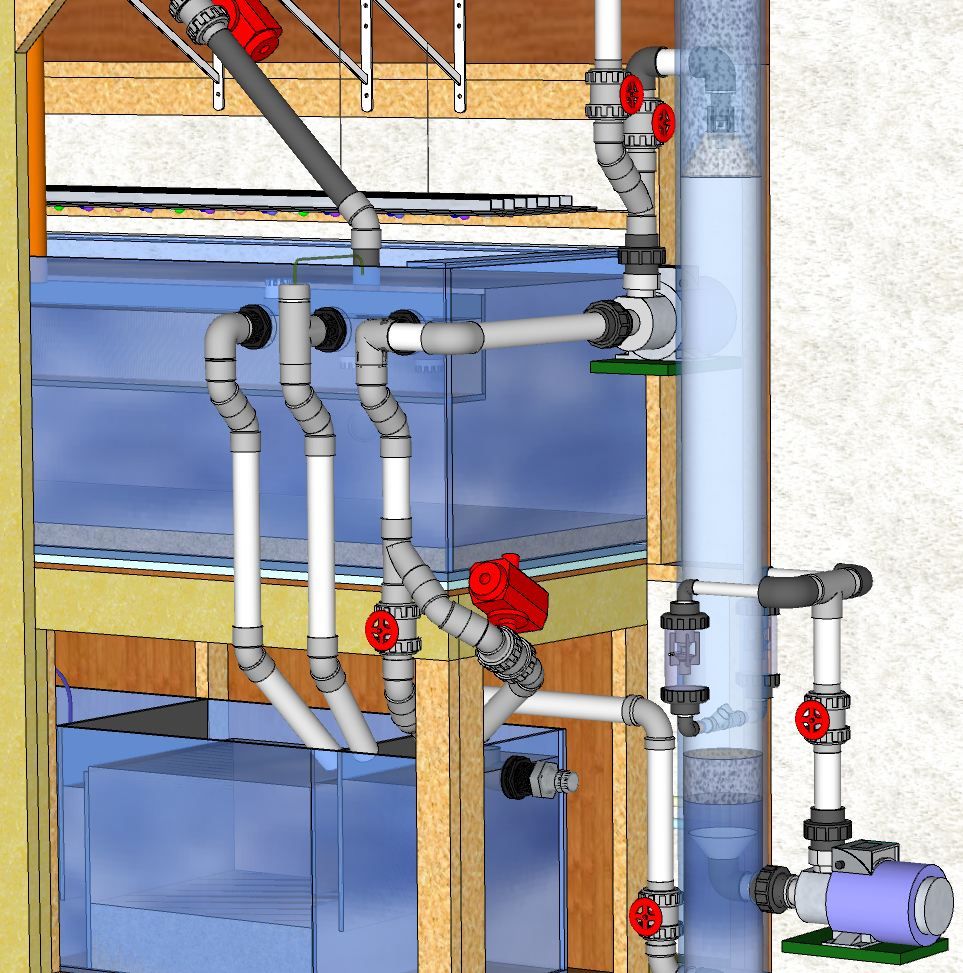 Given that both the protein skimmer inlet and the surge resevoir are much higher than the sump, AND the overflow box in the main tank is end-end, I decided to take the main drain bulkhead as the pump inlet rather than the sump. This reduces the head needed by about 4 feet (half the original head). The resevoir emergency overflow pipe doesn't need to flow to the sump, so I redirected it to the main tank overflow box instead. This allows the pipe to go behind the main support beam for the resevoir platform. These changes open up the area for accessing the top and front of the tank and should increase flow to the skimmer and surge resevoir. The return pump also becomes dedicated which should make the in-tank penductors a lot more effective. I realize that this is unconventional plumbing. I'm also concerned with the structural support for the resevoir tank. Please let me know your thoughts on how to improve this design. |
|
|
|
|
11/07/2012, 10:37 AM
|
#38 |
|
Premium Member
Join Date: Aug 2011
Location: Overland Park, KS
Posts: 1,030
|
I like the idea of moving your pump 4 feet closer to its target. My concern would be scenarios where your c2c runs dry (more explicitly the primary siphon return) and the pump is still running for some period of time. Would the primary siphon ever be without water and, if so, would that negatively impact the pump?
I'm sure there would be a way to attach a sensor tied to the water level that could shut down the pump. In fact, I will probably also need to do this with my set up but was thinking my Apex and a properly situated sensor would be able to solve the problem.
__________________
"...for it is not necessary that these hypotheses should be true, or even probably; but it is enough if they provide a calculus which fits the observations..."--Introduction (attributed to Andrew Osiander) to On the Revolutions of the Heavenly Sphere by Nicolaus Copernicus. Current Tank Info: 600g DT, 140g sump, 200g Cryptic, 90g Refugium, 3-400w MH, 2 Reeflo Barracudas, and 3 MP60s |
|
|
|
|
11/07/2012, 11:18 AM
|
#39 |
|
Registered Member
Join Date: May 2004
Location: Dallas, TX
Posts: 11,033
|
Yes. I already had two level sensors in the overflow box. One for emergency (high line) and one for dry (low line).
The "high" opens a second (un-valved) path in the main drain. Still working up the stability analysis on this due to the time delay. The "low" turns off the surge and skimmer pump. The main pump (6000 gph) should generate a 0.5" over the box lip with the 2" main drain gate valve turned down a little. |
|
|
|
|
11/07/2012, 12:02 PM
|
#40 |
|
Registered Member
Join Date: May 2004
Location: Dallas, TX
Posts: 11,033
|
In terms of flow, the constriction is the 2" elbow inside the overflow box. This would have to process 6000gph (sump) + 4000gph (surge).
The rest of the main drain and sump only need to handle the 6000 gph of the main pump. |
|
|
|
|
11/09/2012, 01:02 AM
|
#41 |
|
Registered Member
Join Date: May 2004
Location: Dallas, TX
Posts: 11,033
|
Has anyone constructed a resevoir stand this large before?
How about using the overflow box as the pump inlet to the skimmer? Trying a lot of new things here and would rather not go through avoidable errors... 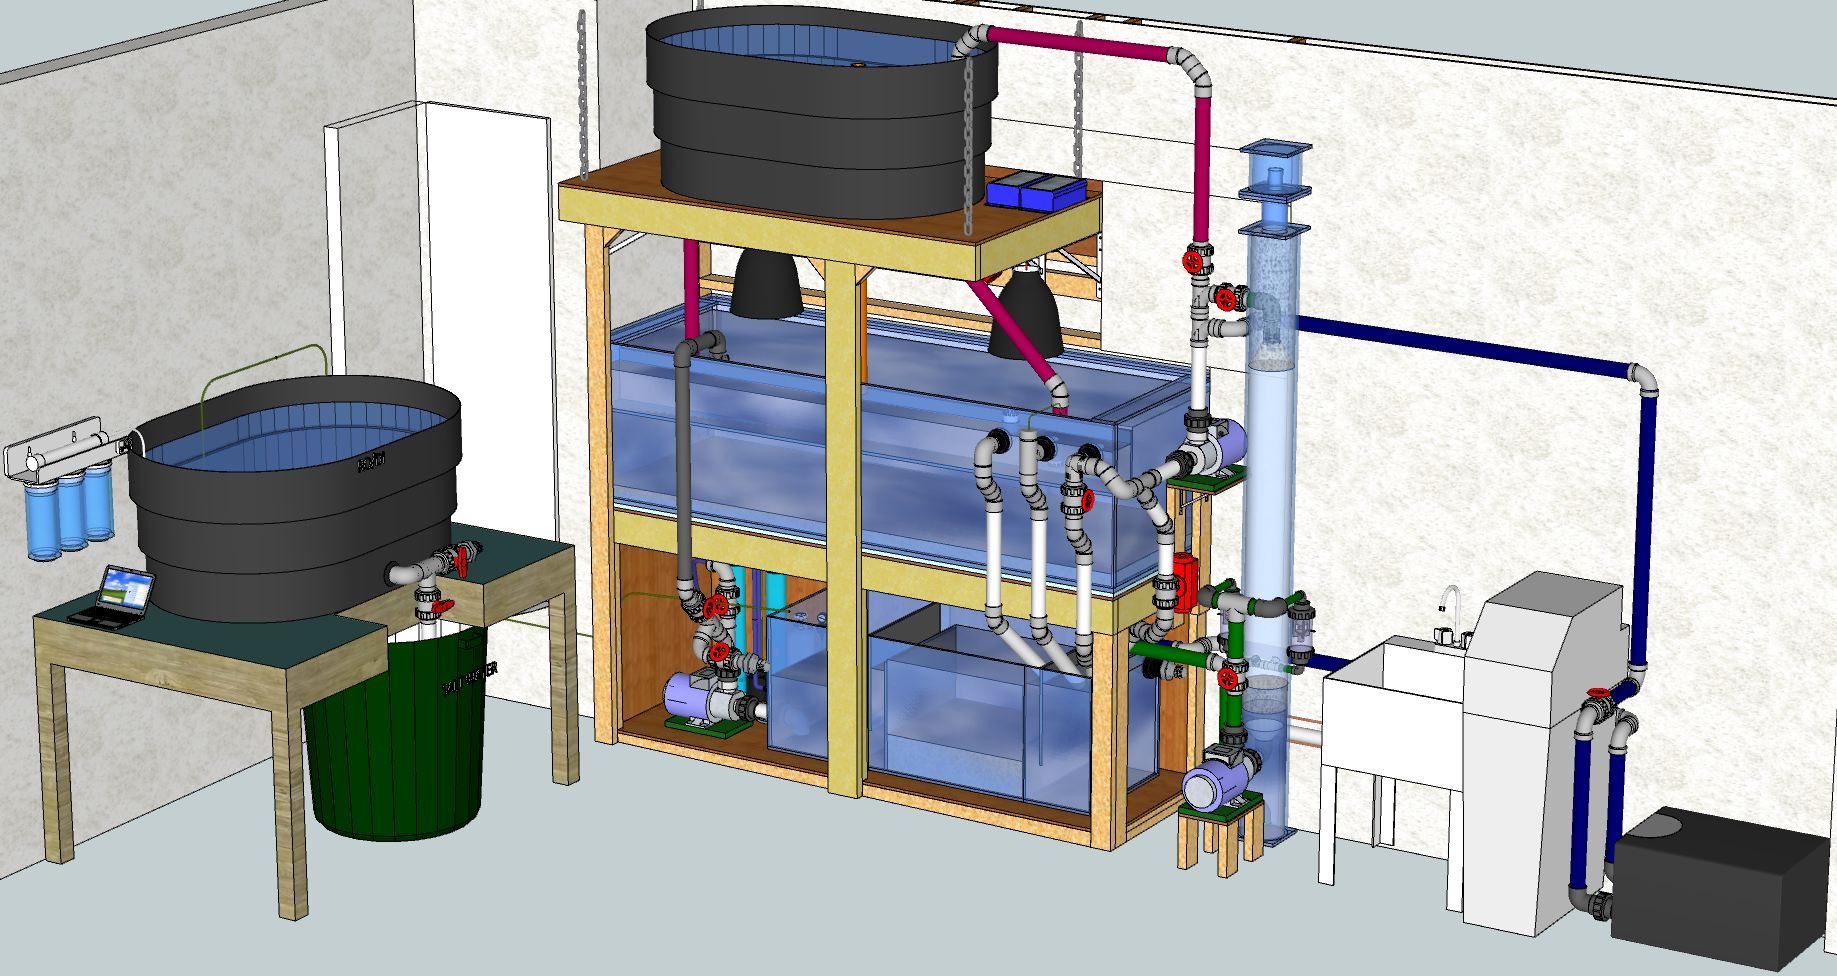 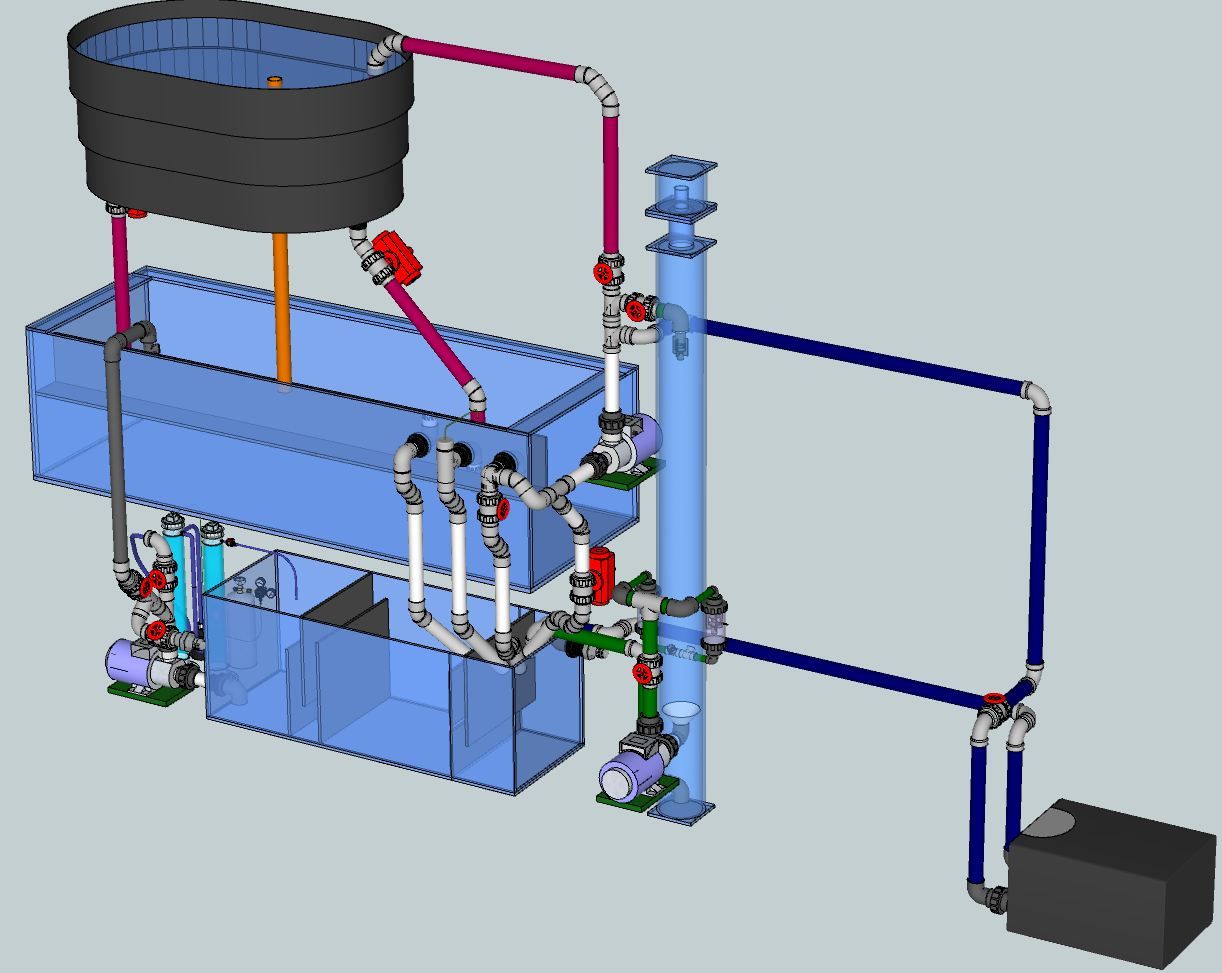
|
|
|
|
|
11/09/2012, 05:10 PM
|
#42 |
|
Premium Member
Join Date: Aug 2011
Location: Overland Park, KS
Posts: 1,030
|
Yes, I really like the skimmer being fed with the cl (surge) pump. You're saving a lot of head pressure, thus more energy going into water movement. Nice.
__________________
"...for it is not necessary that these hypotheses should be true, or even probably; but it is enough if they provide a calculus which fits the observations..."--Introduction (attributed to Andrew Osiander) to On the Revolutions of the Heavenly Sphere by Nicolaus Copernicus. Current Tank Info: 600g DT, 140g sump, 200g Cryptic, 90g Refugium, 3-400w MH, 2 Reeflo Barracudas, and 3 MP60s |
|
|
|
|
11/18/2012, 11:41 PM
|
#43 |
|
Registered Member
Join Date: May 2004
Location: Dallas, TX
Posts: 11,033
|
Real progress. Here is the original wall with the drywall removed showing the studs.
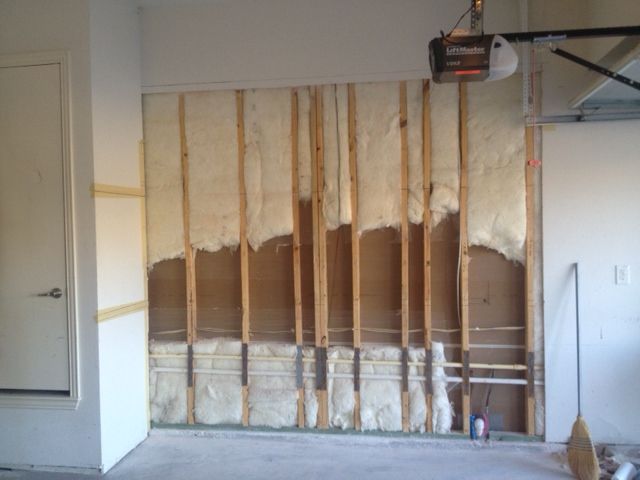 Then removed the studs and added the header, bar and side frame 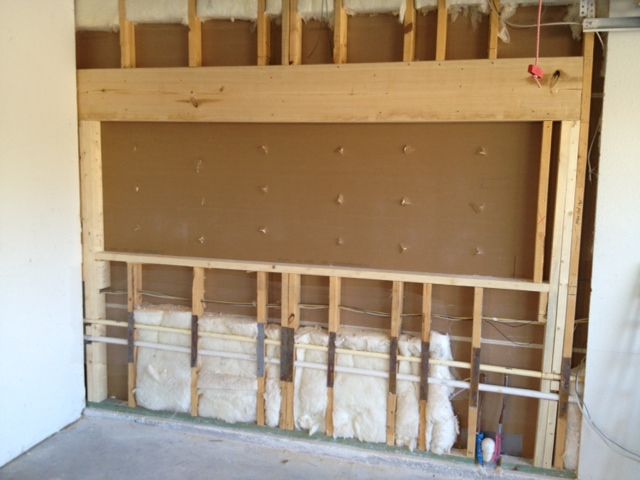 and now building in the framed stand 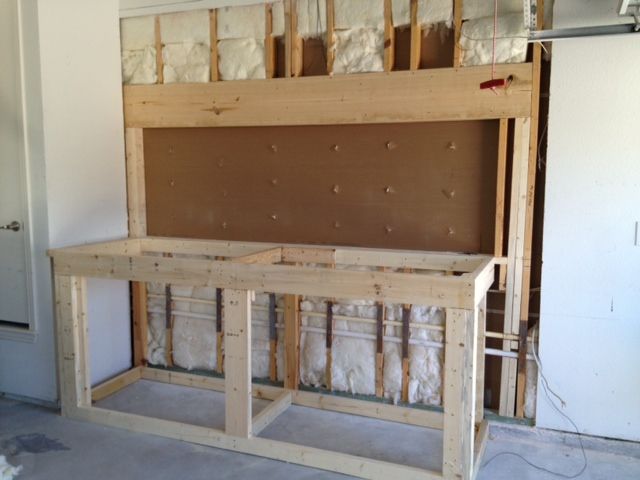 covering it with pegboard to simulate the 1/2" plywood that is yet to be installed. 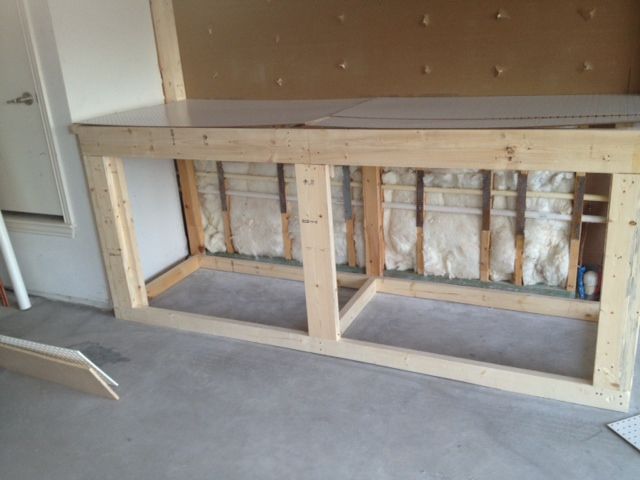 Looking under and into the framed stand:  
|
|
|
|
|
11/18/2012, 11:47 PM
|
#44 |
|
Registered Member
Join Date: May 2004
Location: Dallas, TX
Posts: 11,033
|
The exposed areas will be covered with green drywall and the opening will be cut out when the tank arrives.
Top and bottom will be covered with 1/2" plywood (yet to be cut). |
|
|
|
|
11/19/2012, 10:39 AM
|
#45 |
|
Registered Member
Join Date: Jan 2006
Location: Toledo OH
Posts: 2,466
|
Everything is looking very good.
One concern as you have, Is it really worth the headache/worries to save the 4' of head on the surge and skimmer feed pump? All in all the loss of that extra 4' is minimal. Especially given the entire build here! Not that it can't be done and the way you have it looks like it should work. But if you go drilling holes and it doesn't work right or 2 yrs down the road a soloenoid/float sticks, etc.... Also I would go with atleast 3/4" plywood top deck and maybe two more cross braces (front to back) on that top frame..... is this just a perimeter bottom tank? Any concern for the legs straigh down to the edge of that concrete foot? What if that crakcs chips gives way.....anyway to get that leg supported on the wood frame?
__________________
Inwall Basement Setup w/ Growout Tank & Common Acrylic sump, SRO XP3000E, Neptune Apex, Bubble Magus Triple Doser, CLS- Super Dart Gold + OM 4way, 2-400w MH & 4-80w T-5, ROX .08 carbon... |
|
|
|
|
11/19/2012, 11:05 AM
|
#46 |
|
Registered Member
Join Date: May 2004
Location: Dallas, TX
Posts: 11,033
|
4' is nearly half of my total head from sump to surge. There's no additional holes to drill, but I was concerned about pulling the water out of the overflow box too quickly for the main return tank and surge return to manage. Then again, I should have a higher water level in the tank at all times.
One option was to drill a dedicated overflow hole for the pump feed instead of leaching off the main drain line. That would keep things cleaner. If anything sticks, there are emergency open drains from the surge to the DT and from the DT to the sump and the sump has a 50 gallon excess capacity to accomodate the surges. I was thinking of adding a backup tank through a higher impedance line to give me even more protection. The tank is all glass 3/4" and the top is 1/2" plywood and 3/4" foam. I can add a couple more cross-braces. The concrete foot is between the house framing and the stand framing - no real place for it to chip or break. I can add another 2x4 from the top to the framed bottom. |
|
|
|
|
11/19/2012, 01:40 PM
|
#47 |
|
Premium Member
Join Date: Aug 2011
Location: Overland Park, KS
Posts: 1,030
|
I am looking forward to this continuing build.
__________________
"...for it is not necessary that these hypotheses should be true, or even probably; but it is enough if they provide a calculus which fits the observations..."--Introduction (attributed to Andrew Osiander) to On the Revolutions of the Heavenly Sphere by Nicolaus Copernicus. Current Tank Info: 600g DT, 140g sump, 200g Cryptic, 90g Refugium, 3-400w MH, 2 Reeflo Barracudas, and 3 MP60s |
|
|
|
|
11/19/2012, 08:23 PM
|
#48 |
|
Registered Member
Join Date: May 2012
Location: Galloway, OH
Posts: 103
|
If u don't mind me asking, what software did u use for your mock-ups? They look great!
|
|
|
|
|
11/19/2012, 10:14 PM
|
#49 |
|
Registered Member
Join Date: May 2004
Location: Dallas, TX
Posts: 11,033
|
sketchup 8 from Google. It's free. I strongly recommend watching the tutorial videos ... it'll save you hours of frustration.
|
|
|
|
|
11/20/2012, 10:16 AM
|
#50 |
|
Registered Member
Join Date: May 2004
Location: Dallas, TX
Posts: 11,033
|
drywalling tomorrow!
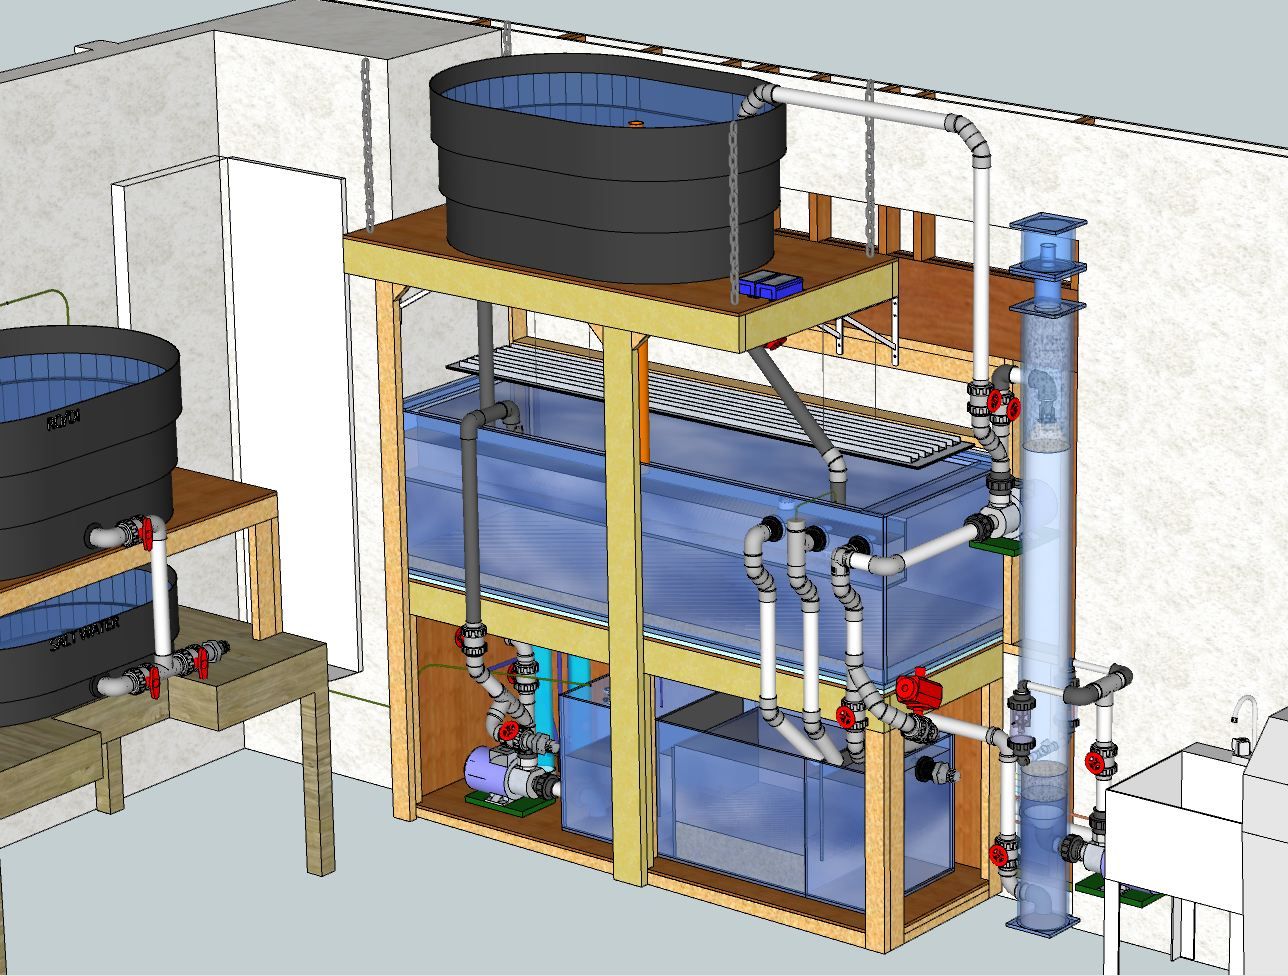
Here are the updated drawings. I separated the overflow box outlet pipes to make them more manageable. 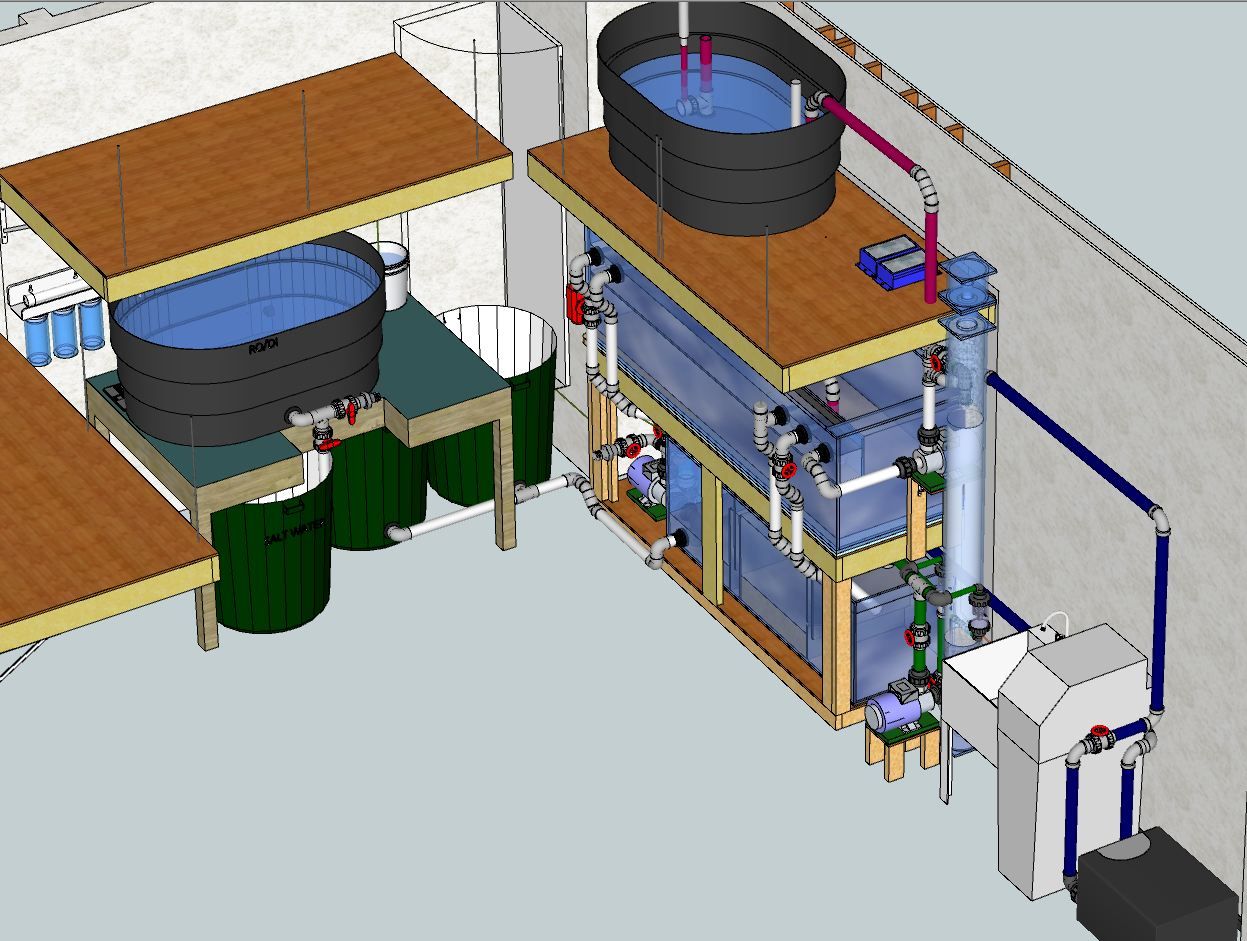 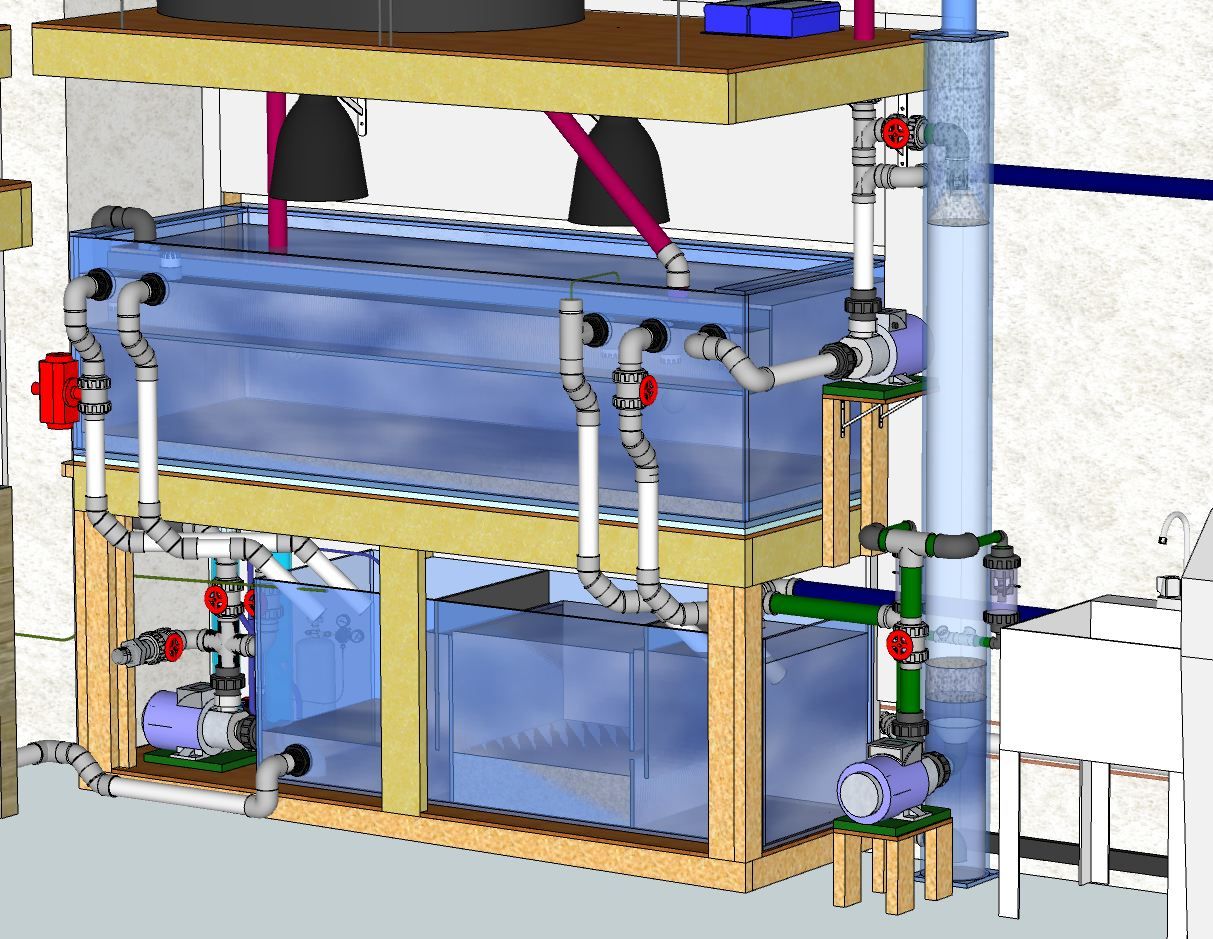 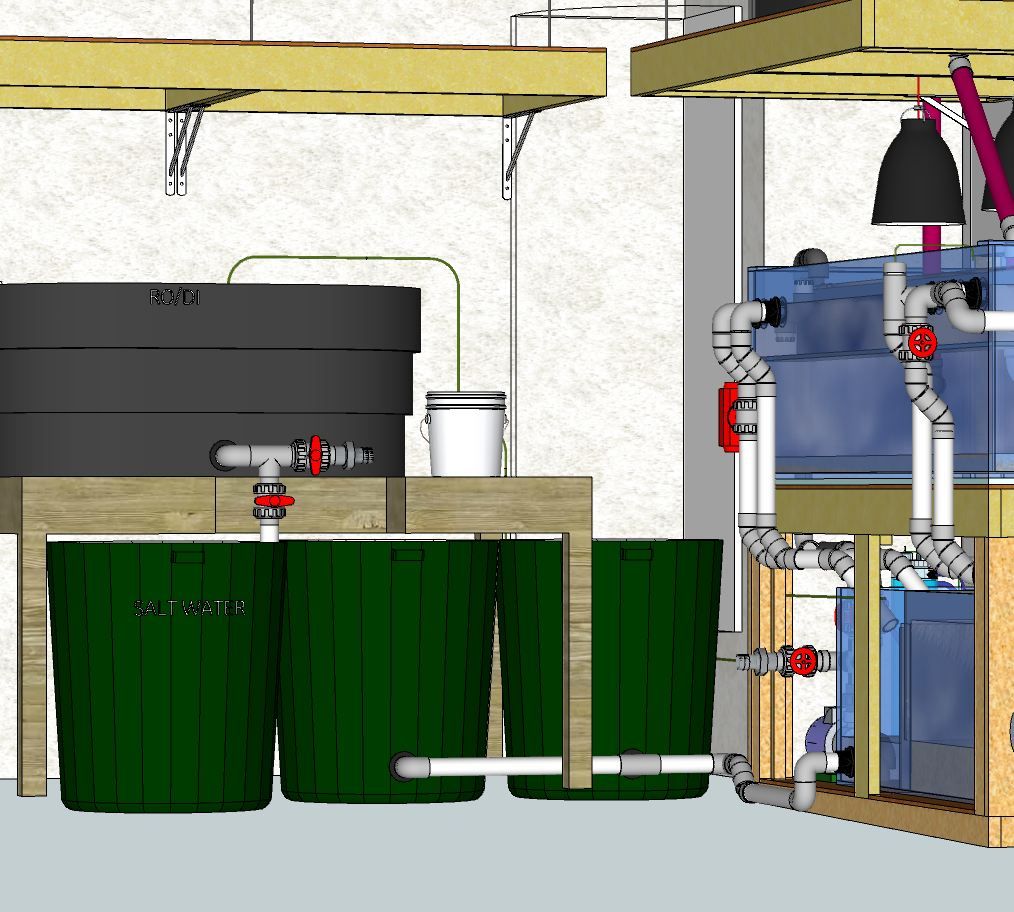 The sump is now 2' x 2' x 6' = 180g It is connected to two additional 30 gallon resevoirs providing about 40 gallons of additional buffering. I don't know if I'll need this, but it's available in case I do. The impedance between them is high so this won't help with the surges but may mitigate some emergency overflow events. The overflow now has 5 separate connections. 3 go to a BA overflow (valved main, slow, emergency), 1 goes to the pump that recirculates to the surge (to tank), skimmer (to sump) and chiller (to sump), and the last 1 is an aux drain that activates when the surges do to provide additional flow to the sump. The surges have built in overflows that flow into the main tank through the same pipes. I have a dedicated Kalk bucket in the ATO path that overflows to replenish the sump. Tank coming in 2 weeks or so. Last edited by karimwassef; 11/20/2012 at 10:51 AM. |
|
|
|
 |
|
|


