|
|
 02/23/2009, 05:33 PM
|
#51 |
|
Registered Member
Join Date: Feb 2008
Location: Columbia,SC
Posts: 177
|
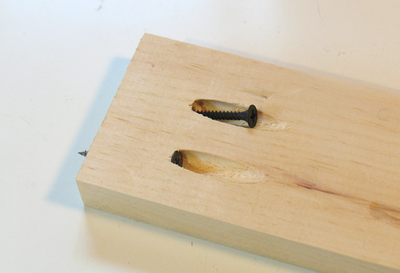
Someone please reassure me that these gaps are not that bad. can i still fill them in with siliconized latex caulk? one side is not touching the 2x4 but it is very close.
__________________
THANX IN ADVANCE, Ty Current Tank Info: 75 gallon tank, DIY Stand, 20long sump, 29g reef, 10g nano |

|

|
|
02/23/2009, 06:00 PM
|
#52 |
|
Premium Member
 Join Date: Oct 2008
Location: Lakeland, Florida
Posts: 970
|
I cut some wood at an angle with the miter saw and sort-of shimmed/wedged the wood in the gap, then I caulked the cracks-I am going to put some vinyl flooring in to make clean ups easier-I should have waited on the caulk until after the flooring- I figure you want it water tight anyway so water doesnt get where you cant clean.

__________________
Roger Save a fish, click on the red house. Current Tank Info: 90 Gallon-mixed reef |
|
|
|
|
02/23/2009, 06:10 PM
|
#53 | |
|
Premium Member
Join Date: Oct 2008
Location: Lakeland, Florida
Posts: 970
|
Quote:
I am sure plywood would work well-I just wanted to avoid having to cut a square hole in plywood for the cabinet opening. To hide the tank frame-you could skin the front and sides so the plywook covers the inch or two of frame and then trim it with what ever you want-you could use the trim itself as the cover and just fasten it to the height that would cover the frame. I just tried to place things and sort of get a visual of how it would look and here is how I did it:  It is a pretty thick border but without the tank on it yet Its hard to say-with a 180 gallon you should be able to get away with that kind of border.
__________________
Roger Save a fish, click on the red house. Current Tank Info: 90 Gallon-mixed reef |
|
|
|
|
|
02/27/2009, 04:31 AM
|
#54 |
|
Registered Member
Join Date: Jan 2009
Location: Mount Juliet, TN
Posts: 1,440
|
Finally started my build last night. Got the top and bottom frames built. Hope to have the rest of the frame built and ready for paint by the end of the weekend. I have not decided on the skin yet. Still debating whether to go in wall or not.
To build these I am working in my neighbors shop. He has all the tools needed including some nifty 90 degree corner jigs to help keep it all straight.  
__________________
Michael Visit my homepage for my build thread. Hey.. it's just my opinion... I could be wrong... Current Tank Info: None |
|
|
|
|
02/27/2009, 06:02 AM
|
#55 |
|
Premium Member
Join Date: Mar 2002
Location: Triad Area, NC
Posts: 1,182
|
Heavy Hittah, I personally would redo that piece. Only real reason is the one end that does not touch the 2X4. No that a sumo is going to be extremly heavy, but you don't want to risk anything. All the other gaps can be filled in using an industrial glue that hardens, like liquid nails or the like. This will basically make it very rigid and strong while filling in the gaps.
Matt
__________________
-Matt ><> ><> Worry looks around, Sorry looks back, Faith looks up. Click red house for Pico build page. Current Tank Info: 3g Pico and workin on a new 100g Acrylic setup |
|
|
|
|
02/27/2009, 10:28 AM
|
#56 | |
|
Registered Member
Join Date: Jan 2009
Location: Charleston, SC
Posts: 971
|
Quote:
Thanks for your response and for the picture. Its worth a 1000 words. I've been thinking about using board wood vs plywood. As long as it looks like furniture, my wife will be happy!!! I like your trim work as well. The thicker trim will look good with my tank. I'm going to start the frame this weekend between my honey do list and band practice and try to skin it during the week. Thanks again for your help and for the picture. I greatly appreciate it. Chris |
|
|
|
|
|
02/27/2009, 07:44 PM
|
#57 | |
|
Premium Member
Join Date: Oct 2008
Location: Lakeland, Florida
Posts: 970
|
Quote:
__________________
Roger Save a fish, click on the red house. Current Tank Info: 90 Gallon-mixed reef |
|
|
|
|
|
02/27/2009, 10:43 PM
|
#58 |
|
Registered Member
Join Date: Mar 2008
Location: Lewis Center, OH
Posts: 477
|
I built a stand with the crown of the board up. Would that put undo stress on the tank? With the tank empty, there is a gap on both sides of the tank since the crown is supporting the middle.
I went ahead and filled it up watching the gaps on each side to see if the would shrink. I have a bulkhead on the bottom ready to drain into the basement sump should I need to. One side shrank and the other side still has a hairline gap. Should I shim it? Drain the tank and shave down the crown? |
|
|
|
|
02/28/2009, 07:52 AM
|
#59 | |
|
Registered Member
Join Date: Jun 2004
Location: Central Kentucky
Posts: 78
|
Quote:
|
|
|
|
|
|
02/28/2009, 09:42 AM
|
#60 | |
|
Registered Member
Join Date: Jan 2009
Location: Charleston, SC
Posts: 971
|
Quote:
Chris 
|
|
|
|
|
|
02/28/2009, 04:05 PM
|
#61 | |
|
Registered Member
Join Date: Apr 2006
Location: Gurnee, IL
Posts: 410
|
Quote:
Do you think you kind find a picture of what you are describing? I want to make sure that I do this right. |
|
|
|
|
|
02/28/2009, 06:08 PM
|
#62 | |
|
Registered Member
Join Date: Aug 2008
Location: US ARMY - El Paso TX
Posts: 3,678
|
Quote:
that make sense???
__________________
Yes I hear voices in my head, but they speak spanish so I can't understand anything they say. there's no place like 127.0.0.1 It's a shame that stupidity isn't painful.... Current Tank Info: currently tankless....but planning an AIO |
|
|
|
|
|
02/28/2009, 06:28 PM
|
#63 | |
|
Registered Member
Join Date: Jun 2004
Location: Central Kentucky
Posts: 78
|
Quote:
|
|
|
|
|
|
02/28/2009, 08:49 PM
|
#64 |
|
Registered Member
Join Date: Apr 2008
Location: Winston Salem NC
Posts: 38
|
Well I thought I would update everyone with my Stand. It is for my 125g and I will say this is my first attempt at a nice piece as opposed to a "Hell it is in the garage and works" piece. I still need to set the nails and putty it up and sand it before painting but here it is, plus the cost was under $120. Enjoy!
   Build thread http://www.aquaria.info/index.php?na...wtopic&t=73593
__________________
Old enough to Know better, Still Young Enough to SCREW it up! |
|
|
|
|
02/28/2009, 08:56 PM
|
#65 |
|
Registered Member
Join Date: Aug 2008
Location: US ARMY - El Paso TX
Posts: 3,678
|
nice....is the drawer functional or just for looks???
__________________
Yes I hear voices in my head, but they speak spanish so I can't understand anything they say. there's no place like 127.0.0.1 It's a shame that stupidity isn't painful.... Current Tank Info: currently tankless....but planning an AIO |
|
|
|
|
02/28/2009, 09:14 PM
|
#66 | |
|
Registered Member
Join Date: Apr 2008
Location: Winston Salem NC
Posts: 38
|
Quote:
Yes indeed it works! I picked it up at Habitat for Humanity Restore for $6.00 with Sliders. Picked up the doors there as well for only $4.00
__________________
Old enough to Know better, Still Young Enough to SCREW it up! |
|
|
|
|
|
03/02/2009, 10:48 AM
|
#67 |
|
Registered Member
Join Date: Jan 2009
Location: Charleston, SC
Posts: 971
|
Well, here is my attempt at making a stand for my 180. I leaned a few things along the way and may want to start over.
The top and bottom frame are 2x8s. I wanted the the ability to remove the center support if I needed to and I wanted to have a basin in the bottom to catch spills if/when they happen. I have not put plywood on the bottom yet. I used 2x4s for the legs and used pocket screws and glue for most of the joints. top frame 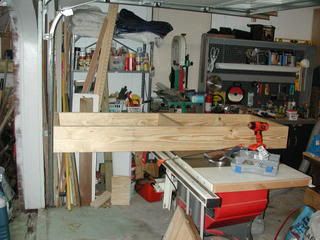 bottom frame with legs 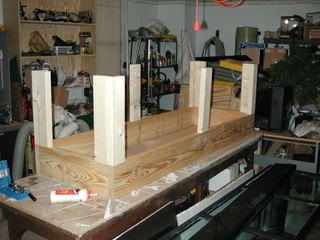 bottom frame corner with legs and pocket screws 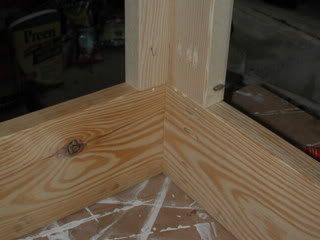 additional screws in top and bottom frame for added support (first time using pocket screws). 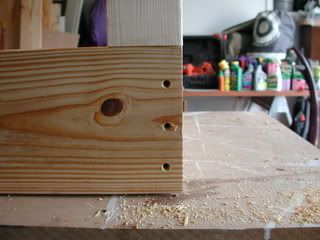 screwed corner legs to each other for stiffness 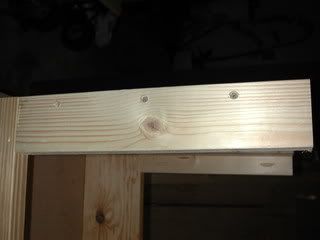 gap under one of the side legs at top. I did shim it later. 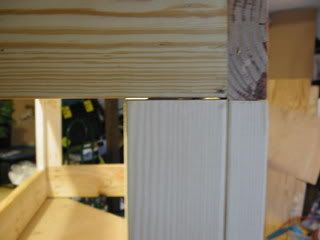 stand framing done 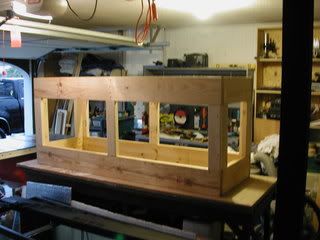 After I finished I realized my 20" tall 55g tank for a sump would not fit through the 17" tall opening and that it would be rather difficult to get into it to work because of its height. I wanted the top of the stand to be 32" tall for appearance purpose and ease of access to the tank but I may have to make it taller. I am also thinking of making the bottom frame out of 2x4s or 2x6s. I wanted an area to catch spills but I'm thinking the 2x8s might be over kill. Plus it reduces the opening in front. Well, I'll have till this weekend to come up with a new plan. That should keep me busy and out of trouble for a while. Besides, I could use a second workbench in the garage! Last edited by Misled; 04/12/2018 at 06:39 PM. |
|
|
|
|
03/02/2009, 11:10 AM
|
#68 | |
|
Registered Member
Join Date: Aug 2008
Location: US ARMY - El Paso TX
Posts: 3,678
|
Quote:
__________________
Yes I hear voices in my head, but they speak spanish so I can't understand anything they say. there's no place like 127.0.0.1 It's a shame that stupidity isn't painful.... Current Tank Info: currently tankless....but planning an AIO |
|
|
|
|
|
03/02/2009, 11:41 AM
|
#69 | |
|
Registered Member
Join Date: Jul 2004
Location: Miami, Florida
Posts: 255
|
Quote:
Do you have a stand design for a 180 gallon tank, 72" x 24", that will allow me to have those dimensions available on the inside of the stand? I need 72" long x 24" wide on the inside of my stand for my sump, chiller and return pump. Please let me know. Thank you --- Chris  : :
|
|
|
|
|
|
03/02/2009, 12:31 PM
|
#70 |
|
Premium Member
Join Date: Oct 2008
Location: Lakeland, Florida
Posts: 970
|
Rhodes19- Looks like it was shaping up well, Your next attempt should be right on! Nice documentation-
I finished my stand-here are the the final pics=the photos are a little dark but you should be able to get the Idea:     
__________________
Roger Save a fish, click on the red house. Current Tank Info: 90 Gallon-mixed reef |
|
|
|
|
03/02/2009, 04:55 PM
|
#71 |
|
Registered Member
Join Date: Jan 2009
Location: Charleston, SC
Posts: 971
|
Thanks Roger. Nice pictures. What kind of stain did you use? My wife wants me to stain the stand a similar color. After looking at my stand framing I think its lending itself to plank wood instead of plywood as well.
James3370, I'm glad to hear I am not the only one who is enhancing their garage appeal! LOL Chris
|
|
|
|
|
03/02/2009, 06:50 PM
|
#72 | |
|
Premium Member
Join Date: Oct 2008
Location: Lakeland, Florida
Posts: 970
|
Quote:
__________________
Roger Save a fish, click on the red house. Current Tank Info: 90 Gallon-mixed reef |
|
|
|
|
|
03/03/2009, 09:07 AM
|
#73 | |
|
Registered Member
Join Date: Jan 2009
Location: Charleston, SC
Posts: 971
|
Quote:
Chris
|
|
|
|
|
|
03/03/2009, 03:07 PM
|
#74 |
|
Registered Member
Join Date: Jan 2009
Location: Mount Juliet, TN
Posts: 1,440
|
Hello Rocket Engineer... I do not know if I will explain this properly, but I have a 'hypothetical' situation/problem.
Let's say someone built a stand for a 125 (~72" with 2x8's) from the specs, but messed up on his cut list and made the depth 3 inches too long. Is there a best solution to this again hypothetical problem? Taking it apart would not be an option as it was glued. Starting over would be undesirable as it is a wast of wood and is demoralizing. My initial thought is to build a duplicate of the outer frame inside at the correct width. This of course would line up just inside the nailing piece. The only significant difference would be that the rails do not span the full length and instead would screw into the existing ends. I would just end up with a larger stand and the excess could be made to look like a good place to hold test kits/beer etc. Not a good explanation but hopefully it makes sense.
__________________
Michael Visit my homepage for my build thread. Hey.. it's just my opinion... I could be wrong... Current Tank Info: None |
|
|
|
|
03/03/2009, 04:41 PM
|
#75 |
|
Registered Member
Join Date: Jan 2009
Location: Mount Juliet, TN
Posts: 1,440
|
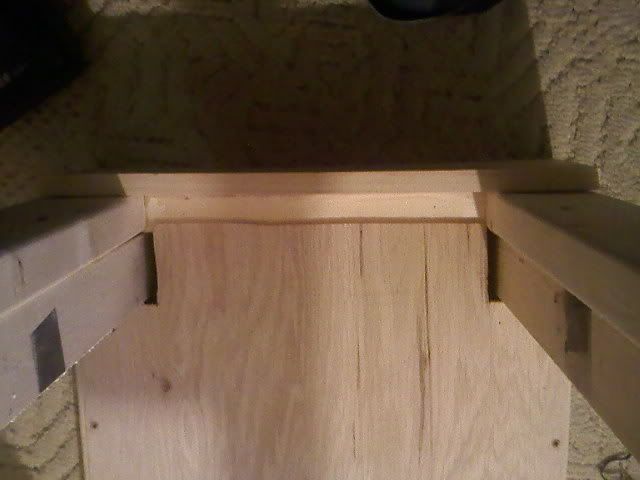
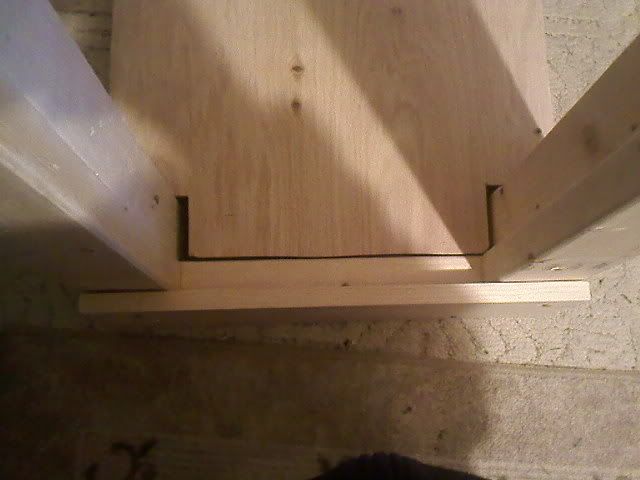
Little more detail... I was thinking along the lines of doing something like below. Exception... I would not bring length of the tank in only the depth. I was also thinking of supporting the new 2x8 on each end. That would make two corners doubled up with two legs sandwiched around the nailing board.
I will try to take a picture of this hypothetical stand and add some crude markups tonight. Originally posted by saltwaterfishlover 
__________________
Michael Visit my homepage for my build thread. Hey.. it's just my opinion... I could be wrong... Current Tank Info: None Last edited by Misled; 04/12/2018 at 06:40 PM. |
|
|
|
 |
| Thread Tools | |
|
|