
|
|
|
|||||||
 |
| Thread Tools |
 12/30/2017, 11:26 PM
|
#26 |
|
In Memoriam
Join Date: Jan 2004
Location: Huntington Beach, CA
Posts: 3,059
|
So you might be making a new sump too huh? Sounds like a cool project. If you waited 15 years an upgrade is warranted lol.
|

|

|
|
12/31/2017, 02:05 AM
|
#27 | |
|
Registered Member
Join Date: Oct 2014
Location: Toronto GTA,Canada
Posts: 1,763
|
Quote:
It's 55 Gallons... Here are the SUMP Build details. (Spent a long time designing) http://www.reefcentral.com/forums/sh....php?t=2570553 AND TESTING IT https://www.youtube.com/watch?v=WI_HJ9nDyc8&t=3s I built it oversized to handle both my OLD 65 Gallon and 90 Gallon Tank (just in case I ever wanted to join both tank into One Sump). So for the 110 Gallon Tank it will be fine. The Return-Pump-STOP Drain Quantity via Overflow is fine and no issue. The issue is the SeaSwirl over drain. (which a Siphon Break hole will fix). |
|
|
|
|
|
12/31/2017, 11:09 AM
|
#28 |
|
Registered Member
Join Date: Oct 2014
Location: Toronto GTA,Canada
Posts: 1,763
|
TODAY'S (Mini Project) RO System & Shelf Shift
For me this improvement is a Real Happy Moment, since I've stuggled with this problem over last year or so. HERE was the Problem:  Neighbour through out that Car (due to broken wheel hinge). I fixed it with a simple wheel screw. Was really handy to mix water in bucket and roll around. BUT I Couldn't get INTO SUMP Room. So MY ORIGINAL plan was to remove the Shelf and relocate. 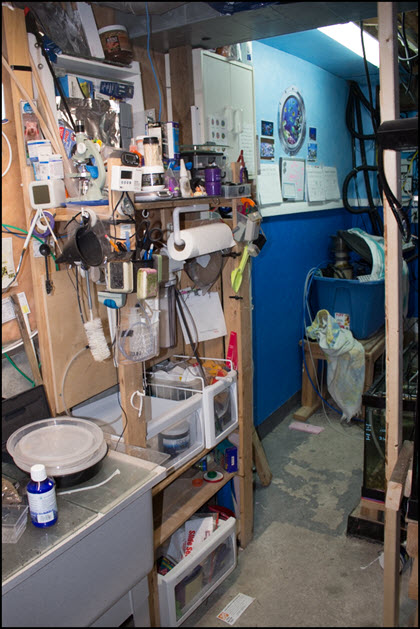 But after cleaning it up, I found out I could shift it back and 1.5" 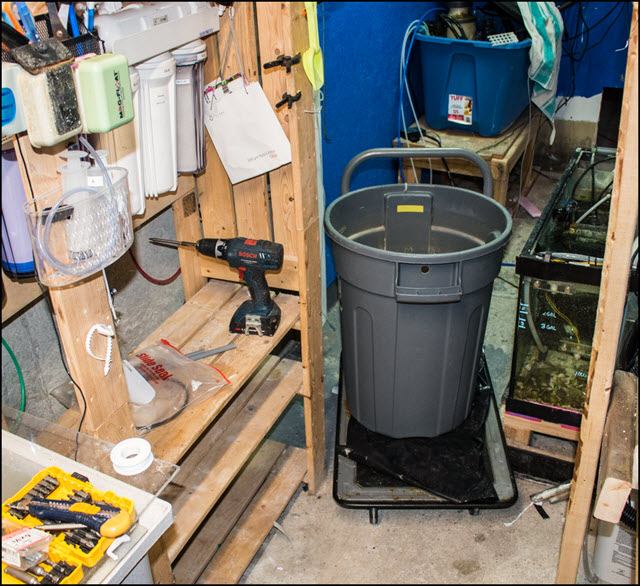 And now the CART with Bucket Fit's like a charm!!  So with Shelf all EMPTY.... I decided to install my Christmas Present (The MAX RO System) 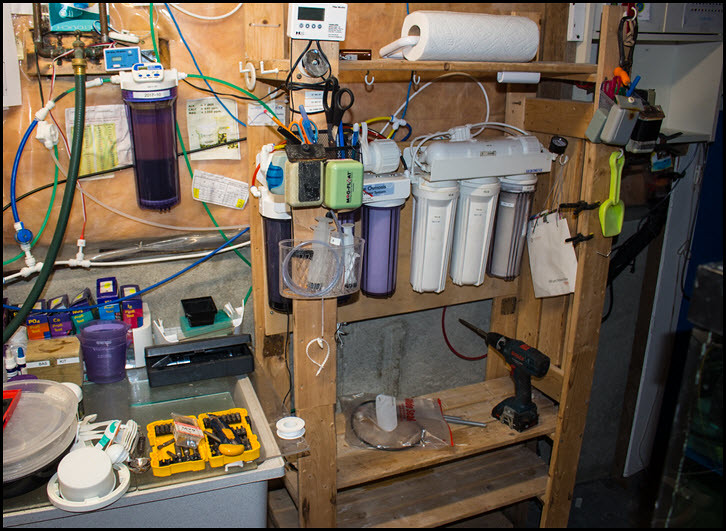 The new System will be for our HouseHold Water, while the OLD one will remain on Fish Tank (since it also has a DI Stage). 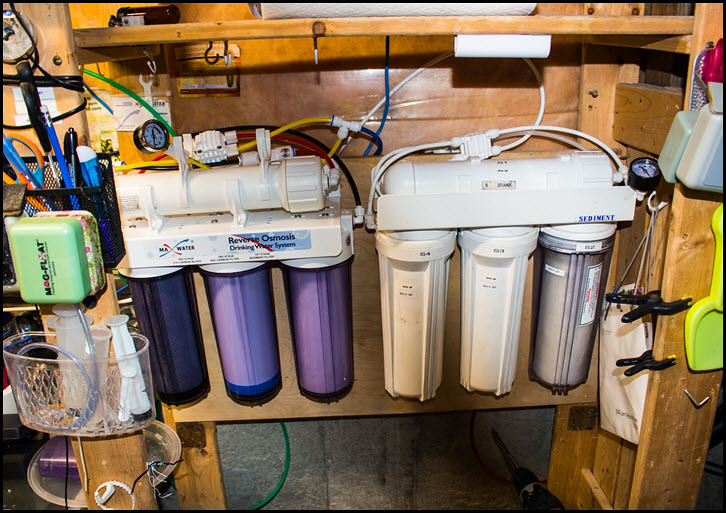 This will help simplify cartridge maintenance. PLUS the OLD RO Tank with OLD Tap will now give me flowing water in the SUMP room which I never had. I just had the RO reservoirs. 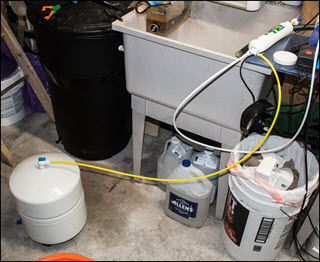 I've also Slept on my TANK Install Design, and figured out my STAND and Wall design. Coming up soon, it's really simple but SOLID. |
|
|
|
|
12/31/2017, 04:54 PM
|
#29 |
|
Registered Member
Join Date: Oct 2014
Location: Toronto GTA,Canada
Posts: 1,763
|
TANK FRAMING & STAND (Dream Design)
Yup, I slept and daydream about the Stand and Framing. Came up with something I didn't think of before. Total Flush-Wall install. The game changer is decision to use Plywood as a FRAME bottom. The STAND will be screwed into Frame. Kit of like a cabinet. Also came up with a Different STAND. Instead of 2x4's (Screw & Glue) like my other previous stands, going to consider 4x4 Deck Posts. (STUDY, Looks nicer) Here was the initial sketch before going to Home Depot. 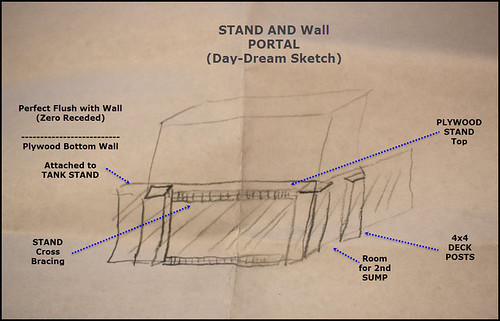 Found exactly the materials I needed for this. Had Depot do a rough cut on the MAPLE Plywood. This is the Material Mock up. FINAL CUTS will come later. 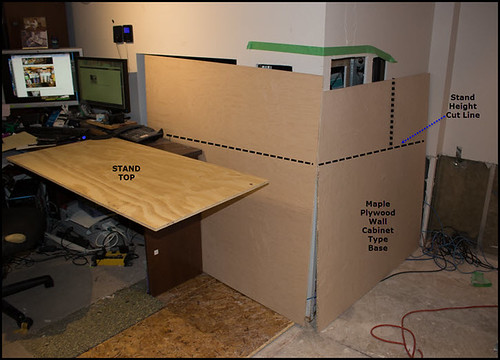 Got the Stand Materials too (DECK Post and 2x4, Screws). 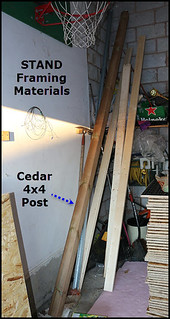 This is the DESIGN DIAGRAM 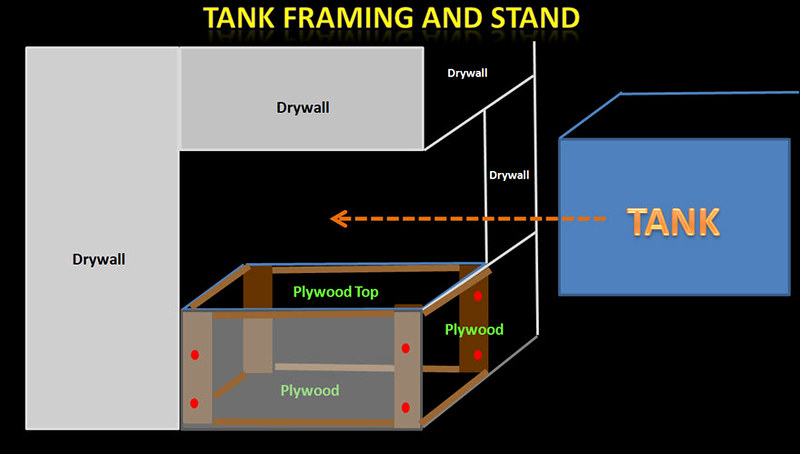 I have choices for later. -> I may stain Bottom Frame and do Matching Wood Trim to create a Virtutal In wall Cabinet Look (Or Drywall Wall look) -> I will make portal larger than Tank viewing area. -----> Tank will slide in from REC ROOM SIDE -----> Then enclosed with Hinged access Panels (LEFT,TOP,RIGHT) -> Height is flexible since no final cuts yet. -> I can go 100% FLUSH (0% Receeded) or slighting in wall. ------> The EURO REEF TOP will protect front wall from Salt Creep/Spills. -> May have room for Kitchen Sump (Partially hidden under stand) |
|
|
|
|
12/31/2017, 06:53 PM
|
#30 |
|
Registered Member
Join Date: Oct 2014
Location: Toronto GTA,Canada
Posts: 1,763
|
HAPPY NEW YEAR 2018 (Out-With-The-OLD.....In-With-The-NEW)
Few More Hours till 2018. I've pretty well left the OLD TANK to Rot. Basic Water parameters all fine. Like Christmas Bulbs burning out one by one, some of the Frags are Bleaching. Cyano patches here and there.  Today I lost my PACMAN which was one of my favourites and doing VERY well up last time I checked (Few days ago). Could be the fact that I never transferred over my T5 lighting. Could be that I haven't cleaned the Full Algae Scrubber. Could be that I didn't transfer all of my circulation pump. Could be shock of transfer. Too much Epoxy used. Could be nothing. Don't care anymore. THIS TELL ME one things about 2018++ and the NEW TANK BUILD. I want nothing to do with the OLD TANK and it's miserable past. Somehow, some way....I will make sure the new Tank is NEW...Inside and out.... (A "FULL" GENESIS restart) . -> Few days ago I added a bunch of Astrea Snails. -> I started minimal Vinegar dosing -> Will just let it do what it naturally will do, and prepare to move on to new tank. HAPPY NEW YEAR Everyone!! LOOKING FORWARD To a NEW Everything in 2018. |
|
|
|
|
01/01/2018, 11:33 AM
|
#31 |
|
Registered Member
Join Date: Oct 2014
Location: Toronto GTA,Canada
Posts: 1,763
|
WELCOME to (2018) My Resolution [ ** MORE PATIENCE ** ]
Hello and Happy New Year 2018. My New Years Resolution is to exercise more patience, and some degree of Restraint. I'm pretty sure the lack of both has been a contributing factor to my SPS failures. I've been accused of TOO MUCH TINKERING (which I Love). So BEFORE I touch a screw or piece of anything on the New Build, I'm going to Model and plan things properly. (To get the next 15 years done right) 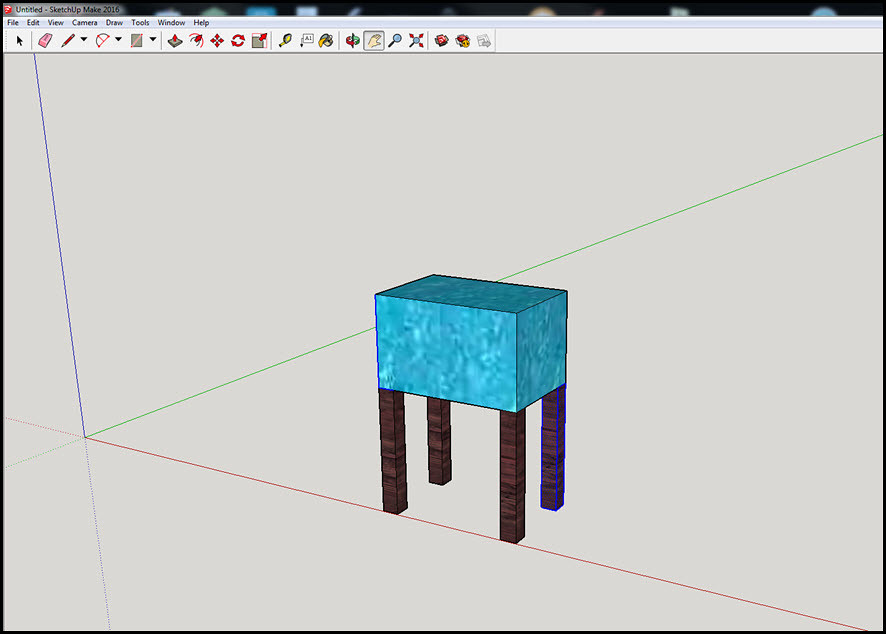 I started Learning Google SketchUP. It's really tough at the beginning, and the 3D model of (TANK and STAND Posts) above took me 2 hours to get right. But as you learn the tricks and proper 3D build steps it get's faster. The power of SketchUp is amazing. No harm in learning this too for some future 3D printing possibilities. This Modelling will allow me to brainstorm some possible ideas for the Virtual In-Wall Cabinet, and the SUMP Room Layout. |
|
|
|
|
01/01/2018, 01:18 PM
|
#32 |
|
Registered Member
Join Date: Oct 2014
Location: Toronto GTA,Canada
Posts: 1,763
|
CAREFUL (Easy) TEAR DOWN (Progress) Hanging Stud Support (Extra Protection)
I've pretty well done all the Easy Tear Down work (Inside and out) Biggest challenge is dealing with TWO RUNNING TANKS. ** A only NEW BUILD WOULD BE WAY EASIER ** INSIDE SUMP ROOM 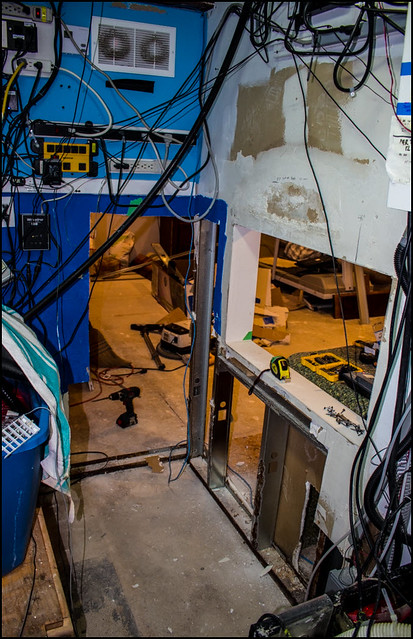 OUSIDE OFFICE/REC ROOM 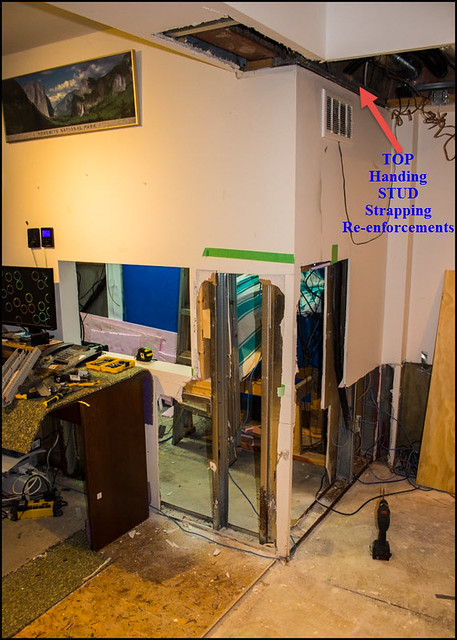 Before I cut all the STUD, I noticed the TOP remaining Stud could use some extra Hanging Support.  I just added some STRAPPING to the CEILING joices. ** PLENTY OF SUPPORT HERE.....That is the MAIN STEEL HOUSE BEAM ** No cost to add this since I'm just re-using the Steel Stud Pieces that I remove from SUMP room FRAME. THE NEXT HARD PART is Cutting the METAL STUDS. I did one, and they are razor sharp at edges. ** MUST BE CAREFUL with proper thick Gloves ** Then I need to protect the sharp exposed edges (somehow). |
|
|
|
|
01/01/2018, 01:46 PM
|
#33 |
|
Registered Member
Join Date: Oct 2014
Location: Toronto GTA,Canada
Posts: 1,763
|
What years of SALT Water Spills (will do to Metal Framing)
I didn't need to use the cutter in this area. Everything just crumbled. 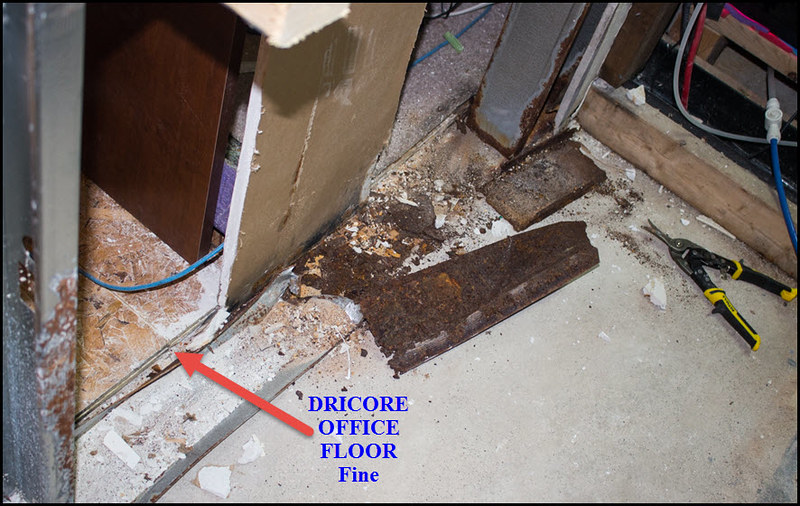 But the 15 year old DRI-CORE Flooring is perfectly intact and Fine. |
|
|
|
|
01/01/2018, 04:12 PM
|
#34 |
|
In Memoriam
Join Date: Jan 2004
Location: Huntington Beach, CA
Posts: 3,059
|
Everything is looking killer. Great well thought out setup. My OCD is counting the days until you redo your wiring

|
|
|
|
|
01/02/2018, 12:52 AM
|
#35 | |
|
Registered Member
Join Date: Oct 2014
Location: Toronto GTA,Canada
Posts: 1,763
|
Quote:
This de-construction Stuff isn't my thing, but I'm learning as I go along. Room Setup/Electrical-Electronic-Layout/ is my passion. This is What I did for the Sump Room back in 2014 (Plan is to make things even better this time, after learning dislikes using room for last 3+ years) 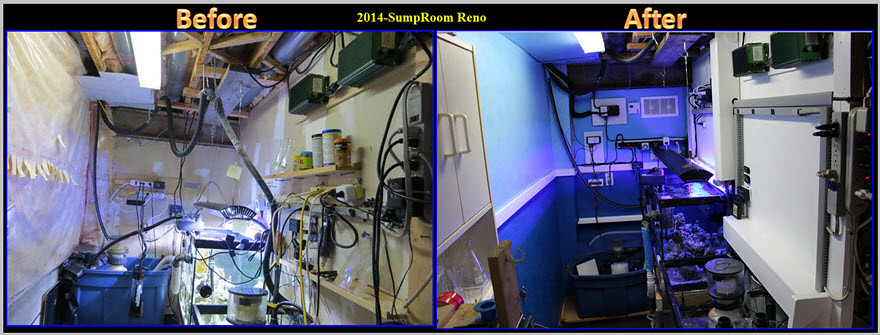 I learned that tight conduits are a pain for maintenance (ie removing a heater, pump, etc), so won't make that mistake this time. That last reno success was use of the White PVC Deck Posts, for A verticle Condiuit and a shelf. GOT THOSE POST at Home Depot on Clearance for $5 dollar each. Still have 4 left, and I'm sure I'll put them to good use.  I have all the Electrical parts for the Wiring work. New GFCI circuit since I've had a few Overload Trips (with Rec-room Lighting etc)  Soon as the Bad Walls are down, and things clean, I'll start the wiring. Things are going to start clicking together soon. The only delay is back to work tomorrow. Christmas break is over. |
|
|
|
|
|
01/02/2018, 11:07 AM
|
#36 |
|
Registered Member
Join Date: Oct 2014
Location: Toronto GTA,Canada
Posts: 1,763
|
NOTE OF CAUTION (ELECTRICAL WORK)
Before I move on I just want to make a comment on Electrical work. Water and Electricity is a DANGEROUS mix. Salt Water is even worse. Anyone reading this thread should not consult my BUILD as proper building code practices. Although I have a Degree in Electrical Engineering I do have a cousin who is a Certified Electrician that I will be consulting with to ensure I do things properly. I have visited some reefer tanks that don't install Ground Fault outlets since they sometimes falsely trip and disrupt tank operations. I am totally against that (Safety bypass), and (for Added Safety) all my tanks, sumps have Titanium (NOT COPPER) Grounding probes to Ensure GFCI outlets works properly. (I have experience proof that both GFCI and grounding is a must, since a Urchin once bit thru a 2 prong probe (no ground) heater cord....Exposed tank water to 120Volts, but did not trip GFCI protection. WHen I touched the water in sump I got a shock.....When I added the GROUND Probe the GFCI tripped). That convince me to have GFCI/Ground Probes everywhere on or near my Fish Tanks) I've also read on the Forums that some folks are against ANY Grounding probes since they can introduce currents drains into Tanks and inhabitants. I don't agree with the comments at all (regardless if true or not). Human safety outweighs a fish or snail. In my case I plan on overdoing Electrical Safety Standards since your life and your loved ones is at risk when you have your arms in Salt Water, during Equipment failure, a flood/spill.... and even worse standing on a concrete floor that is not insulated. Onward.... |
|
|
|
|
01/02/2018, 07:31 PM
|
#37 |
|
In Memoriam
Join Date: Jan 2004
Location: Huntington Beach, CA
Posts: 3,059
|
That urchin sounds like a jerk
|
|
|
|
|
01/02/2018, 08:45 PM
|
#38 | |
|
Registered Member
Join Date: Oct 2014
Location: Toronto GTA,Canada
Posts: 1,763
|
Quote:
Ever notice if you buy a quality pump like a HYDOR Koralia. They come with a coil ribbon that wraps (Teflon or something) which coil around the power cord (the part you put into the tank). CALLED A URCHIN GUARD, but applicable to any critter that may peck at the power cord. |
|
|
|
|
|
01/02/2018, 09:19 PM
|
#39 |
|
Registered Member
Join Date: Oct 2014
Location: Toronto GTA,Canada
Posts: 1,763
|
CREEPY (
 FREAK OUT TIME ) Behind Drywall Over TANK FREAK OUT TIME ) Behind Drywall Over TANKI started Cuting out the Drywall In SUMP ROOM (to prepare for Electrical and Plywood Panelling).  Didn't expect this. (Dried out from who know how many years ago)  We have Had about 2-3 occasions over last decade where we had a mouse family get into House. I thought I caught them all in Mouse Traps. Appears (These Young ones 3 in ALL) fell in from TOP of Ceiling and couldn't make it up the Slipper Metal STUDS. |
|
|
|
|
01/03/2018, 12:18 AM
|
#40 |
|
Registered Member
Join Date: Oct 2014
Location: Toronto GTA,Canada
Posts: 1,763
|
ALMOST BUILD TIME (SUMPROOM - TankFront-Wall - Purged and Ready)
This was probably the hardest work I've ever done (Mainly to keep both tanks running, and some distance limitations on power Cords/Apex temp probe/ph-probe). A solution was to hand both Apex EB8's off the CELING. and hand some power cords of the Lighting Fixture hooks.  The Front Wall is ready for build up/Electrical. Far Right NEW TANK Exposed side is NEXT.... (Not much work) just shift things up. NOW I NEED TO THINK ABOUT STAND HEIGHT, and will post some details about my options next. |
|
|
|
|
01/03/2018, 02:28 AM
|
#41 | |
|
In Memoriam
Join Date: Jan 2004
Location: Huntington Beach, CA
Posts: 3,059
|
Quote:
|
|
|
|
|
|
01/03/2018, 07:54 AM
|
#42 | |
|
Registered Member
Join Date: Sep 2000
Location: Waukesha , WI
Posts: 4,998
|
Quote:
__________________
David Polzin |
|
|
|
|
|
01/03/2018, 09:50 PM
|
#43 |
|
Registered Member
Join Date: Oct 2014
Location: Toronto GTA,Canada
Posts: 1,763
|
STALLED!! (In Deep Thought) THIS WALL MUST BE (Perfect)
I put up the Supporting Board for the Floating Wall above tank and stalled.  STALLED!! (In Deep Thought) since THIS WALL MUST BE (Perfect) Been staring at it (For 1.5 hours) with my Tablet on Ladder with Photo of OLD SUMP ROOM Setup. This wall is the most important piece of the Sump Room since the CENTER OF OPERATION (from Above) (Safely above tank BUT.... must be within Cord reach AND Hand Reach Access/Tank access/Lighting Options and MOST IMPORTANT Maintenance) ....One of my 2nd greatest mistakes/oversights of last renovation (Not terrible mistake, just not ideal). THE #1 mistake last build (was the access to clean Tank GLASS). That I will get 100% right this time. I have lots of ideas while staring at wall: -> Hinged Access Panels -> Conduits for Wiring, Plumbing possibilities -> Extra Storage Space Shelving (within wall) ** NOT FOR MICE **-> Many, MANY other Options/Possibilities. Wish I had the tank already, but I can't wait that long. So I need to build something flexible, adjustable, and modifiable for the future. Thinking on how to do things right. Can't rush, since this is for the next 5-10+ years or more. Last edited by Wally.B; 01/03/2018 at 10:01 PM. |
|
|
|
|
01/03/2018, 10:15 PM
|
#44 |
|
Registered Member
Join Date: Oct 2014
Location: Toronto GTA,Canada
Posts: 1,763
|
Staring helps.......
But writing these posts and posting my photo's helps too. It just hit me. The NEW TANK will be 24" deep, not 18" like old tank. THAT CHANGES a Lot . (from last TANK setup) ----> The lights will be 3" further from wall (CENTERED ON TANK). -----------> Good thing about that is more space Behind Center MH fixture!! ----> Also means cords will need farther reach to get to back wall for pumps ----------> THUS RIGHT SIDE WALL will be just as important (FOR TANK, NOT SUMP...on LEFT SIDE) -------------------> I need to NOT co-located the TWO APEX EB8's (One on Back Wall, One on Side wall) hmmmmn.....I just need to build flexibility. I'll never get things right till tank is in place (IMPOSSIBLE). |
|
|
|
|
01/03/2018, 11:44 PM
|
#45 |
|
Registered Member
Join Date: Oct 2014
Location: Toronto GTA,Canada
Posts: 1,763
|
EUREEKA (BINGO - Solved the ORIGIN of Wiring Mess/Problems)
** THINGS ARE GOING TO BE GOOD. EASY PEASY *** I've been banging my head what went wrong with my LAST SUMP ROOM RENO.  I was all good when I did original did the SUMP ROOM RENO. I NOW REMEMBER WHAT HAPPENED after 2014 -[#1] ---> AFTER THE BUILD (2015) I got a 2nd (USED APEX Classic) for Kitchen tank. -[#2] ---> Built new SUMP (2016) ** AND I Swapped SUMPS (LOCATIONS) ** That made all the wiring DISTANCES to APEX's offset, and things didn't reach. SO I have to patch, and use extension cords, Apex Display Extender, etc *** SOLUTION is SIMPLE for this SUMPROOM-RESET/REBUILD **** MOVE APEX closer to SUMP and NEW TANK. This will be easier than I thought. I can start building now...
|
|
|
|
|
01/04/2018, 01:11 PM
|
#46 |
|
In Memoriam
Join Date: Jan 2004
Location: Huntington Beach, CA
Posts: 3,059
|
Well you could have just made a bigger sump that reached closer to the Apex -- But then again that's how I get people in trouble.
|
|
|
|
|
01/04/2018, 10:17 PM
|
#47 |
|
Registered Member
Join Date: Oct 2014
Location: Toronto GTA,Canada
Posts: 1,763
|
Some Progress (SumpRoom ABOVE-TANK WALL) SECURE & Flexibility Design
This may not seem like much progress, but it is.  Now that Wall is Secure to Ceiling and Really Secure at Left Corner (Steel Bream) ....I can cut off Bottom Stud/and Old Frame Portal The spacing is for future "TIDY but Easy Pull-OUT" Wiring Concept (Wire Tucking into Wall) |
|
|
|
|
01/05/2018, 12:05 AM
|
#48 |
|
Registered Member
Join Date: Oct 2014
Location: Toronto GTA,Canada
Posts: 1,763
|
OOPS (Small Tank Design Problem) Not a big issue (OVERFLOW Position From Tank Front) DRYWALL Alignment
After doing the TANK FRONT Wall, I noticed a small Tank Design problem. ALL was fine with original plan!! Till I change my plan (and now am receding tank fully into WALL // Perfectly Flush will Wall on Office side) THE GREEN areas in diagram is the DRYWALL  The External Overflow Box (Starts 4" away from Tank Front). Matching the 4" EuroTop Trim. OVER THE TANK is (no issue at all, since I have plenty of space above tank) The issue is the Wall beside the Tank. It will stick out and not be flush with the overflow (1/2" overlap). Plus I notice now that the 1/2" drywall at front of tank will take away from Overflow Access/Cleaning Space. I can cut away more of the STUD/DRYWALL to compensate. I just emailed MIRACLE AQUARIUMS to see if that part of tanks hasn't been done/cut YET, and if OVERFLOW can be reduced by 1/2" from the FRONT SIDE OF TANK. Last edited by Wally.B; 01/05/2018 at 12:30 AM. |
|
|
|
|
01/05/2018, 10:26 AM
|
#49 | |
|
Registered Member
Join Date: Apr 2003
Location: Mtl. Canada
Posts: 7,824
|
Quote:
I always love seeing this before and after. Its amazing. I wish this was my passion, too.. sadly, it aint. That overflow issue doesnt look too serious.. dont you think youll still be able to access the box from the sump room side?
__________________
Matt. Current Tank Info: 53x32.5x26 190g dt 60g of sumps 3 tank-100 gal frag system 6xAI prime 8xt5. 4x maxspect gyre. Skimz Dual internal sicce pump skimmer Deltec PF601s ca rx+Kalk stirrer |
|
|
|
|
|
01/05/2018, 11:36 AM
|
#50 | |
|
Registered Member
Join Date: Oct 2014
Location: Toronto GTA,Canada
Posts: 1,763
|
Quote:
Have no worries about not being the most proficient with a hammer and saw thing. We all can't be Jack of all trades.... ...You are a MASTER when it comes to Aquarium & SPS care. I wish someday to be half as good as you. On that thought. It's still quite too soon but I am thinking what to do when I have the NEW Tank. The frags in old tank are doing terrible (mostly neglect) and pure lack of care and attention. The only good thing about them is coralline is overgrowing FRAG dead parts. One downside is I have some CYANO, SLIME, and possibly a tiny few Cells of DINO. (Dino is only at microscope level, so not a outbreak or anything visible to human eye). I am thinking... REUSE/REFRESH: --> Clean/DIP the rocks and salve some of the frags and move things over (including some of the same water)? --> Just add the SUMP to new Tank AS IS (with a light cleaning) to keep a portion of the biology, sponges, etc. FULL RESTART --> Or really start the NEW Tank Fresh --------> Do a full clean of SUMP --------> All new Water (tiny bit come over from film on rocks and in sump coated equipment) --------> Really purge the rocks (Bayer DIP), scrap the Frags (into Frag tank) --------> Go Fish only for a while till tank stabilizes (With minimal low level lighting) --------------> Build up a Fish Stock with ability to Treat/QT --------> Then after a few months of stability (start some select Frags) --------> Maybe, MAYBE give up on MH lighting (and go T5/LED) --------> Change out EUROreef Skimmer with the RLSS DB8i sitting on shelf (made for larger bio-load) For the 2nd option I'll need some help how to do best. Last edited by Wally.B; 01/05/2018 at 11:42 AM. |
|
|
|
|
|
|
|


