
|
|
 02/18/2010, 07:50 AM
|
#101 |
|
Registered Member
Join Date: Aug 2001
Location: Wayne PA
Posts: 692
|
Mike, here is the part of Sanjay's thread where he starts cementing and the rock an using PVC to build the columns:
http://www.reefcentral.com/forums/sh...730564&page=26 I forgot he used some Thorite to cement some of the rocks together. I have seen his tank in person many times, and the rock columns are holding up with no issues. |

|

|
|
02/18/2010, 11:22 PM
|
#102 |
|
Registered Member
Join Date: Feb 2003
Location: geelong, australia
Posts: 111
|
sorry if this has been covered, i cant see it.
just out of curiousity, what are the dimensions of a "DD"? your old tank looked great by the way. Damien |
|
|
|
|
02/19/2010, 09:37 PM
|
#103 |
|
SPS Slave
 Join Date: Aug 2003
Location: Richmond, VA
Posts: 3,388
|
PSU Appreciate it, Rob. I'm gonna talk to Joe tonight about some substrate. He told me he can get some bulk sand in several different grades, I'll probably go with something in-between the CC, and Fiji Pink.
Leonardo Thanks Leonardo. We have read your threads with great interest and respect. We are looking forward to working on the rock this weekend! RichK Thanks a lot for the link Rich - Gonna have a look at that for sure. What is thorite? Don't think I've heard of that before. damer Damien, thanks for the compliment! The dimensions on the "deep dimension" are 72x36x27. raymorris Thanks Ray! Nice to have you along!  Got some good news guys!! Wait for it....  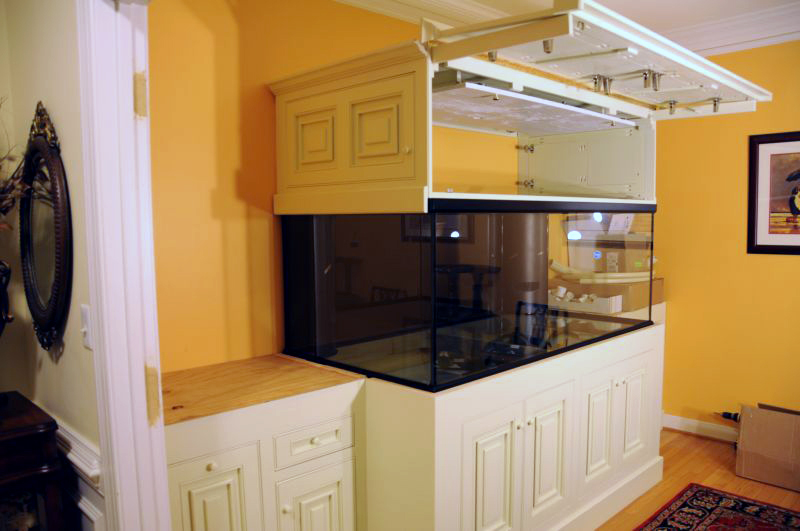 WEEE HOOOO! We brought the BIG OL' DOUBLE D into da house last night!  Next up, drill the holes for the closed loop, and the extra b/h in each overflow. Then we can start on plumbing in the CL and drains.
__________________
- Mike & Terry "Less technology, more biology ... indeed." - Gary White Current Tank Info: 200g temp garage tank Last edited by Dino; 04/20/2013 at 04:53 AM. |
|
|
|
|
02/21/2010, 05:37 PM
|
#104 |
|
Registered Member
Join Date: Jan 2004
Location: Findlay, OH
Posts: 216
|
 Nice!! Nice!!
__________________
Living vicariously via reefcentral! Current Tank Info: :( Had to tear down all my tanks due to a move... |
|
|
|
|
02/21/2010, 05:41 PM
|
#105 |
|
Reef Keeper
Join Date: Oct 2001
Location: New Jersey
Posts: 1,346
|
Whats going to sit on top of the cabinets next to the tank? It looks like blank plywood now.
__________________
- Jim |
|
|
|
|
02/21/2010, 09:53 PM
|
#106 |
|
SPS Slave
Join Date: Aug 2003
Location: Richmond, VA
Posts: 3,388
|
knpjdad Thanks!! it's starting to come together.
JazzMan The quartz countertop is going to cover each end of the extended stand, and wrap around the front of the tank as well. We're going with the darker one on the left: 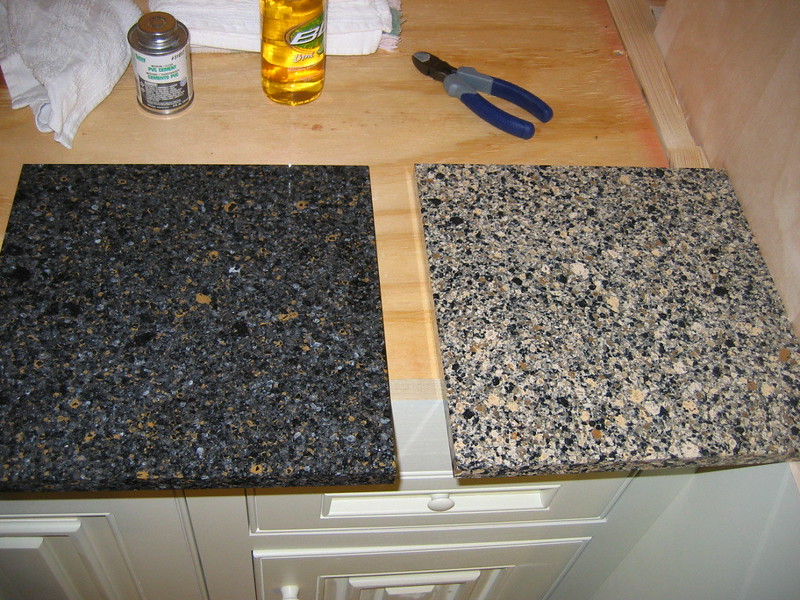 So in between meetings for work (we've got a big conversion this weekend), and trying to keep up with the Olympic games, we've been working on the plumbing. The stock Marineland 300DD comes with two pipes (pre-cemented to 1" bulkheads) for placement within the overflow. One of them is essentially a 1.5" Durso standpipe, and the other is a 1" line for the return. They also throw in some 3/4" locline with a Y fitting: 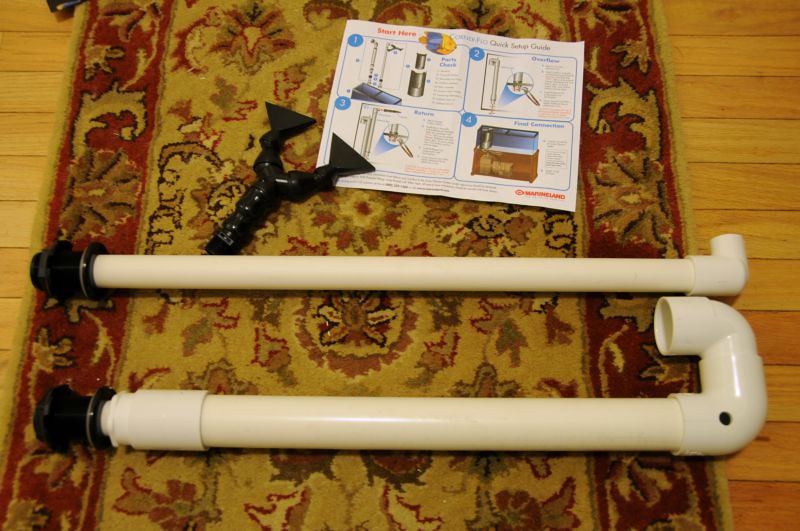 The pipes seem well made. You can see they drill siphon-break holes in both, and there is a little air line "straw" in the top of the durso. I don't necessarily like the fact that all the pieces are cemented together, because I occasionally like to take durso's apart for cleaning, or when something unexpected happens. We are going to drill a third 1" bulkhead in the overflow (there's plenty of room in there for a 3rd hole). So we'll be using a 1" herbie (submerged full siphon) drain, the stock durso pipe, and the return pipe. Tonight, I was putting the drain plumbing together... This particular fitting is for the herbie drain line. It will come out of the 1" bulkhead with spa flex connecting to a 1" TUBV, then immediately adapt up to 1.5" spa flex and into the 2" wye for the main drain down to the remote sump. Here is a shot of the 1-to-1.5 adapter: 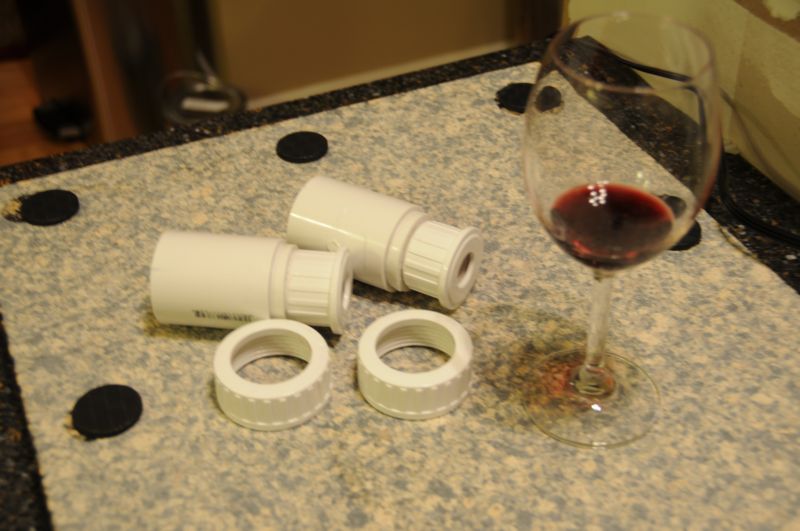 Let's have a quiz!! This is: 1) just the way it's supposed to work 2) wait a minute, something doesn't look quite right 3) oh boy, you just wasted an hour and $20 worth of parts 4) the wine was really good and we can always use more practice with PVC 5) thats some strange looking telescopes you got there son
__________________
- Mike & Terry "Less technology, more biology ... indeed." - Gary White Current Tank Info: 200g temp garage tank Last edited by Dino; 04/20/2013 at 04:54 AM. |
|
|
|
|
02/22/2010, 12:02 PM
|
#107 |
|
Registered Member
Join Date: Jun 2009
Location: Richmond, VA
Posts: 449
|
I vote for #4!!!!! The wine was really good.......wait, what was the question???
__________________
Chuck and Milissa Current Tank Info: 150 gal with 40b sump/fuge |
|
|
|
|
02/22/2010, 12:17 PM
|
#108 |
|
Registered Member
Join Date: Sep 2005
Location: Montclair, NJ
Posts: 1,046
|
been there before!
 That there is a #3, son! LOL That there is a #3, son! LOLStupid union connections... 
|
|
|
|
|
02/22/2010, 02:14 PM
|
#109 |
|
Registered Member
Join Date: Jan 2007
Location: mid west
Posts: 397
|
whoops.............forgot to put the union piece on before gluing!!!! Been there and done that on my build. One more trip to lowes!!!!
__________________
265gal starfire, 90 gal. sump, 70gal. frag tank, 40gal. QT tank, Vertex Alpha 300 Cone Skimmer, calcium and kalk reactors, 5- tunze 6105's, 7069 controller, Apex, 3-400watt radiums w/galaxy ballasts in lumenbright larges, 2 super actinic VHO's Current Tank Info: 265gal starfire, 90 gal. sump, 70gal. frag tank, 40gal. QT tank, Alpha 300 Cone Skimmer, Geo 618 calcium and kalk reactors, 5- tunze 6105's, 7069 controller, Apex, 3-400watt radiums w/galaxy ballasts in lumenbright larges, 2 super actinic VHO's |
|
|
|
|
02/22/2010, 04:25 PM
|
#110 |
|
Registered Member
Join Date: Aug 2001
Location: Wayne PA
Posts: 692
|
Mike, the tank looks awesome on the stand! Canopy looks great too. Really looking forward to the finished product for sure!
|
|
|
|
|
02/24/2010, 07:21 PM
|
#111 |
|
Premium Member
Join Date: Apr 2003
Location: Chesapeake VA
Posts: 399
|
yep I've been there done that, just chock it up to the wine being a little more expensive than you thought. The real problem is you never notice it until they're both done.
__________________
Mike Current Tank Info: Currently tankless planning ~90G nano |
|
|
|
|
02/27/2010, 06:12 PM
|
#112 |
|
SPS Slave
Join Date: Aug 2003
Location: Richmond, VA
Posts: 3,388
|
You guys are sharp! Eagle eyes, I'm sayin!
More plumbing progress. The tank still hasn't been drilled, but LFS delays with this project have become the norm rather than the exception  So rather than continuing to wait, we went ahead with the drain and CL plumbing, trying to get as far as we can before we have all the holes drilled and the B/Hs in place. Today, we worked on getting the return line "distribution bar" in place, as well as dry fitting all of the drain line connections. The two stock holes in each overflow are going to be used for the return and for the herbie drain. We'll drill a third hole in each overflow to be used for the emergency durso drain. We have continued to play around with how the tank drain lines are going to merge into the main drains running down to the sump. Remember, we're putting the herbies into a 2" drain, and the dursos into a 1.5" drain. The return is a 1" line that we're splitting with a T fitting and up through the overflows. Here's some pics of the dry fitting we've done thus far: This first one shows the herbie lines connected up and the return line: 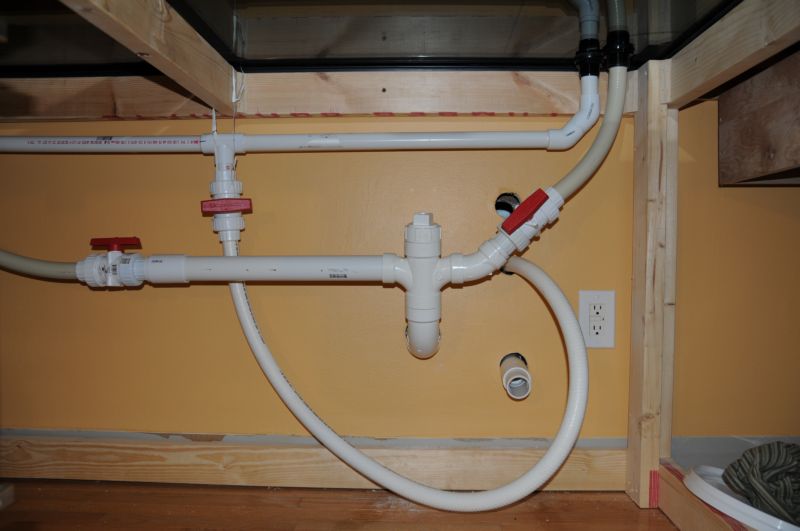 And here's looking to the left side a bit: 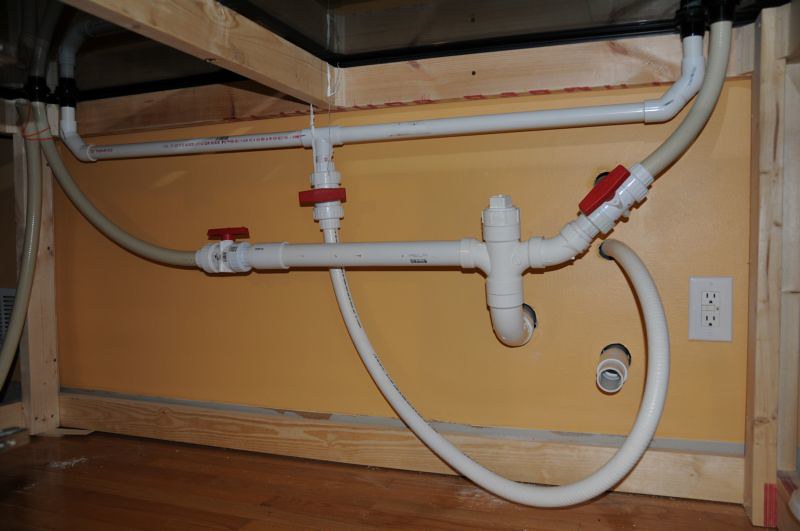 Next are the durso open channel/emergency drain lines: 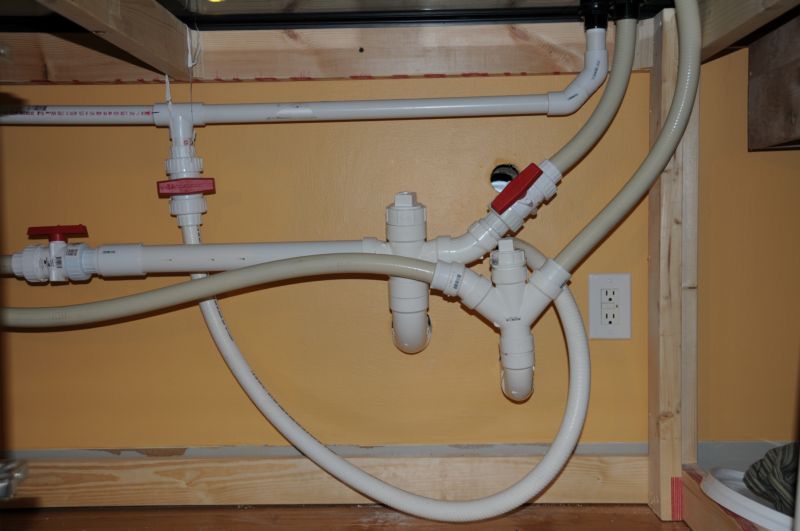 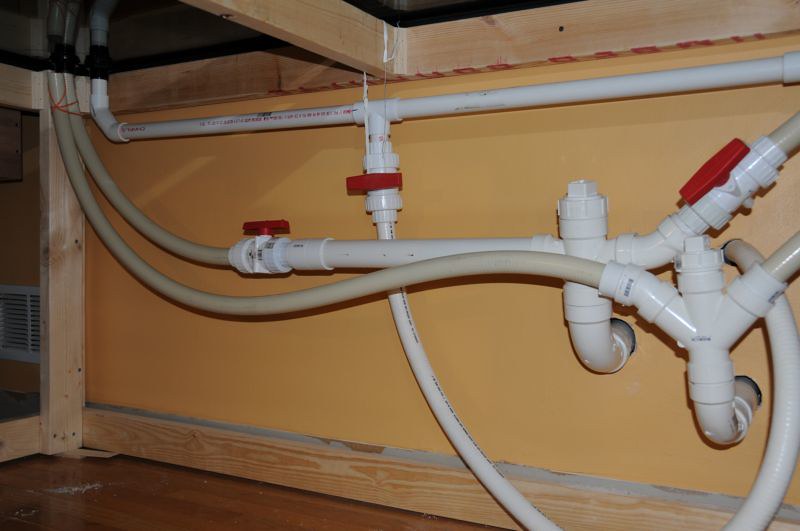 Here are the CL outlet lines all prepped. No sense in trying to size them exactly until the holes get drilled and we can play with the placement: 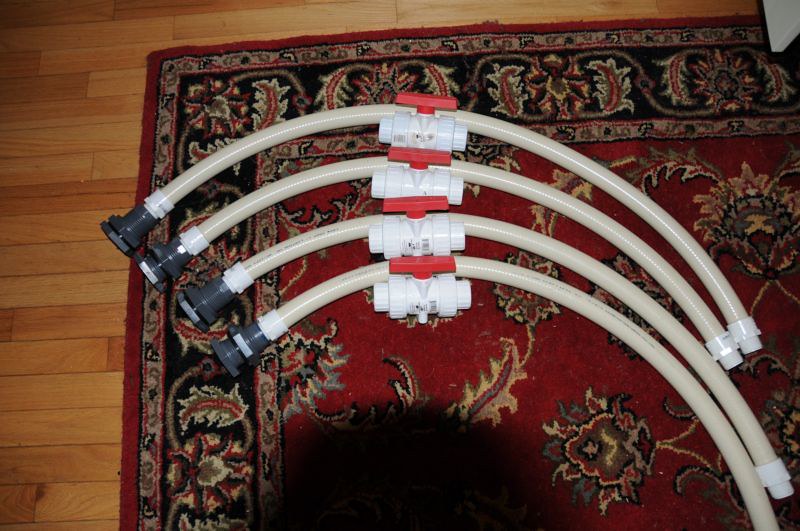 We're still not exactly sure where to place the TUBVs for each of these CL outlet lines. Closer to the Ocean Motions4 would be better for reducing strain on the B/Hs, but it will get crowded around the OM4 with all of them sprouting out in all directions! Need to play around with this a little bit... Also, there's a minor update on the light rack. We have been talking with the EZTube folks. They had some suggestions on how to improve the design, so we worked up a new drawing which will have them creating a more customized unit that will cradle each reflector more precisely. Here's the revised design drawing: 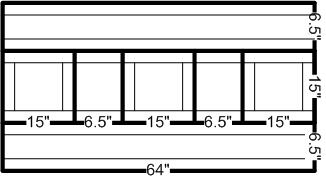 Hope we get some drillin' going soon! 
__________________
- Mike & Terry "Less technology, more biology ... indeed." - Gary White Current Tank Info: 200g temp garage tank Last edited by Dino; 04/20/2013 at 04:55 AM. |
|
|
|
|
02/28/2010, 12:22 AM
|
#113 |
|
Registered Member
Join Date: Dec 2005
Location: Canada
Posts: 1,578
|
I hope somebody warned you not to use ball valves on the herbies. You should have used gate valves. Not the end of the world...but if you can still change it, I would recommend doing so.
__________________
Fishlist: Tangs: Yellow, Vlamingi, Blonde Naso, Unicorn, Atlantic Blue Others: Maroon Clown(s), Foxface, Majestic Angel, Hawkfish and more.. Current Tank Info: 400gal Envision Acrylic reef started 04/07 |
|
|
|
|
02/28/2010, 09:12 AM
|
#114 |
|
SPS Slave
Join Date: Aug 2003
Location: Richmond, VA
Posts: 3,388
|
Thanks, UT.
Do the box stores carry 1" gate valves?
__________________
- Mike & Terry "Less technology, more biology ... indeed." - Gary White Current Tank Info: 200g temp garage tank |
|
|
|
|
02/28/2010, 09:56 AM
|
#115 |
|
Team RC Member
Join Date: Jul 2005
Location: houstonia
Posts: 7,989
|
I've not seen 1" PVC gate valves at the HD or lowes personally. I've always had to buy them online, such as www.savko.com.
__________________
-Chris- You don't win friends with salad. "Look! They're trying to learn for free!" ... "Use your phony guns as clubs!" Current Tank Info: rectangluar? wet? |
|
|
|
|
02/28/2010, 01:53 PM
|
#116 |
|
Coral Curmudgeon
Join Date: Dec 2001
Location: western NC
Posts: 1,663
|
If you are doing the BeanAnimal or Coast to Coast style - the gate valve is not needed Mike. The Herbie IS much more sensitive, and gate valve will be needed for ease of adjustment
T
__________________
No....really honey, it was a gift! Current Tank Info: 700 gallon combined reef/frag systems - 650gal Cichlid system |
|
|
|
|
02/28/2010, 09:20 PM
|
#117 |
|
SPS Slave
Join Date: Aug 2003
Location: Richmond, VA
Posts: 3,388
|
crvz Thanks for the link, Chris. I ordered the gate valves (and a few other goodies) from them today.
teesquare Yep, you convinced me Tee. The gates are pretty cheap from Savko, so I'll just be patient and put them in. OK some good news on today's update. The LFS came last night and we did some drilling! Big Joe has an awesome portable drill press. This thing is the shizzle! And diminutive Joe is a total expert at operating it. First, we lifted the tank off the stand and flipped it over GRUNT! and then lil' Joe climbed up and drilled the third 1" hole into the overflows: 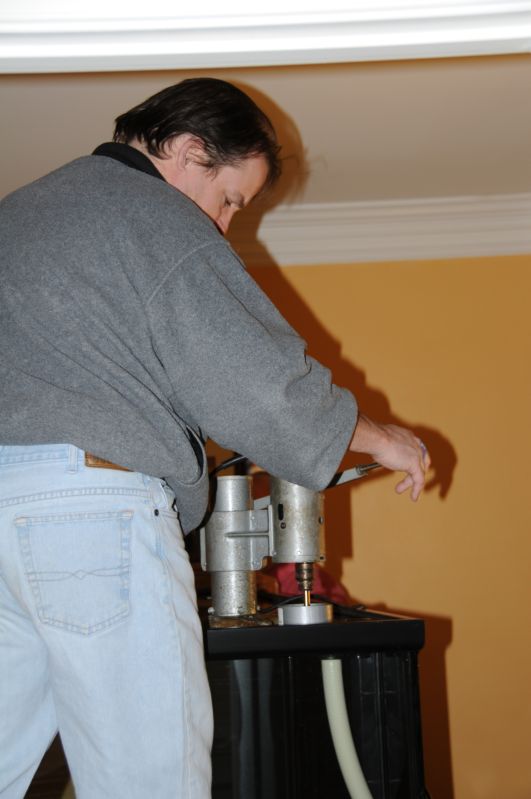 And here's how it turned out. The pic doesn't do it justice; Joe did a better job than the factory did. In case you guys are wondering, the bottom plate of the 300 DD is 3/4" thick! 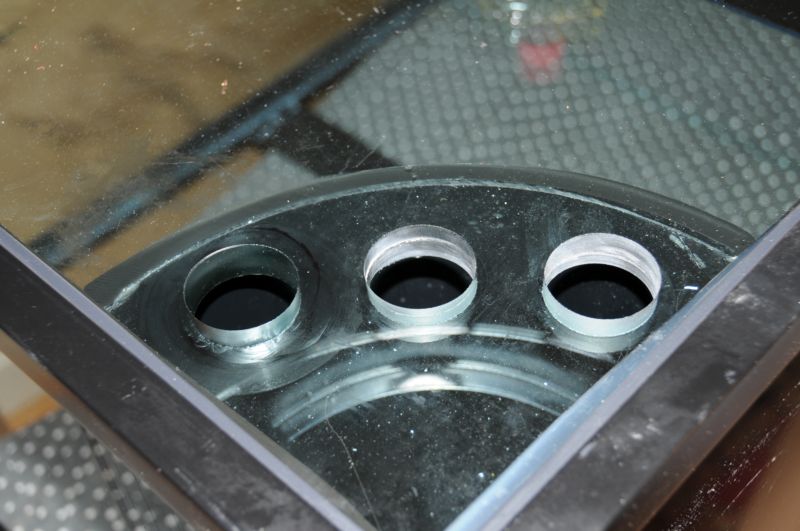 We then flipped her back over, put her back on the stand HEAVE HO!, and drilled the 4 CL outlet holes. Joe had a brand new diamond hole saw bit for his drill press... You'll need an over-sized bit if you are using the Hayward Industrial Bulk Heads. These things are huge, and require larger holes in the glass than typical bulkheads: 1.0" B/H = 1.87" hole 1.5" B/H = 2.37" hole 2.0" B/H = 3.25" hole In fact, the 2" B/H is so big, we coined it the Seaworld Bulkhead , Joe doesn't have a bit large enough to cut the hole. So we're waiting for a new bit to be located. Anyway, here's how the left side looks now from underneath with the three holes and connections all made - You can see the new CL outlet bulkheads in there: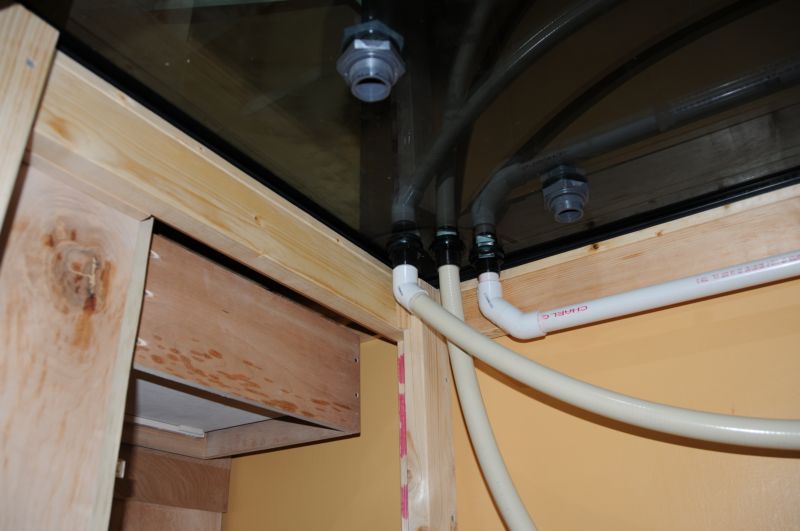 And here's a look at the right side: 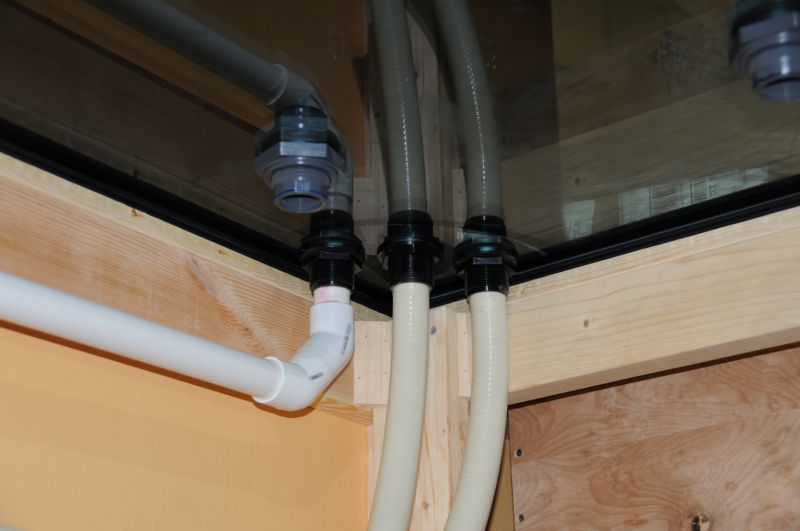 With the progress we've made this weekend, we felt like we were ready for the obligatory mermaid pics  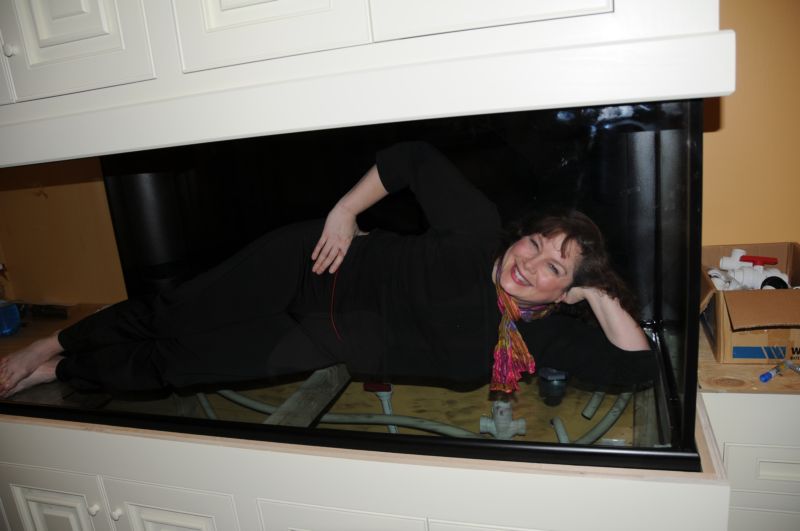 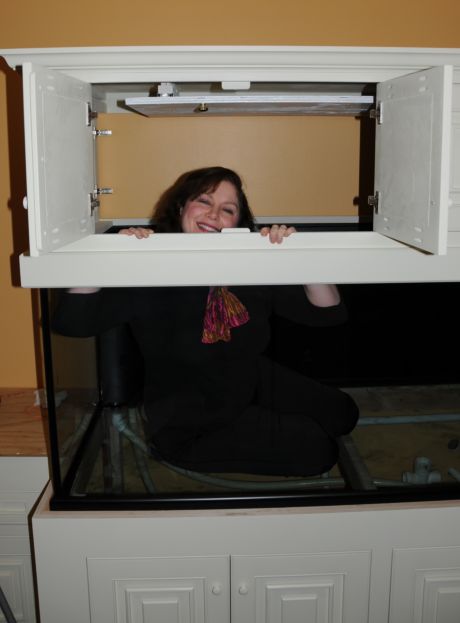 Thanks for all the help and support so far guys!!
__________________
- Mike & Terry "Less technology, more biology ... indeed." - Gary White Current Tank Info: 200g temp garage tank Last edited by Dino; 04/20/2013 at 04:56 AM. |
|
|
|
|
03/01/2010, 05:56 PM
|
#118 | |
|
SPS Slave
Join Date: Aug 2003
Location: Richmond, VA
Posts: 3,388
|
Quote:
 Here's a pic from that thread that is just fantastic - very much like the effect we are shooting for with the "corkscrew" effect:  We'll head over to Lowe's and see if they have any of that hydraulic concrete mix. Oh, Terry snapped a nice pic of the Regal today. She's getting very antsy to go for a swim in her new home under construction! 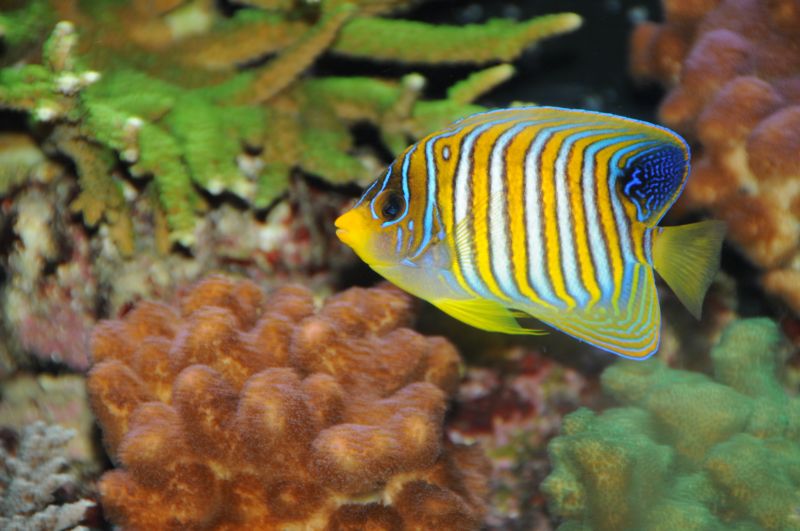
__________________
- Mike & Terry "Less technology, more biology ... indeed." - Gary White Current Tank Info: 200g temp garage tank Last edited by Dino; 04/20/2013 at 04:57 AM. |
|
|
|
|
|
03/08/2010, 09:15 PM
|
#119 |
|
SPS Slave
Join Date: Aug 2003
Location: Richmond, VA
Posts: 3,388
|
We haven't forgotten about the build thread, I promise.
Been busy with work again and had some friends in from out of town this past weekend, so that's slowed us up a bit on the progress. That hasn't stopped everything though! The quartz installer came and built the template for the tank stand. This guy is a real pro. Very helpful, dependable, and knows his stuff. He advised that we would need to raise the tank up on the stand about 1.5" so that the quartz can fit flush against the bottom of the tank. The reason is that the Marineland 300 DD has a curved bottom brace/surround (i.e., it is not a flat piece of plastic all the way around, it has more of a curved shape bottom-to-top, more like a piece of shoe molding does). So we lifted the tank off the stand, and put another 2x4 all the way around the top of the stand. Any how, two more days later, the quartz countertops were installed: 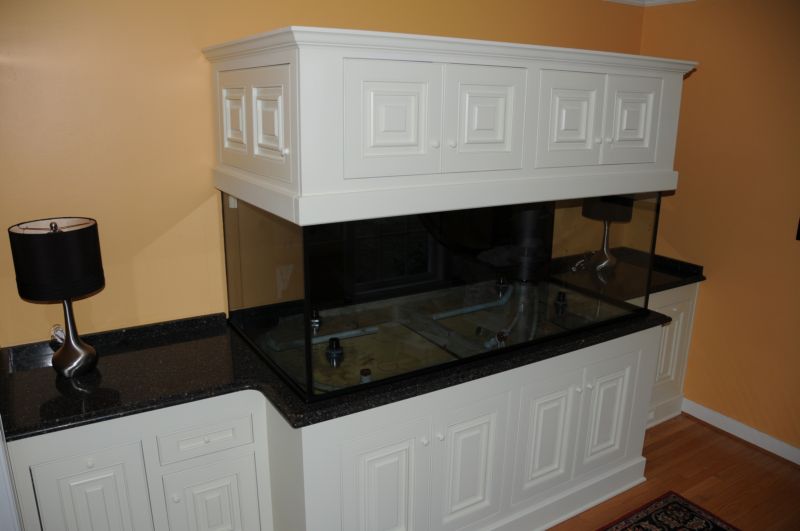 The last two nights, we've been working to finalize the drain line plumbing since we've got all the overflow holes completed, and everything is now in its proper place. We like to let the spa flex connections dry a full 24 hours before putting any strain on them, so it takes a few days to get everything completed...getting real close to having that all complete. We'll post a few pics of that once everything is in place. We also started playing around with the CL plumbing this evening; dry fitting the connections for now to see where things are going to best fit... Stay tuned!
__________________
- Mike & Terry "Less technology, more biology ... indeed." - Gary White Current Tank Info: 200g temp garage tank Last edited by Dino; 04/20/2013 at 04:57 AM. |
|
|
|
|
03/08/2010, 09:23 PM
|
#120 |
|
Registered Member
Join Date: Aug 2001
Location: Wayne PA
Posts: 692
|
Looking good Mike. Getting closer
|
|
|
|
|
03/09/2010, 02:54 PM
|
#121 |
|
Registered Member
Join Date: Jan 2010
Location: Lincoln, NE
Posts: 298
|
I've been watching for awhile, great build! At first I was thinking that you should have gone with the lighter stone due to the white cabinetry but seeing it I think you made the right choice with the darker one. It just works seemlessly with the black background of the DD and draws your eye to the tank. Once again, beautiful work on the entire presentation!
Last edited by BennyFrank; 03/09/2010 at 03:07 PM. |
|
|
|
|
03/09/2010, 09:33 PM
|
#122 |
|
SPS Slave
Join Date: Aug 2003
Location: Richmond, VA
Posts: 3,388
|
RICHK Thanks a lot, Rich. It is exciting to see it getting close to the "wetness" stage!
BennyFrank Thanks BF! We really did wrestle with the quartz choice. We were even asking folks who were dropping by the house which they preferred, and much like the opinions on here, it went both ways. I agree with you though, that the contrast is really nice. Some progress tonight. The big box from EZTube came today. The kit was very well packaged. Most of the parts were wrapped up individually, or with packing paper in-between. And each bundle was strapped. Here's the parts all laid out after un-boxing: 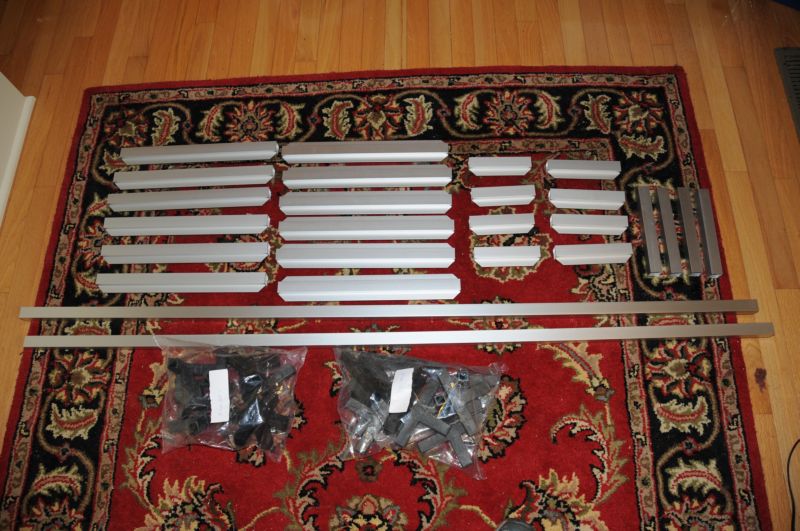 The assembly was a snap. It just takes a while to piece everything together. I made a few mistakes and had to pull some stuff apart and make corrections. But I think we're looking good so far. The Lumenmax Elites fit into the frame like a glove!!  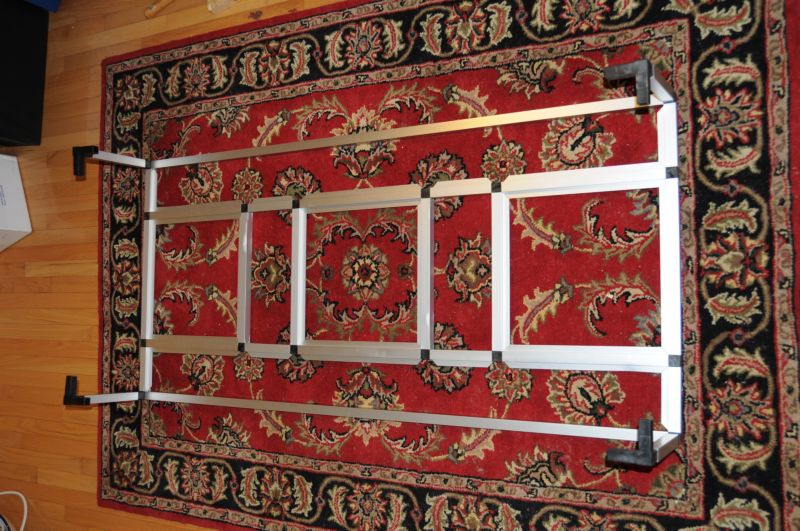 You can see we've got 4 pieces missing - the "top of the rectangle". I dropped an email to our sales rep and expect he'll ship those out tomorrow. Mark Warner over there is great to deal with - and the products are very precisely manufactured. Highly recommended!
__________________
- Mike & Terry "Less technology, more biology ... indeed." - Gary White Current Tank Info: 200g temp garage tank Last edited by Dino; 04/20/2013 at 04:58 AM. |
|
|
|
|
03/09/2010, 10:43 PM
|
#123 |
|
Premium Member
Join Date: Jan 2006
Location: Richmond, VA
Posts: 298
|
Mike- The build looks awesome! I am looking to buy my light rack from EZ tube and was going to buy the tube and cut it myself. After seeing how yours came ready to assemble I am curious if there is a big upcharge for that? That sure beats cutting and filing down the edges, etc..!!
|
|
|
|
|
03/11/2010, 05:47 AM
|
#124 | |
|
SPS Slave
Join Date: Aug 2003
Location: Richmond, VA
Posts: 3,388
|
Quote:
No - in fact they charged less than $40 for the cuts, deburring, and packaging... And get this, they sent out the missing parts yesterday at no cost!! Now that is what I call AWESOME CUSTOMER SERVICE!!
__________________
- Mike & Terry "Less technology, more biology ... indeed." - Gary White Current Tank Info: 200g temp garage tank |
|
|
|
|
|
03/12/2010, 09:25 PM
|
#125 |
|
SPS Slave
Join Date: Aug 2003
Location: Richmond, VA
Posts: 3,388
|
Mark and the guys from EZTube sent us our missing parts next day air. Sweet. A few minutes unpacking and tapping in, and voila!
 Tomorrow, there are a few things on tap. Mount the light rack into the canopy, work on the CL plumbing and maybe start on the rock work... we really want to get some water flowing into this thing! 
__________________
- Mike & Terry "Less technology, more biology ... indeed." - Gary White Current Tank Info: 200g temp garage tank Last edited by Dino; 04/20/2013 at 04:59 AM. |
|
|
|
 |
|
|


