
|
|
 03/16/2011, 02:50 PM
|
#76 |
|
Registered Member
Join Date: Jan 2004
Location: San Francisco
Posts: 9,103
|
if the floor boards are simply screwed down, I'd absolutely take them up again.
Cutting gaps would work, a better idea might be to cut an X between the areas of timber on the plastic, so you have triangle pieces of plastic that you can wrap up and over any boards (cut off any excess). However simply making large holes would work just as fine as well since you did put the water resistant paint on them, and it would prevent the area from becoming a pond if you had a big spill  however it all depends how much spillage you think you might get. With a separate fish room, most of the water work might be done there... however with a tank that large, and thinking you might be "going in" on a regular basis, I'd say the tank area is also potentially a really wet (drippy) zone.
__________________
Mike |

|

|
|
03/16/2011, 03:33 PM
|
#77 |
|
Registered Member
Join Date: Oct 2009
Location: Lancashire, UK
Posts: 773
|
Thanks Mike
Yes I think I will take your advice, I can cut up the membrane and wrap the wood in the excess. i will also lay another membrane on top of the floorboards under the finish flooring to try and avoid any water getting down there in the first place. Thanks for your help. |
|
|
|
|
03/16/2011, 04:02 PM
|
#78 | |
|
Registered Member
Join Date: Oct 2009
Location: Lancashire, UK
Posts: 773
|
Quote:
I had a look at those pics and it does look very cool. For this build however I think I will stick to the fibreglass method only because I have read a lot of threads relating to that method and feel comfortable with the principles. Maybe on the next build! Thanks very much for the info, much appreciated. I look forward to seeing your 2500 gallon tank!, now thats a monster! |
|
|
|
|
|
03/16/2011, 04:12 PM
|
#79 |
|
Registered Member
Join Date: Oct 2009
Location: Lancashire, UK
Posts: 773
|
Just a little more to add before you are all caught up.
New toy, remote screen for GHL  I want this to be set into the wall next to the tank so i can get some info with a quick glance tank side. So I ran the cable from the fish room to where I want the screen, chiseled out the brick wall and lined it with plasterboard ready for the final skim. 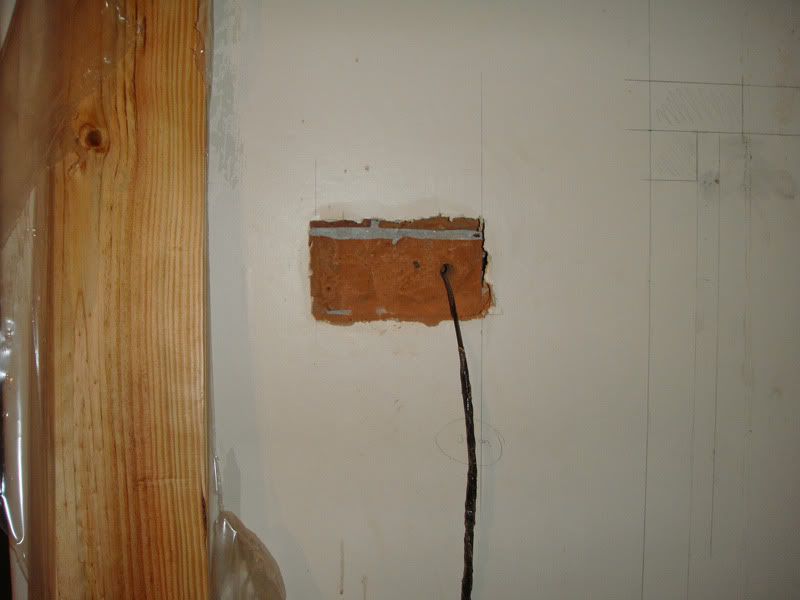 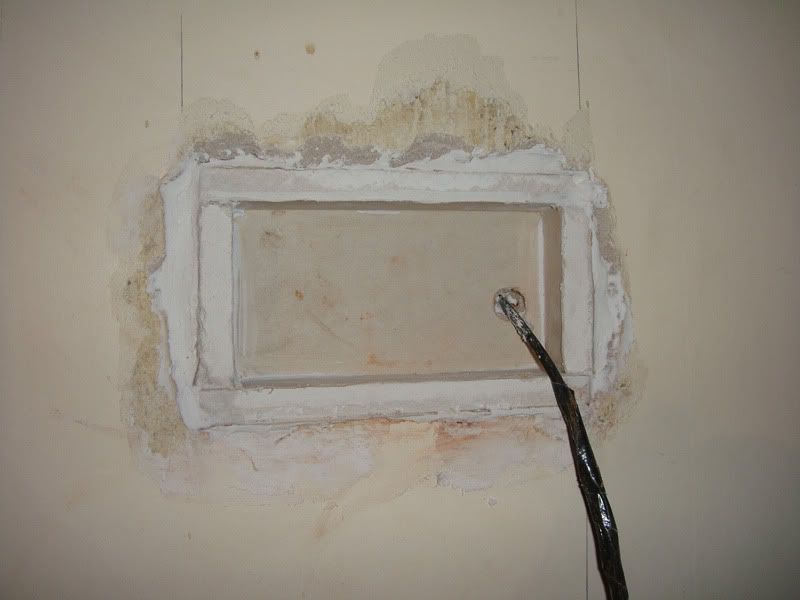
|
|
|
|
|
03/16/2011, 05:54 PM
|
#80 | |
|
Registered Member
Join Date: Jan 2004
Location: San Francisco
Posts: 9,103
|
Quote:
How's the air circulation down in that space with the concrete? Does air flow at all? Or is it insulated from the outside? If you have adequate airflow I wouldn't worry when water drips down there. If air doesn't flow, then I'd definitely go with a plan to prohibit water from getting there.
__________________
Mike |
|
|
|
|
|
03/16/2011, 06:19 PM
|
#81 |
|
Registered Member
Join Date: Oct 2009
Location: Lancashire, UK
Posts: 773
|
There is quite good air circulation under the floorboards with a couple of air bricks on the outside wall.
The aim would be to have no water on the floor at tank side. If I need to get in I would switch off the return pump and surge pump allowing the water level to drop. The tank will run 2-3" lower than its maximum normally to allow for the surge water when that fires so I would expect that turning off the return pump and surge pump will allow me enough room to not overflow the tank when getting in. |
|
|
|
|
03/16/2011, 06:28 PM
|
#82 |
|
Registered Member
Join Date: Oct 2009
Location: Lancashire, UK
Posts: 773
|
Next was the provision for sockets above the tank. These will accomodate light ballasts for both MH and T5, moonlights, OM 4 way and pc fans.
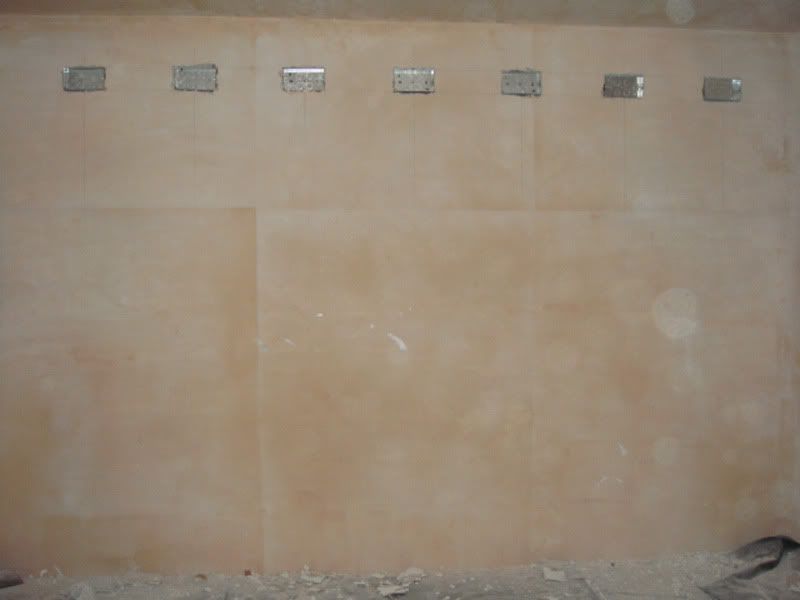 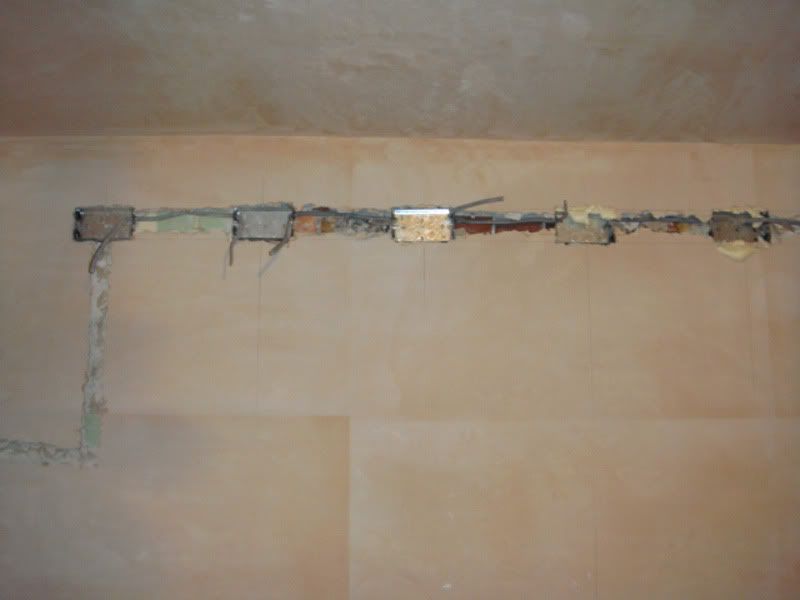 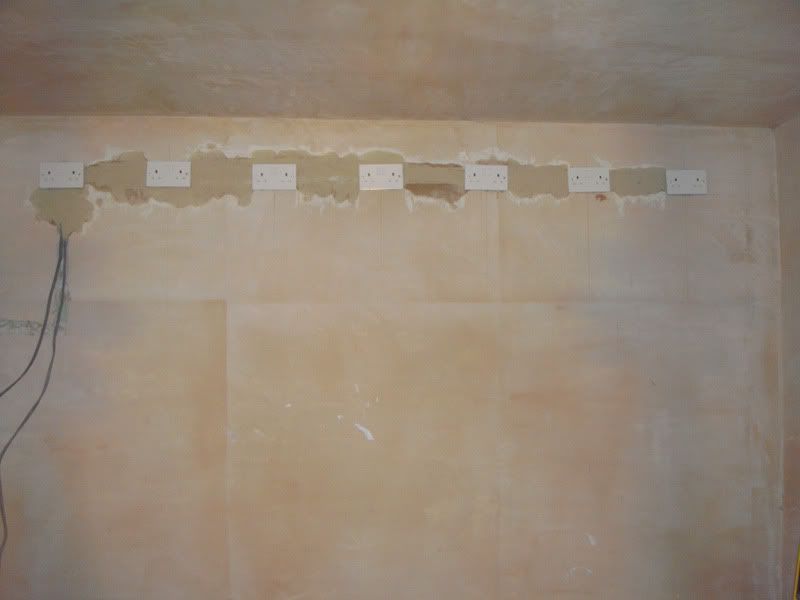 With the sockets being above quite a large expanse of water I will use baby proofing caps to seal any unused socket to prevent moisture build up 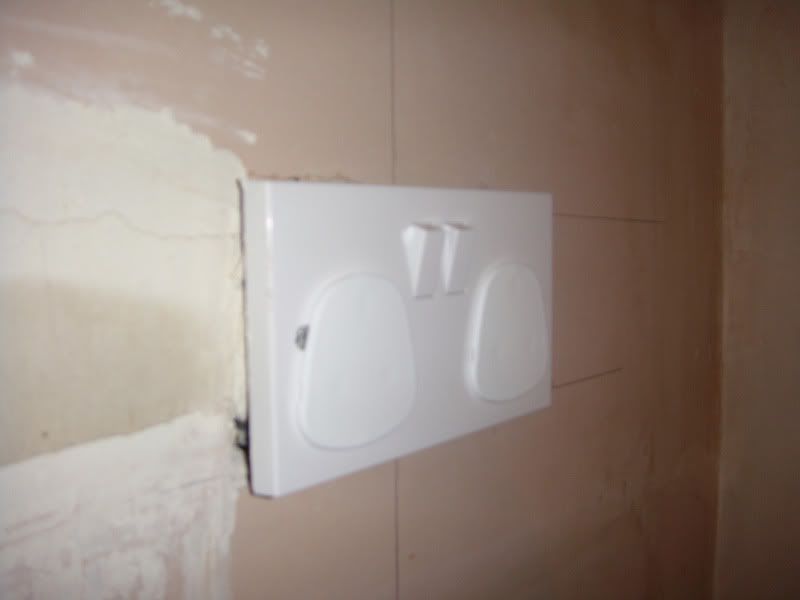
|
|
|
|
|
03/16/2011, 06:32 PM
|
#83 |
|
Registered Member
Join Date: Oct 2009
Location: Lancashire, UK
Posts: 773
|
The plug socket for the PC fans will be controlled via the ghl temp probe and will turn on at a certain temperature.
I bought 5 large pc fans and wired them to a 12v transformer 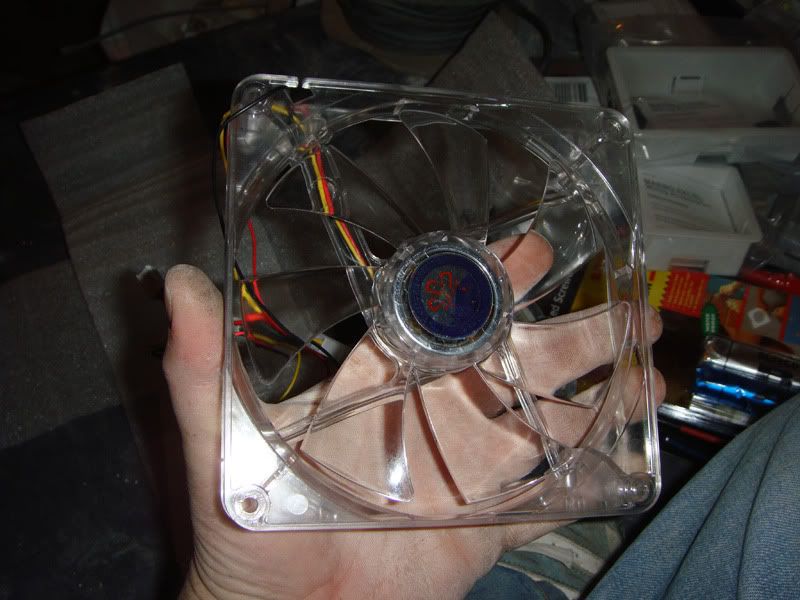 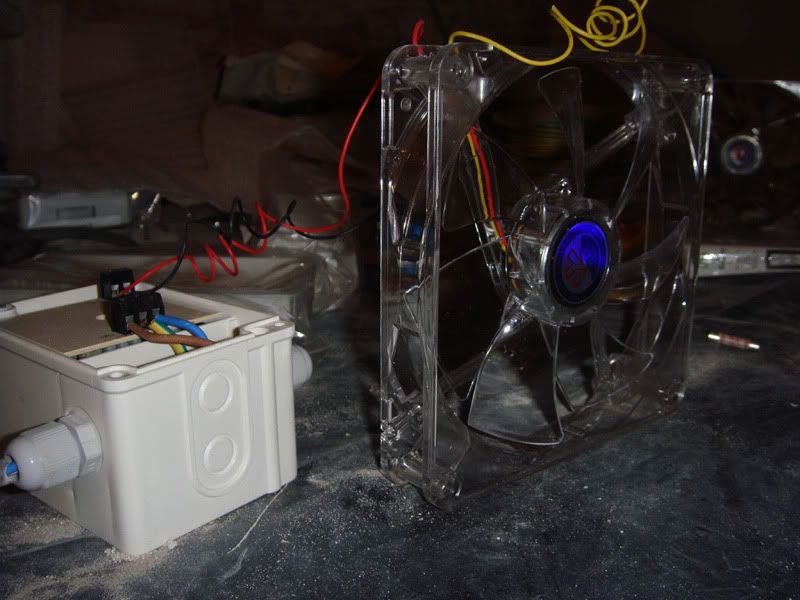
|
|
|
|
|
03/16/2011, 06:41 PM
|
#84 |
|
Registered Member
Join Date: Oct 2009
Location: Lancashire, UK
Posts: 773
|
Through this cavity wall is where the garage and the fish room is.
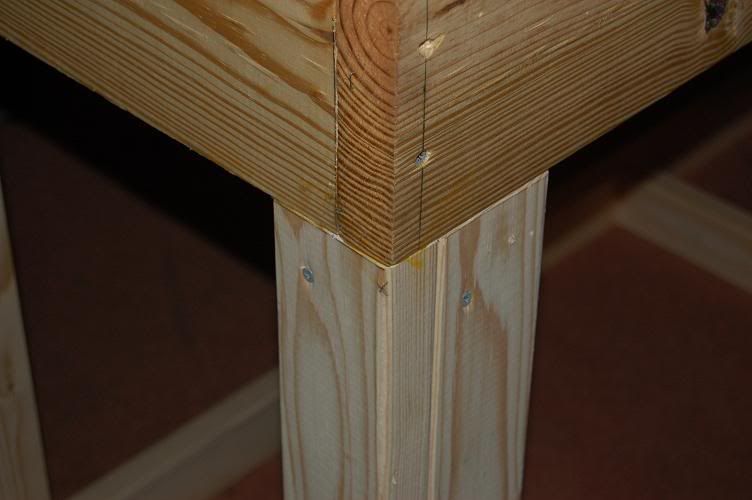
The drain plumbing is 2.5" (63mm) and the closed loop feed manifold plumbing is 3" (75mm) so I am going to need a lot of quite large holes through this wall. 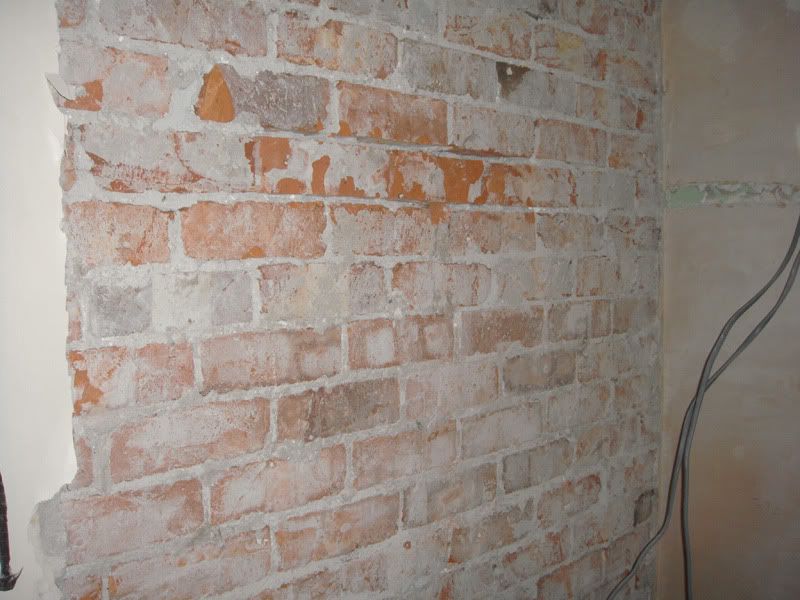 I felt I had a couple of choices. 1) I could acro the wall, add an rsj for support and remove a course or two of bricks enough to allow me to feed the plumbing through the wall. 2) I could drill large cores through the bricks, maintaining the loadbearing properties of the wall. I chose the later. I bought a couple of 5" diamond tipped core drill bits 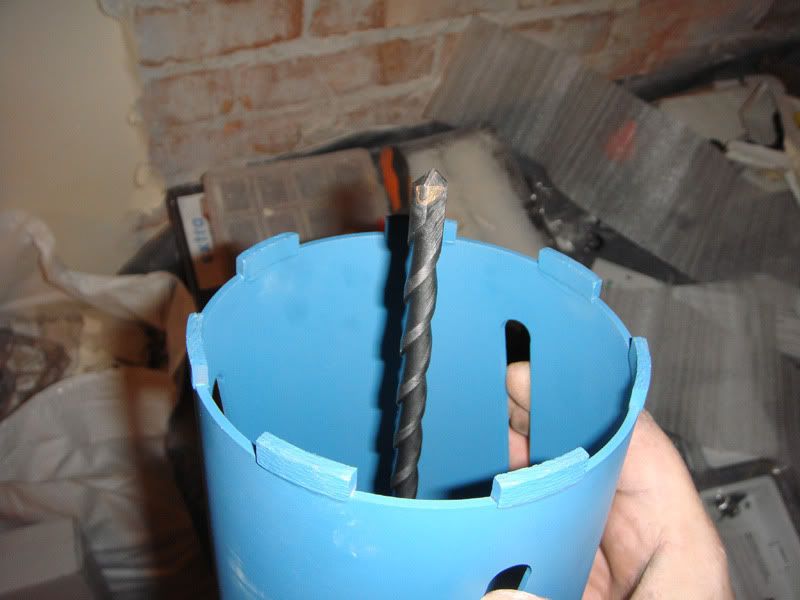 And an extension arbour for the sds drill so I could drill straight through the cavity. 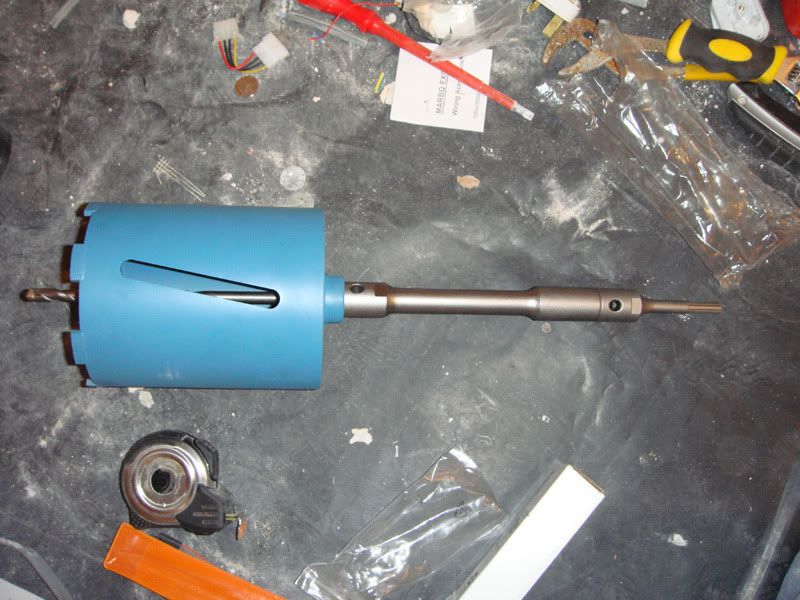
|
|
|
|
|
03/17/2011, 01:22 PM
|
#85 |
|
Registered Member
Join Date: Oct 2009
Location: Lancashire, UK
Posts: 773
|
Part way through one hole
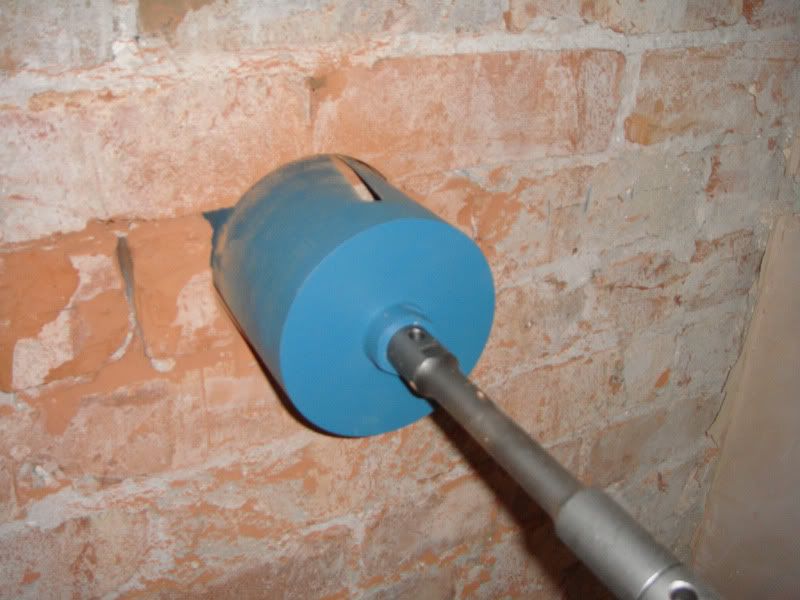 3 holes done, a total of nine holes needed. 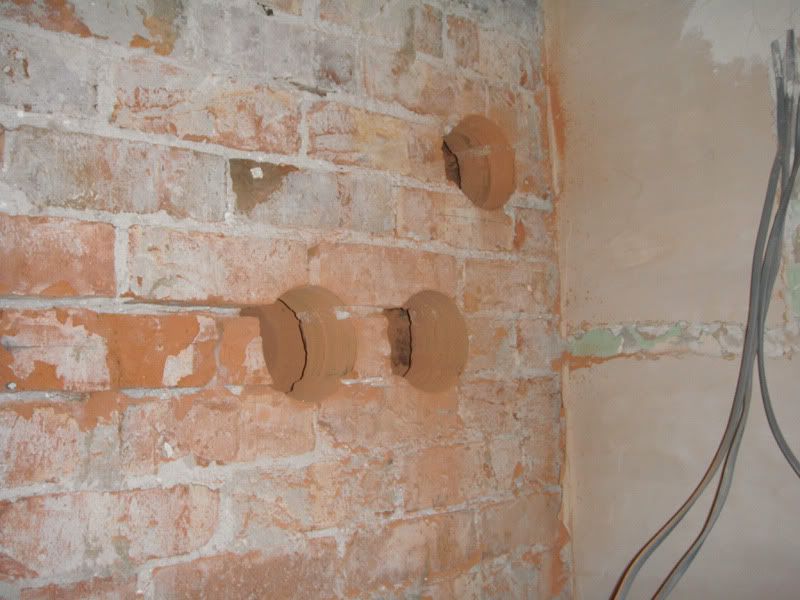 3 x holes to drain to sump 2 x holes for extractor fans 2 x holes for closed loop manifold 1 x hole for surge. |
|
|
|
|
03/17/2011, 01:26 PM
|
#86 |
|
Registered Member
Join Date: Oct 2009
Location: Lancashire, UK
Posts: 773
|
two holes were for the extractor fans. 2 linline fans, one will extract air from above the tank and one will pull in air from outside.
Both fans will be controlled by a humidity probe. 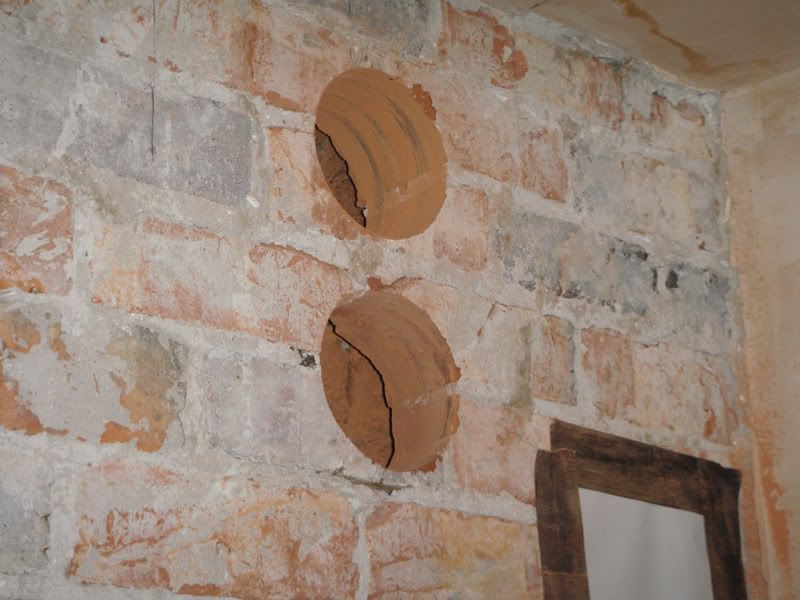 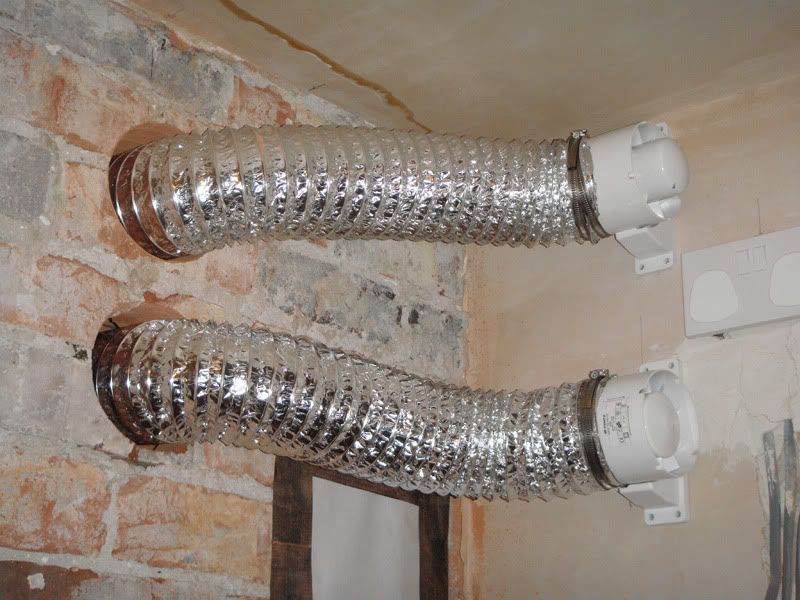 There is more ducting to add so that the inlet of one is away from the outlet of the other. I also need to add an inline carbon filter for the air being pulled from outside. 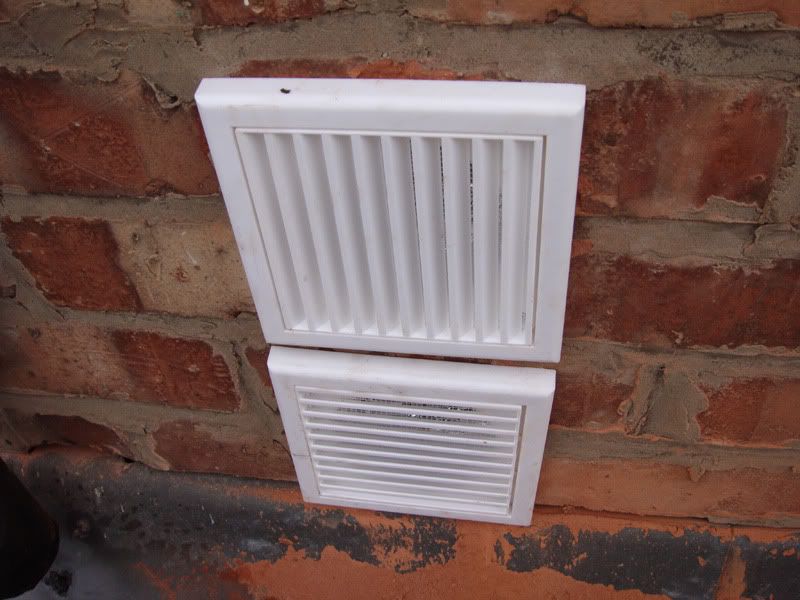
|
|
|
|
|
03/20/2011, 10:36 AM
|
#87 |
|
Registered Member
Join Date: Oct 2009
Location: london england
Posts: 11
|
nice mate more pics pls
rgds yvan |
|
|
|
|
03/20/2011, 02:07 PM
|
#88 |
|
Registered Member
Join Date: Jan 2010
Posts: 480
|
Awesome build - cant wait for the updates
__________________
Inside the Glass Box - my New Reef Obsession |
|
|
|
|
03/22/2011, 01:19 AM
|
#89 |
|
Registered Member
Join Date: Feb 2011
Location: Indianapolis
Posts: 130
|
Great work on the planing. Its funny that no matter how much you plan, you always see a better way latter on. The old saying "hind site is 20/20".
I'm in the 2nd year plus of planing my 5000g propagation system, I can't seem to settle on anything for more than a couple of months. Anyway great build, Ill be watching. |
|
|
|
|
03/22/2011, 11:25 AM
|
#90 | |
|
Registered Member
Join Date: Oct 2009
Location: Lancashire, UK
Posts: 773
|
kintaro,Michael B thanks for the comments guys.
Quote:
One reason I spent a long time planning and went into the detail that i have done is that i am determined to put right all the errors I made in my current system. However it would be naive of me to expect to have a perfect tank at the end of it...is there such a thing? |
|
|
|
|
|
03/22/2011, 03:05 PM
|
#91 |
|
Registered Member
Join Date: Oct 2009
Location: Lancashire, UK
Posts: 773
|
Here are the last few pictures to get you caught up.
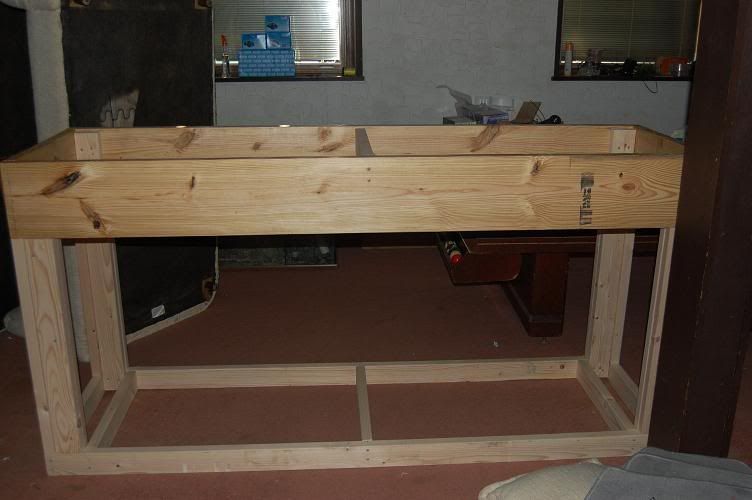
Unfortunately work is demanding I have no free time at the moment so progress has ground to a halt. I hope to pick up where I left it in a few weeks or so though. Having drilled all the holes i was able to batten out the first wall. I cant explain how tough I found drilling the cores. For a guy who drives a desk and computer all day and night for work my hands felt shredded after drilling these cores. The standard red bricks were fine and each hole took about 20mins but every now and then I hit a brick made of a different clay or something, like an engineering brick and hitting one of these added about 2 hours to the time needed to drill one hole. Coupled with the noise and having a young daughter meant that it took me 3 weeks to drill the cores. Anyway, they are done now...thankfully. 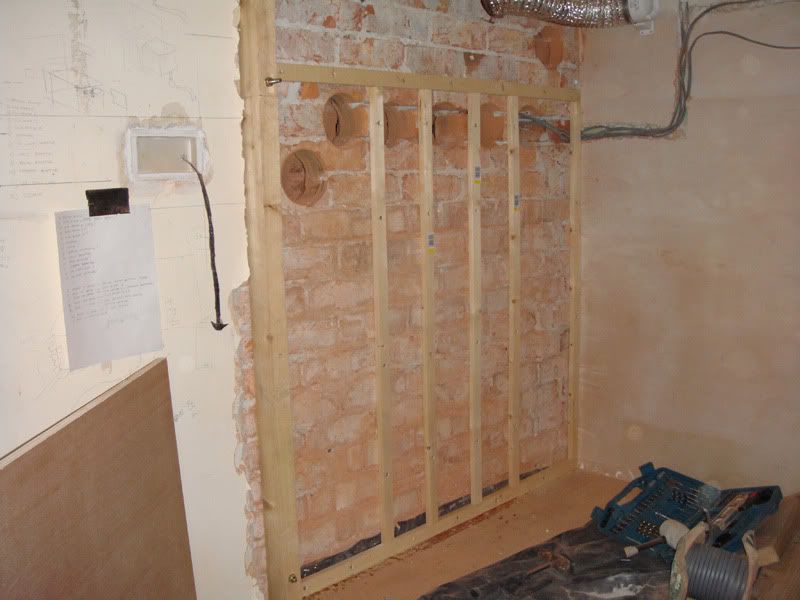 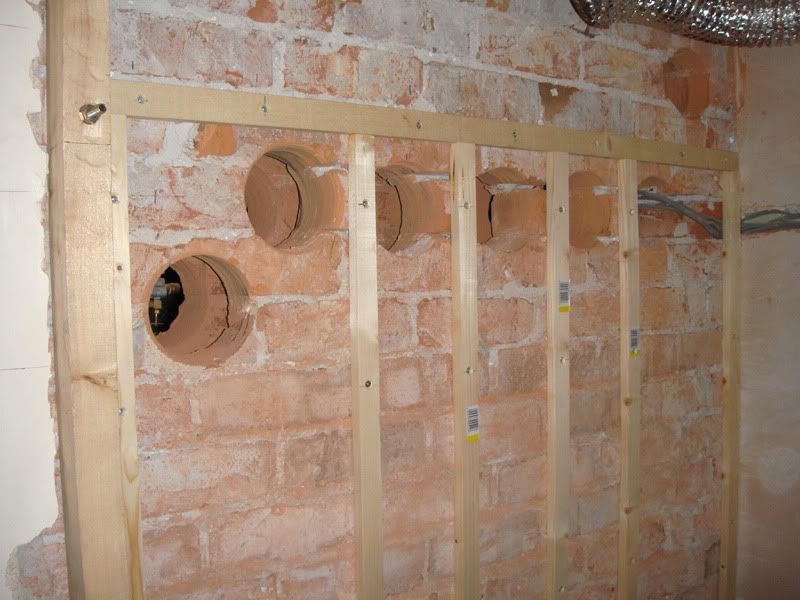 Once the battens were fixed to the wall I was able to add a side of ply. 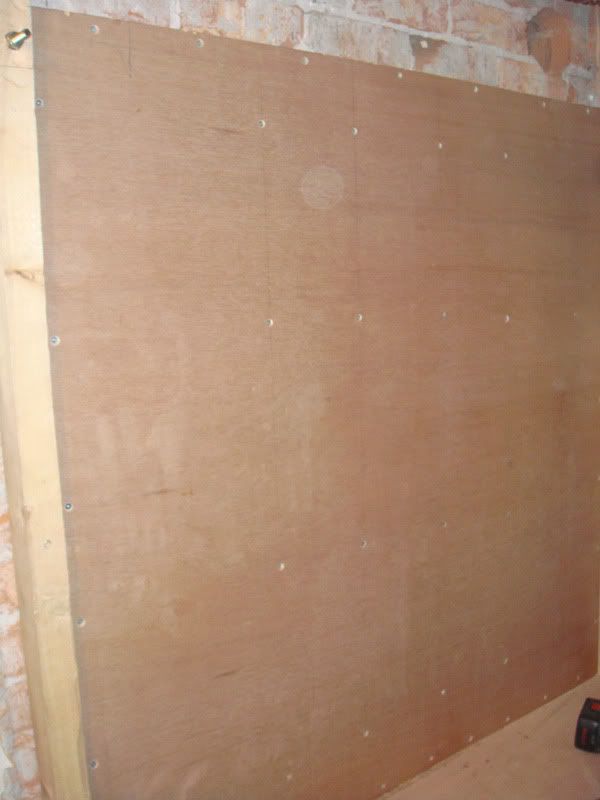 Once this piece of ply was added it began to give the sense of scale to the tank. The ply is 52"x52" |
|
|
|
|
04/05/2011, 06:34 PM
|
#92 |
|
Registered Member
Join Date: Sep 2007
Posts: 1,867
|
Updates

|
|
|
|
|
04/05/2011, 06:43 PM
|
#93 |
|
Registered Member
Join Date: Oct 2009
Location: Lancashire, UK
Posts: 773
|
I am working about 130 hours a week at the moment and have another 2-3 weeks or so of this. Then I will have a bit of time to carry on with the tank...cant wait.
It shouldnt take long to get the carcass put in and then I will be getting a firm in to fibreglass and seal it. |
|
|
|
|
04/06/2011, 03:56 AM
|
#94 |
|
Registered Member

Join Date: Mar 2006
Location: camberley uk
Posts: 209
|
Nice to see another Brit doing a great build !! I'm watching this 4 sure...
|
|
|
|
|
04/06/2011, 12:11 PM
|
#95 |
|
Registered Member
Join Date: Jul 2008
Location: Cape Town , South Africa
Posts: 822
|
looking forward to seeing this build progress

|
|
|
|
|
04/06/2011, 12:50 PM
|
#96 | ||
|
Registered Member
Join Date: Oct 2009
Location: Lancashire, UK
Posts: 773
|
Quote:
Quote:
|
||
|
|
|
|
04/06/2011, 04:53 PM
|
#97 |
|
Registered Member
Join Date: Oct 2007
Location: St Charles
Posts: 3,544
|
I like the pvc idea as well, I have seen a plywood build with triggers in the tank and they actually ate through the fibergalss and plywood behind the live rock creating a leak. As far as your stand I believe it was rocketengineer that started the stand thread and had the specifications on wood and the distribution of weight. I used his method of building for my 210 reef and actually overbuilt my stand for my own piece of mind. Instead of 2x4s I used 2x6s and the top was made of 2x10s. Here are a few pics.
__________________
Sometimes things fall apart so something better can fall together. Current Tank Info: Tall Jason has it!!!!! |
|
|
|
|
04/06/2011, 04:55 PM
|
#98 |
|
Registered Member
Join Date: Oct 2007
Location: St Charles
Posts: 3,544
|
After these pics I added braces in the middle. However like yo9u said your stand will be braced to the wall as well, so that could definitly change the game.
__________________
Sometimes things fall apart so something better can fall together. Current Tank Info: Tall Jason has it!!!!! |
|
|
|
|
04/06/2011, 05:13 PM
|
#99 |
|
Registered Member
Join Date: Oct 2009
Location: Lancashire, UK
Posts: 773
|
Thanks Angler, nice stand! Are the uprights 2x6?
I like the idea of the pvc lining I too have read horror stories of fish eating through the resin, urchins too. I also have concerns of scraping coraline off of the resin over years will that also weaken it? I looked into the pvc idea when it was mentioned earlier but I could only find it avaliable in grey in the sizes i want. I did have an idea of lining the inside of the tank with glass so that I could happily scrape away any algae build up and the fish can pick at it all they want. Because the glass wont be load bearing aslong as i get it flush to the walls I thought it would be ok. 10 x 5 sheets of float glass that are 6mm thick are drastically cheaper than inch thick glass. |
|
|
|
|
04/06/2011, 06:04 PM
|
#100 |
|
Registered Member
Join Date: Jan 2010
Location: Canadia
Posts: 4,276
|
If you were to go with the PVC lining you could then spray-coat it with gunnite or similar. I believe that's how Royal-Exclusiv does theirs. The thing I'd like to know is how to attach the PVC sheet to the plywood surround. You'd want something that was non-toxic and wouldn't off-gas VOCs.
Dave.M
__________________
My Gawd! It's full of corals! Current Tank Info: None. Nil. Zip. Nada. |
|
|
|
 |
|
|
 Similar Threads
|
||||
| Thread | Thread Starter | Forum | Replies | Last Post |
| display refugium- lighting, macro and coral beauty? | Moonstream | Reef Discussion | 5 | 03/12/2011 05:35 PM |
| Macro algae in Display Tank? | calziereef | Marine Plants & Macroalgae | 2 | 07/29/2010 09:53 PM |
| Matt's Nano | meschaefer | Large Reef Tanks | 12 | 06/05/2007 11:22 AM |
| Matt's 110 progress report | McCrary | Arizona-Sierra Vista/Tucson Reef Keepers | 10 | 09/29/2006 09:28 PM |


