
|
|
 11/04/2011, 06:31 PM
|
#26 | |||
|
More Idiot Than Savant
Join Date: Nov 2005
Location: Billings, MT
Posts: 560
|
Quote:
Quote:
 I haven't seen the one from cmpenny, I'll have to check that out. Been looking at the Hayward. I haven't seen the one from cmpenny, I'll have to check that out. Been looking at the Hayward.Quote:
|
|||

|

|
|
11/06/2011, 08:11 PM
|
#27 |
|
More Idiot Than Savant
Join Date: Nov 2005
Location: Billings, MT
Posts: 560
|
So this is totally not tank related.....ok, well sorta tank related in an offhand way because it prevented me from getting any work done on the tank (and the tank is in the background in the picture). How's that for a justification?
Well anyway it's my thread and I'll do what I want!  Just drove 650 miles round trip yesterday for this beautiful gal! We adopted her from a great rescue orginization in Rapid City, SD. She is such a sweet girl and turns pink when she gets excited. Meet Berkley!  
|
|
|
|
|
11/07/2011, 03:42 PM
|
#28 |
|
Registered Member
Join Date: Jun 2005
Location: Ocoee, Fl
Posts: 1,580
|
I love me some boxers, Shes a pretty 1. Im a part of Florida Boxer Rescue down here in Orlando, FL. I have had a few recues in the past. Its a great way to help out for such awesome animals. I couldnt believe people actually give there boxers away. The dog I have is now 5. I had a lady called me up and told me she had a 2 year old puppy that is just way to much for her to handle he eats everything in site, so I said ok I will come get him. Im glad I did, he has been the best dog I have ever had.
|
|
|
|
|
11/13/2011, 09:42 PM
|
#29 | |
|
More Idiot Than Savant
Join Date: Nov 2005
Location: Billings, MT
Posts: 560
|
Quote:
|
|
|
|
|
|
11/13/2011, 09:50 PM
|
#30 |
|
More Idiot Than Savant
Join Date: Nov 2005
Location: Billings, MT
Posts: 560
|
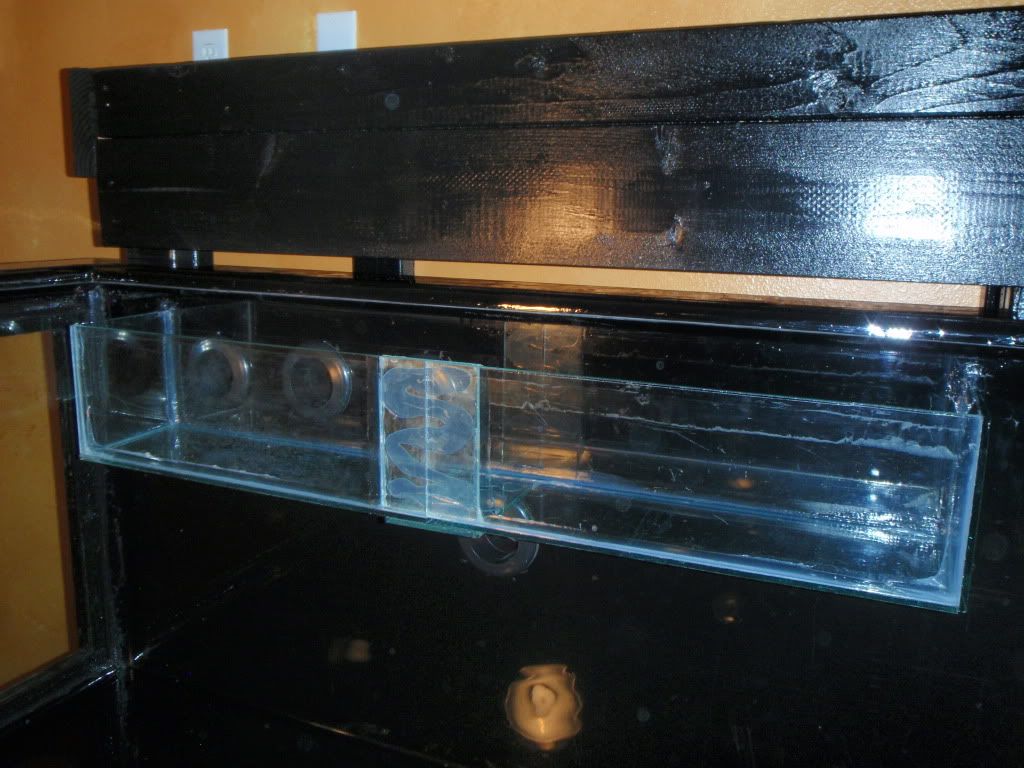
In spite of playing with the new pup all week, I did manage to get a bit of work done on the tank. I got my overflow built and installed. You'll see it's a bit of a Frankenstein creation because I made it with some leftover scraps of 1/4 I had laying around and none of them were the full 36 that I wanted. So a couple of seams later and I had a workable overflow. It's not the prettiest overflow but that doesn't matter to me because I plan on doing a foam and rock wall that will completely cover it.
 With the overflow done my son and I used all of our manly power and hoisted the tank up on the stand. I installed the bulkheads with some temporary caps which allowed me to do this.... Wait for it..... Wait for it..... TA DA! Houston we have splashdown! 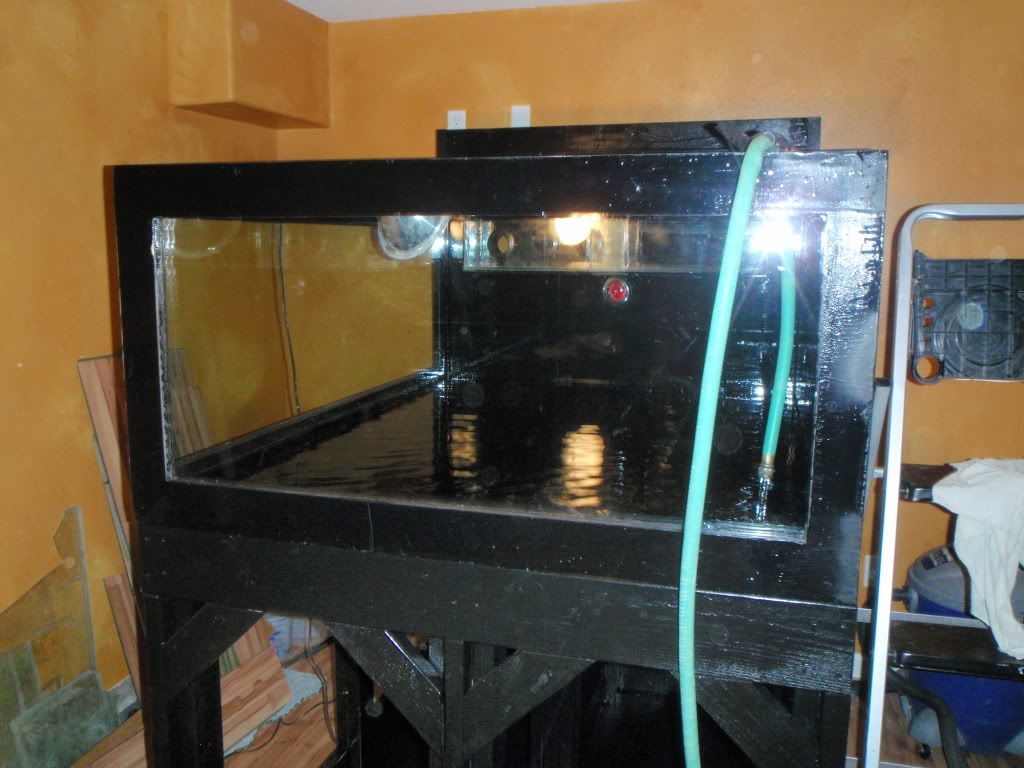 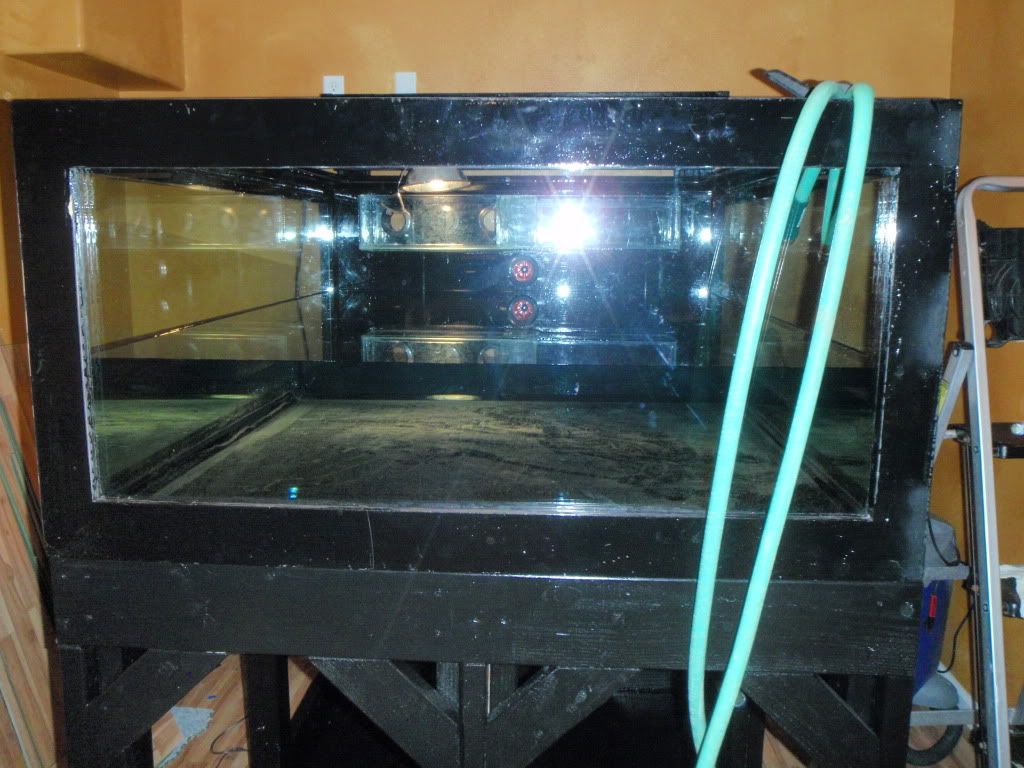 Yes folks, that's water going into the tank. But before you get too excited, this is just a leak test. My first one. First leak test? Are you frigging kidding me!!!!????? You put that behemoth of a tank in it's final resting place and THEN decided to do a leak test? Yes, yes I did. I installed the glass in the tank in the room where it's going and I didn't want to drag it back up the stairs and outside to do a leak test and that drag it back in to put it in place. So, needless to say, I was sweating it a bit. I was very careful throughout the build so I felt good that I wouldn't have any problems but you just never know. I did it in increments and let it sit for a while just in case the increasing pressure found a weakness. I figured I could catch it without catastrophic failure that way. I filled it up to 120 gals and let it set for 12+ hours. Then I went to 200 gals and let it sit another 12 hours. Finally I filled it to the tank capacity of 260 gals and it's been there for a few hours now with no leaks under full pressure. My wife has been waiting for it to explode all weekend. I don't know why she doesn't trust my skill. After all, the wet carpet (...twice) at the old house had nothing to do with tank construction and everything to do with user error when filling up the top off container. But that's another story.... I'm also happy to report that I have virtually no deflection. Less than 1/16 across either span. I'm going to leave it full for a couple of days just to be sure no pressure leaks develop around the glass silicone gasket. That's really the only place anything could develop but I'm not expecting any problems. Here's a picture to prove it's full.  And another fun one you don't often see. Since I have a fancy camera, I thought I'd take a shot from INSIDE the full tank looking out. 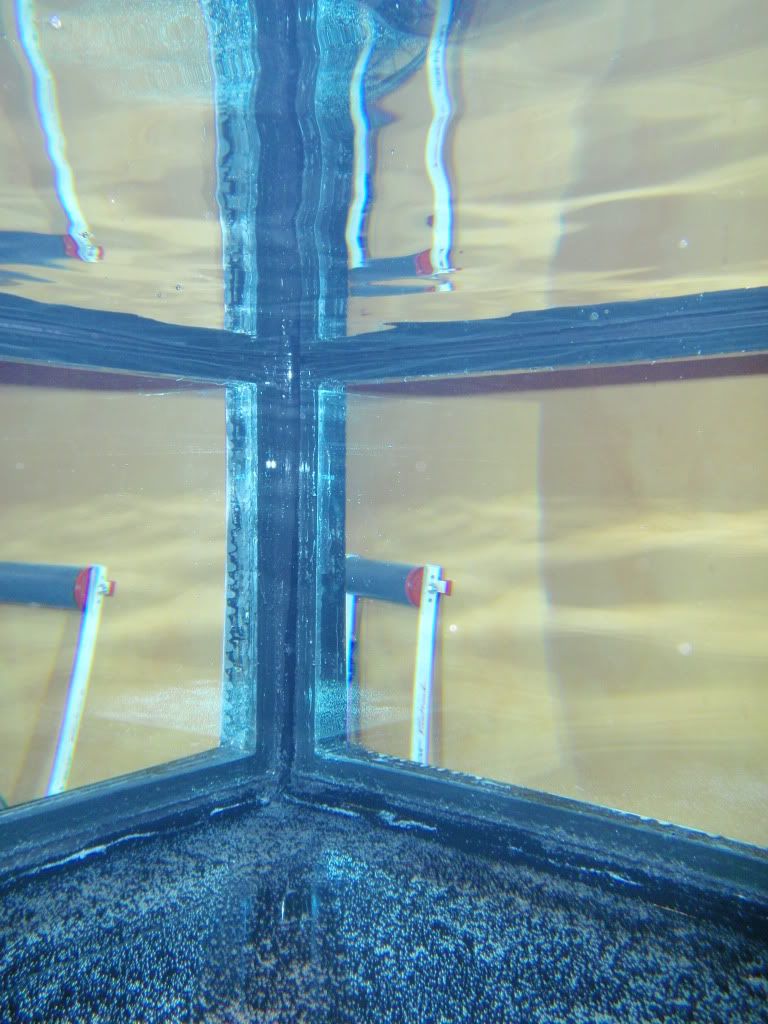 Once the water is drained I want to start on the foam and rock wall but I have a lot of other things that need attention too. I need to finish the sump, build the pre and post surge tanks, run electrical, ventilation, plumbing, etc., etc. So, whatever gets worked on first will be the next update but don't look for it anytime soon with the holidays coming. So that's it for now and for a while. Thanks for continuing to tag along! |
|
|
|
|
11/14/2011, 08:05 AM
|
#31 |
|
Registered Member
Join Date: Feb 2010
Posts: 674
|
Well done man, will be tagging to see once its all setup.
|
|
|
|
|
11/14/2011, 09:56 AM
|
#32 |
|
Likey the bikey
Join Date: Dec 2004
Location: Colorado
Posts: 3,371
|
Congrats on it being waterproof!
__________________
Mike On hiatus. I'm either out riding my bicycle, playing with my family, or throwing ferts in my planted tank. Or working. I hope I'm not doing that though. Current Tank Info: 140 DIY Cube |
|
|
|
|
11/14/2011, 07:27 PM
|
#33 |
|
MTS Sufferer!
Join Date: Feb 2005
Location: NW Ohio
Posts: 1,926
|
Congrats on finally getting it wet!
__________________
Next step on the system is adding A 90 gallon! Current Tank Info: 475 multitank system is now running! Several hundred gallons of additions planned! |
|
|
|
|
11/16/2011, 10:05 AM
|
#34 |
|
Registered Member
Join Date: Jun 2005
Location: Ocoee, Fl
Posts: 1,580
|
I cant wait to see your foam rock wall. I did 1 in 120 gal tank and I love it. Every tank I put together in the future will have 1.
|
|
|
|
|
12/11/2011, 05:15 PM
|
#35 |
|
Registered Member
Join Date: Dec 2010
Location: Sioux City, IA
Posts: 245
|
This has been a very informative read, I am eager to build another plywood tank very soon. I built a 300 gallon 3 years ago and used fiberglass resin but now I would like to build something a bit smaller with a matching sump. I love all of the idea's I'm finding on this site, it's going to help me tremendously in the upcoming year! Thanks for sharing!!!
|
|
|
|
|
01/11/2012, 08:36 AM
|
#36 |
|
Registered Member
Join Date: Jun 2005
Location: Ocoee, Fl
Posts: 1,580
|
Any new updates?
|
|
|
|
|
01/11/2012, 10:23 PM
|
#37 | |
|
More Idiot Than Savant
Join Date: Nov 2005
Location: Billings, MT
Posts: 560
|
Quote:

|
|
|
|
|
|
01/12/2012, 09:11 AM
|
#38 |
|
Registered Member
Join Date: Sep 2009
Location: Sylvania, OH
Posts: 636
|
I am so amazed by the "can do" attitude of the DIYers on RC. We are DIYers, but still, not sure I could talk my hubby into a wooden tank. When I show him these threads he just looks at me. no comments... nothing....so...probably, I will never get to do this but...luckily I get to enjoy reading this thread. Thank you fors sharing this experience. Everything is looking awsome.
|
|
|
|
|
01/14/2012, 01:53 AM
|
#39 |
|
More Idiot Than Savant
Join Date: Nov 2005
Location: Billings, MT
Posts: 560
|
Well, the update I'm hinting at is taking longer than expected. I did start on the rock wall but I don't want to post the results until it's completely done and I need to get some more expanding pond foam first. Went through more than I expected.
So, to welcome the new folks to the thread (FadedSpy and Mrs. Music), thank you for the thread bumps, and to tighten down lusenut2 before he falls off, here is an intermediate update. I'm a cheap bast...thrifty. I mean thrifty. Who isn't in this economy anymore right? Some of you are probably thinking, well if you're such a cheap...err if you're so thrifty, why the frak are you in the reef hobby? The rest of you are like, where the frak are the pictures, I thought this was an update? I'll make my point (although I'll be long winded about it because it's my thread after all) and then we'll get to the pictures mmmmK? I've done my fare share of stimulating the economy and I wouldn't be in this hobby if I squeak when I walk but I'm a sucker for a deal if it's something I need and I can get it/make it cheaper. So sit a spell, grab a drink, and let me tell you a story. In a galaxy long, long ago far, far away, live rock cost $2-$3 retail on the frozen plains of Montana. Because the Emperor tried and failed at TWO Death Stars (did I mentions how big of a geek I am?) live rock is now considerably more expensive. I did look at dry rock but even that is more expensive than what I can make rock for. So Lance, what are you going to do for fun this Friday night? Go dancing, take in a movie, see a new band, go to the theater? Nah, I'm gonna stay home and make rock.  I have been married for 23 years, have 2 kids, and 3 dogs. That is as exciting as my Friday nights get. Yeah I know, I'm about ready to go live at Senior Assisted Living. Don't worry, there's one about 200 feet from my back door so I don't have to far to go. I have been married for 23 years, have 2 kids, and 3 dogs. That is as exciting as my Friday nights get. Yeah I know, I'm about ready to go live at Senior Assisted Living. Don't worry, there's one about 200 feet from my back door so I don't have to far to go. Anyway, back to the rock. 1 bag of each of mortar mix, crushed coral, chicken grit, and water softener salt and I can make 125+ lbs of rock for $50. So that's what I did. I made all the rock for my last tank so I'm no stranger to this. It does take longer for man/woman made rock to mature but once coralline algae covers everything, you'll never notice the difference. I'm really glad I went this route for my foam and rock wall because I ended up making twice as much as I thought I would need so that would have translated to $200+ dollars for dry rock or $1.5 million dollars in live rock. psssttt...Red one, are the images ready yet?...psssttt pssttt...Affirmative Blue Leader...psssttt Alright folks, here we go! This is about half of what I made. 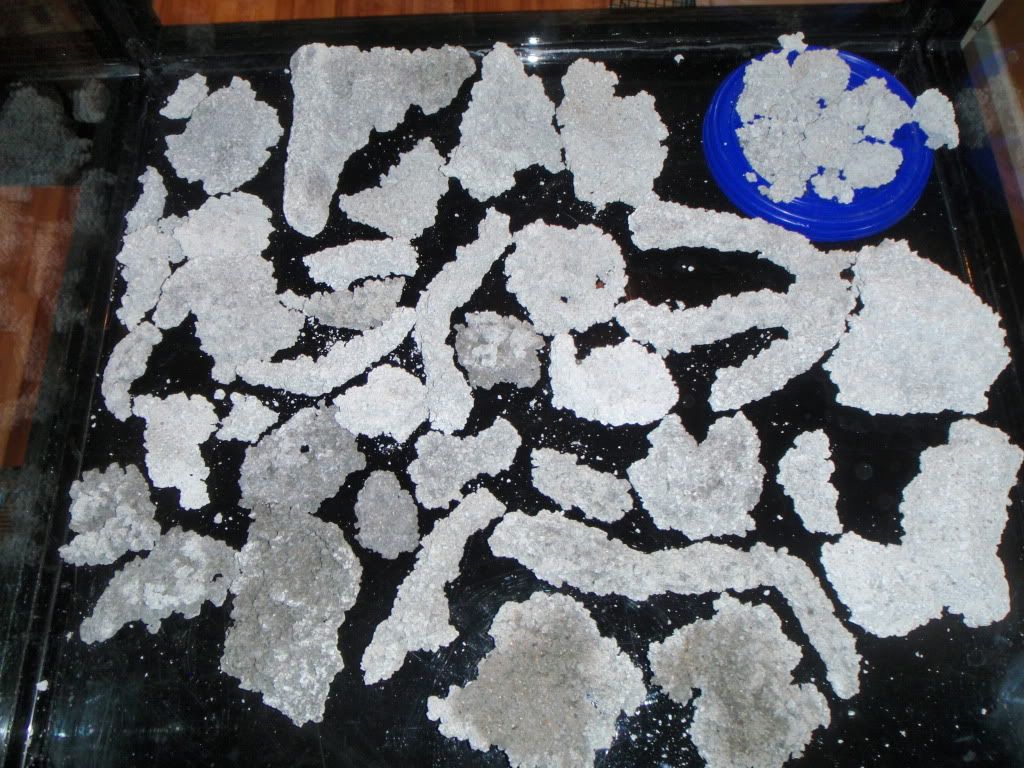 And here are some close ups. Please understand though, these 2d pictures can't come close to showing the true structure of the rock.  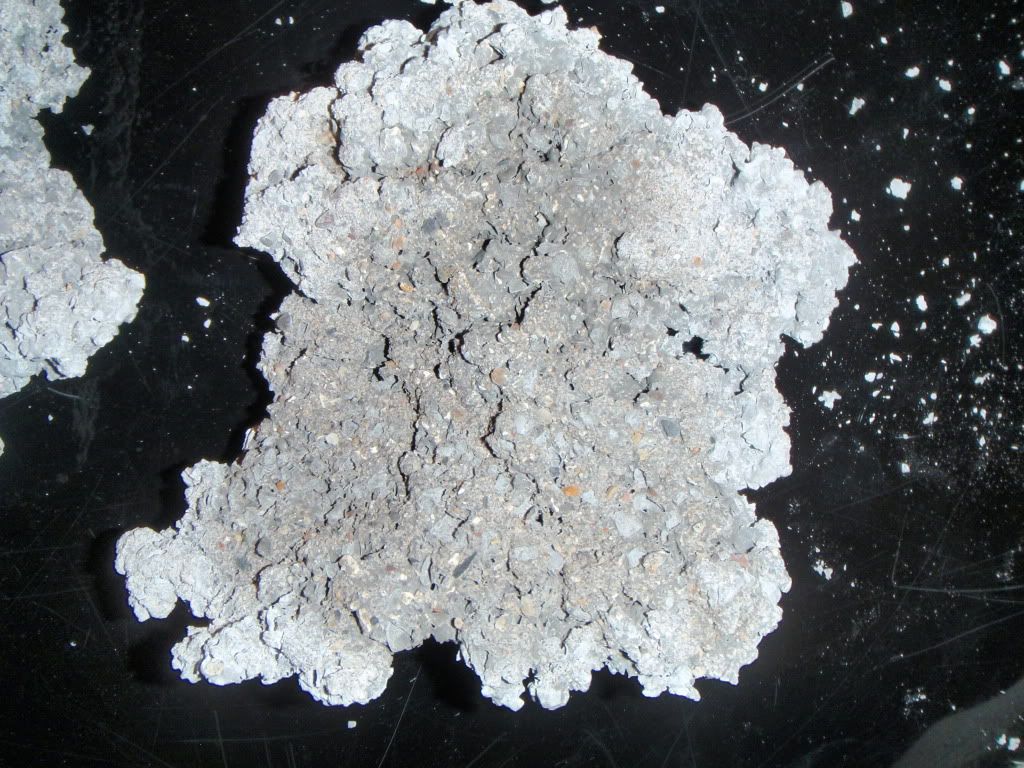 I told you this wasn't a full update so you'll just have to be satisfied with these three pictures as a teaser.  Thanks for tagging along and until the next update, may the force be with you. 
|
|
|
|
|
01/14/2012, 08:40 AM
|
#40 |
|
Registered Member
Join Date: Sep 2011
Location: San Diego, CA
Posts: 36
|
You know what? I really, really hate build threads likes yours. Being on deployment, i have got allllllll the time in the world to come up with the system i going to build when we get a house, and i think i have an idea of what i want to do...then BAM! I come across your thread and it throws a big ol' resin-coated wood and glass wrench into the brain storm.
 I know for sure im going to building my skimmer section and my fuge section out of wood, cause i can pretty much do what ever i want in the design. I will definitely doing the home made rocks as well, except i will be adding a coloring to the rocks to make them purple-ish, Ricketsreef did a video on making his rocks purpleish. I have to re-watch it cause i don't know what he used to color them up. Awsome job on the rocks btw. Supreme job on the tank though, its beautiful. Also, moar pichurs! Last edited by Bushpig_2; 01/14/2012 at 08:45 AM. Reason: moar pichurs? |
|
|
|
|
01/17/2012, 02:06 PM
|
#41 |
|
Registered Member
Join Date: Jun 2005
Location: Ocoee, Fl
Posts: 1,580
|
Thats awesome, I want to make my own rock too. I think rock is WAY over priced. My first tank I have about 1,000 bucks in live rock. My current take is a 120 gal tank I used about 75 pounds of rock that was sitting around and did a whole bunch of foam. 6 months later you couldnt tell what was rock or foam.
|
|
|
|
|
01/21/2012, 01:12 PM
|
#42 |
|
MTS Sufferer!
Join Date: Feb 2005
Location: NW Ohio
Posts: 1,926
|
What is the purpose of the chicken grit? Rock looks great by the way!
__________________
Next step on the system is adding A 90 gallon! Current Tank Info: 475 multitank system is now running! Several hundred gallons of additions planned! |
|
|
|
|
01/21/2012, 03:34 PM
|
#43 | |
|
More Idiot Than Savant
Join Date: Nov 2005
Location: Billings, MT
Posts: 560
|
Quote:
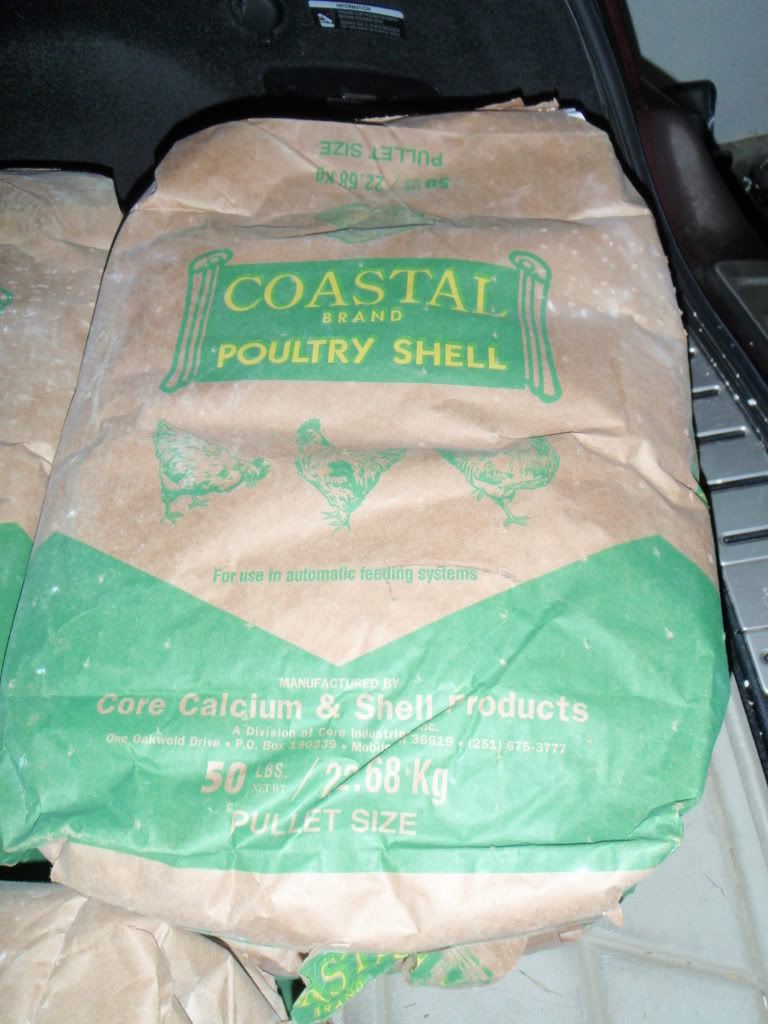
What I used was poultry calcium as a substitute for crused coral. I thought I was getting more oyster shell (which is what I had the last time I made rocks) but to my pleasant surprise, the brand I picked up actually is a crushed coral. I've actually purchased several more bags and plan to use it as my substrate since it's the perfect size for a plenum. Can't beat 50lb bags of crushed coral for $13. |
|
|
|
|
|
01/21/2012, 07:04 PM
|
#44 |
|
Registered Member
Join Date: Feb 2011
Location: Louisiana
Posts: 52
|
Great build that tank is beautiful!
|
|
|
|
|
01/21/2012, 08:08 PM
|
#45 |
|
Combat-tested Reefer
Join Date: Jan 2008
Location: Cincinnati, OH
Posts: 169
|
Okay, so I've got to ask... What brand of poultry calcium did you use? I'd sure love to use that stuff for making/covering some of my DIY rock structure...
__________________
Previous tanks: 60g AO Starphire cube w/ 400w MH, 2x Vortech MP40w // 29g BC w/ 250w MH // 29g BioCube Currently: in design/building process |
|
|
|
|
01/21/2012, 11:59 PM
|
#46 | |
|
More Idiot Than Savant
Join Date: Nov 2005
Location: Billings, MT
Posts: 560
|
Welcome to the thread Bushpig_2, Made4water, and fjr_wertheimber. And BP and fjr, thank you for your service.
Quote:
  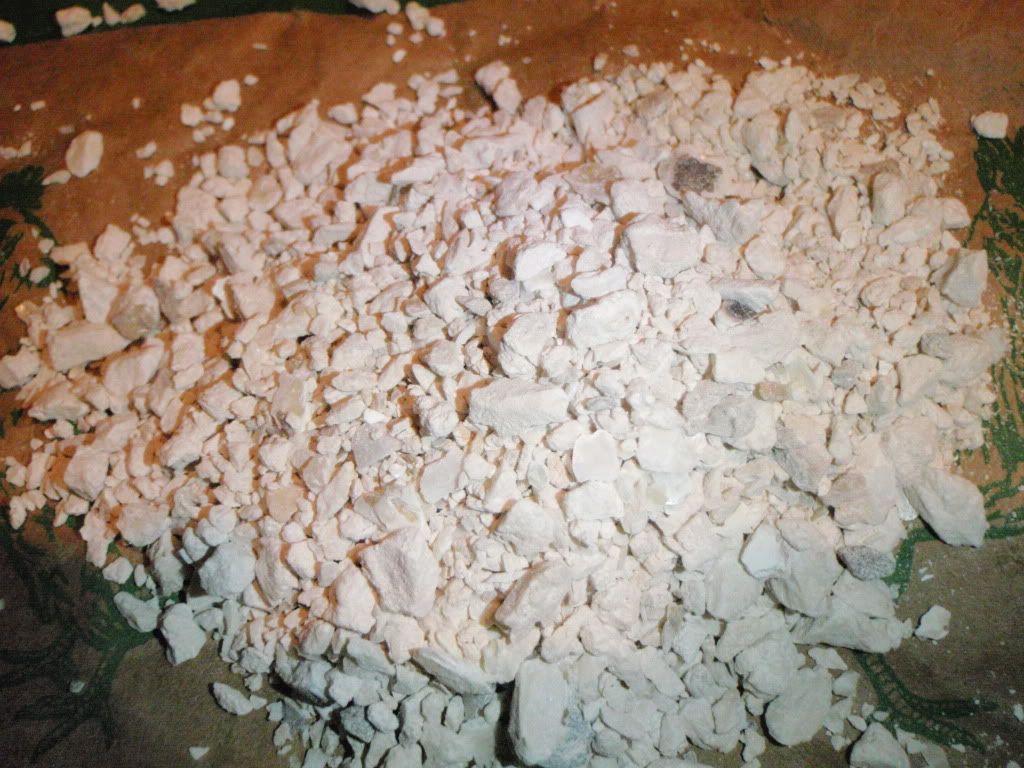 It's not quite this white once it's rinsed off. It's got a nice off white color like aragonite sand. Now, you will have to decide for yourself if you feel comfortable using a non aquarium specific product in your reef tank but for me a guaranteed analysis of minimum 97% calcium carbonate and the fact that this gets fed to an animal that ultimately produces something for human consumption is good enough for me. 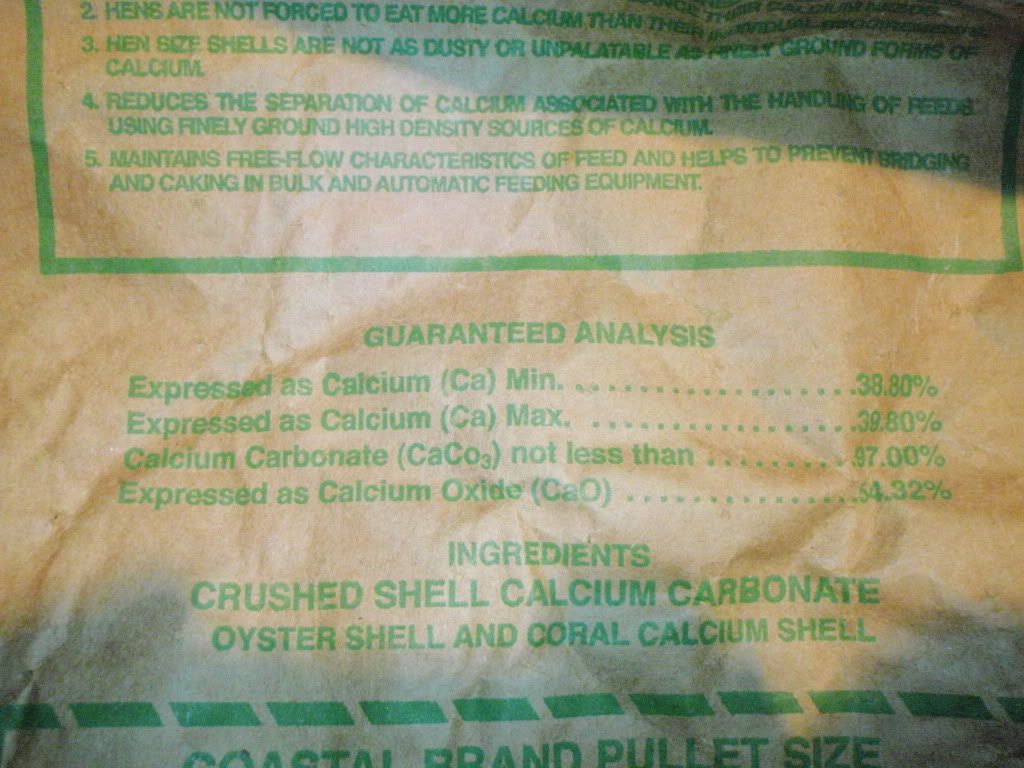 Although I have no first hand knowledge, I'm willing to make the assumption that this stuff is probably mined from the same places we can get that dry rock from. It's probably just the crushed version of the dry rock. I'm even willing to bet that Caribsea crushed coral is a mined product from the posts I see about it having foreign materials in it. Some might be worried that there could be bound phosphate in this product like there is in dry rock. I'm prepared to take care of that with lanthanum chloride dosing before the tank is fully online for livestock. Speaking of lanthanum chloride, I was looking at a phosphate remover product marketed for aquariums (which I bet is lanthanum chloride although it wasn't listed on the bottle). It was over $20 for less than 8 oz of product. I can buy twice as much of lanthanum chloride in a product made for pools for less than half that price. That is why I'm willing to take a chance on non-aquarium products. I'm not opposed to a company making a profit and we are a niche hobby but come on, do you really need to jack the price up that much? Sorry, rant over. Pond foam is on the way so hopefully I'll have a full update for you on the rock wall in a few days. Current music selection- The Clash: Rock the Casbah |
|
|
|
|
|
01/23/2012, 01:00 AM
|
#47 | |
|
Registered Member
Join Date: Sep 2011
Location: San Diego, CA
Posts: 36
|
Quote:
Plus you can make one relatively cheap, and algae doesn't come from a company. Heres the link for the ATS thread from advanced topics if you need more convincing: http://www.reefcentral.com/forums/sh...1977420&page=1 And no problem, i do it for us so we can reef it up! 
|
|
|
|
|
|
01/23/2012, 09:39 PM
|
#48 | |
|
More Idiot Than Savant
Join Date: Nov 2005
Location: Billings, MT
Posts: 560
|
Quote:
Yes, an ATS will be an integral part of the filtration scheme. It was discussed in post #7 on page 1 although it was very short. I will detail my idea for an ATS once I get to that point. However, the ATS is meant for long term nutrient export. I will use lanthanum chloride to get rid of initial phosphate release IF I find that it's bound in the substrate. That way I hope to get a leg up on any potential early problems. And looking through some of the previous posts I see that I've been less than polite and completely missed a shout out for zaheda joining the thread. So sorry it's belated but welcome zaheda!
__________________
Current tank- 300 gal with enough critters to fill a 50 gal....barely. 30+ years in the hobby (man I'm getting old), former LFS manager, and oh.... I'm Batman. |
|
|
|
|
|
02/05/2012, 11:29 PM
|
#49 |
|
More Idiot Than Savant
Join Date: Nov 2005
Location: Billings, MT
Posts: 560
|
A few days....two weeks. Yeah, that means the same thing.
Clearly time is relative in my world. I almost didn't even make this post because the look of the wall isn't in a finished state because substrate will be covering the bottom area so you won't see the exposed egg grate. But alas, I decided to press on anyway as I'm a ways away from getting substrate in. So on to the update! Since the tank was put on the stand for the initial water test, I didn't really relish the thought of taking it back off to stand on end to do the rock wall. So I decided to attach egg grate with silicone first so I had something to to tie the rocks to prior to foaming. This also meant I was laying on my back working upside down to do some of the foaming. Yeah, fun times....    From all the posts I've read about foam and rock walls, I've found some of the most realistic looking ones used 90% rock and 10% foam. So that's what I set out to do. In the end I probably used the equivalent of 100-120 lbs of rock (remember I made all my rock and it ends up being much lighter than live rock) and 9 cans of foam. 9 CANS??!!!! Yes, 9 cans. I wanted to ensure all the space behind the egg grate and rock was filled with foam and in between the rock for structure. Of course there was quite a bit of waste because it's hard to tell how much is going to expand in a given area and I carved all the foam down to match the rock better rather than leaving it in the big blobs that oozed out. I totally forgot to take pictures as the wall was progressing so all I have are the before and after shots. It's so hard to get dimensionality out of pictures on the web so I took a few of the same shot with different lighting to try and show that. 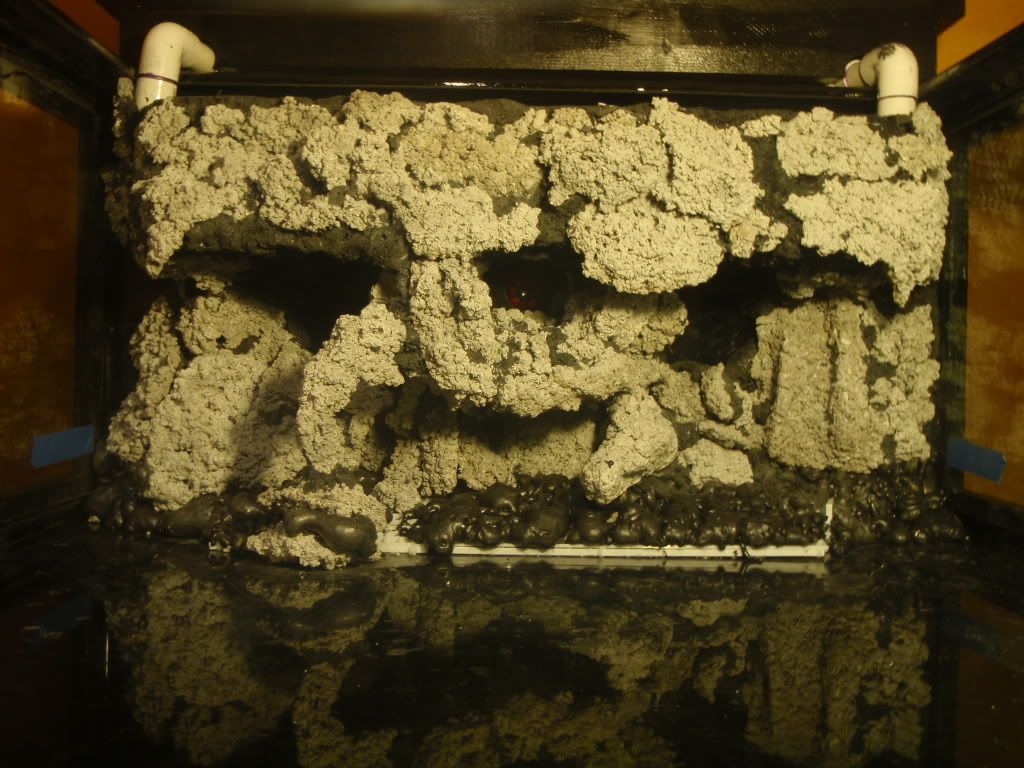 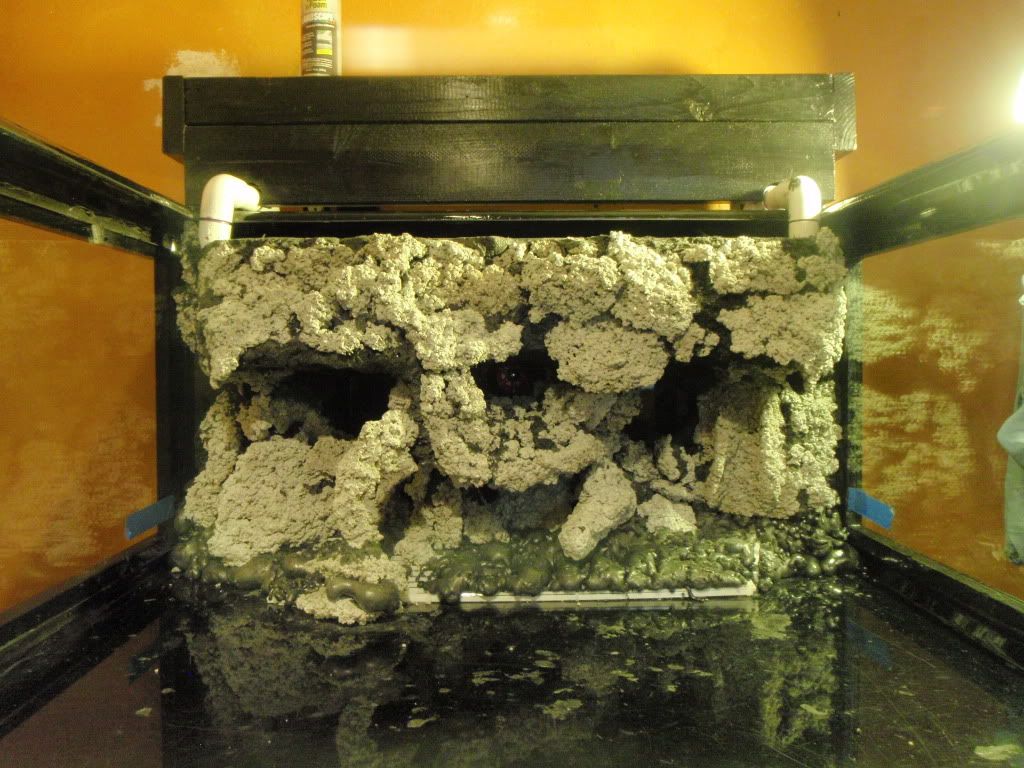 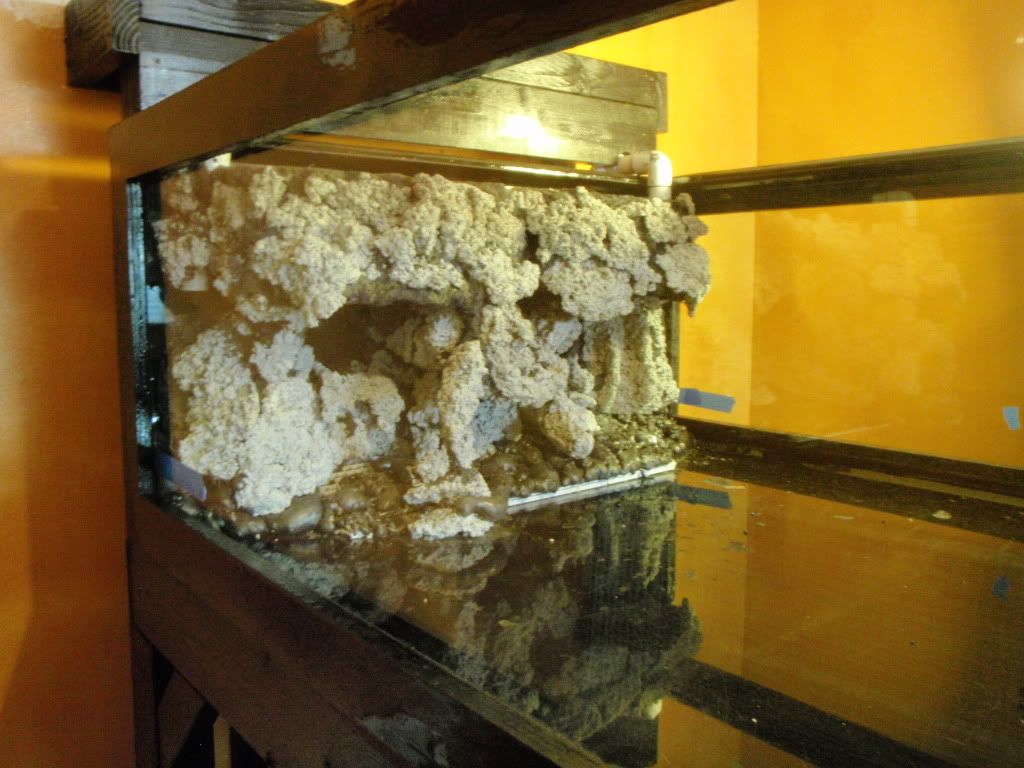    I got some more epoxy so I can finish the sump and my pre and post surge tanks. I've got all my outlets in a wired and will be installing the dedicated breakers for those in a couple of weeks. I've decided to install my humidity control duct work myself as I should be able to punch through the house pretty easily right above the foundation wall. With a little luck I'm hoping to have the tank fully plumbed in the next 2-3 months. I'll be sure to post updates as things progress but for now, that's it!
__________________
Current tank- 300 gal with enough critters to fill a 50 gal....barely. 30+ years in the hobby (man I'm getting old), former LFS manager, and oh.... I'm Batman. |
|
|
|
|
02/06/2012, 08:15 AM
|
#50 |
|
Registered Member
Join Date: Apr 2003
Location: Cupertino, CA USA
Posts: 4,027
|
Out of curiosity, for the water softener salt you used for the rocks, did you break it up at all? The stuff I've seen locally are around 1/4 - 1/2" sized "pebbles" of salt.
I've been looking to start making rock for me next tank and was thinking of using crushed limestone as my aggregate -- although I live in the middle of the prairies, this area was once an ocean bottom, so crushed limestone is both plentiful and cheap. Good tip on the lanthanum chloride phosphate remover; I'm all for using cheaper alternatives for aquarium products! |
|
|
|
 |
|
|
 Similar Threads
|
||||
| Thread | Thread Starter | Forum | Replies | Last Post |
| 300 gallon plywood tank build re post!!!! | dericcanderson | Do It Yourself |
42 | 09/04/2011 11:04 AM |
| Looking to build a 300 gal glass tank need advice ?? | steelhant | Do It Yourself |
6 | 12/01/2010 06:35 PM |
| FS: Complete 300 gal Oceanic tank and livestock | greenbench | Tampa Bay Reef Club | 2 | 07/05/2010 07:46 AM |
| 300 gallon plywood tank build | dericcanderson | New to the Hobby | 180 | 06/04/2010 08:37 AM |
| CyclistMT's 150 Gal Plywood and Glass Build Log | CyclistMT | Reef Discussion | 55 | 12/06/2009 05:22 PM |


