
|
|
 11/10/2009, 10:59 PM
|
#51 |
|
Registered Member
Join Date: Mar 2009
Location: NY
Posts: 293
|
looks nice so far taging along
|

|

|
|
11/11/2009, 06:44 AM
|
#52 |
|
Tangaroa to 500 gallons
 Join Date: Jul 2007
Location: Edmond, OK
Posts: 5,855
|
It looks great!
I have to tag along on any tank install which includes cats. LL
__________________
Click on my username and select "Lightsluvr's Home Page" for a recap of our build thread - AGE Hybrid Tank in a 500G system with dedicated fish room. (Takes a few minutes for photos to load) Leave a note if you stop by... Current Tank Info: 350G AGE Hybrid reef tank. 500G+ total water volume. Three sumps for filtration. Barracuda Gold return and Hammerhead Gold closed loop pumps. DIY T5 light system on rails. MP40W x3 to supplement closed loop. 130G Water management system. |
|
|
|
|
11/14/2009, 01:26 AM
|
#53 |
|
Registered Member
Join Date: Nov 2003
Location: Berlin, Germany
Posts: 521
|
HI
I will post more pictures, including some where you can see the Stream holders after my return from the Barents Sea in early December. Please be patient Jens |
|
|
|
|
11/14/2009, 01:34 AM
|
#54 | |
|
I <3 Corals!
Join Date: Nov 2006
Location: Santa Barbara, Ca
Posts: 4,555
|
Quote:
 Great build so far, I look forward to seeing it take shape 
|
|
|
|
|
|
11/14/2009, 05:52 AM
|
#55 | |
|
Premium Member
Join Date: Oct 1999
Location: Atlanta, GA, USA
Posts: 4,542
|
Quote:

__________________
-Mark TOTM March 2001 Current Tank Info: 225g stony reef, 38g softie |
|
|
|
|
|
11/15/2009, 11:08 AM
|
#56 | |
|
Registered Member
Join Date: May 2002
Location: Colorado Springs
Posts: 56
|
Quote:
 Tagging along Last edited by gabe3eb; 11/15/2009 at 11:22 AM. |
|
|
|
|
|
11/15/2009, 12:52 PM
|
#57 |
|
Premium Member
Join Date: Oct 2001
Location: Spokane Valley WA
Posts: 3,533
|
Hi Jens,
I wish more companies would build tanks on site here in the US. Looks like a nice fun project. The picture of you in the tank really shows the size as the pictures previously made it appear to be much smaller. Cheers, Kevin
__________________
SPS Guy Current Tank Info: 600 reef (set up June 2001), with 125 gal refugium and 100 gal sump. |
|
|
|
|
12/10/2009, 02:37 PM
|
#58 |
|
Registered Member
Join Date: Jan 2004
Location: Colorado Springs
Posts: 4,670
|
Hi Jens any updates?
|
|
|
|
|
12/10/2009, 03:32 PM
|
#59 |
|
Registered Member
Join Date: Sep 2009
Location: Hazleton, PA
Posts: 303
|
This should be a really nice setup. Cant wait!
|
|
|
|
|
12/14/2009, 08:56 AM
|
#60 |
|
Registered Member
Join Date: Nov 2003
Location: Berlin, Germany
Posts: 521
|
Hi there,
not much to report, right not I am extremely busy at work and can't spend much time on the tank. Also, the doors for the cabinet and the light cover still haven't arrived. They promised me to deliver this week......heard that one before. By the end of the week I'll get the material for the filter tank (keep the fingers crossed), this will keep me busy next weekend. As soon as I have something worth reporting I'll do so. Jens |
|
|
|
|
12/23/2009, 09:45 AM
|
#61 |
|
Registered Member
Join Date: Nov 2003
Location: Berlin, Germany
Posts: 521
|
HI
Finally I managed to get some work done on the tank. The bottom is now completely covered with concrete, the only things that were sticking out were the bulkheads for the closed loop system. My intention is to have a system without visible technical equipment. So the bulkheads had to go into hiding….. 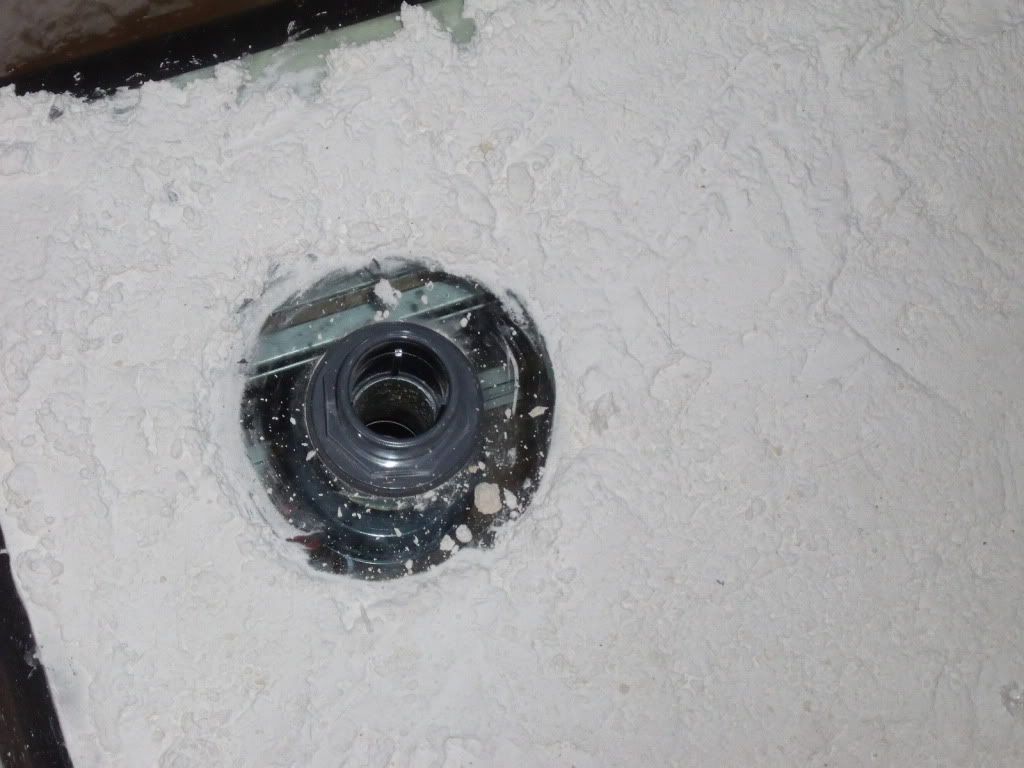 I did not want to cover them with concrete directly, as this would have prevented me from access to the seal. Also the 45° elbows had to be fixed in a way that I can still turn them to adjust the direction of the flow. In the end I decided on a two-piece construction, with a removable donut-shaped cover for the bulkhead and concrete covered 45° elbow. I covered the bulkhead with Clingfilm and put a rather stiff concrete mix around it. Small pieces of Ceramic were stuck into the sides. After the concrete was hardened I could remove the whole Donut and peel off the Clingfilm. The donut sits tighly around the bulkhead and can be removed if necessary. 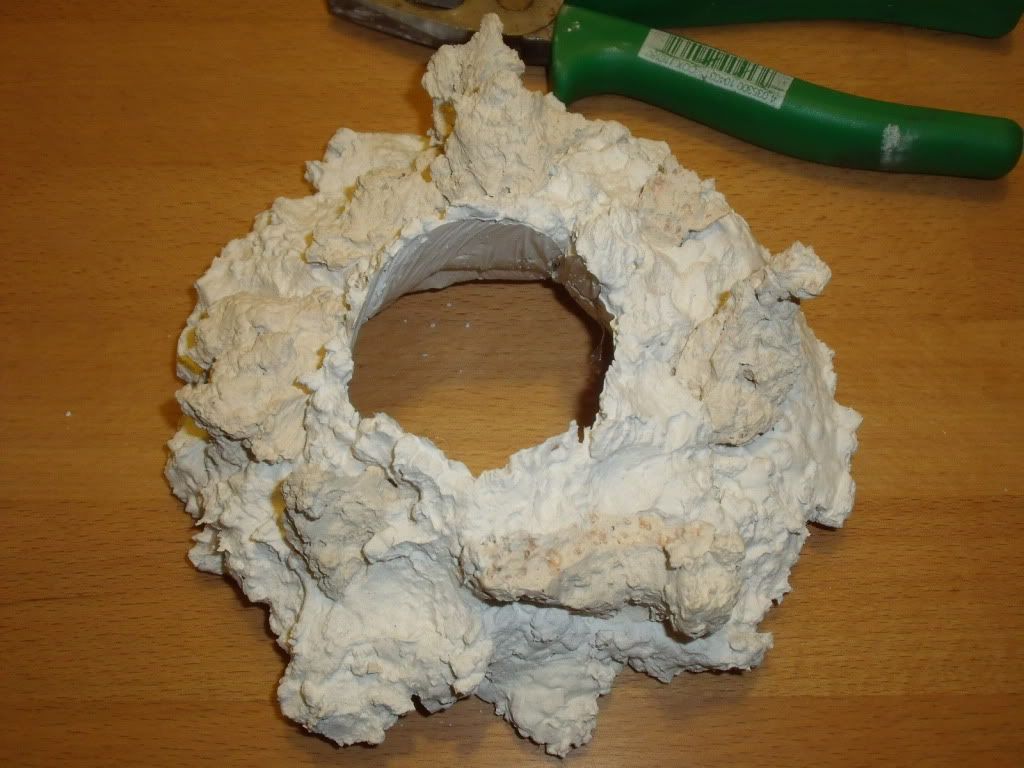 The concrete does not stick to the PVC directly, therefore I glued small pieces of ceramic on the elbow first. After the glue had hardened the whole thing was covered in concrete. 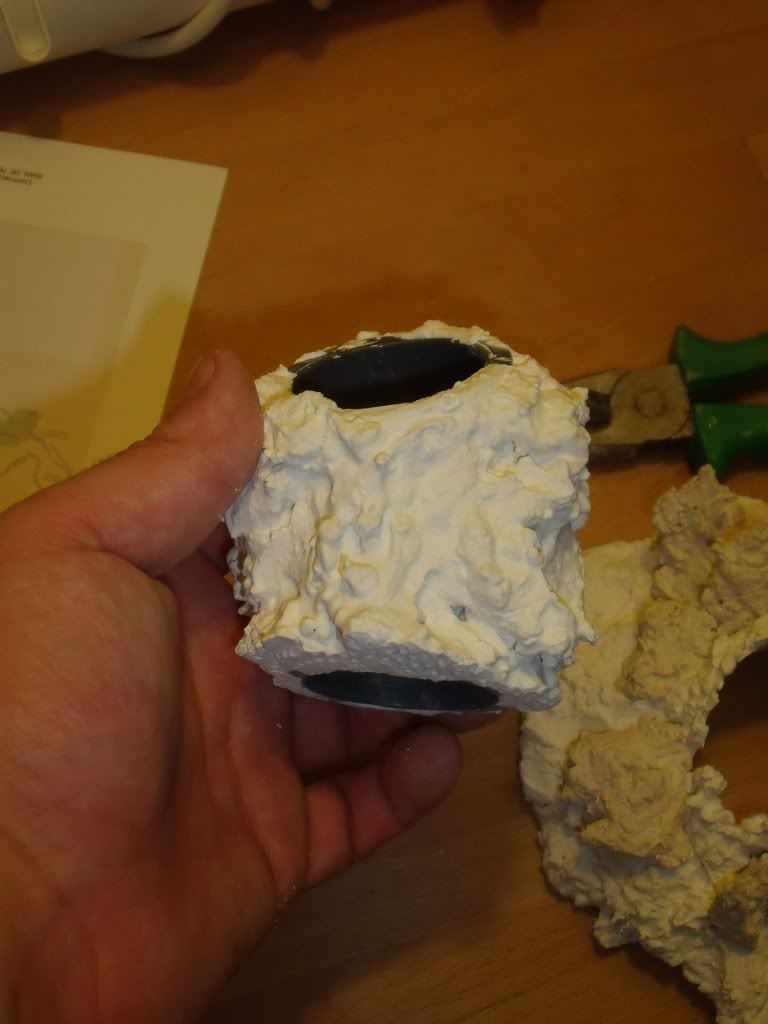 Everything mounted together looks like this. I will try to grow some Xenias or Polyps around the whole unit. 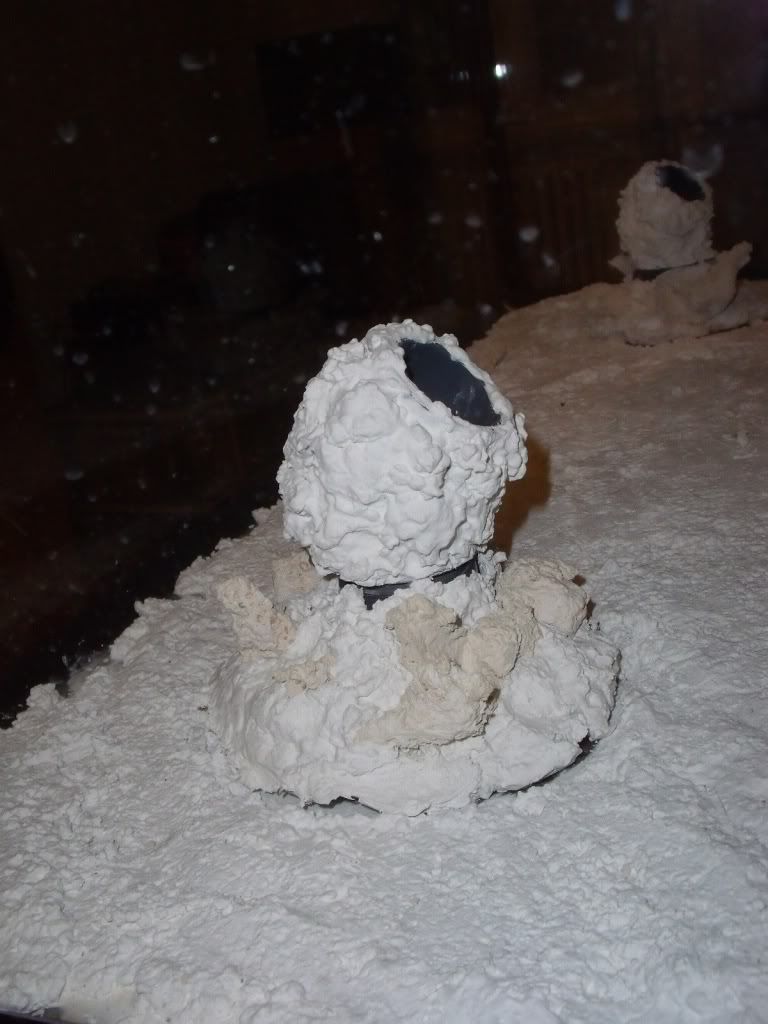 Finally I could also do the final work on the overflow boxes. On the side of the filter Overflow, the ceramic back plate ends right below the screen, on the side of the closed look overflow the back plate is bent forward a bit. On this ledge I built a very open framework of smaller rocks, leaving lots of small channels for the water to go through but not allowing a direct sight of the 6” high overflow screen. The pictures don’t show how open the structure is, but getting 5000 gal/h through it won’t be much of a problem. 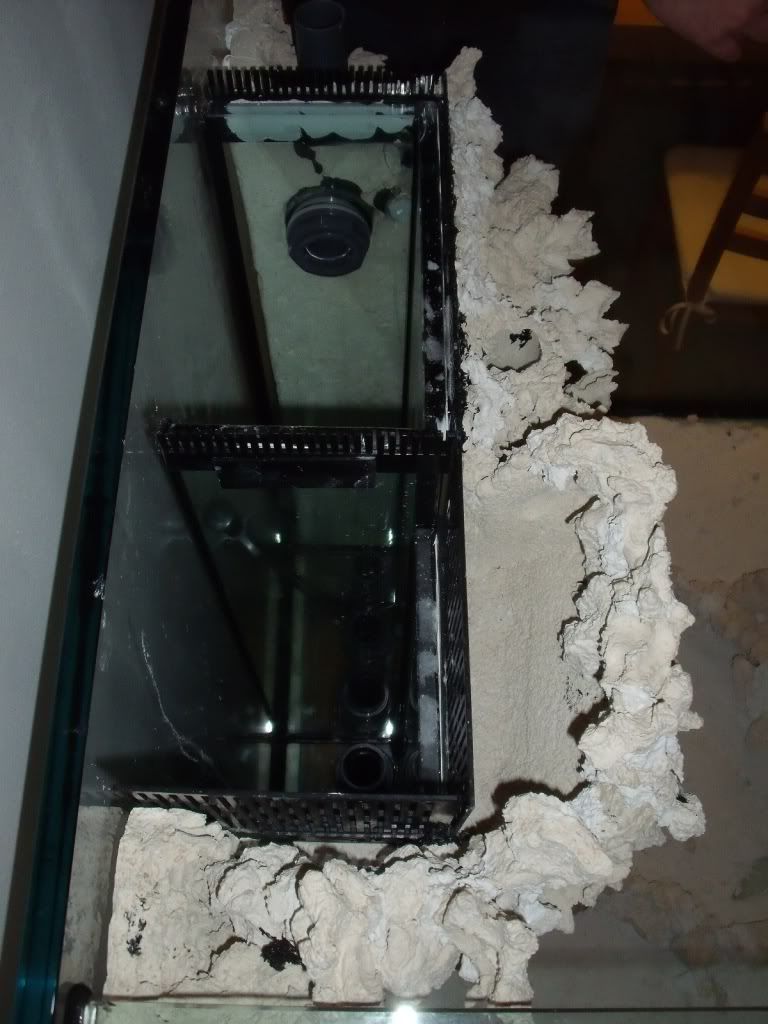 Looking at closed loop overflow from the sofa it looks like this 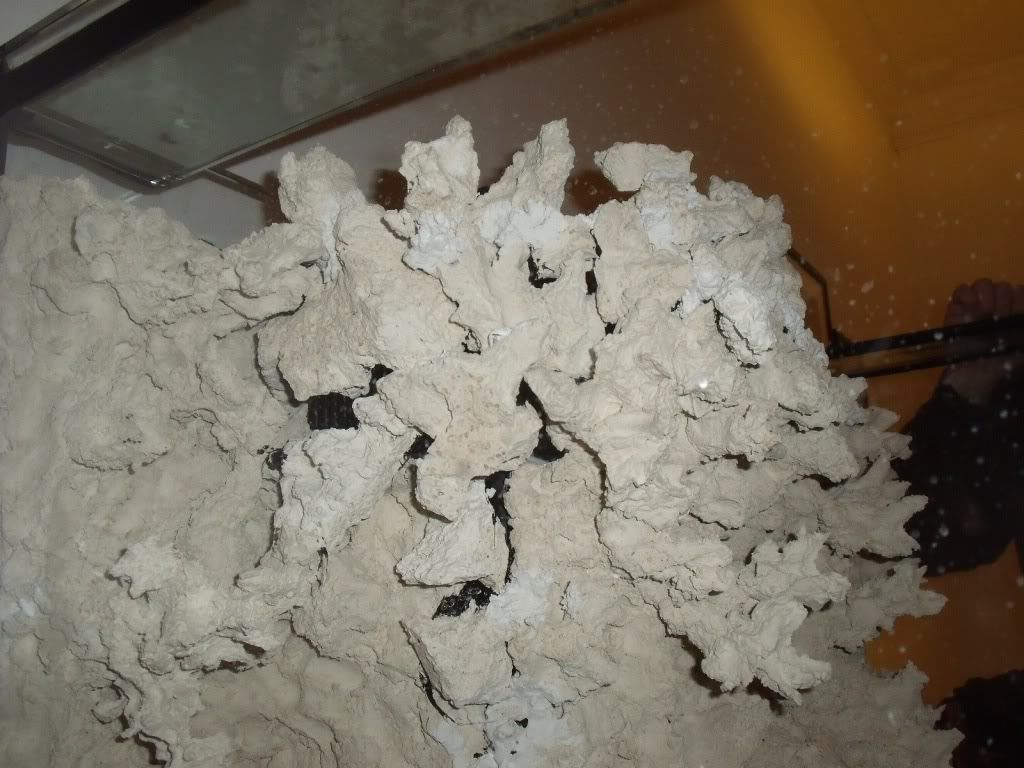 When looking into the tank through the front panel, the large overflow screen can be seen through a few holes, but I can live with that. I may put some SPS corals there in the future. 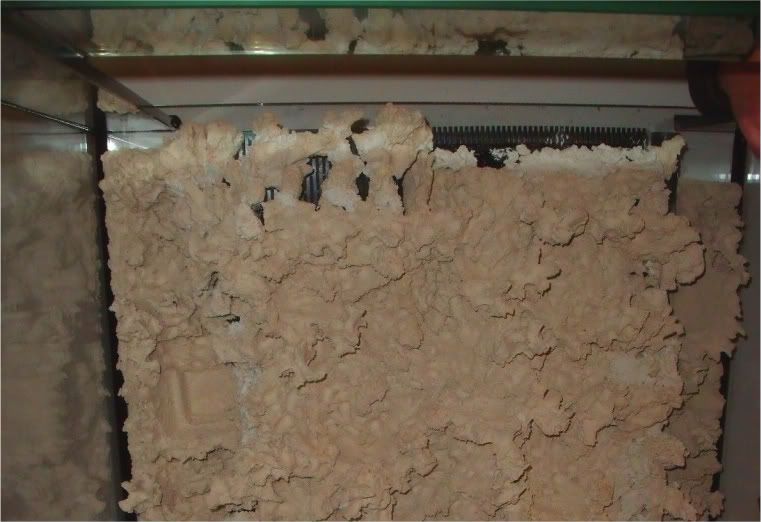 The Parapan Panels for the cabinet have finally arrived, over Christmas I will try to get them fixed. Merry Christmas to all of you Jens |
|
|
|
|
12/23/2009, 09:51 AM
|
#62 | |
|
Registered Member
Join Date: Nov 2003
Location: Berlin, Germany
Posts: 521
|
Quote:
just to follow up on your question about the Stream holders; on the last picture that I just posted, you can see the pockets for the Streams. I still have the old square ones, not the new balls. Fixing them is dead easy, you just take a strip of blue foam and stick them in. The foam will dampen any vibration very nicely. The downside of this technique is that you can't really adjust the direction of the flow. But as I usually run the Streams without the top cover, just open props, the flow is so wide that you really can't adjust the flow anyways. Jens |
|
|
|
|
|
12/23/2009, 11:14 AM
|
#63 |
|
Registered Member
Join Date: Jan 2004
Location: Colorado Springs
Posts: 4,670
|
Thanks for the update, Jens. How much do you think the cement and ceramic weigh on the glass?
Merry Christmas to you as well. |
|
|
|
|
12/23/2009, 12:51 PM
|
#64 |
|
Registered Member
Join Date: Sep 2005
Location: First State
Posts: 98
|
Tagging along. Can't wait to see the completed tank. Looks good so far.

__________________
Rhinecanthus aculeatus |
|
|
|
|
12/23/2009, 01:07 PM
|
#65 | |
|
Registered Member
Join Date: Nov 2003
Location: Berlin, Germany
Posts: 521
|
Quote:
In total I used about 20 lbs of cement. The raw material contains some highly porous and light grains, almost like cat litter, so you get a lot of volume for rather little weight and even some porosity. Also, the layer at the bottom is less than 1/2" thick. The ceramic is pretty lightweight too, the center reef may be around 40 to 50 lbs, the back plates are in the same range. The material is really porous. Even the center reef I could easily lift on my own. Jens |
|
|
|
|
|
12/23/2009, 01:15 PM
|
#66 |
|
Registered Member
Join Date: Nov 2003
Location: Berlin, Germany
Posts: 521
|
Now the cabinet is finished.....at least for the time being. I still need to do some adjustments to get the panels absolutely parallel, but this I will do after Christmas. The panels are made from a rather new material called Parapan. It is 3/4" thick fully colored solid acrylic with a high-gloss surface. The edges were rounded and polished as well. Except for the horizontal strip along the bottom of the tank all panels are held in place with strong magnets and can be removed if necessary. The filter sump will be in the next room so I could make the cabinet really low. The only thing in there will be the CL pumps, everything else will be next door in a height that is much healthier for my back.
The hood will also be made from Parapan, but I haven't had the time yet I'll keep you posted 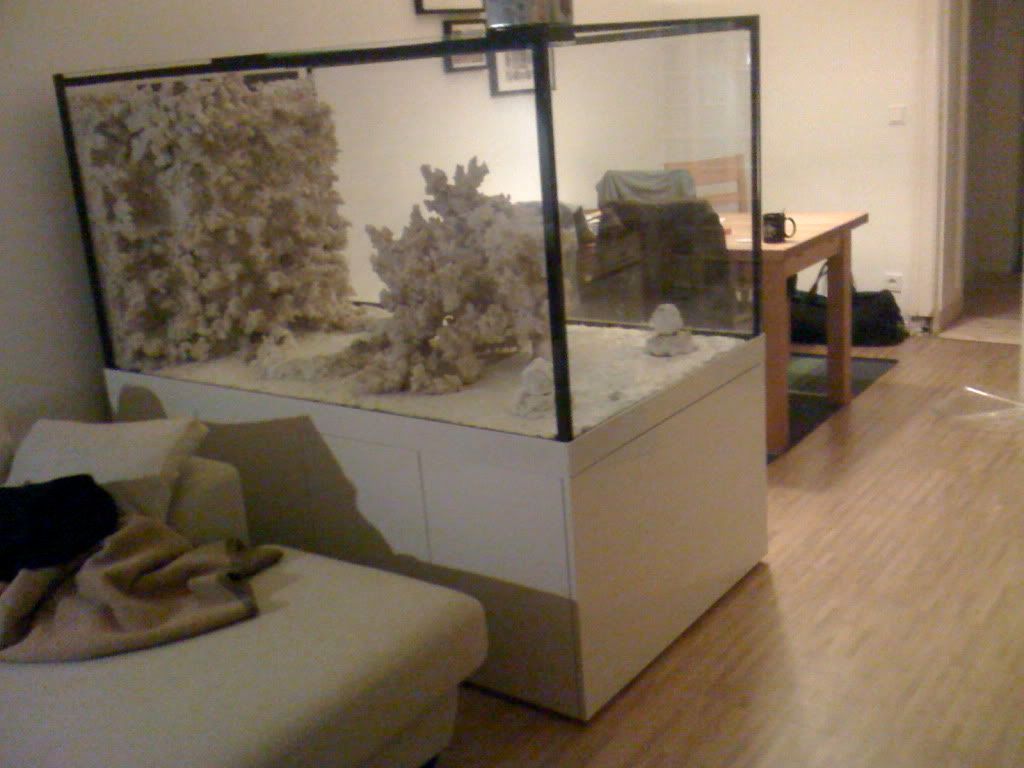 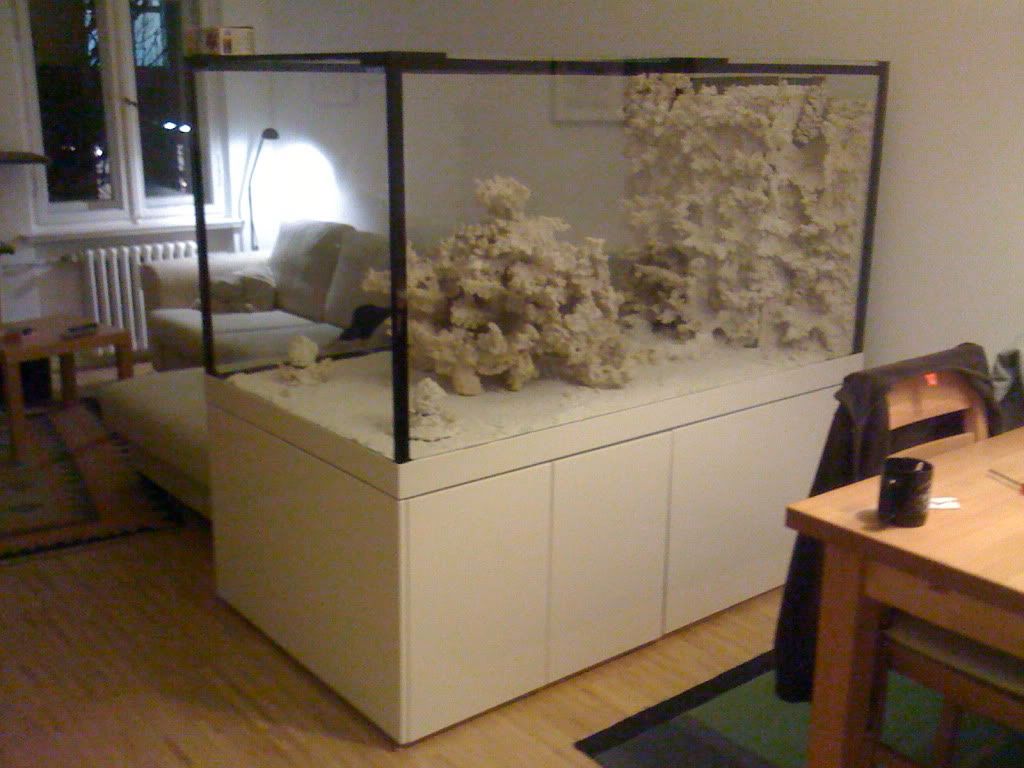 Jens |
|
|
|
|
12/23/2009, 02:33 PM
|
#67 |
|
Reef Hugger
Join Date: Jul 2007
Location: Submerged
Posts: 3,253
|
Looks fantastic Jens
 I was a big, big fan of your last cube tank and look forward to watching your build.
__________________
-Austin Make your animals Thrive, not just Survive. |
|
|
|
|
12/23/2009, 08:03 PM
|
#68 |
|
Registered Member
Join Date: Mar 2009
Location: NY
Posts: 293
|
it's coming out beatyfull ,cant wait to see this bad boy up and runing
|
|
|
|
|
12/23/2009, 08:22 PM
|
#69 |
|
Registered Member
Join Date: Dec 2009
Location: richmond ky
Posts: 290
|
man that looks awsome i am wanting to do something like that to my 180 when i start setting it up.
|
|
|
|
|
12/23/2009, 09:51 PM
|
#70 |
|
SPS Slave
Join Date: Aug 2003
Location: Richmond, VA
Posts: 3,388
|
+1
I really like the looks of the concrete/ceramic - very natural, and should provide great anchors for mounting your corals. The low stand is great too - looks like it fits into the room perfectly! (love that oak floor btw - very nice!)
__________________
- Mike & Terry "Less technology, more biology ... indeed." - Gary White Current Tank Info: 200g temp garage tank Last edited by prop-frags; 12/23/2009 at 10:04 PM. |
|
|
|
|
12/24/2009, 03:26 PM
|
#71 |
|
Registered Member
Join Date: Dec 2007
Location: OKLAHOMA
Posts: 151
|
Great looking tank, can't wait to see it running with fish moving around... Great planning on this set up.... Thanks
|
|
|
|
|
12/24/2009, 05:13 PM
|
#72 |
|
Premium Member
Join Date: May 2005
Location: Slidell, Louisiana
Posts: 313
|
WOW! I like what you're doing. It's inspirational!
Last edited by rharr21; 12/24/2009 at 05:15 PM. Reason: left out a word |
|
|
|
|
12/25/2009, 12:02 PM
|
#73 |
|
out of hobby
Join Date: Aug 2009
Location: murrieta
Posts: 251
|
I dream of 1 day owning a peninsula tank. I love the 3 sided viewing/room divider. Following along
|
|
|
|
|
12/26/2009, 05:47 AM
|
#74 | |
|
Registered Member
Join Date: Nov 2003
Location: Berlin, Germany
Posts: 521
|
Quote:
When I designed the tank, I found it really helpful to measure the eyelevel of my partner and myself while (a) standing, (b) sitting on a normal chair, and (c) sitting on the sofa. The lowest measurement (me on the sofa) should be at least 8" above the bottom of the tank, when we sit on a chair, our eyelevel should be around 2/3 the height of the tank and the highest measurement (my partner standing) should be not more than 6" above the water level. We want to live with that tank for many years, so it has to fit. Because tank and stand are custom, everything can be made as we want it to be, so why settle for something else? During the setup of all my last tanks there was some time pressure due to some animals having to move in etc. This time I start from scratch, there is no pressure at all, so I take all the time it takes to get it done the way I want. I don't care if I have to look into a an empty tank for a few months longer, it's the final result that counts. Best wishes Jens |
|
|
|
|
|
01/26/2010, 07:54 AM
|
#75 |
|
Premium Member
Join Date: Mar 2003
Location: 41°35'45.83" N 72°53'25.27" W
Posts: 1,717
|
Looks great, I'll be following your progress
__________________
Tom Stange - If corn oil comes from corn, where does baby oil come from? Current Tank Info: 30 gallon fresh water planted, 75 gallon reef, 8000 gallon koi pond |
|
|
|
 |
|
|


