
|
|
 04/23/2014, 02:09 PM
|
#1 |
|
Registered Seaweedist
Join Date: Feb 2004
Location: Boulder, CO
Posts: 5,807
|
My DIY Fake Mudbank
As I finish up my fake mangrove root project, I'm anxious to move on to the next!
Following in the footsteps of some great fake rock walls, I want to create a variation and approximate the look of a mangrove lagoonal mudbank. In keeping with my overall goal of building a Caribbean Biotope Seagrass Tank, I want a mudbank-not a reef rock wall. This is NOT a reef tank! It IS a marine planted tank-a completely different animal. Besides trying to make it look cool, I have some specific goals and functions I hope to accomplish. My number one goal is to provide numerous caves for some specific fish I want to keep. Because this tank will have very little live rock, there won't be enough hiding places for the fish to feel safe and secure. I want to provide additional nooks without using more live rock. Second, I want it to take up as little room as possible. My tank is 24 inches front to back, and I'd like to keep this mudbank within about 2 inches thick. Third, I'm building a surface overflow on the back wall that will span almost the entire width of the tank. I need the fake mudbank to integrate well with the overflow and hopefully even disguise it. Construction will take place outside the tank, so it will have to be in more than one piece, allowing me to fit it under my hood and through the tank's top openings. One of the downsides to doing it this way, is ending up with a straight, vertical seam running up the middle of the wall. To avoid that, I will shape the wall pieces to fit together like puzzle pieces, so there won't be a straight, unsightly dividing line. Like most of the fake-rockers before me, I will probably use egg crate light diffusor as my base structure. However, I will consider other materials that are thinner, since overall thickness is a big concern. I've been collecting small plastic bottles, which will become my caves. Since they are all different shapes and sizes, I hope they will provide a natural look to the wall. They will be attached to the structure laying flat on it. I will use the black pond foam, which should be almost the perfect color as-is. I may sprinkle some silica sand on it as it dries to make it more brown. I'll add shells and rubble and many small fiddler crab-like holes as well. So there you have it! I'm excited about this because I've never seen it done in a home aquarium before. Comments? Suggestions?
__________________
As many naturalists and environmentalists have suggested, we should set aside our arrogance, our desire to conquer and control everything, and walk hand in hand with Mother Nature. -Walter Adey Current Tank Info: 180g Seagrass Sandbar Lagoon, START DATE November 28, 2018 |

|

|
|
04/23/2014, 02:18 PM
|
#2 |
|
Registered Member
Join Date: Dec 2013
Location: Bloomington, Indiana
Posts: 312
|
Sounds cool. I'd think just a thin layer of the black foam over egg crate would look pretty mud-like.
|
|
|
|
|
04/23/2014, 04:57 PM
|
#3 |
|
Registered Seaweedist
Join Date: Feb 2004
Location: Boulder, CO
Posts: 5,807
|
That's the trick, isn't it? A THIN layer of foam. I know the pond foam doesn't expand as much as 'great stuff', but I don't know HOW much.
Anybody out there know how much the black pond foam expands?
__________________
As many naturalists and environmentalists have suggested, we should set aside our arrogance, our desire to conquer and control everything, and walk hand in hand with Mother Nature. -Walter Adey Current Tank Info: 180g Seagrass Sandbar Lagoon, START DATE November 28, 2018 |
|
|
|
|
04/23/2014, 07:57 PM
|
#4 |
|
Cyprinius carpio
Join Date: Mar 2004
Posts: 4,496
|
Yes and it is more than you think but there is a trick to the process to keep the expansion to a minimum.
You can use salt to control it or an easier thing to do is to remove the plastic tube that you screw onto the can. Ever spread cheese whiz from a can? Hold the can over the egg crate and apply. You will get expansion but it is much less than the ones that look like cookie dough tubes that people do. |
|
|
|
|
04/23/2014, 09:15 PM
|
#5 |
|
Registered Seaweedist
Join Date: Feb 2004
Location: Boulder, CO
Posts: 5,807
|
So, for one pass across the egg crate (with the black pond foam), how thick will it get? Can you be more specific than "more than you think"?
__________________
As many naturalists and environmentalists have suggested, we should set aside our arrogance, our desire to conquer and control everything, and walk hand in hand with Mother Nature. -Walter Adey Current Tank Info: 180g Seagrass Sandbar Lagoon, START DATE November 28, 2018 |
|
|
|
|
04/24/2014, 07:00 AM
|
#6 |
|
Registered Member
Join Date: Dec 2013
Location: Bloomington, Indiana
Posts: 312
|
I've also seen people wear rubber gloves and just squeeze the air out of the foam after applying. It seems to limit the expansion quite a bit. Other option that would probably work would just be to put it on and let it expand in phase 1. After it has dried go back with a dremel or similar tool and shape it out.
Is there anything that the foam wont stick to? Wax paper or something might be worth a try. Wondering if you could skip the egg crate all together to save yourself a little on the thickness. I would think that the foam would be sufficiently stiff. Not sure what the best method to stop it floating away while keeping it removable would be. |
|
|
|
|
04/24/2014, 07:57 AM
|
#7 |
|
Registered Seaweedist
Join Date: Feb 2004
Location: Boulder, CO
Posts: 5,807
|
Those are good ideas Clay12340. I think I read where someone used wax paper as their work surface while working with foam. Foregoing the eggcrate altogether is interesting, but I think I'll need something to anchor my plastic bottles to, so they stay in the positions I want. It doesn't have to be eggcrate, just something I can glue or zip tie the bottles in place.
I've thought about the buoyancy issue as well. I'll probably zip tie a piece to the bottom at a 90 degree angle to bury in the sand to anchor it. Plus, it will be under my overflow, which extends about an inch and a half into the tank. I can probably work out some kind of attachment method to it. I could even fashion some attachment 'keys' to the back of the tank to help secure it. I'd love to hear from others out there who've made the foam walls, and lived with them for a while. Maybe you've thought of ways to improve on your designs?
__________________
As many naturalists and environmentalists have suggested, we should set aside our arrogance, our desire to conquer and control everything, and walk hand in hand with Mother Nature. -Walter Adey Current Tank Info: 180g Seagrass Sandbar Lagoon, START DATE November 28, 2018 |
|
|
|
|
04/24/2014, 07:58 AM
|
#8 | |
|
Registered Member
Join Date: Oct 2013
Location: Gainesville FL
Posts: 81
|
Quote:
__________________
55g w/ DIY overflow and skimmer, 25g cube (under construction) Its a tad hard to play with your aquarium if you cant lift more than a gallon of water... |
|
|
|
|
|
04/24/2014, 09:23 AM
|
#9 |
|
Registered Member
Join Date: Dec 2013
Location: Bloomington, Indiana
Posts: 312
|
I suspect that you could just sink the zip ties into the foam or rough up the bottles for the foam to stick directly to. Though I may be off base here as I'm not fully comprehending what you plan with the bottles.
The magnets are a cool idea. Could glue them into the foam and hook it in that way. Pull the mags off the back and the background would just float to the top. |
|
|
|
|
04/24/2014, 10:27 AM
|
#10 |
|
Cyprinius carpio
Join Date: Mar 2004
Posts: 4,496
|
Honestly it is hard to say but you can get an inch or more expansion depending on how much you apply etc.
Best thing to do is go burn through a can trying different techniques to see which one works the best for you. Have you checked out the great DIY foam thread? |
|
|
|
|
04/29/2014, 05:25 PM
|
#11 |
|
Registered Seaweedist
Join Date: Feb 2004
Location: Boulder, CO
Posts: 5,807
|
[QUOTE=clay12340;22692920]I suspect that you could just sink the zip ties into the foam or rough up the bottles for the foam to stick directly to. Though I may be off base here as I'm not fully comprehending what you plan with the bottles.
My plan for the bottles is to cut off the threaded neck at the top, so the opening is as big as the circumference. I will attach them to my support structure laying them flat, so the openings will be facing towards either side, not the front. Basically I'll be substituting the rocks on the wall with plastic bottles. And since plastic bottles aren't exactly pretty, I will cover them with foam. I'm hoping that through careful arrangement, I can get an interesting and natural looking wall with varying undulations. I also hope to provide lot's of hiding places for the fish that I have in mind.
__________________
As many naturalists and environmentalists have suggested, we should set aside our arrogance, our desire to conquer and control everything, and walk hand in hand with Mother Nature. -Walter Adey Current Tank Info: 180g Seagrass Sandbar Lagoon, START DATE November 28, 2018 |
|
|
|
|
04/29/2014, 10:09 PM
|
#12 |
|
Registered Seaweedist
Join Date: Feb 2004
Location: Boulder, CO
Posts: 5,807
|
I like the idea of testing different techniques to get what I want. I'l do that, thanks!
I'm still liking using egg crate. Although it's thicker than some other choices, it may work best because the foam can expand into it, negating its thickness and locking the foam in place.
__________________
As many naturalists and environmentalists have suggested, we should set aside our arrogance, our desire to conquer and control everything, and walk hand in hand with Mother Nature. -Walter Adey Current Tank Info: 180g Seagrass Sandbar Lagoon, START DATE November 28, 2018 |
|
|
|
|
04/30/2014, 01:32 PM
|
#13 | |
|
Registered Member
Join Date: Dec 2006
Location: Ulster County, NY
Posts: 2,521
|
Quote:
Here is a photo: 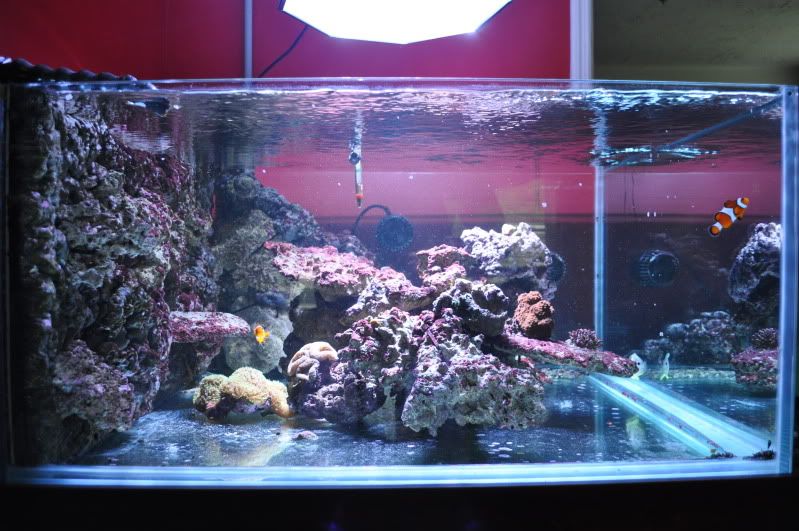 My one problem was when the foam was drying, it curved the egg crate into a mild U-Shape. This obviously caused some problems trying to mount the wall to perfectly flat glass. I ended up just redoing it and keeping weight on the eggcrate as the foam dried. Also, do not underestimate the boyancy of this stuff. You need a lot of weight to keep it down. I basically has rocks plastered across the entire egg crate panel, and filled in the spaces in between. It was barely enough to keep the egg crate submerged. If you want to cut the expansion down it's very easy to do that. Just put on a glove and poke the foam as soon as you see a skin start to form on it. The more times to do that, the less expansion you'll have. This will probably help cut the buoyancy of the foam down as well since the foam won't be trapping so much air. Other than that is incredibly durable stuff. I had no problems at all in the entire time the tank was up. It took 3-4 weeks for everything to start blending in. I actually took a tooth brush to the entire wall when I broke the tank down this past weekend to clean some nuisance algae off for the buyer.
__________________
30 Gallon FOWLR 2004-2006 90 Gallon LPS Reef 2006-2008 180 Gallon SPS Reef 2008-20012 100 Gallon Custom Rimless Mixed Reef 2012-2014 29 Gallon Biocube Reef! Current Current Tank Info: 29 Gallon Biocube, StevesLED Upgrade, Neptune Apex |
|
|
|
|
|
04/30/2014, 11:23 PM
|
#14 |
|
Registered Seaweedist
Join Date: Feb 2004
Location: Boulder, CO
Posts: 5,807
|
Amoore311, wow thanks, that was very helpful! Great pic too! Love the cubes. And with the rimless look, gorgeous!
Great info on the foam. I can't wait to play around with it. Poking the foam will be perfect since I was planing to do that anyway to simulate fiddler crab holes. Weighting down the panels as it dries is brilliant. Thanks for saving me a step! Since I'm not hanging any rocks on my wall, it will tend to be very buoyant. But I am going to have a lot of plastic bottles in it (for the fish caves), that will fill with water. I'll press and poke as much air out as I can get away with. It will be anchored under the weight of a deep sand bed-around 7-8". I'll attach it to the wall with square 'keys' that fit into the egg crate, and it will be 'topped' with an overflow that spans the width of the tank. Hopefully that'll do it! Have any of you Fake Rockers out there had success adding sand, shells, rubble to the foam as it cures? From what I remember reading, the foam tended to swallow up sand and small bits. It seemed like people had better luck adding them to a resin sealer over the cured foam. It would be great to not have to use the resin, since the foam is fish-safe already.
__________________
As many naturalists and environmentalists have suggested, we should set aside our arrogance, our desire to conquer and control everything, and walk hand in hand with Mother Nature. -Walter Adey Current Tank Info: 180g Seagrass Sandbar Lagoon, START DATE November 28, 2018 |
|
|
|
|
05/01/2014, 08:22 AM
|
#15 |
|
Registered Member
Join Date: Dec 2006
Location: Ulster County, NY
Posts: 2,521
|
The shells and rubble get covered by foam very quickly. The sand just does not stick too well since the first part of the foam that dries is the outside skin, and that dries rather quickly.
Also, if you want to add holes, try little PVC elbows of various diameter. I used a couple in my wall for fish caves/etc. The foam covers em almost completely, and the little bit of white pvc that is left gets covered by algae/coraline/etc so quick you will never notice.
__________________
30 Gallon FOWLR 2004-2006 90 Gallon LPS Reef 2006-2008 180 Gallon SPS Reef 2008-20012 100 Gallon Custom Rimless Mixed Reef 2012-2014 29 Gallon Biocube Reef! Current Current Tank Info: 29 Gallon Biocube, StevesLED Upgrade, Neptune Apex |
|
|
|
|
05/01/2014, 09:25 PM
|
#16 |
|
Registered Seaweedist
Join Date: Feb 2004
Location: Boulder, CO
Posts: 5,807
|
OK, so I gotta do the resin if I want to add sand and shells. I guess I'll see how it looks without and then make the call. I've got plenty of resin I think, which I'm sealing the fake mangrove root with as well.
It will be interesting getting the color of both the wall and the roots to look natural. Also getting them to look good together will be a challenge. Can't wait! Thanks for following! My other threads: http://reefcentral.com/forums/showthread.php?t=2393807 - My DIY Fake Mangrove Root http://reefcentral.com/forums/showthread.php?t=2391470 - Caribbean Biotope Seagrass Tank
__________________
As many naturalists and environmentalists have suggested, we should set aside our arrogance, our desire to conquer and control everything, and walk hand in hand with Mother Nature. -Walter Adey Current Tank Info: 180g Seagrass Sandbar Lagoon, START DATE November 28, 2018 |
|
|
|
|
08/11/2014, 08:55 PM
|
#17 |
|
Registered Seaweedist
Join Date: Feb 2004
Location: Boulder, CO
Posts: 5,807
|
Foam Practice
I've been playing with the pond foam on a scrap piece of eggcrate. Not a lot of control available to this control freak! I've got to try a few more ideas before I commit to doing the final piece.
__________________
As many naturalists and environmentalists have suggested, we should set aside our arrogance, our desire to conquer and control everything, and walk hand in hand with Mother Nature. -Walter Adey Current Tank Info: 180g Seagrass Sandbar Lagoon, START DATE November 28, 2018 |
|
|
|
|
08/12/2014, 09:38 AM
|
#18 |
|
Registered Member
Join Date: May 2004
Location: Dallas, TX
Posts: 11,033
|
I made mine from eggcrate and concrete laden cloth sheets. It doesn't float and is as thin as I want it to be. The surface texture depends on what you sprinkle or paint it with.
You can add black pigment to make it muddy too. Here's mine during construction (outside)    
|
|
|
|
|
08/12/2014, 09:40 AM
|
#19 |
|
Registered Member
Join Date: May 2004
Location: Dallas, TX
Posts: 11,033
|
Sides before concrete - the bottom support is important to keep it upright.
 One of the overhang ledges 
|
|
|
|
|
08/12/2014, 09:41 AM
|
#20 |
|
Registered Member
Join Date: May 2004
Location: Dallas, TX
Posts: 11,033
|
The ingredients

|
|
|
|
|
08/12/2014, 09:46 AM
|
#21 |
|
Registered Member
Join Date: May 2004
Location: Dallas, TX
Posts: 11,033
|
By the way, the cloth tends to want to form smooth organic looking patterns. I had to work to get it to look so rough.
Just cloth and concrete with fine aggregate looks like mud. Tossed the first batches out because of it. |
|
|
|
|
08/12/2014, 09:47 AM
|
#22 | |
|
Registered Member
Join Date: May 2004
Location: Dallas, TX
Posts: 11,033
|
Quote:

|
|
|
|
|
|
08/12/2014, 09:50 AM
|
#23 |
|
Registered Member
Join Date: May 2004
Location: Dallas, TX
Posts: 11,033
|
I know you're not doing a reef but for reference to what is possible, here's what mine ended up looking like before live rock (plastic coral)
 And then with bits of live rock to cover the gaps (8' end to end weir was hard to do in one piece) 
|
|
|
|
|
08/12/2014, 10:53 AM
|
#24 |
|
Registered Seaweedist
Join Date: Feb 2004
Location: Boulder, CO
Posts: 5,807
|
Very cool! But doesn't concrete leach harmful chemicals into the water? Does it have to be sealed? I'd love to know more. Cool design work!
__________________
As many naturalists and environmentalists have suggested, we should set aside our arrogance, our desire to conquer and control everything, and walk hand in hand with Mother Nature. -Walter Adey Current Tank Info: 180g Seagrass Sandbar Lagoon, START DATE November 28, 2018 |
|
|
|
|
08/12/2014, 11:31 AM
|
#25 |
|
Registered Member
Join Date: May 2004
Location: Dallas, TX
Posts: 11,033
|
Concrete cures and then is stable. People have been making life rock with it for a decade.
It does raise the pH significantly while curing but that's about it. The rest of the components are the source of trouble: unwashed sand, crushed oyster shells, etc... My contribution to the method is using a plastic base (PVC and eggcrate) and then wrapping it with cloth-concrete. The cloth fibers create strength without being angular and artificial looking. It's essentially a composite. |
|
|
|
 |
| Tags |
| fake wall, mudbank, plastic bottle caves, pond foam |
|
|


